
Blues University is an ongoing series of articles geared towards beginner- and intermediate-level developers who are looking to expand their knowledge of embedded development and the IoT.
Energy efficiency is a noble goal for any system, but when running on batteries or off-grid sources (e.g. solar) the amount of power drawn can mean the difference between success and failure. Also consider that while saving a few mA of current draw on a single wired device might not make a meaningful difference to one person, multiply this by a few million units–of your fantastically successful project–and you've made the world just a little bit better.
Here you'll learn how to make embedded systems more efficient, with a focus on the microcontrollers and the wireless communications standards that make the world of IoT possible. This guide's chapters include:
- Chapter 1: Initial System Specification
- Optimize system architecture and component selection at the start of your project, setting the foundation for more specific optimizations to follow.
- Chapter 2: Processor Selection
- Specific focus on processor selection, meeting project requirements with a minimal power needs.
- Chapter 3: MCU/Processing Unit Optimization
- Microcontroller efficiency techniques, with a hands-on example featuring the fantastically efficient ATtiny series.
- Chapter 4: Wireless Efficiency
- Communication options, including WiFi, Bluetooth, Cellular, and more.
- Chapter 5: Shutdown/Wake via Dedicated Hardware
- Techniques for shutting off power-hungry hardware that can't otherwise be tamed.
- Chapter 6: Optimize! – Final thoughts
Chapter 1: Initial System Specification
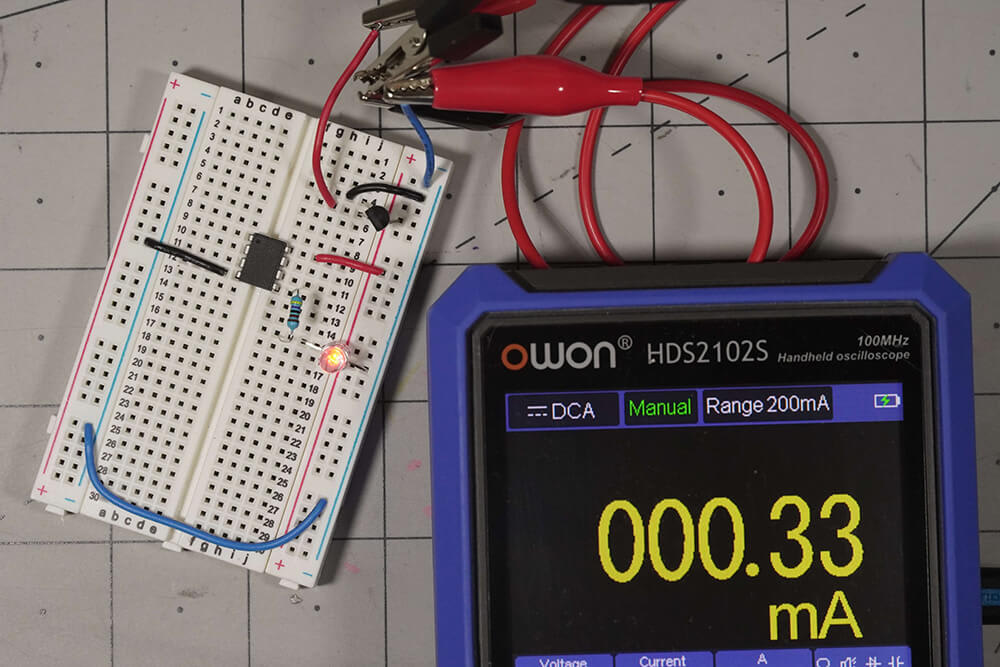
Image Credit: Jeremy Cook
Outlining system requirements and choosing the correct architecture for your project lays a foundation that facilitates its efficient operation–or that can make it very difficult. The first step is to decide what features are needed for your design, potentially generating a formal requirements document if appropriate.
Items to specify may include:
- Wireless needs (e.g. Bluetooth and/or WiFi)
- Plugged-in or battery-powered
- Battery life (for standalone operation)
- Always on, intermittent operation, or on-demand usage
- Other project-specific requirements
Keep in mind that additional features typically mean added power requirements and additional monetary expense. This can be especially relevant when considering wireless data transmission.
Minimum Voltage (and Number of Voltages)
Generally speaking, the use of low voltages (e.g. 3.3V vs 5V) is a good idea from a processing efficiency standpoint (see the chart below). However, the number of different voltages required on an overall device should be minimized to avoid lossy conversions. Fewer conversions can also mean fewer required components, which must themselves be carefully spec'd to minimize quiescent current draw.

Efficient Individual Components
The design as a whole, as well as individual components (e.g. power supplies), should be considered during initial specification. Different techniques can be used to tame the power draw of many components, whether through settings optimization or simply shutting down the offending components altogether when not in use. Consider not just the default power draw, but if power-saving options exist for your components and overall design.
Of course, sometimes you do need a specific device (or devices), configured in such a way that it results in a significant power draw. In this case, the only solution may be to use more batteries and/or solar panels. Or it could mean that your device must be plugged in to operate.
Carefully Considered Tradeoffs
The design requirements specified earlier will dictate the tradeoffs that can be made. If your initial ideas about a project don't work out, you can go back to the proverbial drawing board and re-examine how the puzzle pieces can be reassembled. Design requirements are especially critical when working with other parties as either a systems designer or on the other side as a customer. Misunderstandings about requirements and deliverables can lead to dissatisfaction on either or both sides, and it's best to have things nailed down as soon as possible. If you do need to go back and negotiate, the earlier in the process the better.
At the same time, if accomplishing something initially looks impossible, it may not be. It may simply be a matter of selecting the correct hardware to do the job and/or optimization. Keep reading to see how to get the most out of your system!
Chapter 2: Processor Selection
Today you can buy roughly the processing power involved in putting men on the moon 50 years ago for around a dollar (~an ATtiny85). It's therefore very easy to buy an overspec'd device and call it a day. For example, while something like an ESP32-S2 (or -S3) will do just about anything an ATtiny will do–many times over–it's not only more expensive, but it can draw much more power. To illustrate this point, let's consider the hardware involved in blinking an LED.
Thought Experiment: Blinkie Architecture
Consider how you can blink a single LED at a 50% duty cycle using a microcontroller, development board, or single-board computer (SBC). Any of the devices listed below can do the job, though their prices and power consumption are dramatically different. Values listed are drawn from a variety of sources in different conditions, and verification is left as an "exercise for the reader:"
| Raspberry Pi 4 | 680mA (3.4W) | ~$35 |
|---|---|---|
| ESP32-S2 | 200mA (.66W) | ~$2 |
| Raspberry Pi Zero | 80ma (.4W) | ~$10 |
| Arduino Uno | 47mA (.23W) | ~$5-$30 |
| ATtiny85V | .3mA (.00054W) *@1.8V | ~$1.50 |
The Raspberry Pi 4 and the ATtiny85 can both nominally blink an LED. What's shocking is that the power consumption of the Pi4 requires… 6,295 times that of the ATtiny85V in this setup.
Processor Selection
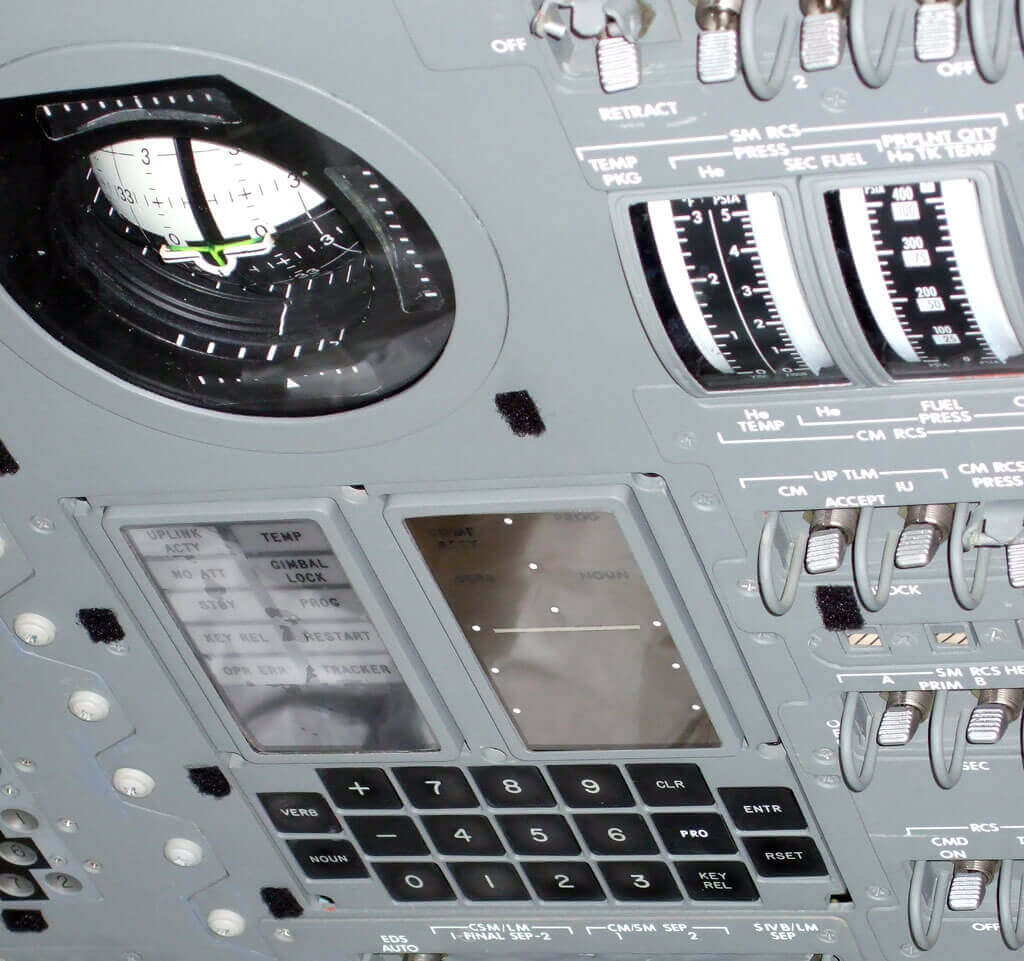
While the Apollo Guidance Computer could undoubtedly have been programmed to blink an LED, today we have much better, more efficient, and much less expensive options. What you select should be chosen to best satisfy the requirements outlined in Chapter 1 at a minimum cost.
In this case, for simple blinking, the ATtiny is the obvious choice. Given this microcontroller's input voltage flexibility (Ch. 3), the ATtiny series is even capable of working with a number of battery configurations without extra equipment. If you need wireless capabilities, an ATtiny isn't appropriate, but devices like the ESP32-S2, ESP8266, or nRF5340 may do the job very well (Ch. 4). Or if you'd like to add a keyboard and monitor as a "blinkie terminal," the Raspberry Pi Zero or even Raspberry Pi 4 might make sense. Just note the nearly order-of-magnitude difference power-wise between the Pi Zero and Pi 4!
Low Power, Appropriate Capabilities
We haven't yet even considered the actual LED power draw, which can be around 20mA when on, nor does our discussion include the supporting hardware (voltage regulators, etc.) that may be needed. Carefully consider what type of processing hardware is needed on a holistic level to avoid inflating your power and/or monetary budget. At the same time, don't skimp on essential features–again, back to the requirements document!
As for the LED in this story, don't be afraid to experiment. A resistor far above what would normally be considered optimal (e.g. 4.7k @ 3.3V) can allow you to prolong battery life at a reduced, but acceptable light level.
Chapter 3: MCU/Processing Unit Optimization
Once you've decided on your processor and overall system architecture, you can hone in on making it the most efficient that it can be. Here we'll address three possibilities: voltage, clock speed, and basic sleep modes. Each has its own set of tradeoffs and considerations. TL;DR: minimize processor frequency and voltage, sleep as much as possible.
Voltage: Lower is Better...Mostly
Some devices, like the ESP32 family, are powered via a certain voltage, e.g.
3.3V within a set tolerance range. Other devices can operate within a wide range
of inputs, such as the ATtiny-V series That can be powered at between 1.8 and
5.5V. This voltage flexibility is shown in the chart below, taken from the
ATtiny datasheet. At every frequency, the lower the voltage the lower the
current draw, and since P = VI, the difference in power draw is even greater.
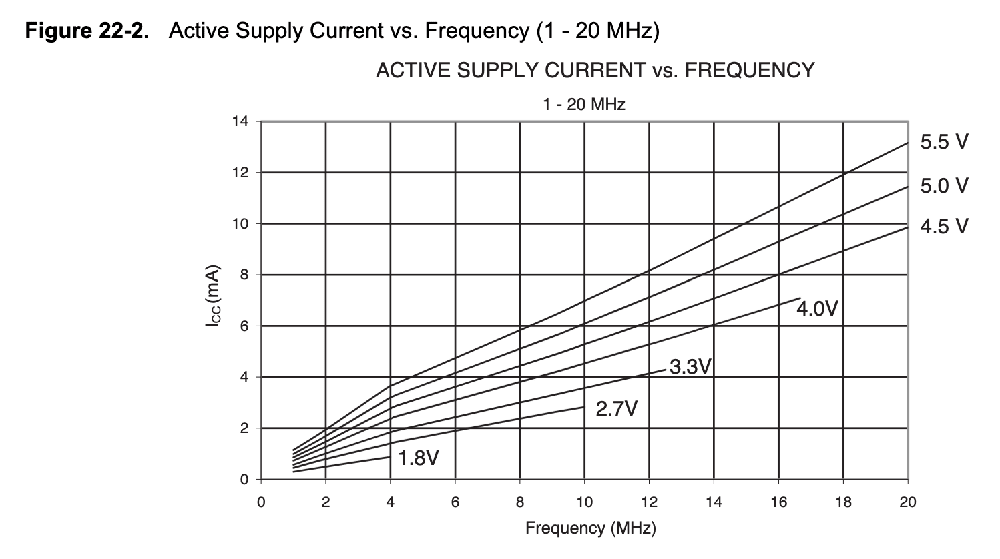
Using the lowest voltage possible would therefore always seem better, however, there are two major tradeoffs that must be considered:
- At lower voltages, the top processor frequency is restricted, e.g. at 1.8V the top speed of an ATtiny is 4MHz.
- The most processor-efficient voltage may not suit your overall system architecture, e.g. 5V stepped down to 1.8V means there may be losses and extra components needed elsewhere in the design.
Frequency: As Low as Possible… but Not Any Lower!
The second variable that dictates processor power usage is processor speed. On the same ATtiny chart, note that a processor supplied with 5V and running at 20MHz draws around 11mA, while at 1MHz, 5V the current draw is slashed to 1mA. The obvious caveat here is that operations requiring higher frequency processing may be restricted or impossible at lower speeds.
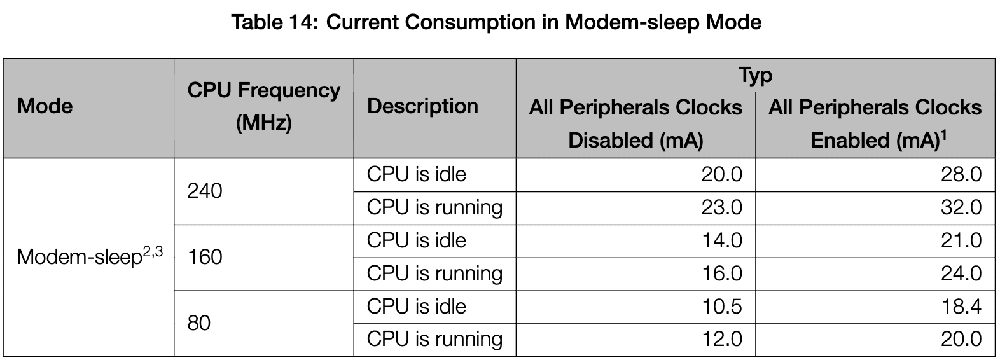
Looking at the 3.3V-only ESP32-S2 table below, we can still regulate the clock frequency for efficient power usage. Broadly speaking, the lowest (80MHz) clock setting uses roughly half the current of the highest clock setting (240MHz), disregarding wireless considerations.
Nap Time
In addition to active mode, processors like the ATtiny and ESP32 can be put to sleep, putting them in a low-power mode of operation to be woken up and used as needed. In power-down mode (1.8V) the ATtiny series uses a practically nonexistent .1µA–i.e. a ten-thousandth of a milliamp–likely lower than a battery's natural degradation. The ATtiny includes three sleep modes, with different power requirements and capabilities, including how it's able to wake up, e.g. via a timer or external input.
The ESP32-S2 also features a number of sleep modes with different capabilities. This is outlined in the table below, ranging from light-sleep at 750µA to RTC timer-only at 20µA, to fully powered off at 1µA:
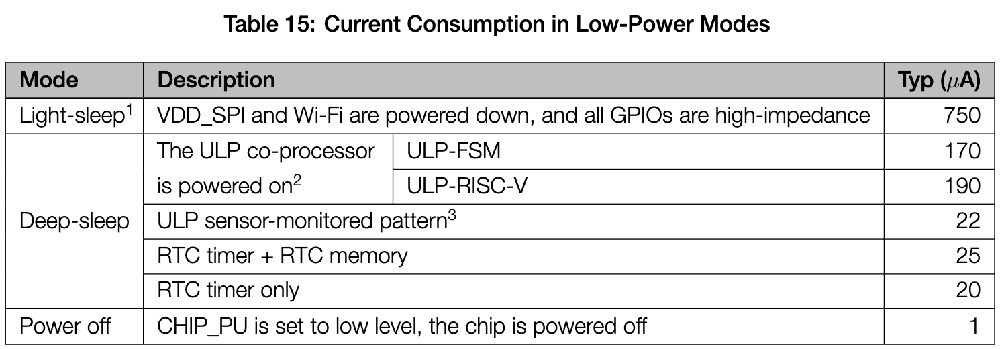
Note that ESP32-S2 frequency and shutdown modes do not account for the effect of wireless transmission on its power consumption (See Ch. 5: Wireless Efficiency TODO).
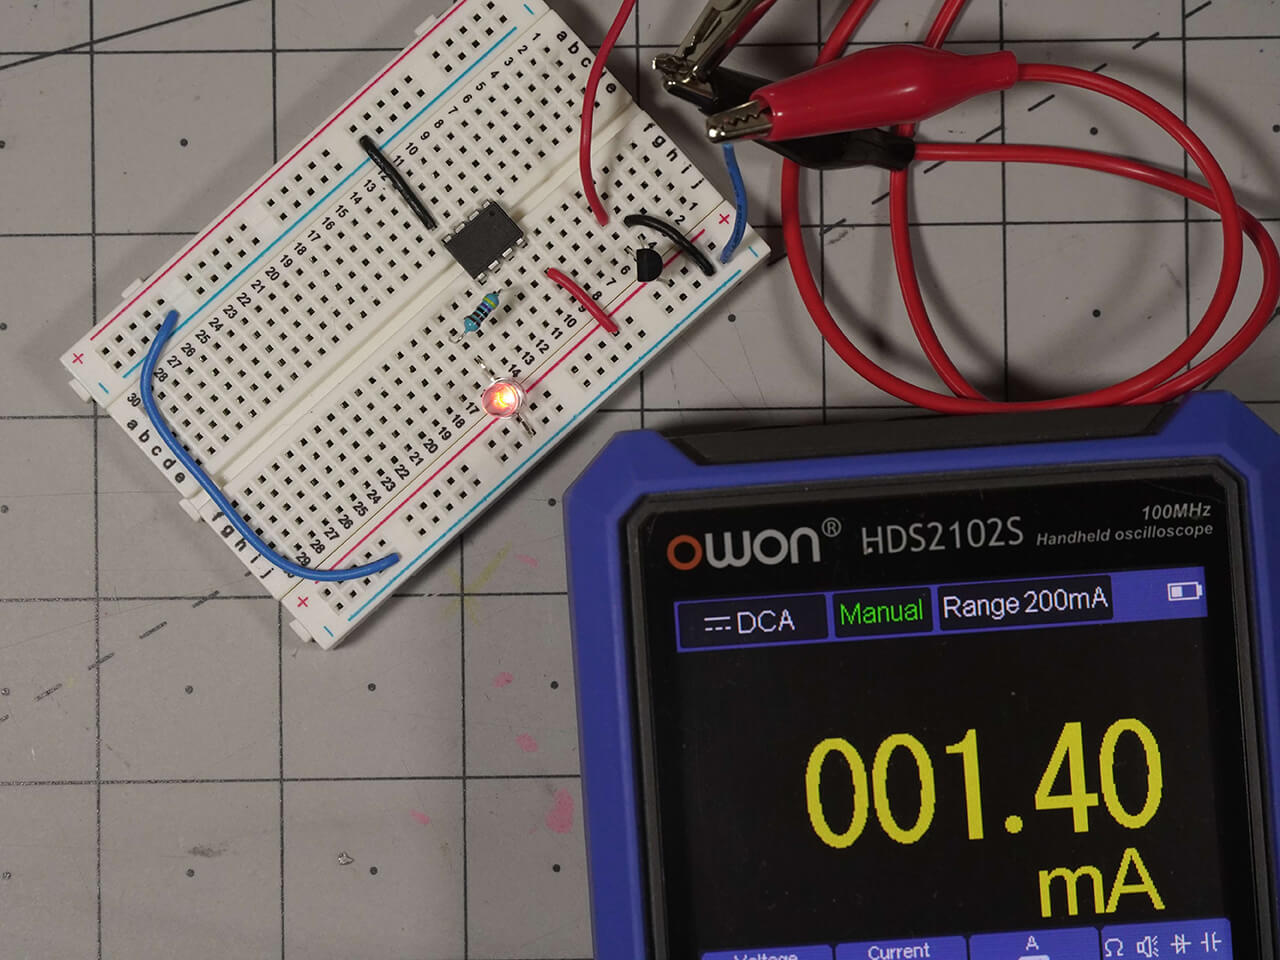
Efficiency Example: Ultra-Low-Power ATtiny Blinkie
The ATtiny series is an inherently low-power device. However, with the proper programming and hardware setup, an ATtiny device can literally last for years. Consider the LED blinkie hardware setup below, using a 5V power supply stepped down to 3.3V as needed.
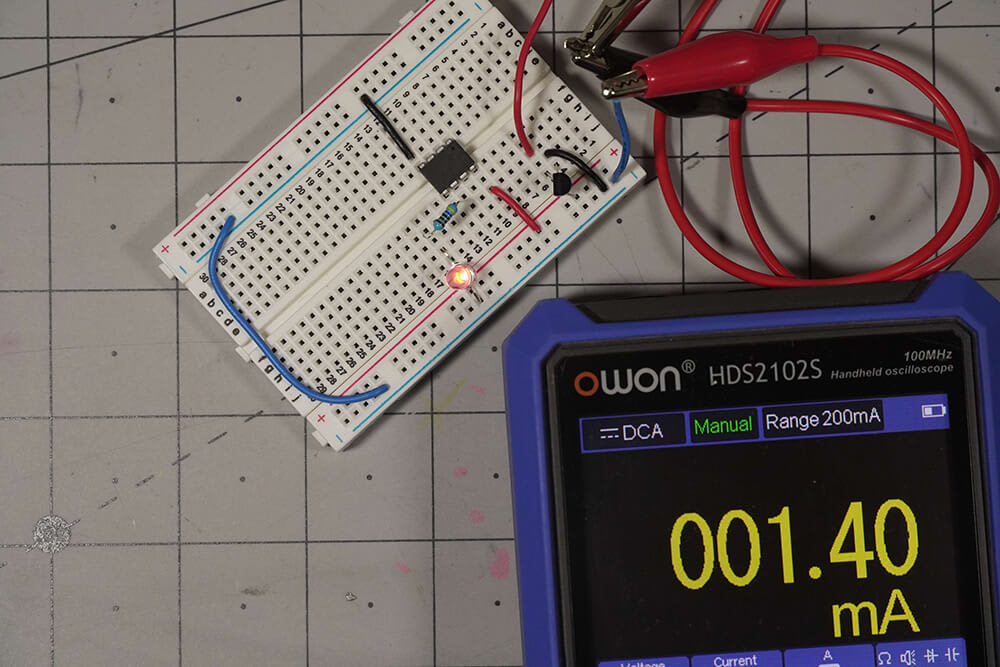
Image Credit: Jeremy Cook
By simply adjusting the clock frequency, sleep cycle, and voltage input, plus varying LED's series resistor, this setup can transform from a nominally low-power device to something that can run for years on battery power, as shown in the chart below. Average is calculated based on a 50% duty cycle.
| Circuit Setup | LED ON mA (W) | LED OFF mA (W) | Watts (Average) |
|---|---|---|---|
| 16MHz, 5V, 220Ω, no sleep | 26 (.13) | 15 (.075) | .10 |
| 8MHz, 5V, 220Ω, no sleep | 20 (.10) | 8 (.04) | .07 |
| 1 MHz, 5V, 220Ω, no sleep | 15 (.075) | 3 (.015) | .045 |
| 1 MHz, 3.3V, 220Ω, no sleep | 7 (.023) | 1 (.0033) | .013 |
| 1 MHz, 3.3V, 4.7kΩ, no sleep | 1.4 (.0046) | 1.1 (.0036) | .0041 |
| 1 MHz, 3.3V, 4.7kΩ, TinySnore | .32 (.0011) | .00 (.00) | .00053 |
Power usage varies from an average of .1W on the high side, to .00053W on the low side, a 189-times difference. Consider that the capacity of a CR2032 coin cell battery is around 235mAh, and puts out just under 3.3V, so the average current usage (.16mA) in our best-case scenario this tiny battery would theoretically last around 1469 hours or 61 days (potentially a bit longer since the battery's voltage is nominally 3V). If you adjust the duty cycle down to 5%, this goes up to a theoretical 610-day lifetime, approaching 2 years of continuous use.
Of course, that's with just one tiny battery. If you instead implement a larger battery pack, the blinking could go on for much longer.
Blinking an LED can be useful, but the general concept of switching something on intermittently with a low-power circuit is attractive in other situations. We'll explore this concept further in Ch 5., outlining how power-hungry equipment can be kept in check via external hardware as needed.
Processor Efficiency Techniques
Once a processor is selected, proper optimization can potentially take a design's efficiency from acceptable (or even unworkable) to excellent. The ATtiny85 and ESP32-S2 outlined here are just two examples out of countless microcontroller types. The general principles are broadly applicable, but careful study of a device's datasheet will reveal ways to make it more efficient.
Other techniques may include using a prescaler to effectively reduce the processor's clock speed even further, or turning off certain chip peripherals that may not be needed for your application. Pack everything you need into your proverbial microcontroller toolbox, but (ideally) nothing else!
Chapter 4: Wireless Efficiency
Wireless communication typically takes a lot of power relative to a non-wireless microcontroller setup. At the same time, it enables much of what we know today as the Internet of Things (IoT) and is therefore often fundamental to a design. There are a number of wireless technologies in use today, and several options are presented here on a high level. While specifics will vary, the general efficiency strategies presented are broadly applicable.
As an example, consider again the ESP32-S2. Its wireless power consumption–the electromagnetic elephant in the room–was conspicuously neglected in Ch. 3.

As shown in the above chart, with WiFi active, current consumption is up to 310mA, roughly 10 times that of when it is disabled (Ch. 3). Wireless is expensive from a power standpoint. The good news is that in many battery-operated applications, wireless data transmission only needs to be used intermittently.
Like minimizing an LED duty cycle, the less we communicate wirelessly, the better. Is that a good analogy for human behavior as well? Probably not, generally speaking, but perhaps one might take a cue from the fact that it is typically much less expensive power-wise to Rx (listen/receive) than to Tx (speak/transmit)!
Wireless Options
There are a number of wireless technologies available today, some of which are specifically designed for low-power usage. Let's consider some of the major options:
-
WiFi – introduced in 1997 and developed in the subsequent decades, WiFi was the first widespread wireless computer networking technology. It allowed first laptops, then smartphones, and now even tiny IoT devices to communicate wirelessly. With a focus on relatively short-range (typically under 100m), high-speed transmission (well into the gigabit range), WiFi is an excellent choice in many circumstances, but it may not be the most power efficient technology available.
-
Bluetooth Classic – Bluetooth is a short-range wireless technology (10m or less), often used to pair devices like wireless headsets to smartphones. Bluetooth was developed as a low-power technology and can allow devices like wireless earbuds to operate for hours at a time.
-
Bluetooth Low-Energy (BLE) – BLE was developed as an ultra-low power, short-range wireless protocol, using its wireless capabilities intermittently, and generally at lower speeds than standard Bluetooth. BLE and Bluetooth Classic are incompatible, but both protocols may be implemented on one device.
-
Cellular – Cellular data presents a number of benefits and tradeoffs. Its already-built infrastructure means that you can transmit from a very wide geographic area with little setup. Power requirements for data transmission are high compared to other technologies on this list, and the traditional need for a monthly data plan can be prohibitive. For many IoT devices, the answer to this tech can be to use data–and thus power–intermittently, a task for which Blues hardware is especially well-suited.
-
LoRaWAN – Newer, and less common than the other protocols listed here, the LoRaWAN, or Long Range Wide Area Network, protocol is designed for low power, low bit rate data transmission. Data transmission takes place in short bursts, at data rates measured in low kbit/s speeds. Transmission distance, however, can be upwards of 10 km in rural, i.e. open, environments.
Protocol Specification
For wireless operation, you'll again need to consider your hardware selections. This may mean starting from an open (wireless) slate, enabling you to select the hardware and protocol perfectly suited to your device. At the same time, wireless transmission doesn't take place in a metaphorical vacuum–but works quite well in a literal one–and you need to consider if a certain protocol or hardware type is standard in your industry or environment. For instance, for home IoT devices, WiFi can be a perfect solution as it's often already available, even if a protocol like BLE or LoRa might otherwise have technical advantages.
The protocol selected will often dictate the hardware used. For example, if WiFi is selected, then the ESP32-S2 could be a great option. If you decide on Bluetooth instead, then another device like the original ESP32 can fulfill this requirement.
If cellular usage is in the cards, then a Blues Notecard setup could work quite well, as it comes with 500MB of cellular connectivity included, and uses a mere 8µA of power when idle. Blues also features a Notecard LoRa in the same form factor for off-grid LoRa communication. See the Blues Accelerators for a range of fully documented reference applications using Blues hardware.
Intermittent Usage
Once the proper protocol/hardware is specified, you should strive to use wireless communications only when necessary in order to preserve energy. The good news is that many devices and/or protocols are designed to facilitate this behavior. The ESP32-S2, for instance, has a dedicated modem-sleep mode where the WiFi baseband and radio are disabled, but the WiFi connection can still remain active.
BLE devices are especially adept at intermittent behavior, as remote beacons typically send out advertising packets of data to announce their presence, then listen for a very short period of time in order for the connection to be established before shutting down. The connecting device, e.g. a smartphone, does the heavy lifting power-wise as it can actively monitor airwaves for these packets and connect as needed. Such devices (e.g. a smartphone) typically have a more powerful battery than remote beacons, and are expected to be recharged on a frequent basis
The drawback to only using a radio on an intermittent basis is the increased latency inherent in such a design. As with other low-power techniques discussed here, you must consider the design requirements and tradeoffs in order to find the optimal solution.
Blues Cellular Example
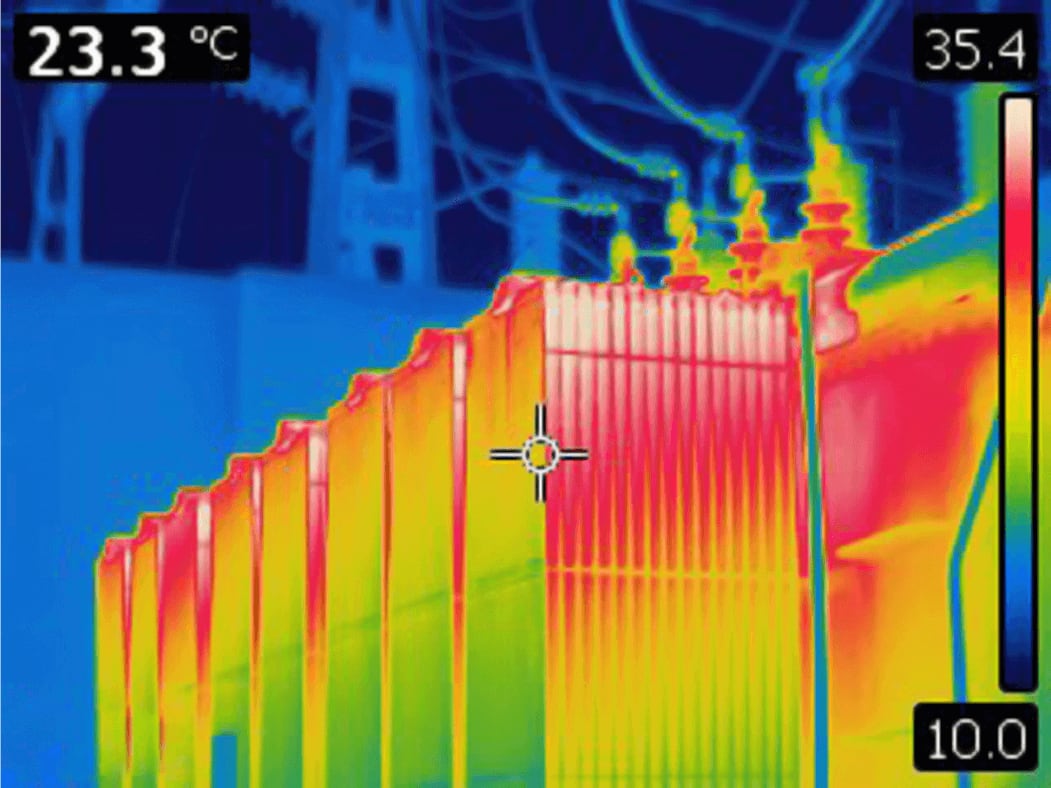
Since the Blues Notecard uses only 8µA of current when idle, it can be used for low-power intermittent data transmission. One interesting application–out of near-limitless possibilities– outlined here (details, code) would be to retrofit legacy equipment with thermal monitoring by simply pointing a thermal camera at it which can be monitored by an ML model and Raspberry Pi hardware. Interfacing is done at the edge, allowing it to send only a subset of collected and translated data to the cloud.
This project uses its cellular wireless connection intermittently (transmitting measurements every 5 minutes), and employs the Raspberry Pi Zero 2 W as a low-power Linux device, making it a largely power-efficient setup. However, in a severely power-limited situation (e.g. solar and/or batteries), having the thermal camera and Raspberry Pi on and using power constantly could be an issue. To take this type of project to the next level energy efficiency-wise, you might also consider shutting down hardware (i.e. the Raspberry Pi and thermal camera) most of the time as explored in Ch. 5.
Wireless Energy Consumption: Challenging but Manageable
While wireless data transmission can consume a lot of power, it doesn't have to. The proper protocol and device selection can go a long way toward creating an IoT device that can sip energy intermittently and last for months or even longer.
Chapter 5: Shutdown/Wake via Dedicated Hardware
Putting hardware to sleep is an excellent efficiency technique, but there are many times when this simply isn't an option. Not everything can be well optimized out of the box.
Instead, some devices need to be electrically cut off–externally–or in some cases safely shut down and restarted. While every situation will be different, as a concept illustration let's consider how you might safely cycle a Raspberry Pi 4, using an ATtiny as the low-power "restarter" processor.
Raspberry Pi 4 Shutdown, Bootup
Consider a situation where you would like your Raspberry Pi 4 to turn on–pulling around 680mA (3.4W) when awake but idle–take readings, possibly send them to the cloud, then shut down. To start this cycle, an ATtiny could pull pin GPIO 3 on the Raspberry Pi low every 30 minutes, causing it to restart from its "off" state. Alternatively, you could use a sensor input to the ATtiny to trigger this action, or even a simple button to startup the Pi on demand.
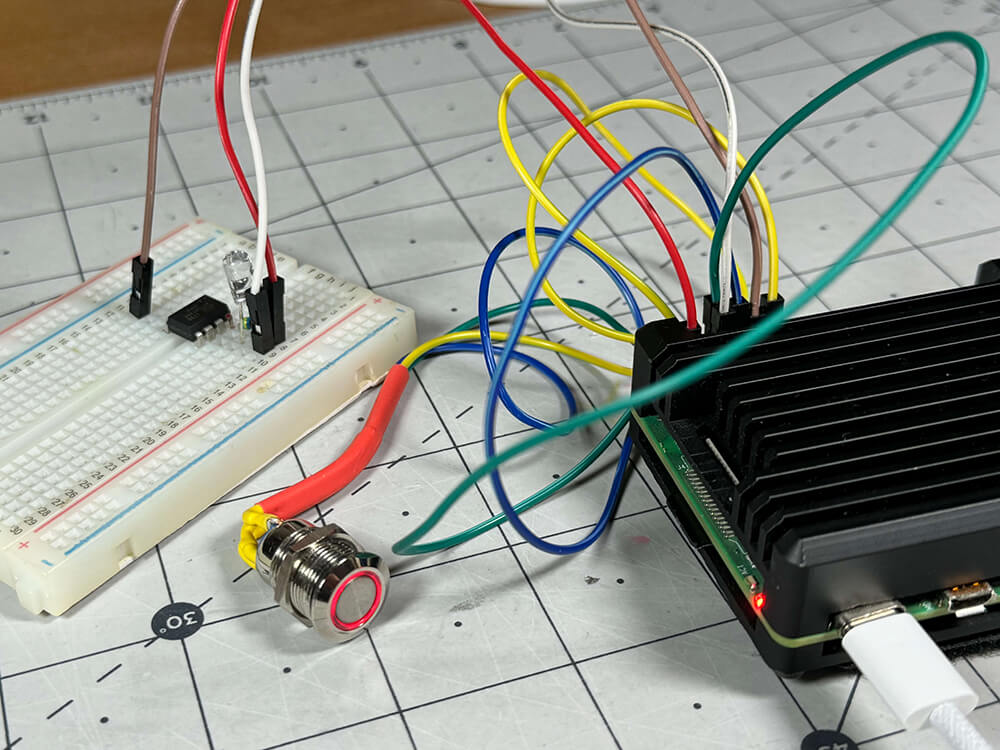
Image Credit: Jeremy Cook
Unfortunately, the RPi 4 still consumes power when "off"–200mA (1W) as tested. An alternative solution would be to provide power on a schedule from the ATtiny via a relay or transistor. The Pi would then start up and could be programmed to shut down after performing its task, potentially informing the sleep processor when power is no longer needed. This sort of relay setup would be applicable well beyond just RPi hardware, allowing any electronics, e.g. an IR camera, to be disconnected from power.
Consider a scenario where the Pi needs to cycle on every 30 minutes, in order to perform a task for 2 minutes. Neglecting the power draw of the ATtiny and associated electronics produces the following scenarios. While "shutting down" the Pi saves significant power, a full cutoff takes power draw down much lower. If you can afford to reduce the cycle time, savings will be even more dramatic:
| Circuit Setup | Pi On Cycle | Pi Idle Cycle | Watts (Average) |
|---|---|---|---|
| Pi Always On | 3.4W | 3.4W | 3.4W |
| Pi Powerup with ATtiny45V | 3.4W | 1W | 1.2W |
| Pi ATtiny45V power cutoff | 3.4W | 0W | .2W |
Another, perhaps better, option would be to use a real-time clock (RTC) module to perform the cycling via an alarm at certain times. This will require some configuration, and potentially extra hardware, but should work quite well whatever hardware you are implementing. As it just so happens, Raspberry Pi's newest device, the RPi 5, does have an RTC, outlined a little further down.
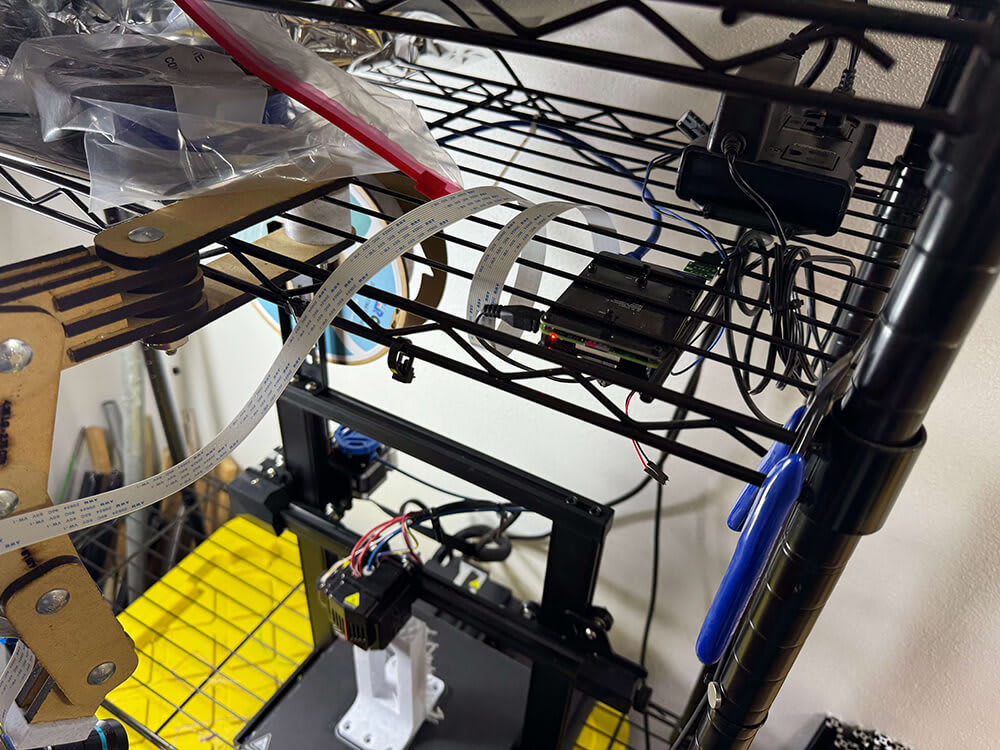
In something of the inverse of this situation, Raspberry Pi single-board computers and the like are often used to run 3D printers, typically left on all the time for easy access. I personally use OctoPrint with my printer, along with an extension called PSU Control. This allows me to control a "power tail" style AC switch that cuts all power to my printer. While I have not tested the amount of power the printer uses when idle versus what the Raspberry Pi requires, having my printer normally disconnected does give me some peace of mind.
Raspberry Pi 5 Has a Real-Time Clock
The Raspberry Pi 5 features an RTC module. According to Alasdair Allan, in charge of "writing things down" at Raspberry Pi, this does indeed mean that this new Pi can go to sleep and wake itself up as needed. This low-power sleep state reportedly consumes around 3mA[^6], significantly better than my Pi 4 observations.
If used properly, this could mean a huge improvement in power efficiency, without additional hardware. On the other hand, it wouldn't cut off external devices out-of-the-box. However, its GPIO pins could, in theory, be used to activate a relay/transistor for external control, reducing the power load significantly.
Total Cutoff For Power Efficiency
While simple microcontroller sleep modes can often be used to make your system very efficient, at other times you'll need to be a little more clever hardware-wise. An "efficiency sub-processor," whether in the form of an ultra-efficient microcontroller or an RTC can sometimes make the difference between battery operation and having to be constantly plugged in. Extra hardware, however, does add complication, expense, and even its own power requirements, all of which must be considered in your overall design.
Chapter 6: Optimize!
As outlined in this guide, a few simple changes, like selecting power-efficient components and putting processors to sleep when unneeded, can make a big difference in a system's power draw. If you need to go further, a few additional clever, and potentially not-so-simple, techniques can transform an otherwise efficiently spec'd system into a true low-power superstar...or small candle, to push the metaphor beyond recognizability.
The question then becomes just how clever do you need to be from a design time and materials standpoint. In some cases the extra components and/or effort will be worth it, in other cases, perhaps not. Or maybe you simply find getting your device to run for as long as possible, on as small a power source as possible, to be a fun challenge. I know I do!
Next Steps
This article if part of a broader series where you can dig deeper into each aspect of embedded development. To embark on this journey, be sure to follow Blues University, where you can explore and contribute to shaping the future of IoT.
If you're new to embedded development and the IoT, the best place to get started is with the Blues Starter Kit for Cell + WiFi and then join our community on Discourse. 💙
Jeremy Cook is an engineer and tech journalist who has spent over a decade in process automation. You can find him on Twitter, YouTube, and elsewhere on the Internet, where he's best known for his electronics experimentation and robotics builds.

Image Credit: Jeremy Cook