

The Model Context Protocol (MCP) is an open standard for connecting AI models to external data sources and tools. It was introduced by Anthropic — the makers of the Claude AI models — and has since been adopted across the AI ecosystem, including by OpenAI, Google, and Microsoft, making it the de facto standard for AI tool integration. Much like USB-C provides a standardized way to connect devices to peripherals and accessories, MCP provides a standardized way to connect AI models to the data and tools they need.
Blues now ships an official, hosted MCP server — Blues Expert — that gives any MCP-capable AI client deep knowledge of Notecard, Notehub, and IoT development. This guide explains how MCP works and how to start using it in your own connected projects.
Understanding How It Works
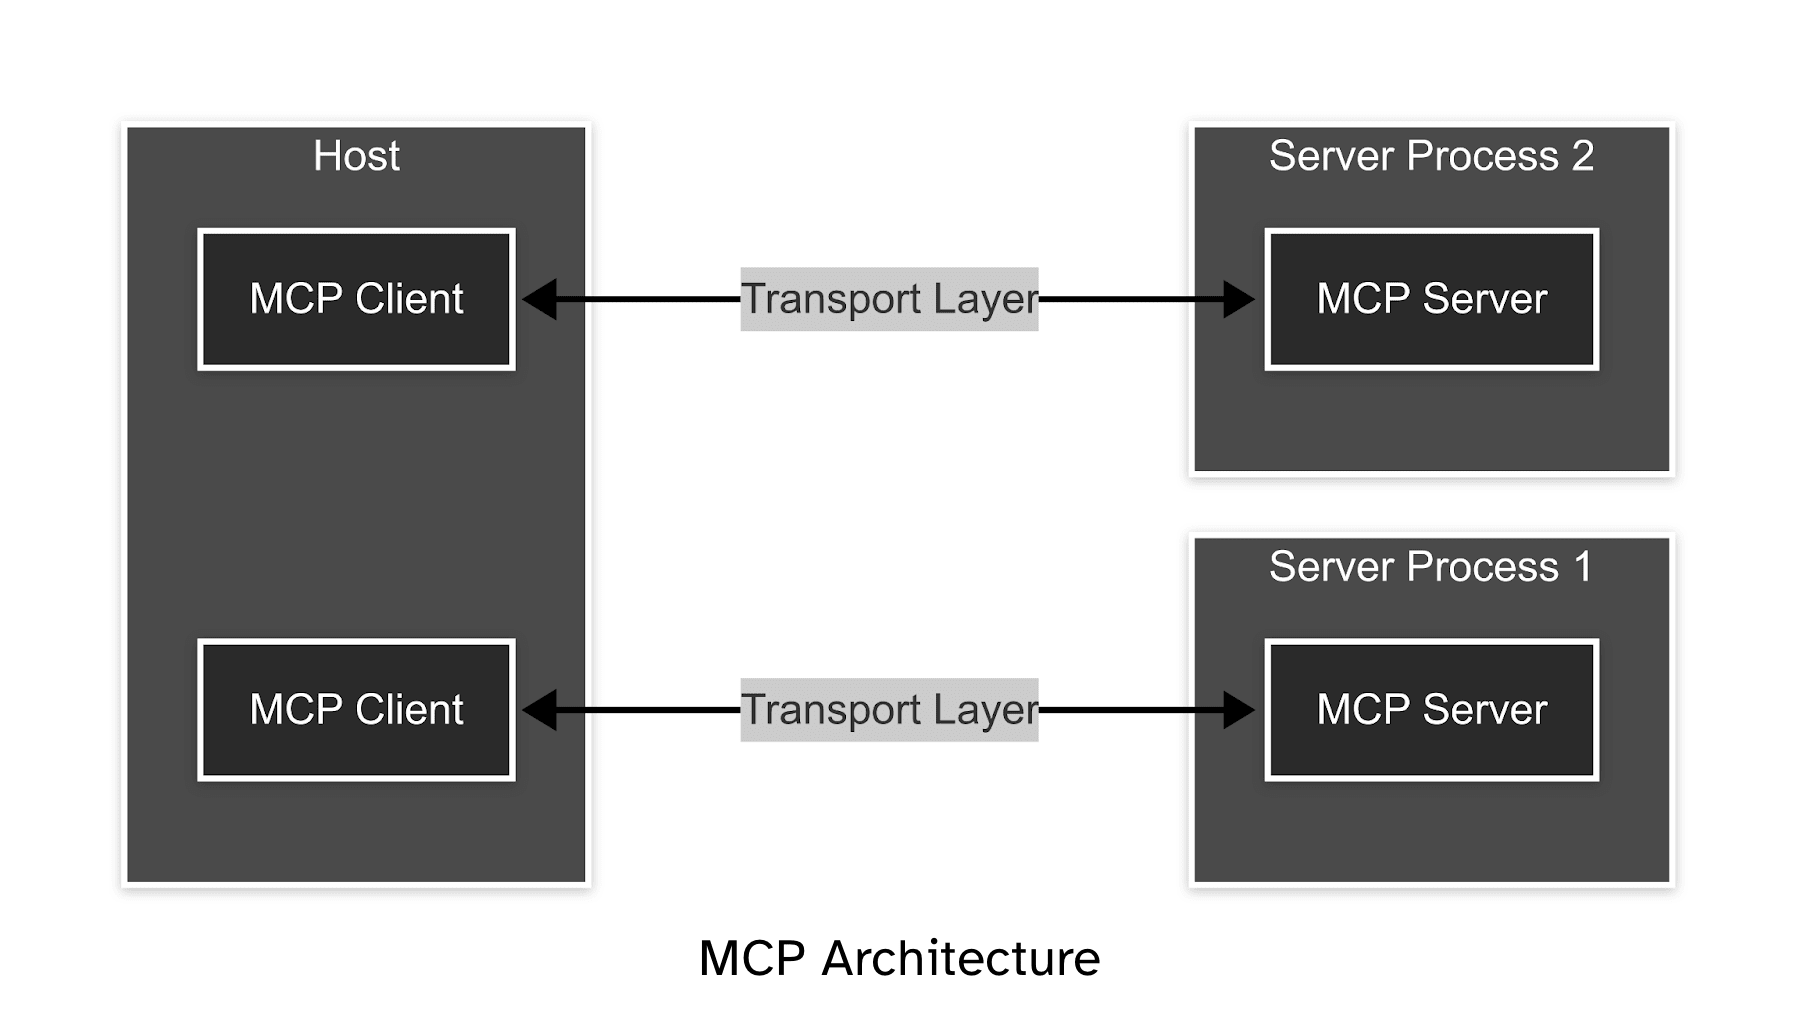
There are a couple of important concepts to understand when it comes to how MCP works to connect AI models. Here's a quick overview of the major elements in the architecture:
- Hosts, such as Claude Desktop, Cursor or VS Code Copilot running locally on your machine.
- Clients, these exist within a host and maintain a 1:1 connection with MCP servers.
- Servers, these provide context, tools, and prompts to clients.
- Transport Layers, this is how a client communicates with a server. MCP defines two standard transports:
stdiofor local servers that run as a subprocess, and Streamable HTTP for remote servers (this replaced the older, now-deprecated HTTP+SSE transport).
Specifically within an MCP server, there are some key components:
- Tools: These are the actions that the MCP server can perform. This could be querying an API, updating a database, or controlling a hardware device.
- Resources: These are the data sources that the MCP server can share with the client, such as API docs, usage examples, etc.
- Prompts: These are the instructions that the MCP server will follow when executing an instruction. For example, this could be to "Analyze a codebase" or in a more complex example, "Debug a project, following a specific set of instructions".
The instructing client will decide which utility it wants to use and then query the MCP server for the requested function. The MCP server will then use the tools, resources and prompts to perform the requested action.
How Can MCP Improve Your Development Process?
MCP Servers, while only recently gaining popularity, have the ability to rapidly improve your AI workflows. Many code IDEs and desktop AI clients such as Cursor and Claude Desktop already support interfacing with MCP servers.
Standardized Context Management
An MCP Server provides a structured way to manage and pass context to LLMs, which can ensure consistency in how your application interacts with the model and improve repeatability across multiple requests and/or projects. There's still many issues relating to hallucinations when using LLMs. An MCP Server can help by summarizing or pruning less relevant information while preserving critical context.
Context Persistence and Retrieval
The server can store conversation history and relevant context, allowing for stateful interactions across sessions without requiring you to manually track and pass all previous exchanges. This allows code agents to use an MCP server as a sort of cache for their actions.
Optimized LLM Token Usage
By improving the management of context windows, an MCP Server can help optimize token usage, summarizing or pruning less relevant information while preserving critical context, reducing costs and improving model performance. This is particularly important when you're working with large code bases and need to reduce the overhead of the LLM.
Enhanced Debugging Capabilities
With centralized logging of prompts, completions, and context, developers can more easily debug LLM interactions and understand why models produce specific outputs. Think of it like having an expert in the room with you that can control/steer the tool you're using. Like having a member of the Blues team in the room with you that can help you debug your projects!
Simplified API Integration
Developers can use the standardized interfaces of an MCP Server to integrate LLMs into applications. For example, rather than needing to understand the nuances of Notehub's APIs, the LLM can directly take action upon complex instructions and access real data sources.
Interface with the Real World
Without the help of an MCP, traditionally LLMs do not have the ability to interact with the real world or access live data sources. An MCP provides an LLM with the tools to directly query programs, servers or even hardware attached to the user's local machine, such as a Notecard.
Getting Started with Blues Expert
The fastest way to put MCP to work with Blues is the Blues Expert MCP server. It's a hosted (HTTP) server — there's nothing to clone, build, or run locally — that gives your AI client:
- Notecard API documentation and request validation
- Search over the latest Blues documentation
- Expert analysis from LLM specialists with deep Notecard, Notehub, and IoT knowledge
- Firmware development guidance for Arduino, C, Zephyr, and Python
Because Blues Expert is a remote HTTP server, you connect to it with a single URL: https://mcp.blues.io/expert/mcp.
For example, to add it to Claude Code:
claude mcp add blues-expert https://mcp.blues.io/expert/mcp --transport httpBlues Expert also works with Claude Desktop, GitHub Copilot (in VS Code and the Copilot coding agent), Cursor, and most other MCP clients. See the MCP Servers documentation for client-by-client setup instructions.
Once connected, you can ask things like:
- "What's the latest firmware for my Notecard, and how do I update it?"
- "Validate this Notecard request and explain what each field does."
- "Show me how to configure a Notecard to send a note when it detects movement."
Self-Hosting the Notecard and Notehub MCP Servers
Beyond Blues Expert, the team maintains two open-source MCP servers you can run yourself: one that talks directly to a connected Notecard over its USB serial interface, and one that interfaces with the Notehub Cloud API.
These run locally over the stdio transport and are a great way to experiment or build custom workflows.
You may find it useful to add these MCP servers into your IDE, such as Copilot or Cursor, to run alongside you as you develop your projects.
Prerequisites
To follow along with this blog post, you'll need:
- Claude Desktop
- note-cli (install with
brewon MacOS, Linux & WSL, available on your PATH)- Notecard MCP uses
note-clito interact with the Notecard over USB Serial
- Notecard MCP uses
- Any Notecard + Notecarrier with USB (e.g. Notecard Cell + Notecarrier F)
- An account on Notehub
- NodeJS Environment (For Notecard MCP)
- Python Environment (For Notehub MCP)
Notecard MCP
Notecard MCP is designed to allow an LLM to directly communicate with a Notecard over its USB serial interface. This server provides up-to-date documentation of the Notecard API along with management tools such as the ability to update firmware and select between Developer, LTS and Nightly firmware versions.
Notecard MCP is intended to teach users about their Notecard and to improve the out of the box experience, learning and understanding how to integrate Notecard into your products.
Available Tools
Each MCP server has its own collection of tools available to the client:
find-port, Allow access to a Notecard over USB Serialrequest, Make a Notecard API request on the connected Notecardlist-firmware-versions, Fetch all the firmware versions available to download for Notecard (DevRel, LTS, Nightly)update-firmware, Update the firmware on Notecardlist-apis, Fetch a list of the available Notecard APIs and usage
Getting Started
To get started with Notecard MCP, you'll need a nodejs environment on your machine. You'll first need to clone the notecard-mcp repository:
git clone https://github.com/Bucknalla/notecard-mcp.gitNow you'll need to install the dependencies:
npm install
npm run build
Now open Claude Desktop and head to settings.
From there go to Developer and click Edit Config.
Open the claude_desktop_config.json file.
Now add the following to the mcpServers section (replace /path/to/notecard-mcp/build/index.js with your actual path to the index.js file):
"mcpServers": {
   "notecard": {
     "command": "node",
     "args": [
       "/path/to/notecard-mcp/build/index.js"
     ]
   },
   ...
}
Restart Claude Desktop to load the new MCP server.
Examples Usage
Here are some examples of how you can use the Notecard MCP:
- "I have just connected a Notecard to my laptop, tell me everything about it"
- "I would like to update the firmware on my Notecard to the latest developer release"
- "Show me how to configure my Notecard to send a message if it detects movement"
- "I would like you to write me a provisioning script, using the same commands you just used, to provision a batch of Notecards for my product"
Demo
Notehub MCP
The Notehub MCP allows you to query your Notehub projects and devices; you provide it with your Notehub Cloud credentials and it works to provide access to your Notehub projects.
Available Tools
Each MCP server has its own collection of tools available to the client:
get-projects, Get all accessible Notehub projectsget-project-devices, Get all devices for a specific project (with optional filtering)get-project-events, Get all events for a specific project (with optional filtering)send-note, Send a note to a specific device
Examples Usage
Here are some examples of how you can use the Notehub MCP:
- "Can you show me all my Notehub projects?"
- "Fetch all devices from my project app:12345 and build me a graphic showing where they are located"
- "Get the last 10 events from device dev:12345 in project app:12345, filtering for events with the message 'alert'"
- "Send a note to device dev:12345 in project app:12345 with the following payload:
POWER ON"
Getting Started
To get started with Notehub MCP, you'll need a python environment on your machine, including the uv package manager to install the dependencies.
Open Claude Desktop and head to settings. From there go to Developer and click Edit Config. Open the claude_desktop_config.json file.
Now add the following to the mcpServers section (replace /path/to/notehub_mcp_server with your actual path to the notehub.py file):
"mcpServers": {
   "notehub": {
     "command": "uv",
     "args": [
       "--directory",
       "/path/to/notehub_mcp_server",
       "run",
       "--env-file",
       ".env",
       "notehub.py"
     ]
   },
   ...
}
Restart Claude Desktop to load the new MCP server.
.env file or environment variables to provide the credentials.
You'll need the following environment variables populated with your Notehub credentials: NOTEHUB_USERNAME, NOTEHUB_PASSWORD.Demo
Conclusion
MCP has quickly become the standard way to connect AI models to real-world hardware and data sources, and it can radically improve your development workflows. With the Blues Expert server, you can chat with an on-demand Notecard and Notehub expert — asking as many questions as you like, whenever you like — from whichever MCP-capable client you already use.
The fastest way to see the value is to try it: add Blues Expert to your AI client and ask it to help with your next Notecard project.