Using LEDs and NeoPixels to Monitor Notecard Status
Introduction
This sample app demonstrates how to integrate monochromatic LEDs, a single RGB LED, and NeoPixels in a Notecard-based product. Specifically, it lays out what is required to wire the components to a Notecard, how to monitor the status of the Notecard, and how to programmatically enable/disable individual LEDs or NeoPixels.
By implementing the concepts laid out in this sample app, you can visually communicate the status of your product via connected LEDs or NeoPixels.
Wireless Connectivity with Blues
This sample app is built around the Blues Notecard and Blues Notehub.
The Blues Notecard is the easiest way for developers to add secure, robust, and affordable pre-paid wireless connectivity to their microcontroller or single-board computer of choice. Notecard is a System-on-Module (SoM) that combines pre-paid data, low-power hardware (~8μA-18μA when idle), and secure communications. It acts as a device-to-cloud data pump to communicate with the Blues cloud service Notehub.
Notehub is the Blues cloud service for routing Notecard-provided data to third-party cloud applications, deploying OTA firmware updates, and securely managing fleets of Notecards. Notehub allows for secure communications between edge devices and the cloud without certificate management or manual provisioning of devices.
General Information
System Hardware
You may use any Notecard and any Notecarrier for this sample app (though there are exceptions noted below for Notecard LoRa). You may also use any host microcontroller, however the code samples provided do not explicitly require a host.
This sample app is documented using the following hardware:
| Component | Purpose |
|---|---|
| Blues Notecard Cellular WBNA | Wireless connectivity module enabling device-to-cloud data syncing. |
| Blues Notecarrier A | Carrier board for connecting Notecard to an MCU. |
| LEDs | Monochromatic LEDs for displaying Notecard status. |
| RGB LED | An RGB LED for displaying Notecard status. |
| Momentary Push Button | Used to simulate a user action. |
| 10K Ohm Resistor | Prevents the button input from floating. |
| NeoPixel Strip | RGB NeoPixels for displaying Notecard status. |
| 5V Power Source | Power source for NeoPixels (requires 5V). |
| Breadboard | Used along with jumper wires to wire components. |
| Male/Male Jumper Wires | Used along with breadboard to wire components. |
List of Acronyms
| Acronym | Definition |
|---|---|
| LED | Light-Emitting Diode |
| MCU | Microcontroller |
| SoM | System-on-Module |
Summary
Many connected products have a need to display some type of visual feedback to the end user. Whether this is to convey the status of the device or to notify the user of a potential issue, it's useful to be able to wire a simple low-power lighting element as opposed integrating a full LCD display.
This sample app demonstrates how to wire monochromatic LEDs, a single RGB LED, or a set of NeoPixels to a Notecard. You'll also learn how to use Notecard API commands to monitor the status of a Notecard and manually control individual lights.
Requirements
The following product requirements will be addressed:
- Use the Notecard's
card.aux/monitormode to convey the status of a Notecard via attached green, red, and yellow LEDs. - Programmatically enable or disable green, red, or yellow LEDs.
- Use the Notecard's
card.aux/rgb-monitormode to convey the status of a Notecard via an attached RGB LED. - Programmatically enable or disable one of the supported colors on a single RGB LED.
- Use the Notecard's
card.aux/neo-monitormode to convey the status of a Notecard via a single NeoPixel or a strip of NeoPixels. - Programmatically enable or disable a single NeoPixel (either standalone or on a strip).
Implementation for LEDs
These requests are not available on Notecard LoRa.
Wiring Instructions
A Notecard may be wired to LEDs, RGB LEDs, or NeoPixels, but not all
simultaneously. This is because the same AUX2 pin on Notecard is required for
all implementations.
A Notecard properly wired to green, red, and yellow LEDs via a Notecarrier A.
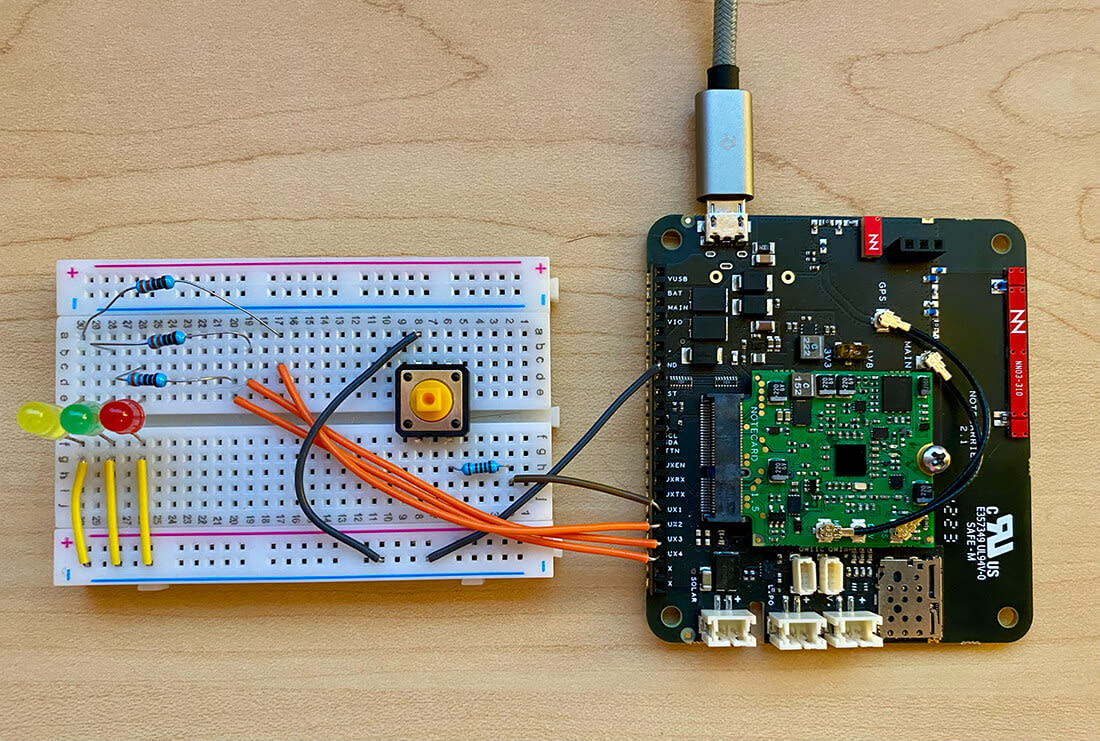
The following are the pins that must be wired to control the three LEDs from a Notecard.
| Pin/Component | Pin/Component |
|---|---|
GND (Notecard) | Breadboard Ground Rail |
AUX1 (Notecard) | 10K Ohm Resistor (Button) |
AUX2 (Notecard) | Yellow LED |
AUX3 (Notecard) | Green LED |
AUX4 (Notecard) | Red LED |
| Button Pin | Breadboard Ground Rail |
Monitor Notecard Status with LEDs
The monitor AUX mode allows the Notecard to utilize three LEDs to convey the
current status of the Notecard. This is commonly used by technicians to test and
monitor Notecard activity.
Whichever LED is wired to AUX2 on the Notecard (documented as yellow) will
become a general purpose LED that flashes acknowledgments when there is activity
on the Notecard (such as writing/reading to/from flash memory). The LED wired to
AUX3 (green) flashes based on active network communications. Finally, the LED
wired to AUX4 (red) will turn on for two minutes if there is a failure to
connect to the network.
To enable monitor mode for a Notecard, send the following card.aux request:
{
  "req": "card.aux",
  "mode": "monitor"
}J *req = NoteNewRequest("card.aux");
JAddStringToObject(req, "mode", "monitor");
NoteRequest(req);req = {"req": "card.aux"}
req["mode"] = "monitor"
card.Transaction(req)Once the request is sent, you can press the momentary push button on the breadboard and watch the Notecard cycle through different colors based on the status of the Notecard:
This action will also send a _button.qo Notefile to Notehub and initiate a
sync.
Manually Managing One or More LEDs
You can manually enable/disable any of the three LEDs connected to AUX2-4 by
placing the Notecard in led or monitor mode and then using the
card.led API.
If not already in led or monitor mode, try setting your Notecard to led
mode and issuing a card.led request specifying the color of the LED you would
like to turn on. Again, the colors in the mode argument correspond to these
pins:
AUX2= yellowAUX3= greenAUX4= red
{
  "req": "card.aux",
  "mode": "led"
}

{
  "req": "card.led",
  "mode": "red",
  "on": true
}J *req = NoteNewRequest("card.aux");
JAddStringToObject(req, "mode", "led");
NoteRequest(req);
req = NoteNewRequest("card.led");
JAddStringToObject(req, "mode", "red");
JAddBoolToObject(req, "on", true);
NoteRequest(req);req = {"req": "card.aux"}
req["mode"] = "led"
req = {"req": "card.led"}
req["mode"] = "red"
req["on"] = True
card.Transaction(req)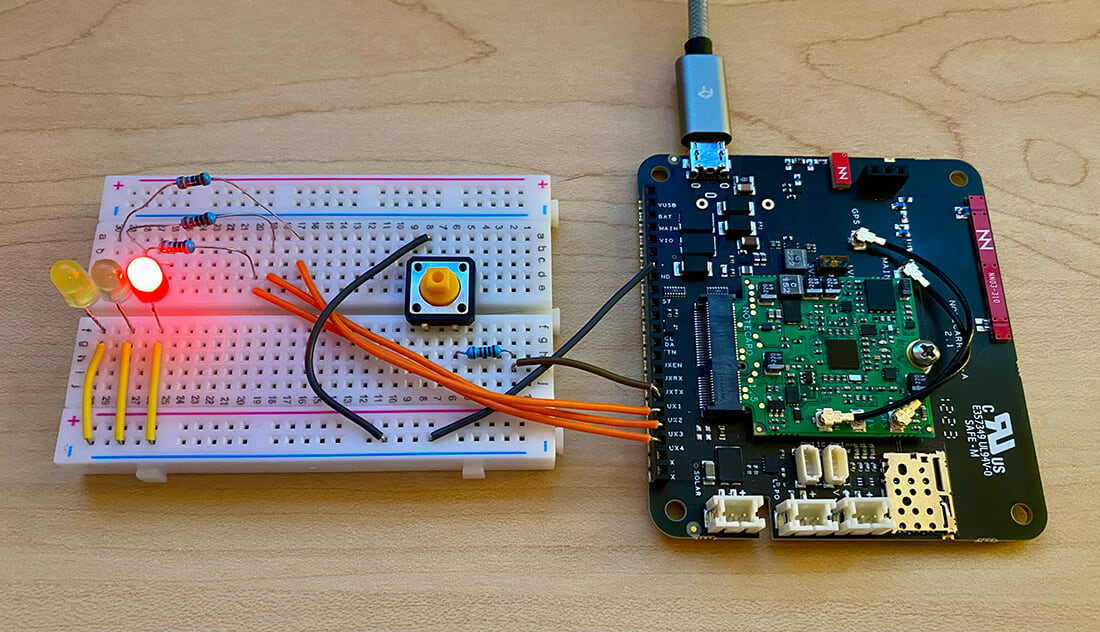
Individual LEDs may be turned off by issuing the same card.led request and
using the "off":true argument.
Implementation for RGB LEDs
These requests are not available on Notecard LoRa.
Wiring Instructions
A Notecard may be wired to LEDs, RGB LEDs, or NeoPixels, but not all
simultaneously. This is because the same AUX2 pin on Notecard is required for
all implementations.
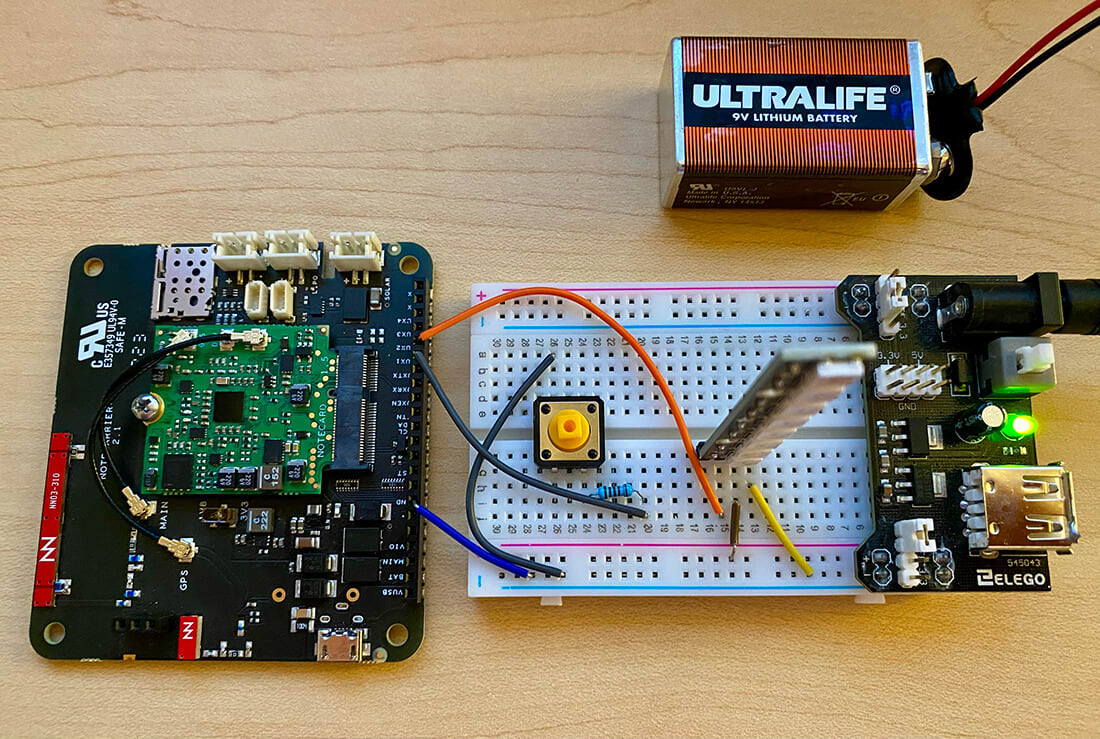
A Notecard properly wired to an RGB LED via a Notecarrier A.
The following are the pins that must be wired to control the RGB LED from a Notecard.
| Pin/Component | Pin/Component |
|---|---|
GND (Notecard) | Breadboard Ground Rail |
AUX1 (Notecard) | 10K Ohm Resistor (Button) |
AUX2 (Notecard) | Red Wire on RGB LED |
AUX3 (Notecard) | Blue Wire on RGB LED |
AUX4 (Notecard) | Green Wire on RGB LED |
| Button Pin | Breadboard Ground Rail |
Monitor Notecard Status with RGB LED
The rgb-monitor AUX mode allows the Notecard to utilize an attached RGB LED to
convey the current status of the Notecard. This is commonly used by technicians
to test and monitor Notecard activity.
To enable rgb-monitor mode for a Notecard, send the following card.aux
request:
{
  "req": "card.aux",
  "mode": "rgb-monitor"
}J *req = NoteNewRequest("card.aux");
JAddStringToObject(req, "mode", "rgb-monitor");
NoteRequest(req);req = {"req": "card.aux"}
req["mode"] = "rgb-monitor"
card.Transaction(req)Once the request is sent, you can press the momentary push button on the breadboard and watch the Notecard cycle through different colors based on the status of the Notecard. As a single RGB LED can display many different colors, you may see any of the following colors flash:
- white will appear when the
AUX1button is pressed, when there is activity on Notecard (such as writing/reading to/from flash memory), or during an active serial transaction. - yellow will flash when Notecard is establishing a network connection.
- green will flash based on active network communications (after a network connection has been established).
- cyan will flash when there is GPS activity.
- magenta will flash when Notecard is searching for a GPS signal.
- red will turn on for two minutes if there is a failure to connect to the network.
This action will also send a _button.qo Notefile to Notehub and initiate a
sync.
Manually Managing an RGB LED
You can manually enable/disable any of the colors supported by the RGB LED by
placing the Notecard in rgb or rgb-monitor mode and then using the
card.led API.
If not already in rgb or rgb-monitor mode, try setting your Notecard to
rgb mode and issuing a card.led request specifying the color of the RGB LED
you would like to turn on. Available colors for the "mode" argument include
"red", "green", "blue", "yellow", "cyan", "magenta", and "white".
{
  "req": "card.aux",
  "mode": "rgb"
}

{
  "req": "card.led",
  "mode": "cyan",
  "on": true
}J *req = NoteNewRequest("card.aux");
JAddStringToObject(req, "mode", "rgb");
NoteRequest(req);
req = NoteNewRequest("card.led");
JAddStringToObject(req, "mode", "cyan");
JAddBoolToObject(req, "on", true);
NoteRequest(req);req = {"req": "card.aux"}
req["mode"] = "rgb"
req = {"req": "card.led"}
req["mode"] = "cyan"
req["on"] = True
card.Transaction(req)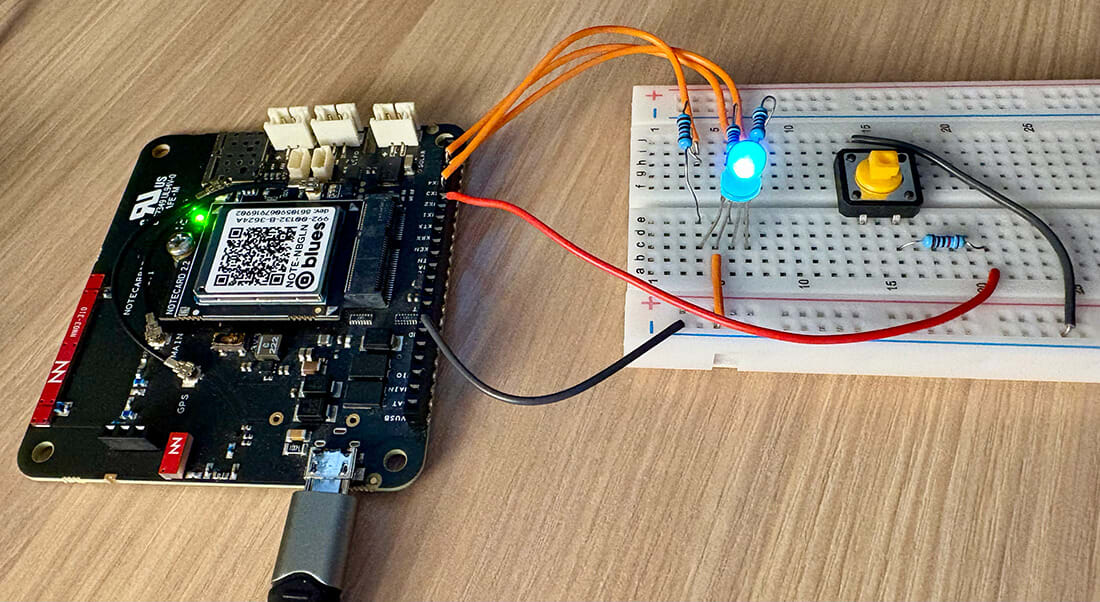
Individual colors may be turned off by issuing the same card.led request and
using the "off":true argument.
Implementation for NeoPixels
Wiring Instructions
A Notecard may be wired to LEDs, RGB LEDs, or NeoPixels, but not all
simultaneously. This is because the same AUX2 pin on Notecard is required for
all implementations.
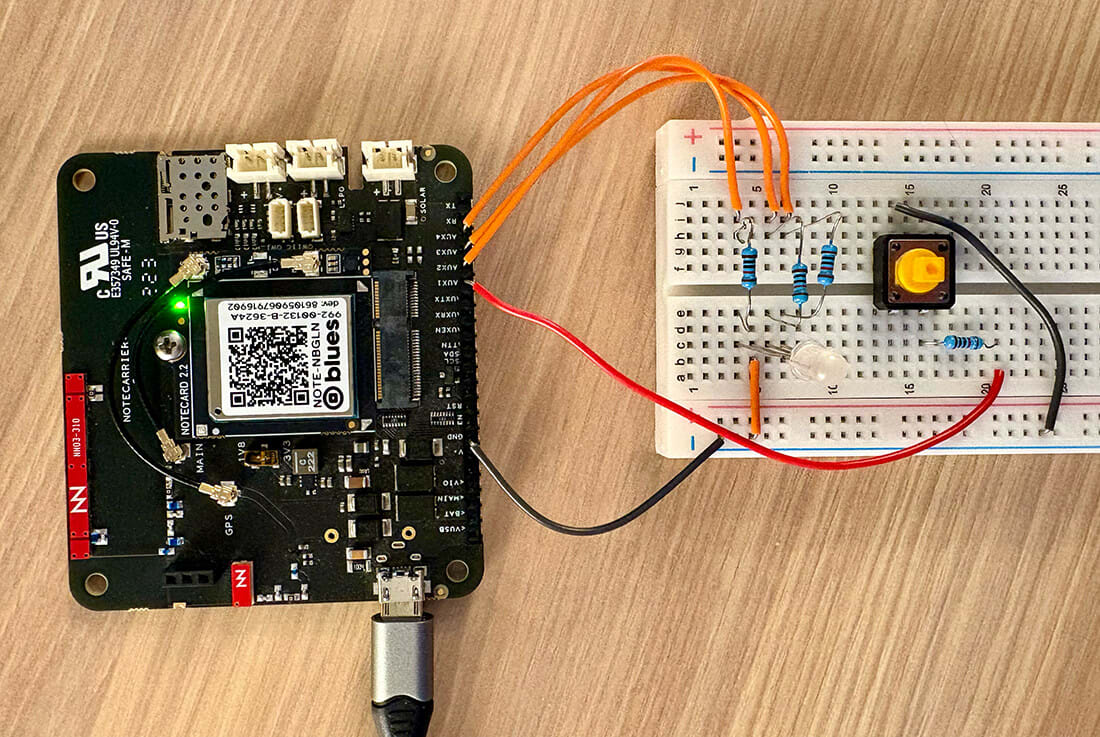
A Notecard properly wired to a NeoPixel strip via a Notecarrier A.
The following are the pins that must be wired to control one or more NeoPixels from a Notecard, noting that since the Notecarrier can only provide 3V3 OUT, a separate 5V power supply may be required.
| Pin/Component | Pin/Component |
|---|---|
GND (Notecard) | Breadboard Ground Rail |
AUX1 (Notecard) | 10K Ohm Resistor (Button) |
AUX2 (Notecard) | DIN (NeoPixel) |
| Button Pin | Breadboard Ground Rail |
5VDC (NeoPixel) | Breadboard Power Rail |
GND (NeoPixel) | Breadboard Ground Rail |
For NeoPixel-based designs that are battery-powered, it is critical that the
NeoPixel be powered off when the connected NeoPixels are all "black". The
Notecard helps by providing a signal on AUX3, which is HIGH when the
NeoPixel should be powered on, and LOW when the NeoPixel should be powered
off.
Do NOT attempt to power the NeoPixel from AUX3 directly, because it is not
capable of delivering the 60mA required and you will risk damaging the Notecard.
Monitor Notecard Status with NeoPixels
The neo-monitor AUX mode allows the Notecard to utilize one or more NeoPixels
to convey the current status of the Notecard. This is commonly used by
technicians to both test and monitor Notecard activity.
To enable neo-monitor mode for a Notecard, send the following card.aux
request:
{
  "req": "card.aux",
  "mode": "neo-monitor"
}J *req = NoteNewRequest("card.aux");
JAddStringToObject(req, "mode", "neo-monitor");
NoteRequest(req);req = {"req": "card.aux"}
req["mode"] = "neo-monitor"
card.Transaction(req)By default, this will only use the first NeoPixel in a strip and multiplex the following colors per the status of the Notecard:
- gray (may appear white) will flash acknowledgments when there is activity on Notecard (such as writing/reading to/from flash memory) or an active serial transaction.
- yellow will flash when Notecard is establishing a network connection.
- green will flash based on active network communications (after a network connection has been established).
- orange will flash when the GPS module is searching for satellites.
- blue will light when the GPS module is active.
- magenta will flash when Notecard is triangulating its location with WiFi access point data.
- red will turn on for two minutes if there is a failure to connect to the network.
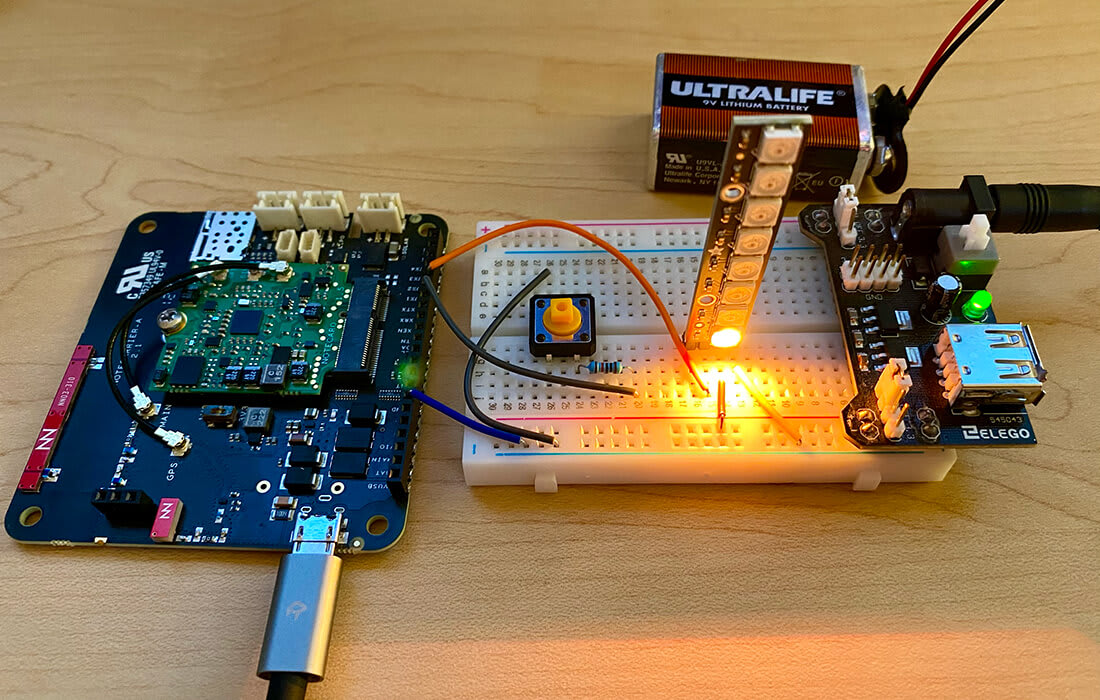
Once the request is sent to the Notecard, you can press the momentary push button on the breadboard and watch the Notecard cycle through different colors based on the status of the Notecard:

Using Multiple NeoPixels
The Notecard also supports NeoPixel strips and will distribute the status lights
amongst available NeoPixels. To use a NeoPixel strip, send a card.aux request
with a count argument of either 1, 2, or 5 (the Notecard only supports
using 1, 2, or 5 NeoPixels in a strip, regardless of the actual length).
NeoPixel support on Notecard for LoRa is limited to a single NeoPixel or the first one in a strip.
Likewise, a single NeoPixel in the same strip can be reserved for
user-management. To reserve a NeoPixel that can be controlled via the
card.led API (see
next section), use the offset argument to specify a 1-based offset location
for the NeoPixel you would like to reserve. The other status lights will flash
around that reserved NeoPixel.
For example, the request below tells the Notecard to use five NeoPixels, and to
reserve the third NeoPixel in the strip for use with card.led.
{
  "req": "card.aux",
  "mode": "neo-monitor",
  "count": 5,
  "offset": 3
}J *req = NoteNewRequest("card.aux");
JAddStringToObject(req, "mode", "neo-monitor");
JAddNumberToObject(req, "count", 5);
JAddNumberToObject(req, "offset", 3);
NoteRequest(req);req = {"req": "card.aux"}
req["mode"] = "neo-monitor"
req["count"] = 5
req["offset"] = 3
card.Transaction(req)Once the request is sent, you can press the momentary push button on the breadboard and watch the Notecard cycle through different colors based on the status of the Notecard (avoiding the third NeoPixel):

This action will also send a _button.qo Notefile to Notehub and initiate a
sync.
Programming a Single NeoPixel
You can manually program a NeoPixel to display a user-defined color while the
Notecard is either in neo-monitor or neo mode by using the card.led API.
If your Notecard is already in neo-monitor mode (from the previous step) and
you have passed an offset argument to a card.aux request, simply send a
card.led request specifying the color you would like to display, and whether
you would like to turn the NeoPixel on or off:
Available colors for the "mode" argument include "red", "green", "blue",
"yellow", "cyan", "magenta", "orange", "white", and "gray".
{
  "req": "card.led",
  "mode": "cyan",
  "on": true
}J *req = NoteNewRequest("card.led");
JAddStringToObject(req, "mode", "cyan");
JAddBoolToObject(req, "on", true);
NoteRequest(req);req = {"req": "card.led"}
req["mode"] = "cyan"
req["on"] = True
card.Transaction(req)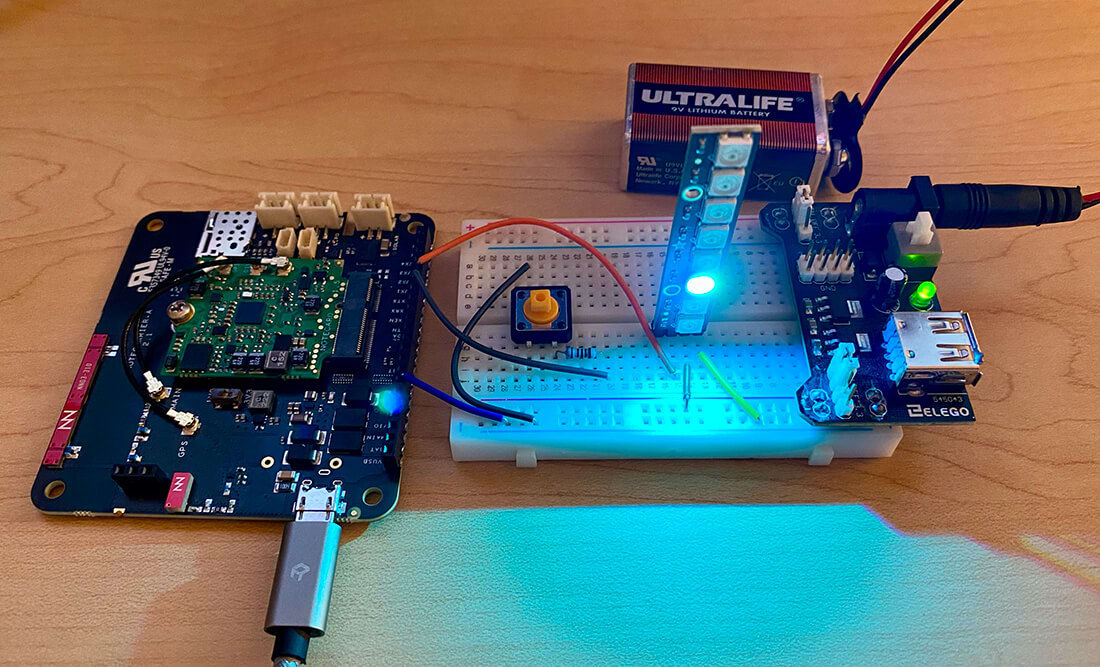
If NOT using neo-monitor mode, there is a separate neo mode that lets you
manage a single NeoPixel (i.e. the first NeoPixel in a strip).
neo mode is not available on Notecard LoRa.
{
  "req": "card.aux",
  "mode": "neo"
}J *req = NoteNewRequest("card.aux");
JAddStringToObject(req, "mode", "neo");
NoteRequest(req);req = {"req": "card.aux"}
req["mode"] = "neo"
card.Transaction(req)Once this request is sent to the Notecard, you may then use the same card.led
request as documented above. This example uses "mode":"orange":
Additional Resources
- Consult the monitor mode, rgb-monitor mode, and neo-monitor mode guides.
- Read the API reference documentation for the card.aux API.
- Read the API reference documentation for the card.led API.