Blues University is an ongoing series of articles geared towards beginner- and intermediate-level developers who are looking to expand their knowledge of embedded development and the IoT.
In an era when technology orchestrates a vast network of machines, embedded programming is an unsung hero. Embedded programming breathes life into machines, allowing them to interact, adapt, and make decisions.
Embedded systems aren't just another piece of hardware! They're specialized computing platforms that perform dedicated functions or tasks within a more extensive system. And unlike general-purpose computers, designers optimize them for a specific application. Factors like power consumption, size, and computational resources often constrain these systems.
At their core, embedded systems generally consist of a microcontroller or microprocessor, memory, and input and output peripherals. These components interact synergistically, usually in real time, to achieve the desired functionality.
Programming these systems involves various toolchains, including compilers, assemblers, linkers, and debuggers. Integrated development environments (IDEs) like Visual Studio Code (VS Code) with PlatformIO, Arduino IDE, and STM32CubeIDE include these toolchains. Each IDE offers its own set of libraries, code editors, and debuggers tailored for particular microcontrollers and development boards, streamlining the process from code development to deployment.
So, when it comes to embedded systems, the art isn't just in designing the hardware or writing the code — it's also in skillfully choosing and employing the proper tools that make the engineering journey feasible and efficient.
This guide aims to be more than a manual. It's your roadmap to a world where software and hardware intersect with limitless possibilities.
Components Overview
The following sections provide an overview of the hardware, software, communications, and debugging tools you can choose.
Hardware
The core hardware is microcontrollers — such as nRF52, STM32, and ESP32 — each with unique capabilities and specialties.
Then, there are development boards like STM32-based Blues Swan, Arduino UNO, and Adafruit Feathers. Think of these boards as your microcontroller's stage, equipped with all the necessary props and settings. Contrary to popular belief, the development board isn't where the real magic happens. Instead, the firmware running on these boards animates your projects. These boards offer a hardware abstraction layer that simplifies complexities, enabling you to focus on your code rather than electrical engineering details.
Then, there's the Raspberry Pi, a single-board computer (SBC), more akin to a full computer. It offers a powerful processor and extensive connectivity, making it suitable for complex tasks beyond the typical scope of microcontroller units (MCUs). While both MCUs and SBCs, like the Raspberry Pi, are used in embedded systems, they cater to different applications based on their computational capabilities and connectivity features.
Software
IDEs serve as your coding playground to create the embedded system's software environment. For Arduino programming, VS Code with PlatformIO is popular, as is the venerable Arduino IDE. You should pay attention to the firmware and libraries specific to your microcontroller, as they offer pre-written code snippets and functions that make your life easier.
There are also compilers and toolchains. But for now, it's enough to understand that your choice of IDE often comes pre-bundled with all the compilers and toolchains you need.
Communications
In embedded systems, the role of communication protocols is not just limited to data transmission. It extends to synchronization, error detection, and power management. The choice of a communication protocol often depends on the system's requirements, such as data rate, distance, power consumption, and the type of interface devices.
For instance, you can use a universal asynchronous receiver-transmitter (UART) for its simplicity and low hardware requirements. Or, you could use a Serial Peripheral Interface (SPI) for its full-duplex communication and server-to-client architecture.
The Inter-Integrated Circuit (I2C) protocol introduces bus arbitration. It allows multiple server and client devices and Controller Area Networks (CAN bus), commonly used in automotive applications, to reduce electrical noise and offer advanced error-handling mechanisms.
For interfacing with personal computers (PCs) or external systems, Universal Serial Bus (USB)-to-serial converters serve as vital bridges.
Learn more about these interfaces in another Blues University article, Understanding Sensor Interfaces - UART, I2C, SPI and CAN.
Wireless communication modules extend the system's capabilities beyond physical boundaries. Bluetooth and Wi-Fi are omnipresent, offering varying data rates and security features. The Blues Notecard provides developer-friendly access to Cellular, Wi-Fi, LoRaWAN, and Satellite as well.
Debugging Tools
Last but not least, let's turn to the unsung heroes of any development process — debugging tools. On the hardware side, logic analyzers and oscilloscopes offer real-time insights into electrical signals. Hardware serial monitors serve a similar purpose but focus solely on serial communication.
There are also software serial monitors. Many IDEs have built-in debugging tools that allow you to step through code and monitor variables. These help you observe the data traffic between your computer and the development board.
Each component plays a pivotal role in this labyrinthine world of embedded programming. Your hardware is your canvas, your software is the palette of colors, communication protocols are your brushstrokes, and debugging tools are the erasers that correct missteps.
Selecting the Right Components
When embarking on an embedded programming project, choosing the right components is a task to take seriously. It's a decision-making process that could make or break the efficacy and efficiency of your final product. You should consider several critical criteria:
- Project requirements
- Budget, availability
- Community support
- Personal proficiency
Project requirements are the cornerstone. Whether developing a simple Internet of Things (IoT) sensor or a complex robotic system, knowing the computational power, memory, and interfaces you'll need is paramount.
Additionally, you can't overlook budgetary constraints. While opting for premium microcontrollers and IDEs might seem appealing, a cost-benefit analysis often indicates that affordable yet powerful options can provide comparable performance. The availability of these tools and your proficiency in using them can also significantly affect development time.
Finally, you should choose tools with solid community support, including forums, tutorials, and online resources to assist beginners and experienced developers.
Remember that the learning curve for new IDEs or unfamiliar microcontrollers could add unexpected delays and complications. For instance, if you're proficient in using VS Code, incorporating PlatformIO to work with a Swan board can offer a smooth transition while delivering a powerful, cost-effective solution for various project scales.
Setting Up the Development Environment: Step-by-Step Walkthrough
In this section, you'll learn how to set up the hardware, install the software, and establish communications.
Step 1: Hardware Setup
Before you start coding, familiarize yourself with your hardware. We will use a Swan board from Blues, but most development boards function similarly.
Remove your board from the box and examine its components. You'll see various pins, the main microcontroller, a USB interface, and possibly some built-in LEDs. Take a moment to locate the power pins, digital I/O, and analog inputs.

Now, locate the USB port on the board and connect it to your computer via a USB cable. When connected correctly, you should see the LED power indicator illuminate, indicating it's receiving power.
Completing these steps sets the stage for your embedded programming project's more complex phases.
Step 2: Software Installation
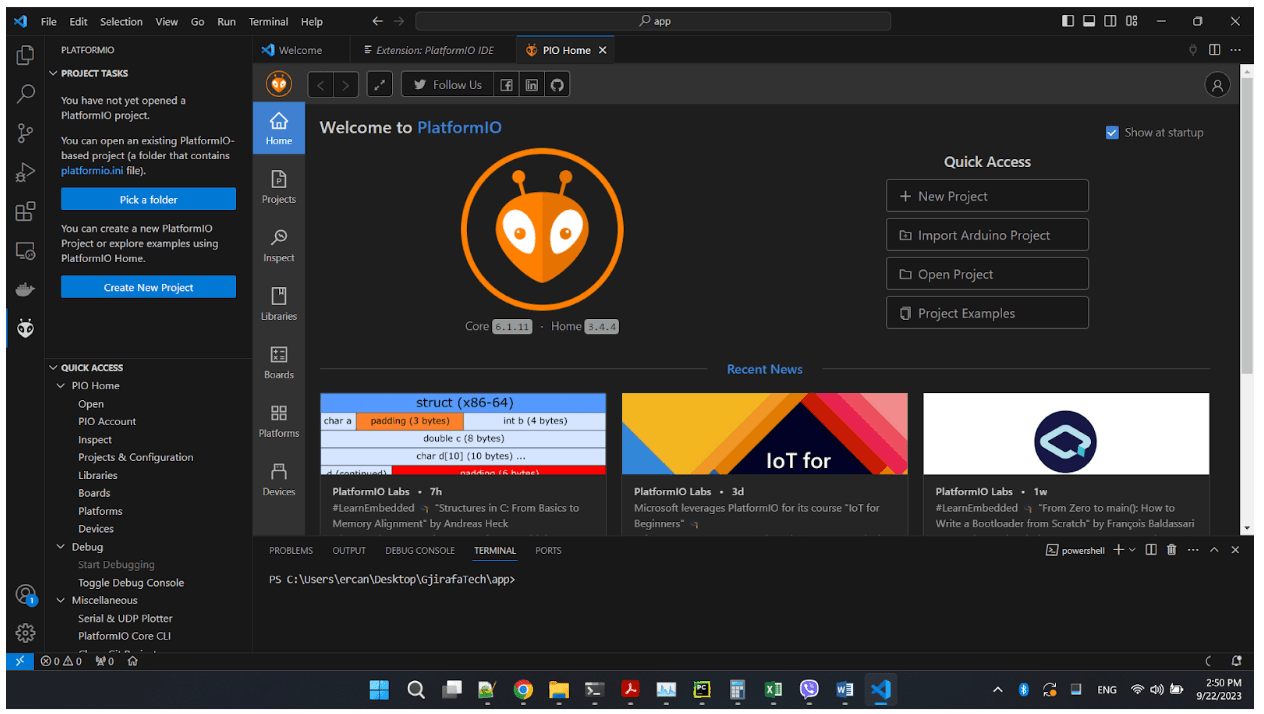
If you've opted for VS Code with PlatformIO, start by navigating to the PlatformIO website and downloading the IDE. Follow the installation wizard to set it up. You'll see PlatformIO integrated into VS Code after installation.

Depending on your operating system, you may need to install additional drivers for the board. For example, Windows users may need to download specific drivers to ensure the board communicates effectively with the computer. Follow the instructions that apply to your OS.
Once the IDE and drivers are in place, you're ready to set up your new project.
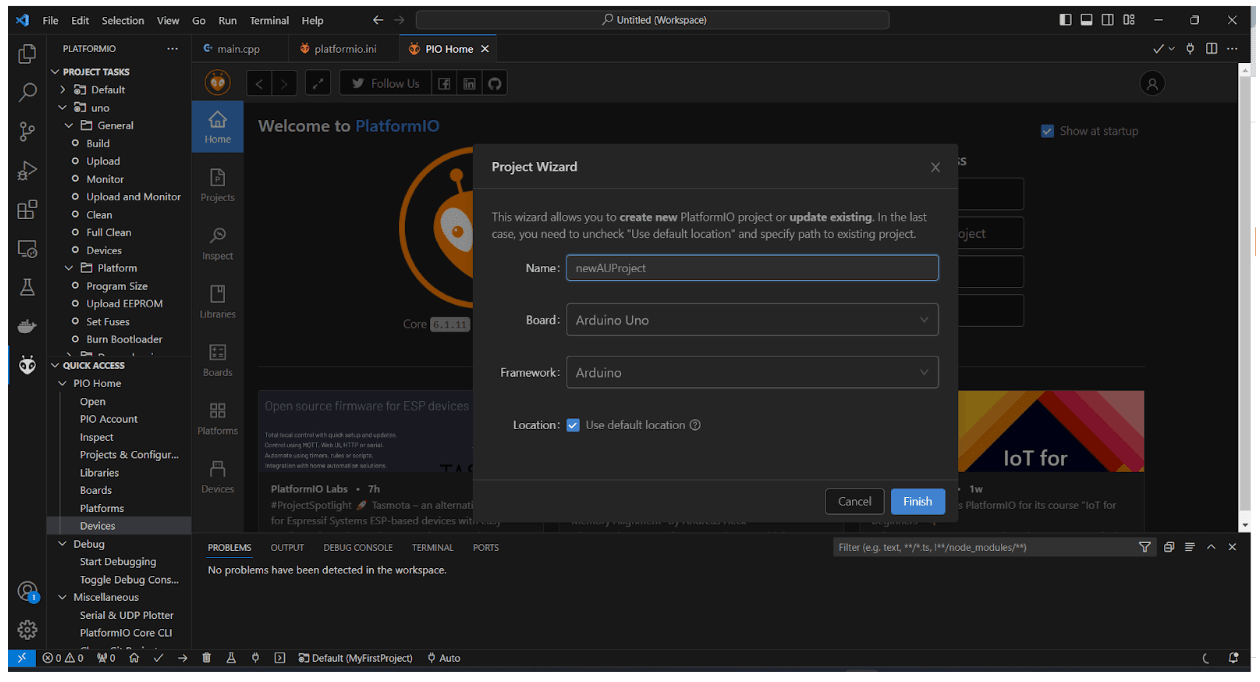
In PlatformIO, click the Projects tab and create a new project. Now, select the appropriate board. The Framework automatically defaults to Arduino.
Your board should now be ready for programming.

After completing this step, the IDE is ready. You've configured the board and installed all necessary drivers, laying the software foundation for building your embedded project.
Step 3: Establishing Communication
UART is a popular protocol for serial communication between your microcontroller and external devices or your computer. Knowing how to set this up is essential for projects involving serial data transfer and debugging.
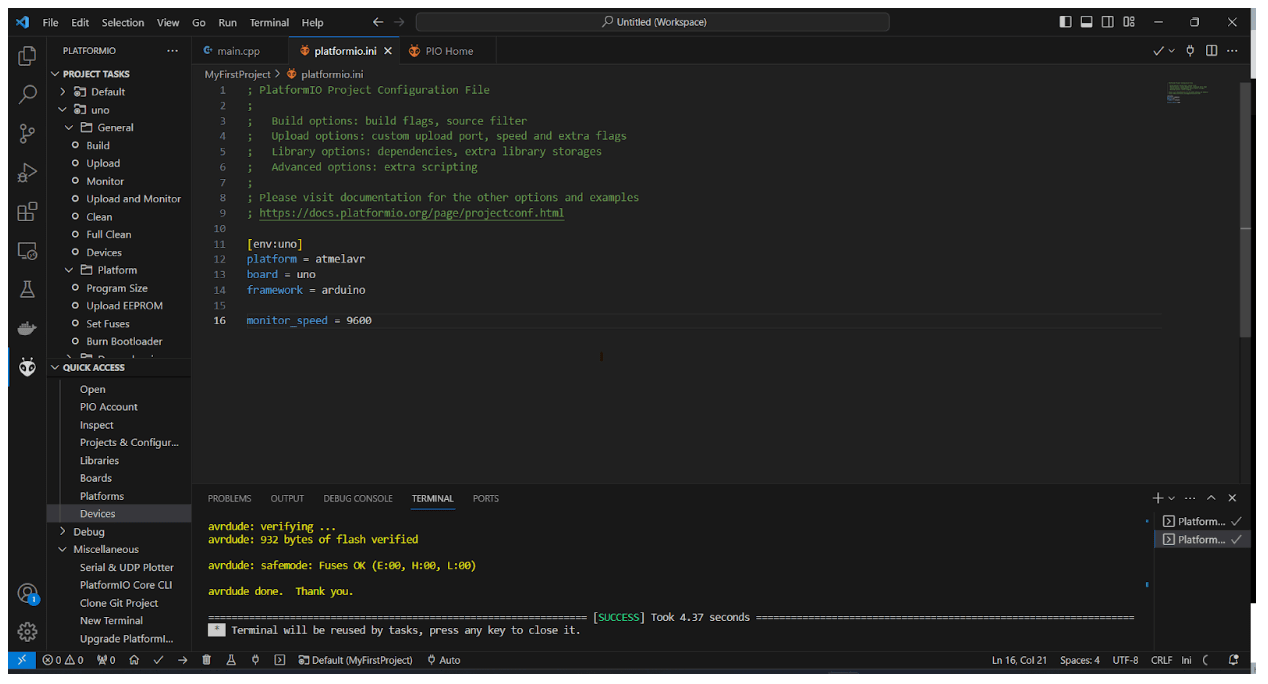
The next step is configuring the communication settings in PlatformIO. Open the
platformio.ini file in your project directory to specify the baud rate — the
speed at which your board communicates. A standard baud rate for most cards,
including Swan, is 9600. Your platformio.ini file should have a line that
reads monitor_speed = 9600 to set this up.

Your development environment is ready for two-way communication between your board and your computer, paving the way for more intricate functionalities, from simple debugging to advanced data manipulation.
Step 4: Viewing Logs in the Serial Monitor
The final piece to complete your development environment setup involves learning how to view logs in the serial monitor. This is crucial for debugging and monitoring the output of your microcontroller.
To begin, open the Serial Monitor within the PlatformIO extension in VS Code, typically accessible via the bottom toolbar. Once opened, it's essential to ensure that the monitor's settings, including the COM port and baud rate, are correctly matched to those of your board and the value you used in the previous step. When the Serial Monitor is correctly configured and opened, it displays the logs and data sent from your microcontroller.

With your hardware connected, software installed, and communication established, you've crafted a versatile development environment tailored for embedded programming.
Blues also provides more in-depth tutorials for getting started with the Swan and extending Swan to build a Machine Learning application.
Conclusion
You've just created an embedded development environment meticulously crafted to serve as your creative playground. From unboxing your development board, which serves as a hardware abstraction layer that simplifies complexities, to selecting an IDE and configuring the UART settings, each step has been a building block toward transforming your digital ideas into tangible, functional projects.
Although there are also compilers and toolchains to consider, when you're just beginning, it's enough to know that your choice of IDE is usually pre-bundled with all the compilers and toolchains you need. But don't forget: This is just your launchpad.
To further your understanding and sharpen your skills, be sure to follow Blues University, where you can explore and contribute to shaping the future of IoT. Whether you're looking to optimize wireless communication through Blues hardware or aspiring to become a seasoned embedded systems engineer, Blues University offers a range of courses that align with our mission of transforming every physical product into an intelligent service.
If you're new to embedded development and the IoT, the best place to get started is with the Blues Starter Kit for Cell + WiFi and then join our community on Discourse. 💙


