
While you might not know it based on the numerous Machine Learning (ML) projects from the Blues community that use Edge Impulse, there are other ML tools and platforms out there! Whether you want to build your ML models "closer to the metal" (e.g. Tensorflow Lite) or need more than what traditional developer-focused ML tooling provides (e.g. STM32Cube.AI), you do indeed have options.
Today I want to provide a high-level overview of how to use another option, that being a developer-focused desktop tool from STMicroelectronics called NanoEdge AI Studio.
![]()
For a video equivalent of this article check out the previously recorded webinar, "Create an Edge ML Solution with ST and Blues", here on YouTube.
What is NanoEdge AI Studio?
As opposed to its "cousin" tool, STM32 Cube.AI (which is more focused on the Data Scientist persona), NanoEdge AI Studio is an accessible solution for creating ML models designed to be trained on, and deployed to, edge devices using an STM32 microprocessor. You can think of NanoEdge AI Studio as a "search engine" for ML model libraries, as it ships with numerous pre-configured libraries that optimize the model generation process based on your own unique sensor inputs.

Overview of creating an anomaly detection model with NanoEdge AI Studio. Image credit STMicroelectronics.
NanoEdge AI Studio can be used to build and deploy ML models to any STM32 Cortex M0-M7 microprocessor (yes, it is limited to the STM32 family). Mac users should also know it is only available on Windows and Ubuntu.
A key differentiator of NanoEdge AI Studio is its lack of cloud dependencies. While generation of the model and initial training happens in the desktop application, additional training can actually take place on the device itself. This enables powerful scenarios like re-training a model in production, allowing for more real world inputs (and thus more accurate inferences).
Supported ML Model Types
NanoEdge AI Studio supports four specific types of ML models:
- Anomaly Detection (i.e. the ability to discern normal vs abnormal behaviors directly on the STM32 and detect anomalies in real time)
- 1-class Classification (i.e. identify outliers in data patterns; especially useful when no examples of anomalies can be detected ahead of time)
- N-class Classification (i.e. classify or group multiple distinct inputs in real time)
- Extrapolation (i.e. predict values based on data patterns that the model may or may not have been seen previously)
Since many consider the "holy grail of Edge AI" to be preventative maintenance, the ability to deploy a robust and reliable ML model can be a first step towards alerting us of potential maintenance issues.
Typical Sensors Used in Anomaly Detection
Exactly how might you get started with building an anomaly detection model? Well there are a variety of common environmental sensors you could start with. From using an accelerometer to detect vibration patterns, gas sensors to detect tiny leaks, watching for spikes in voltage, to comparing audio levels of "normal" vs "abnormal" behavior, there are limitless ways to acquire the necessary data.
It's important to know that data from multiple sensors can also be combined to build an optimized model for your specific use case.
Some example sensor data may include:
- Vibrations
- Pressure
- Gas/VOC
- Current/Voltage
- Magnetic
- Temperature/Humidity
- Light
- Sound Levels
Building an Anomaly Detection Project with NanoEdge AI Studio
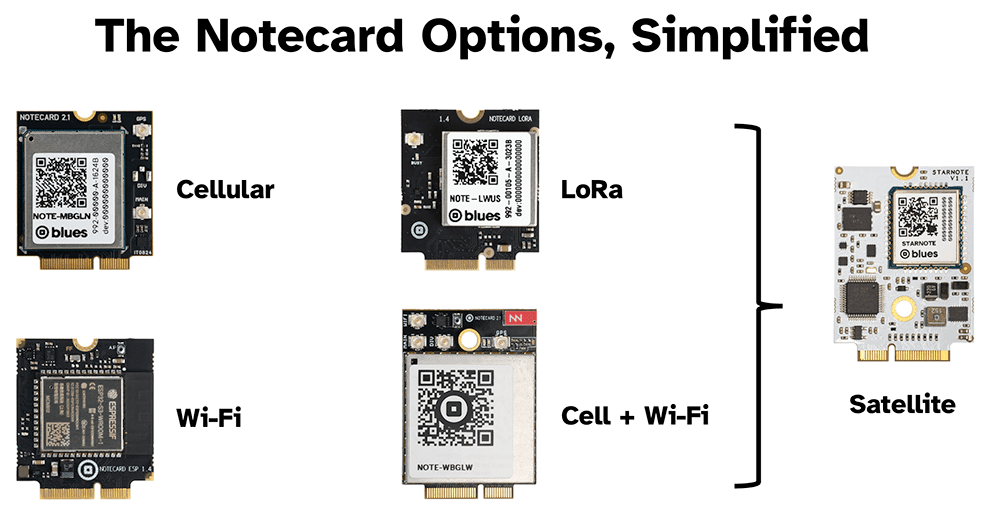
Let's next take a look at how to build a real world anomaly detection project that uses NanoEdge AI Studio along with the Blues Notecard to automatically sync generated inferences to the cloud over cellular, WiFi, LoRaWAN or even satellite.
The Notecard (combined with its paired cloud service Notehub) is the easiest way to not only securely deliver data to the cloud, but also to generate alerts based on that data.
New to Blues?
Learn what we do in this 3-minute video that walks you through how we simplify wireless connectivity.
Learn what we do in this 3-minute video that walks you through how we simplify wireless connectivity.
Project Hardware Components
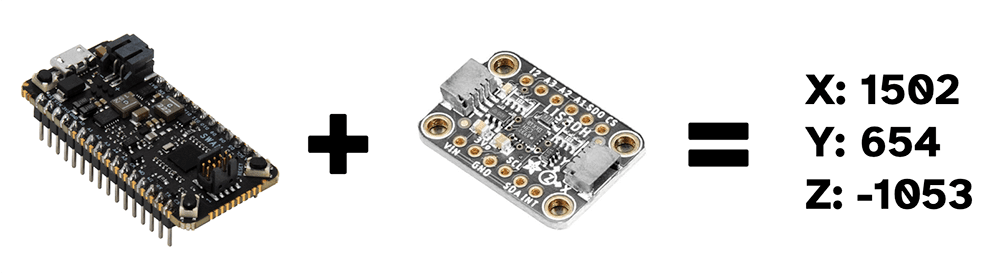
We'll build this Edge AI project using the STM32L4-based Blues Swan along with an LIS3DH accelerometer for measuring vibrations from a machine.
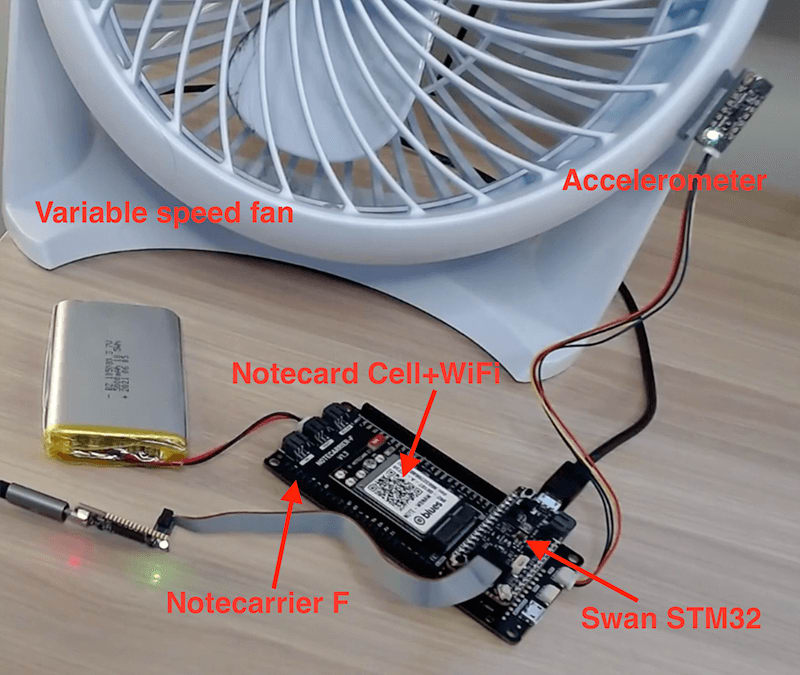
In this prototype, the "machine" is simply a variable speed fan. We will register fan vibrations using the accelerometer and eventually equate a high speed of the fan (i.e. higher vibration rate) with an anomalous behavior.
All of the hardware components in this project thus include:
| Component | Purpose |
|---|---|
| Blues Notecard | Wireless connectivity module for sending generated ML inferences to the cloud for alerting. |
| Blues Notecarrier F | Carrier board for connecting Notecard to Blues Swan host MCU. |
| Blues Swan | STM32L4-based host microcontroller. |
| LIS3DH Accelerometer | Low-cost accelerometer for measuring fan vibrations. |
| Variable speed fan | Used as a stand-in for a machine. |
Download and Install NanoEdge AI Studio
NanoEdge AI Studio is a free download for Windows and Ubuntu, available here on ST's website.

Create Project
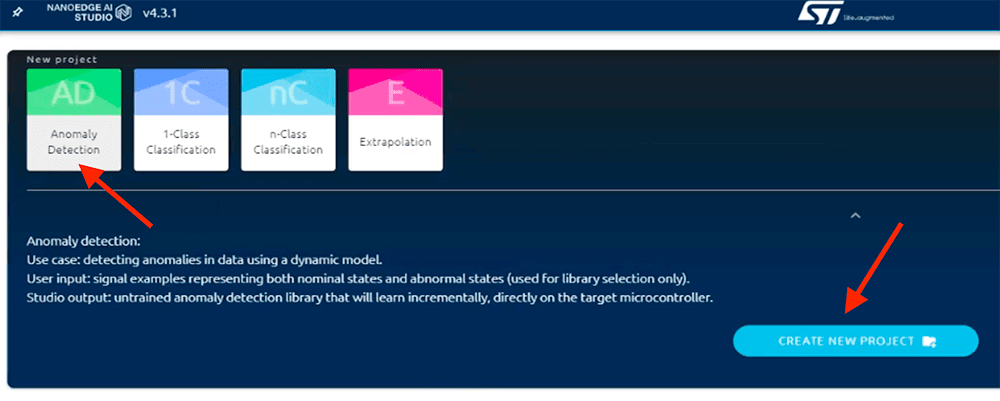
After installing and opening NanoEdge AI Studio, click on the Anomaly Detection project type, and then Create New Project.
Specify Sensor Type(s)
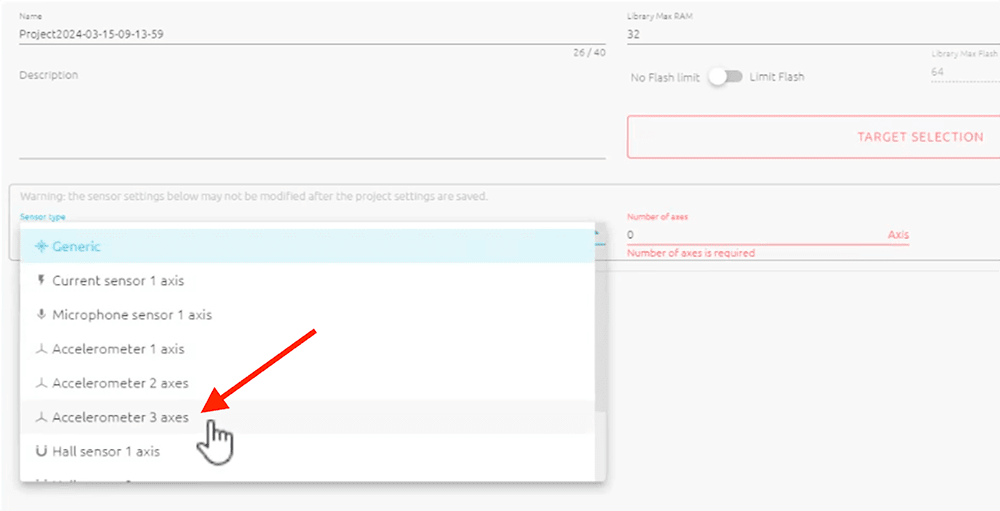
As we are building an anomaly detection model, NanoEdge AI Studio will need to know the type(s) of sensor(s) that will be feeding it data. Yes, this means we can easily combine multiple types of sensor inputs to configure and build our ML models!
In this project, we are going to use just one input though, that being a triple-axis accelerometer that streams x,y,z positioning data over serial. Therefore, go ahead and choose the Accelerometer 3 axes option.
Confirm Deployment Target
Since there are approximately three zillion different STM32-based host options (trust me I checked), NanoEdge AI Studio wants us to choose the specific microprocessor we are using. Depending on the board in use, you may be able to choose the specific development board or just the microcontroller.
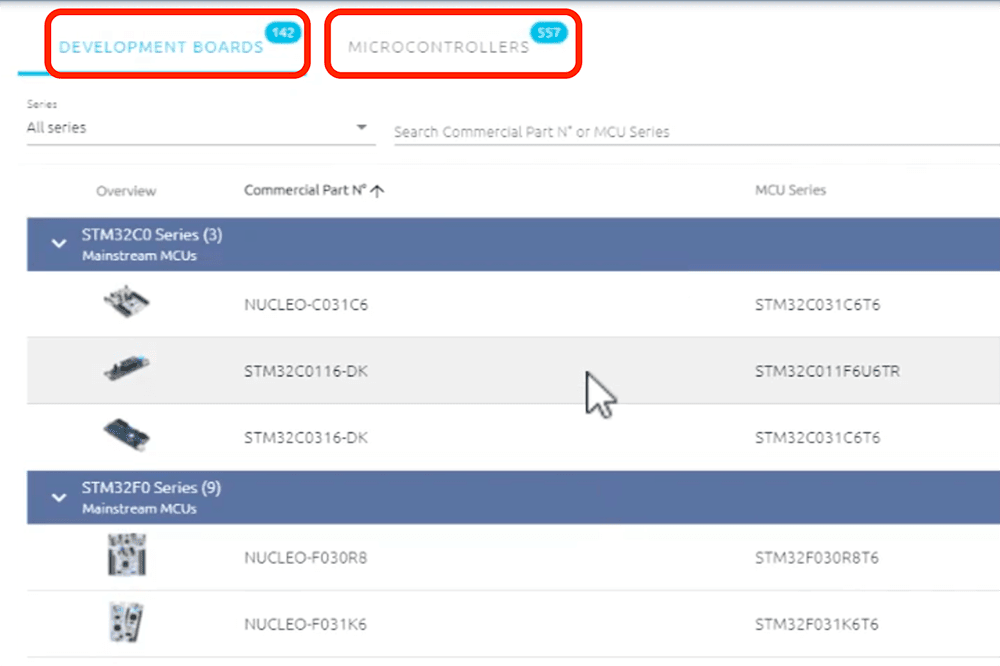
If you can't find your specific development board, just try to match the type of microcontroller you are using. For example, the Swan uses the STM32L4 series, so find a microcontroller with a comparable board in that series and it should work just fine.
Add Sample Signals
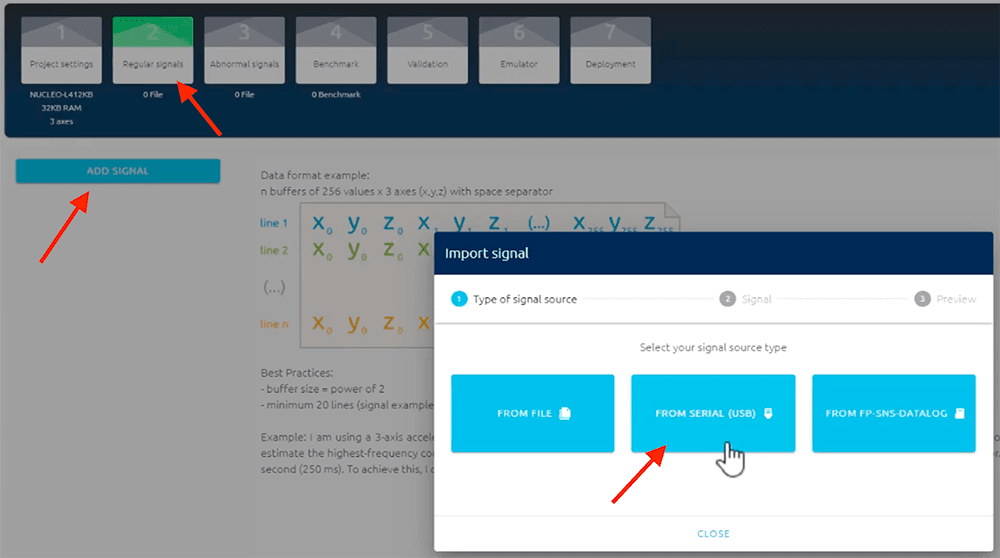
Next, we need to supply NanoEdge AI Studio with some "signals", i.e. data inputs that correspond to regular/normal operations of a machine.
On the Regular signals tab, click the Add Signal button, then click to add data From Serial.
Hold up!
Before we start attempting to ingest data, we need to start streaming data from the accelerometer over serial! Using the following Arduino sketch is a nice shortcut to output accelerometer data over serial at a relatively high frequency:
#include <Wire.h>
#include <Adafruit_LIS3DH.h>
Adafruit_LIS3DH lis = Adafruit_LIS3DH();
void setup(void)
{
Serial.begin(115200);
while (!Serial)
delay(10);
Serial.println("LIS3DH test!");
if (!lis.begin(0x18))
{
Serial.println("Couldnt start");
while (1)
yield();
}
Serial.println("LIS3DH found!");
// lis.setRange(LIS3DH_RANGE_4_G); // 2, 4, 8 or 16 G!
Serial.print("Range = ");
Serial.print(2 << lis.getRange());
Serial.println("G");
// lis.setDataRate(LIS3DH_DATARATE_50_HZ);
Serial.print("Data rate set to: ");
switch (lis.getDataRate())
{
case LIS3DH_DATARATE_1_HZ:
Serial.println("1 Hz");
break;
case LIS3DH_DATARATE_10_HZ:
Serial.println("10 Hz");
break;
case LIS3DH_DATARATE_25_HZ:
Serial.println("25 Hz");
break;
case LIS3DH_DATARATE_50_HZ:
Serial.println("50 Hz");
break;
case LIS3DH_DATARATE_100_HZ:
Serial.println("100 Hz");
break;
case LIS3DH_DATARATE_200_HZ:
Serial.println("200 Hz");
break;
case LIS3DH_DATARATE_400_HZ:
Serial.println("400 Hz");
break;
case LIS3DH_DATARATE_POWERDOWN:
Serial.println("Powered Down");
break;
case LIS3DH_DATARATE_LOWPOWER_5KHZ:
Serial.println("5 Khz Low Power");
break;
case LIS3DH_DATARATE_LOWPOWER_1K6HZ:
Serial.println("16 Khz Low Power");
break;
}
}
void loop()
{
for (size_t i = 0; i < 16; i++)
{
lis.read(); // get x,y,z data at once
Serial.print(lis.x);
Serial.print("\t");
Serial.print(lis.y);
Serial.print("\t");
Serial.print(lis.z);
Serial.print("\t");
}
Serial.println();
delay(200);
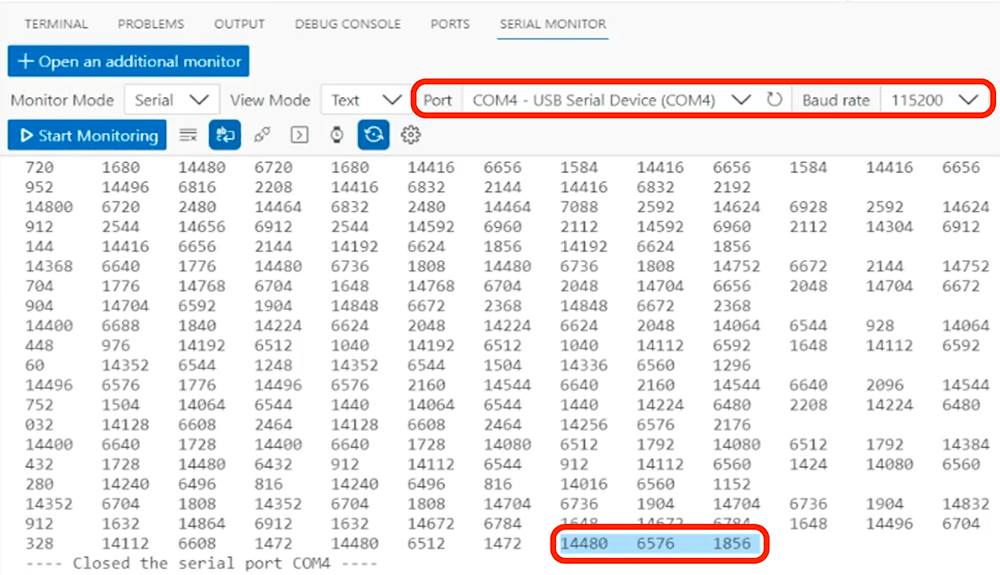
}With this sketch running, we can open up our serial monitor of choice to see the streaming x,y,z position values.
Make sure you have the right port and baud rate selected too.
After confirming our project is streaming data correctly, be sure to close any active serial monitors and return to NanoEdge AI Studio. Verify the appropriate port and baud rate are selected, and click the Start/Stop button to perform the first input. Let this run for 20-30 seconds.
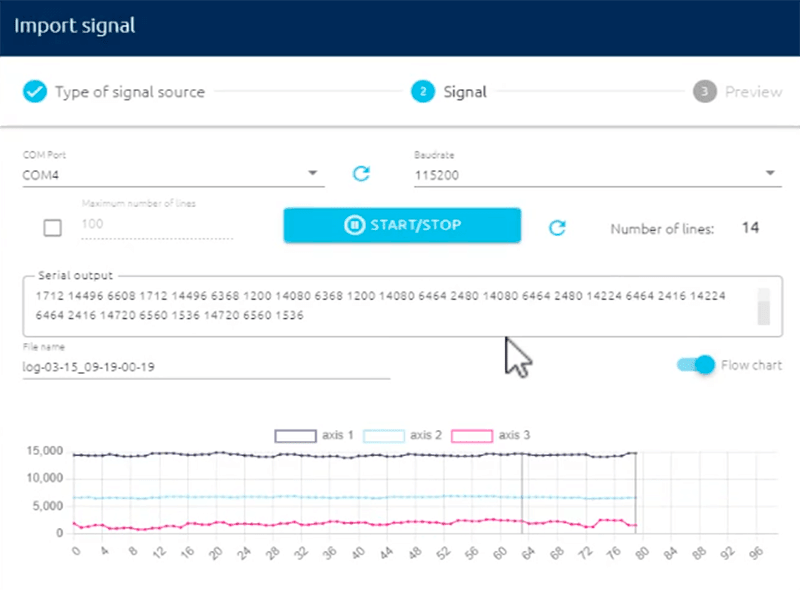
When done with each signal sample, click the Start/Stop button, then Import. After each import, we can see a visualization of the imported data, one axis at a time. This shows us the mean, standard deviation, and min/max values recorded in the import.

Important! Generally speaking, the more data you supply, the more accurate your ML model will be. Therefore, be sure to repeat the above process multiple times to ensure you're covering all possible "normal" behaviors of your machine.
Add Sample Signals (Abnormal)
This step is optional, but will help us to build a more accurate model. Imagine a scenario where we can mimic at least some anomalous behavior ahead of time. If that's possible, it can also be recorded, and help our model to more quickly identify those signals as anomalous.
To do so, navigate to the Abnormal signals tab and simply perform the same signal import process as in the previous step. Repeat this until you feel as though you've identified and recorded all possible abnormal signals, within reason.
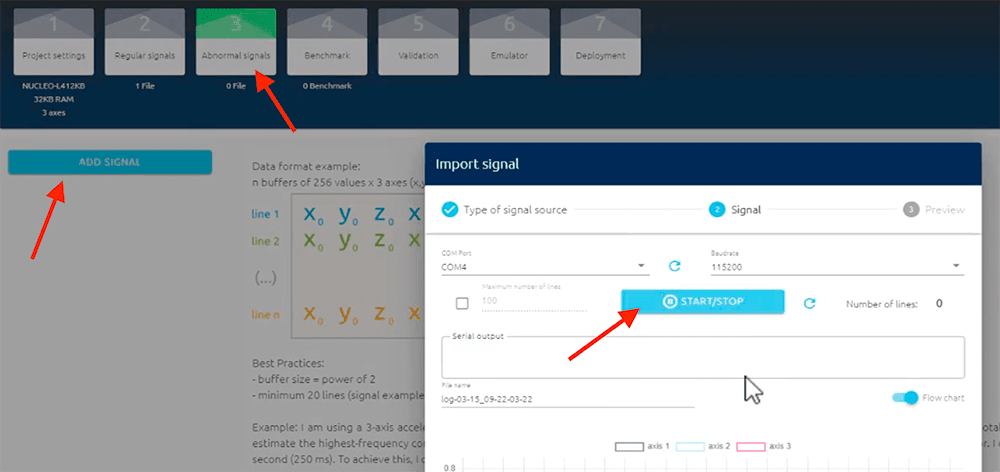
In this example, I simply turned the fan on "high" to cause more extreme vibration values to be recorded on the accelerometer.
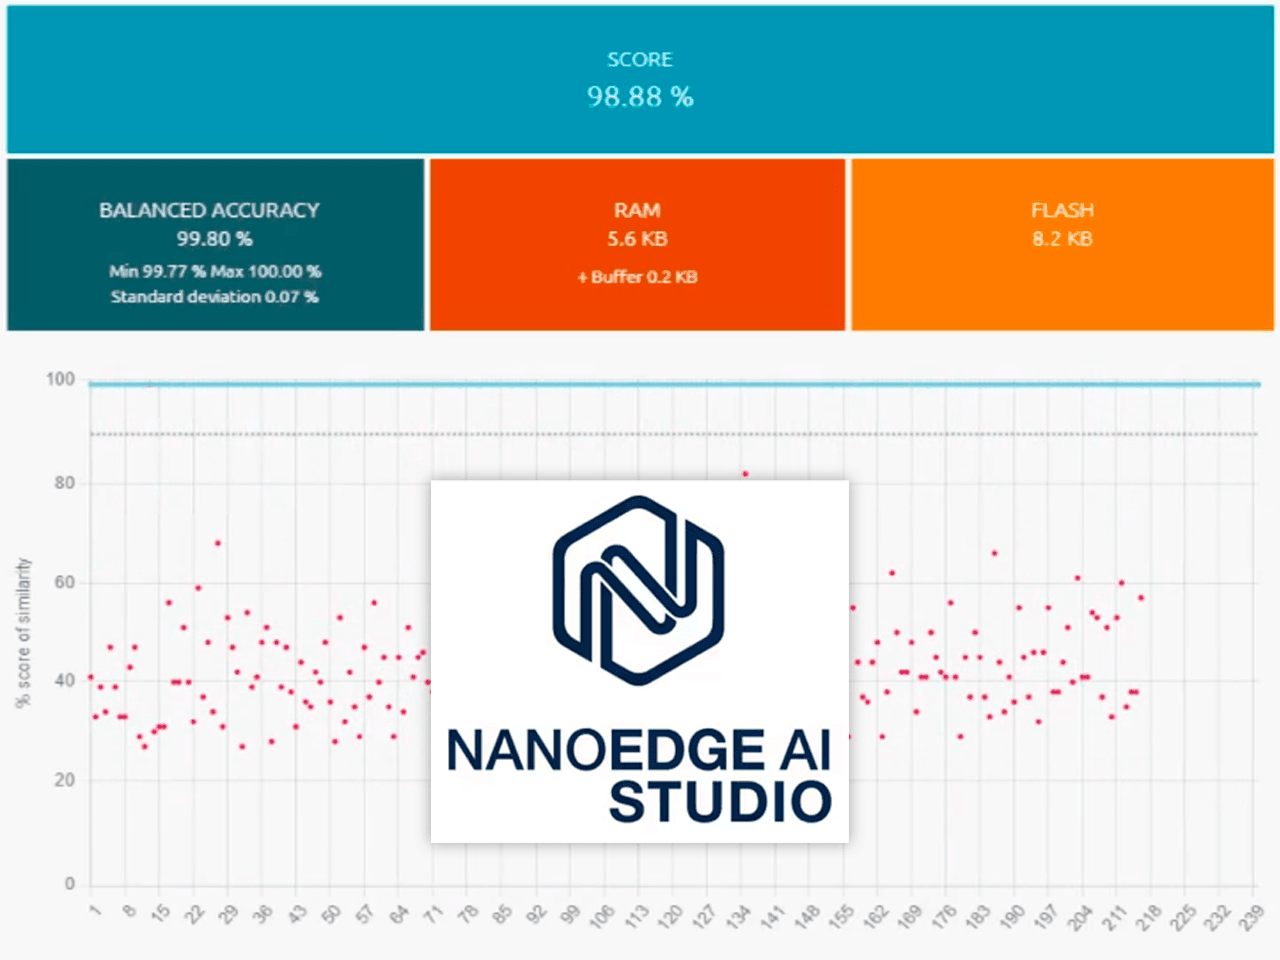
Benchmark Model to Pick Model Library
The next step is to use the "benchmark" function in NanoEdge AI Studio. This process will use your desktop computer's CPU to help pick the best possible ML library. It will also give an estimate of the flash storage and RAM required to run the model on the specified STM32 host.
This step can take some time, depending on the capabilities of your desktop PC.
Recall when I described NanoEdge AI Studio as a "search engine for ML libraries"? Well, that's where this phrase comes into play, as NanoEdge AI Studio will take all of the supplied signal inputs and match them up with the best library supplied by ST.
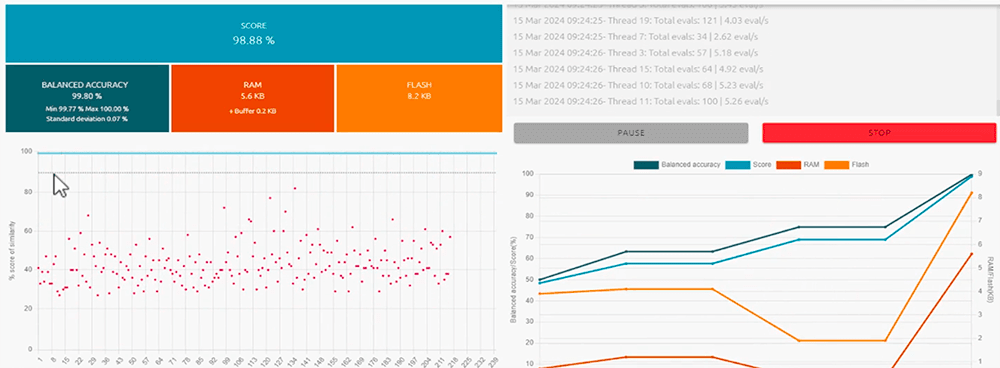
When running the benchmark, we want to wait until the provided Score is above 90%. This corresponds to the blue (normal) signals and red (abnormal) signals being identified correctly by the library at least 90% of the time.
Compile Library
Skipping over the useful, but entirely optional, steps of validating the library chosen by NanoEdge AI Studio and emulating said library on your PC, in the interest of time we can head directly to the Deployment tab.
This is where our library will be compiled and we can export the .a static
library generated by NanoEdge AI Studio to our desktop.
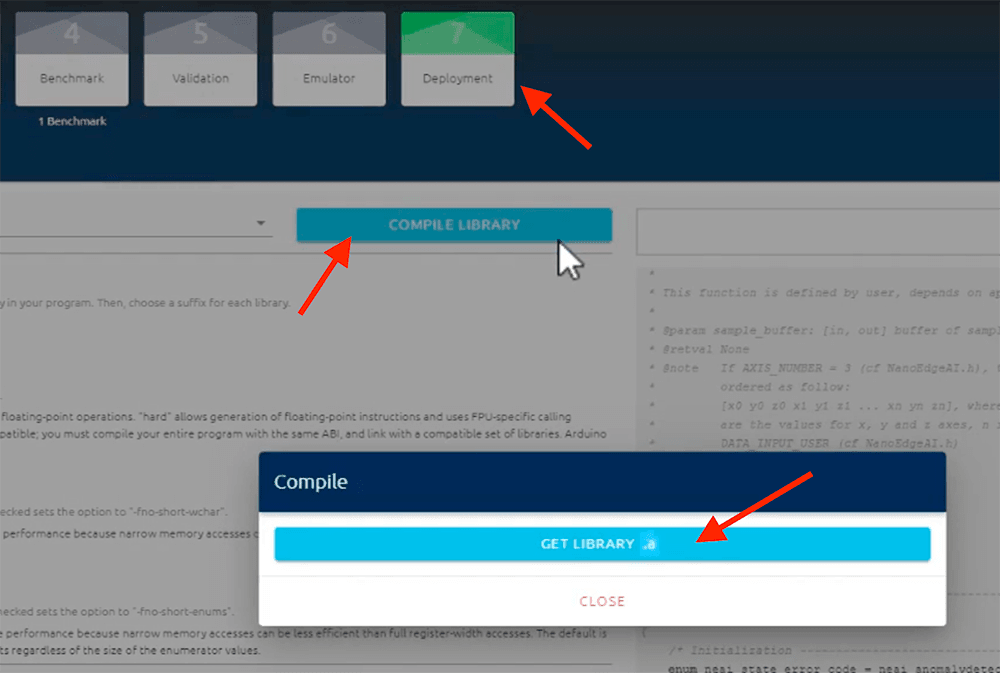
On this screen, NanoEdge AI Studio also provides a useful "Hello World" sketch that you can copy for quick testing of your model.
Deploying to Device
Returning to your IDE of choice, copy and paste the following Arduino sketch. Please note that this sketch already includes some basic functionality for syncing the generated ML inferences with the cloud via the Blues Notecard and Notehub.
#include <Arduino.h>
#include <NanoEdgeAI.h>
#include <Adafruit_LIS3DH.h>
#include <Notecard.h>

Adafruit_LIS3DH lis = Adafruit_LIS3DH();
#define LEARNING_ITERATIONS 30
float input_user_buffer[DATA_INPUT_USER * AXIS_NUMBER]; // Buffer of input values

#define PRODUCT_UID "<your-product-uid>"
Notecard notecard;

static const unsigned long REFRESH_INTERVAL = 15000; // ms
static unsigned long lastRefreshTime = 0;

void fill_buffer(float input_buffer[])
{
  for (size_t i = 0; i < 16; i++)
  {
    lis.read(); // get x,y,z data at once
    input_buffer[AXIS_NUMBER * i] = lis.x;
    input_buffer[(AXIS_NUMBER * i) + 1] = lis.y;
    input_buffer[(AXIS_NUMBER * i) + 2] = lis.z;
  }
}

void setup()
{
  Serial.begin(115200);
  while (!Serial)
    delay(10);

  notecard.begin();

  J *req = notecard.newRequest("hub.set");
  JAddStringToObject(req, "product", PRODUCT_UID);
  JAddStringToObject(req, "mode", "continuous");
  notecard.sendRequestWithRetry(req, 5);

  if (!lis.begin(0x18))
  {
    Serial.println("Couldnt start");
    while (1)
      yield();
  }
  Serial.println("LIS3DH found!");

  enum neai_state error_code = neai_anomalydetection_init();

  if (error_code != NEAI_OK)
  {
    Serial.println("Board not supported!");
  }

  for (uint16_t iteration = 0; iteration < LEARNING_ITERATIONS; iteration++)
  {
    fill_buffer(input_user_buffer);
    neai_anomalydetection_learn(input_user_buffer);
    Serial.print("Learning: ");
    Serial.print(iteration);
    Serial.print("/");
    Serial.print(LEARNING_ITERATIONS);
    Serial.println();
  }
}

void loop()
{

  uint8_t similarity = 0;
  fill_buffer(input_user_buffer);
  neai_anomalydetection_detect(input_user_buffer, &similarity);

  if (similarity >= 90)
  {
    Serial.print("NORMAL: ");
  }
  else
  {
    Serial.print("ANOMALY: ");
  }

  Serial.print(similarity);
  Serial.print("/100");
  Serial.println();

  if (millis() - lastRefreshTime >= REFRESH_INTERVAL)
  {

    J *req = notecard.newRequest("note.add");
    if (req != NULL)
    {
      JAddStringToObject(req, "file", "nanoedge.qo");
      JAddBoolToObject(req, "sync", true);
      J *body = JAddObjectToObject(req, "body");
      if (body)
      {
        JAddNumberToObject(body, "similarity", similarity);
      }
      notecard.sendRequest(req);
    }

    lastRefreshTime += REFRESH_INTERVAL;
  }

  delay(200);
}
Next, unzip the previously saved zip file generated by NanoEdge AI Studio and
copy that directory into a lib folder.
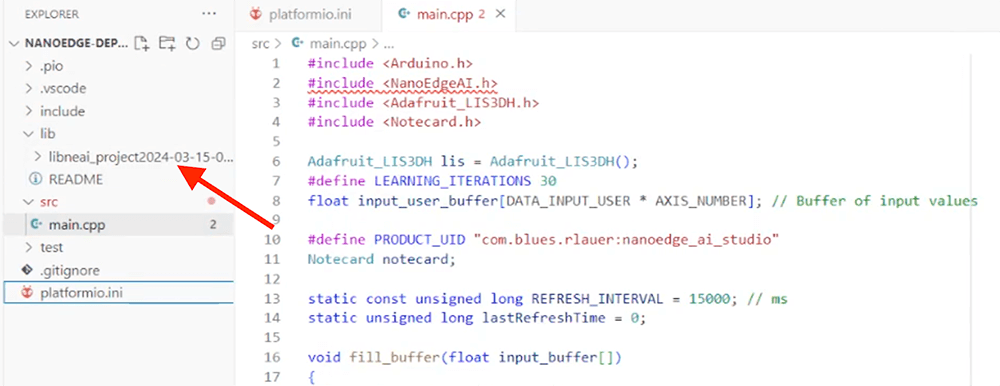
Depending on the IDE you are using, you may need to specify some additional
build flags to make sure the library is imported and compiled correctly.
Here is an example platformio.ini file for use with PlatformIO and Visual
Studio Code that includes the necessary build flags.
[env:blues_swan_r5]
platform = ststm32
board = blues_swan_r5
upload_protocol = stlink
framework = arduino
build_flags =
  -D PIO_FRAMEWORK_ARDUINO_ENABLE_CDC
  -L"C:\Users\me\Documents\PlatformIO\Projects\nanoedge-deployment\lib\libneai_project2024-03-15-09-13-59_1"
  -llibneai
monitor_speed = 115200
lib_deps =
  Wire
  blues/Blues Wireless Notecard
  adafruit/Adafruit LIS3DH
On Device Learning
A unique feature of this sketch is the ability to re-train the model when the host restarts. This allows for dynamic usage when deploying this same firmware in varying conditions. While each deployment may have the same types of inputs, you may also want to customize what a "normal" behavior is for each specific device.
In this sketch, the device "learns" for the first 30 iterations and then switches over to automatically interpreting the inputs and generating inferences with the ML model.
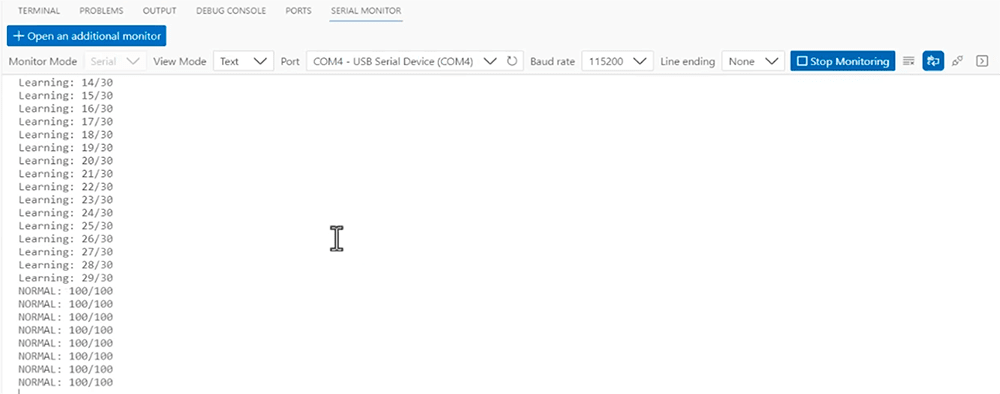
Let's not underestimate what we've accomplished! Using some basic accelerometer inputs, we've created a customizable ML solution deployed to a low-cost STM32 host. While there is a lot more we can do, we've already created a fairly robust anomaly detection model.
Make no mistake, while it's great to see these inferences generated on device, the data itself is only valuable when we start syncing these generated inferences with the cloud and taking action on that data.
Syncing ML Inferences with Cloud
The Notecard and Notehub pair to form a device-to-cloud data pump over cellular, WiFi, LoRaWAN, or satellite. This means we can start securely delivering these locally generated inferences to the cloud to then visualize the data and/or take another action (like generating email or SMS alerts) if any inference is considered "anomalous".
Zooming in on two sections of the code in the Arduino sketch provided above, we can see how the Notecard API lets us configure the Notecard to connect with a Notehub project via the hub.set API.
J *req = notecard.newRequest("hub.set");
JAddStringToObject(req, "product", "your-unique-product-uid);
JAddStringToObject(req, "mode", "continuous");
notecard.sendRequestWithRetry(req, 5);
...and then using the note.add API we can create a Note (e.g. an event) that contains only the generated inference from your ML model.
While this is a very simple example, it shows off how private data can stay on device and only key inference data is sent to the cloud.
J *req = notecard.newRequest("note.add");
if (req != NULL)
{
  JAddStringToObject(req, "file", "nanoedge.qo");
  JAddBoolToObject(req, "sync", true);
  J *body = JAddObjectToObject(req, "body");
  if (body)
  {
    JAddNumberToObject(body, "similarity", similarity);
  }
  notecard.sendRequest(req);
}
Thus, as data is accumulated and synced with the cloud, we will start seeing these events appear in Notehub. Over time we can see "normal" values appear, but also potentially anomalous behaviors that we want to take action on:
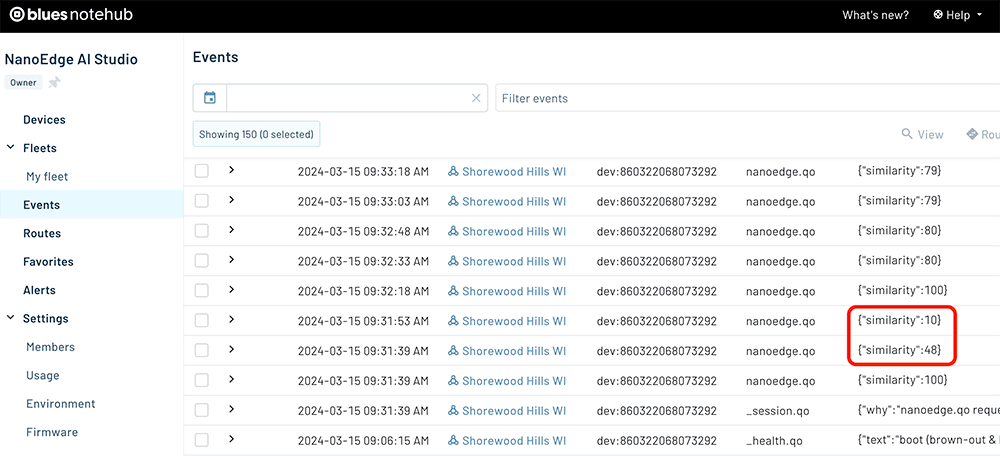
Send Alerts Based on Anomalies
While Notehub lets us route data to virtually any third-party cloud like AWS, Azure, Google Cloud Platform or an IoT-specific platform like Datacake, Ubidots, or Losant, we can also use a feature of Notehub called Alerts to automatically generate emails or Slack messages when specified thresholds are met.
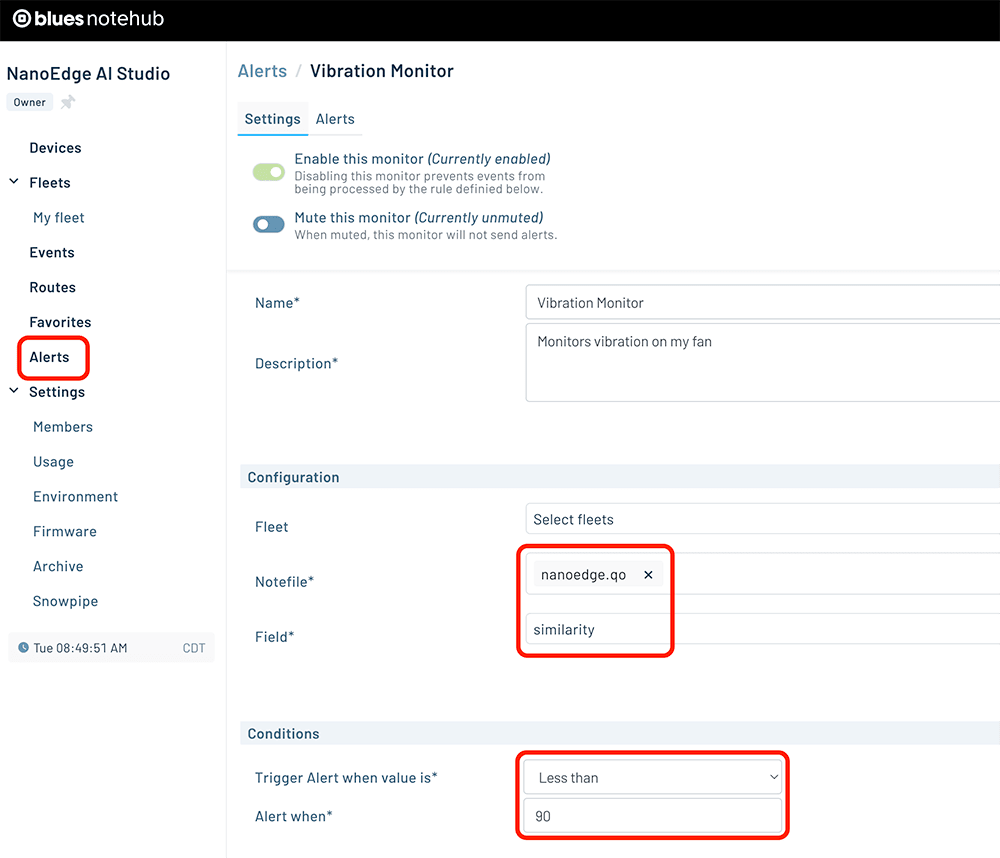
Be sure to consult the Notehub documentation to learn how to quickly configure alerts in your Notehub project.
Summary
In this article we dove straight into creating a real world anomaly detection model using NanoEdge AI Studio from STMicroelectronics. In addition, we showed how easy it can be to add secure wireless communications to the project via the Blues Notecard and Notehub.
To get started with your next anomaly detection ML project, check out the Blues Starter Kit for Cell+WiFi which, combined with a fan and an accelerometer, provides everything you need to follow this tutorial. 💙