Notehub Walkthrough
This walkthrough covers what Notehub is, how to get started, and how to utilize Notehub's rich feature set to accomplish your IoT objectives.
Just getting started? Watch a guided demo and learn how to get started with wireless connectivity at Blues.
What is Notehub?
Notehub is available as a feature rich software as a service (SaaS) platform, implemented as Notehub.io. Notehub is also made available as open-source software (OSS), allowing you to implement your own UI and features tailored to your specific business needs.
Notehub.io provides a UI and a RESTful API which allow you to explore the vast collection of data and metadata created by the Notecard/Notehub infrastructure. Notehub also provides functionality for interacting with Notecards, securely routing data, managing Notecard and host firmware, as well as managing projects, fleets, and teams.
The remainder of this document details and describes the features and functionality of the Blues SaaS product, Notehub.io.
Features
- Detailed information about Notecard Devices, Events, and Sessions.
- Event routing to external services (such as AWS, Azure, MQTT servers, as well as most HTTPS endpoints).
- Over-the-Air (OTA) Notecard firmware and host firmware updates.
- Ability to view and modify Team, Project, Fleet, and Product settings.
- Quick and easy filtering of information by device, session, or event details.
- Ability to set cascading environment variables to enable scalable state updates to projects, fleets, and devices.
- Downloadable device information in JSON format.
Create a Notehub Account
-
Navigate your browser to Notehub.io, and you will be greeted with the sign-in screen.
-
Click the Sign up button at the bottom of the display. Alternatively, if you already have a GitHub account and you would prefer to sign up using GitHub, you may click the Sign in with GitHub button.

-
If you chose to create an account using email, enter your name, email address, and create a password. Then click Sign up.

Otherwise, if you chose to create an account using GitHub, then follow the prompts to authorize Notehub.

-
Verify your email address by clicking on the link in the email you receive from
support@blues.com. The link will return you to Notehub.io and you will be ready to create your first project.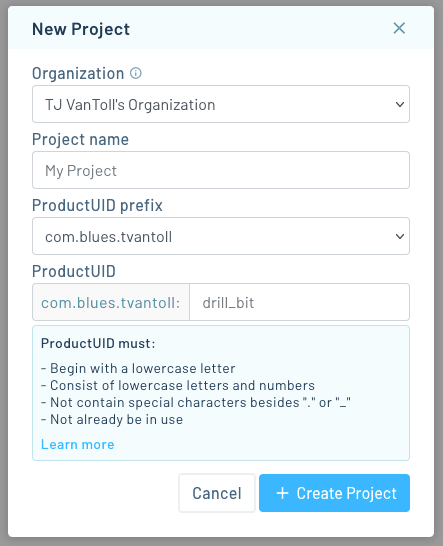
Create a New Project
Projects are core to the functionality of Notehub. They provide a way to organize fleets of devices, distribute firmware, organize teams, and provide team access controls.
A Project is composed of one or more identifiers called ProductUIDs. Each Project is created with an initial ProductUID, enabling you to associate your Notecard(s) to your Project as soon as it is created.
New projects may also be created by cloning an existing Notehub project.
-
Navigate to Notehub.io, and click on the Create Project button in the upper right corner.

-
The Create Project dialog will open.
-
Provide a name for the project in the Project Name input box.
-
Provide a unique identifier for the default ProductUID. In order to help ensure your ProductUID is unique, every ProductUID is prepended with the reverse domain name notation of your account email.
For example, if you signed up with
winston.smith@oceania.com, then your product would take the form ofcom.oceania.winston.smith:your_product_uid. -
By default, projects will be associated with the Organization tied to your Notehub account. If you wish to associate the project with an Organization other than your main account - for instance a company Organization - you can select it in the Organization dropdown.
-
Click the Create Project button.
Cloning an Existing Notehub Project
As an alternative to creating a new Notehub project from scratch, you may instead clone an existing project.
Follow these instructions to clone a project, noting that only high-level project details, fleets, and routes will be cloned (devices, events, and route logs cannot be cloned.)
-
Navigate to the Settings view of your Notehub project and click on the Clone Project button in the upper-right corner.

-
In the modal dialog provided, choose whether or not to include existing Fleets and Routes. You'll also be prompted to choose a Organization, provide a name for the cloned project, and enter a new ProductUID.
-
Once you click the Clone Project button, the current project will be cloned and you will automatically be redirected to the new Notehub project.
Sending Data to Notehub from Notecard
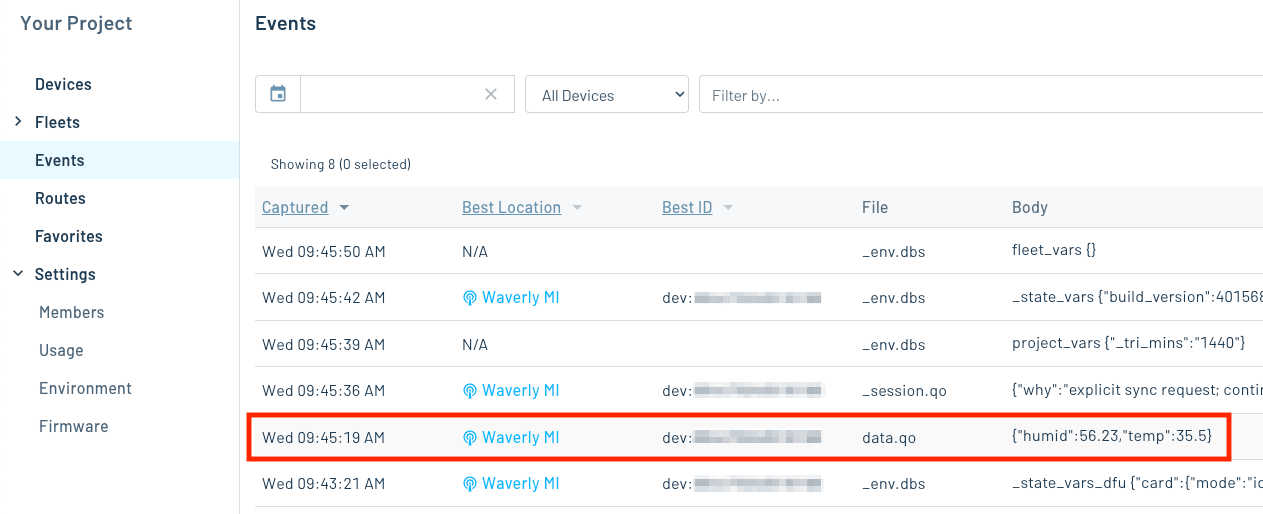
Data is sent to Notehub (from Notecard devices or via the Notehub API) in the form of JSON objects called Notes.
This is an example of a Note containing arbitrary temperature and humidity
data in the body of the Note, along with metadata about the Note and the
device's location:
{
  "event": "df9f5e04-7aa4-44d1-bd7f-068b6b576ffc",
  "session": "6facb2b9-b4af-4790-bc70-a8c3b566c1f3",
  "best_id": "dev:868050040247343",
  "device": "dev:868050040247343",
  "product": "product:com.blues.name:project",
  "app": "app:911ee04e-cd6d-469a-8379-de05062aa5r3",
  "received": 1670791362.736713,
  "req": "note.add",
  "when": 1670790603,
  "file": "data.qo",
  "body": {
    "temperature": 24.56,
    "humidity": 68.22
  },
  "best_location_type": "tower",
  "best_location_when": 1670791362,
  "best_lat": 41.83748,
  "best_lon": -89.183298,
  "best_location": "Shorewood Hills WI",
  "best_country": "US",
  "best_timezone": "America/Chicago",
  "tower_when": 1670791362,
  "tower_lat": 41.83748,
  "tower_lon": -89.183298,
  "tower_country": "US",
  "tower_location": "Shorewood Hills WI",
  "tower_timezone": "America/Chicago",
  "tower_id": "310,410,17169,77315594",
  "status": "success"
}The example above includes two similar-looking timestamps that are easy to confuse:
-
whenis a Unix epoch timestamp set by the Notecard when the Note was added to its Notefile—essentially, when the Note was created on the device. -
receivedis a Unix epoch timestamp with set by Notehub when the Note arrived. Because Notes may sit in Notecard flash before syncing,receivedis almost always later thanwhen, and the gap between them shows how long the Note was queued offline.
Notes are stored in Notefiles, which are also named JSON files. Notefiles are automatically created when a Note is first added, are persisted to Notecard flash, and are managed by the Notecard's synchronization policies with Notehub.
Notecard and Notehub work together to provide bidirectional wireless communication capabilities. In this diagram, Notes are sent from a host microcontroller (or single-board computer) to an arbitrary cloud endpoint.
The Notehub UI displays a list of Events that contains Notes, along with other session and environment-specific data sent automatically by the Notecard.
A hands-on example of the outbound data flow from Notecard to Notehub is available as part of the Notecard quickstart experience.
Notehub retains event data for 7 days after it is created on the Essentials plan. Enterprise plans offer extended retention periods. After the retention window ends, events are no longer available in Notehub, so production applications that require longer retention should route data to an external storage destination.
Routing Data with Notehub
One powerful feature of Notehub is routes, which allow you to forward your data from Notehub to a public cloud like AWS, Azure, or Google Cloud, a messaging platform like MQTT, or a custom HTTP/HTTPS endpoint. Routes are defined in a Notehub for a single project, and can target any fleet(s) and/or device(s). A Notehub project can have multiple routes defined and active at any one time.
Routed events are sent as POST requests, with each event's contents provided
in the request body as JSON. Routed events will always originate from a
defined set of dedicated IP addresses assigned to
Blues Notehub servers.
- Available Route Types
- Available Route Tutorials
- Manually Routing Events
- Bulk Event Retries
- Automatic Retry of Failed Route
- Rate Limiting Routes
- Using Placeholder Variable Substitution/Interpolation
- Transforming JSON when Routing with JSONata
- Inspecting Route Requests as cURL
Available Route Types
There are a variety of different route types available in Notehub, exposing different configuration options depending on the service and protocol.
General HTTP/HTTPS Request/Response
![]()
Allows you to send Notecard events to external HTTP/HTTPS endpoints, including webhooks.
View the General HTTP/HTTPS Route Tutorial
AWS
![]()
Amazon Web Services (AWS) is the world's most comprehensive and broadly adopted cloud platform, offering over 200 fully featured services from data centers globally. Millions of customers—including the fastest-growing startups, largest enterprises, and leading government agencies are using AWS to lower costs, become more agile, and innovate faster.
Notehub supports different route types to connect to various AWS services:
| Route Type | AWS Service | Auth Method |
|---|---|---|
| Lambda | AWS Lambda | AWS-defined auth |
| Lambda (Access Key) | AWS Lambda | IAM credentials (access key + secret) |
| SQS | Amazon SQS (Standard Queue) | AWS-defined auth |
| SQS (Access Key) | Amazon SQS (Standard Queue) | IAM credentials (access key + secret) |
| SQS (Role) | Amazon SQS (Standard Queue) | IAM role (via STS AssumeRole) |
| SQS FIFO | Amazon SQS (FIFO Queue) | AWS-defined auth |
| SQS FIFO (Access Key) | Amazon SQS (FIFO Queue) | IAM credentials (access key + secret) |
| IoT Analytics | AWS IoT Analytics | IAM credentials (access key + secret) |
Amazon no longer supports AWS IoT Analytics, so we do not recommend using IoT Analytics routes for new projects.
Our AWS routing tutorial helps you build a route using AWS Lambda. If you need help getting up and running with your own AWS infrastructure feel free to reach out in our community forum.
Azure
![]()
The Azure cloud platform is more than 200 products and cloud services designed to help you bring new solutions to life to solve today's challenges and create the future. Build, run, and manage applications across multiple clouds, on-premises, and at the edge, with the tools and frameworks of your choice.
View the Azure IoT Central Route Tutorial
Google Cloud Function
![]()
Google Cloud Functions is a serverless execution environment for building and connecting cloud services. With Cloud Functions you write simple, single-purpose functions that are attached to events emitted from your cloud infrastructure and services. Your function is triggered when an event being watched is fired.
View the Google Cloud Platform Route Tutorial
MQTT
![]()
MQTT is an OASIS standard messaging protocol for the Internet of Things (IoT). It is designed as an extremely lightweight publish/subscribe messaging transport that is ideal for connecting remote devices with a small code footprint and minimal network bandwidth.
Proxy for Device Web Requests
![]()
Allows you to send Notecard web requests to external HTTP/HTTPS endpoints, using the Notehub as a proxy.
ThingWorx API
![]()
ThingWorx is an ultra-versatile IoT software platform used for enterprise applications in all varieties of industries. Think of ThingWorx as the foundation on which to build a powerful tool that's perfectly matched to meet your business' needs.
View the ThingWorx Route Tutorial
RadNote RadResponder
![]()
RadResponder is a free radiological data management and sharing tool provided by FEMA in partnership with EPA and DOE. It allows you to manage your own events and exercises, upload data, perform basic assessment, and securely share data with regional partners and federal assets.
Snowflake
![]()
Snowflake enables data storage, processing, and analytic solutions that are faster, easier to use, and far more flexible than traditional offerings.
Twilio
![]()
Twilio allows developers to send text messages, and perform other communication functions using its web service APIs.
Slack
![]()
Slack is a cloud-based set of team collaboration tools and services.
S3 Archive
![]()
Amazon S3 or Amazon Simple Storage Service is a service offered by Amazon Web Services that provides object storage through a web service interface.
Datacake
![]()
Datacake is a multi-purpose, low-code IoT platform that requires no programming skills and minimal time to create custom IoT applications that can be brought into a white label IoT solution at the push of a button.
View the Datacake Route Tutorial
Qubitro
![]()
Qubitro is a no-code, white-label IoT cloud platform built for system integrators and managed service providers. It enables rapid deployment of connected solutions—without writing backend code. Create branded experiences, manage customer projects at scale, and integrate any device with minimal effort.
View the Qubitro Route Tutorial
Available Route Tutorials
The provided Routing Data to Cloud tutorials walk you through routing Notecard data to a variety of big clouds and IoT platforms (including those listed above, and others):
- AWS
- Azure IoT Central
- Datacake
- General HTTP/HTTPS
- Google Cloud Platform
- Initial State
- MQTT
- Qubitro
- ThingSpeak
- ThingWorx
- Ubidots
There is also a Twilio SMS guide that demonstrates the ability to send SMS messages with the Twilio API, a Slack guide for routing data to Slack, and an Amazon S3 guide for archiving Notefile data to an S3 bucket.
Manually Routing Events
After a Notehub route is created, all future events that match the route parameters will be routed. However, you may wish to manually route an event to test a route, or to route an existing event after the Notehub route was created.
To manually route a single event, navigate to the event detail screen and click on the "Route event" button. You will be presented with a modal dialog of routes to use. All routing attempts will be captured in event's route log with a date/time stamp.

Bulk Event Retries
From the Events screen, you may choose one or more events and manually route them to one or more routes. Any events can be selected, regardless of whether or not they were previously routed successfully.
To route multiple events, navigate to the Events screen and select the event(s) you wish to route. In the modal dialog provided, specify whether you only want to retry routing events that previously failed or all selected events.

Automatic Retry of Failed Route
If the routing of an event fails for any reason, you may wish to have Notehub automatically retry the route. To enable this feature, simply check the "automatic reroute on failure" box when creating or editing a Notehub route.

Automatic rerouting is not available for Notecard proxy routes.
If enabled, Notehub will attempt to retry routing the event up to three times: at 30-second, 1-minute, and 5-minute intervals. All retry attempts will be captured in the route log with a date/time stamp.
Event routing is considered a "failure" if one of the following occurs:
- Notehub is unable to connect to the remote endpoint after 30 seconds.
- After connecting to the endpoint, Notehub does not receive a response after 30 seconds.
- Notehub receives an invalid HTTP response from the endpoint.
- A 5XX-level HTTP status code is returned from the endpoint.
Rate Limiting Routes
Notehub routes support rate limiting to control how frequently events are forwarded to a destination. This can be useful for staying within the API limits of external services, or managing costs from downstream integrations. Routes types that support rate limiting have a Rate limit dropdown with three options: Unlimited, Custom Rate Limit, or Shared Rate Limit.
-
Unlimited: The default of all routes. No rate limiting is applied.

-
Custom Rate Limit With this option Notehub will ask you to additionally provide a Requests per second to enforce. If events arrive faster than the configured rate, Notehub will queue those events and dispatch them once the throttle interval has elapsed. For example, with Requests per second set to 2, Notehub will ensure that 1 request is sent every 0.5 seconds, at most, to the configured endpoint.

-
Shared Rate Limit: A shared rate limit is a custom rate limit that can apply to multiple routes. This option only appears in the rate limit dropdown if you have configured a shared rate limit for your project, which you can do in Settings → Shared Rate Limits

Using Placeholder Variable Substitution/Interpolation
If a Route setting (e.g. endpoint URL, MQTT topic, etc) needs to include data from a device, event, or environment variable, you can use string-based substitution placeholders when defining the Route.
Placeholder variables are denoted using a string inside of square brackets:
[string]. A placeholder string either begins with a period . (for event
attributes), a $ (for environment variables), a $$ (for project secrets),
or from a list of reserved strings. Multiple placeholder strings may be used in
a single Route field.
Variable substitution occurs after events have already been transformed by JSONata expressions. See Examples of Using Placeholder Variable Substitution for an example of using placeholder variables with JSONata transforms.
Placeholder substitutions will fail if the string being replaced contains square
brackets ([ or ]). This applies to string data in Notes and environment
variable names.
Where to Use Placeholder Variable Substitution
Many of the open text fields in the Route creation process are supported. These include:
- URL
- HTTP Headers
- MQTT Broker, Port, Username, Password, Topic, and Client ID
- Twilio Routes: From Number, To Number, and Message
- AWS Routes: Lambda and SQS Configurations
Event Attribute Placeholders
Event attribute placeholders are identified by a . immediately after the first
square bracket. Event attribute placeholders can substitute data from an event
visible in Notehub. Inner fields and array elements can be referenced using
standard JSON syntax.
For example, given the following (simplified) event in Notehub:
{
    "best_id": "My Test Device",
    "device": "dev:123456789",
    "body": {
        "temp": 24.5
    }
}
The following event attribute placeholders could be used when defining the Route:
[.best_id]
// "My Test Device"

[.device]
// "dev:123456789"

[.body.temp]
// 24.5
Environment Variable Placeholders
Environment variable
placeholders are identified by a $ immediately after the first square bracket.
For example, [$phone_number] or [$_contact_name].
Environment variables are stored and displayed as plaintext. For credentials such as API keys, bearer tokens, or webhook signing secrets, use Secrets instead (see below). Secrets are encrypted at rest and never readable via the API or UI after creation.
Project Secret Placeholders
Project secret placeholders are identified by two dollar signs ($$)
immediately after the first square bracket. For example, [$$API_Key] or
[$$TwilioAuthCode].
Secrets cannot be used as placeholders in the request body or inside JSONata
transform expressions.
Secrets are managed under Settings → Secrets within a Notehub project or by using the Notehub API. Unlike environment variables, secret values are encrypted at rest, never returned by the API, and decrypted in-memory only at the moment a Route fires. The decrypted value never appears in Notehub event history, route logs, or API responses.

Reserved Placeholder Strings
Certain reserved placeholder variables allow you to substitute in Notecard- or event-specific data:
- [app] or [project] - Replace this portion of the string with the AppUID (a.k.a. ProjectUID) to which the Notecard is associated.
- [device] - Replace this portion of the string with the Notecard's DeviceUID.
- [device_no_prefix] - Same as above, but strips the
dev:prefix from the DeviceUID. - [file] - Replace this portion of the string with the full Notefile name (e.g. data.qo).
- [filebase] - Replace this portion of the string with the name of the Notefile to the left of the first non-alphanumeric (and non-underscore) character.
- [product] - Replace this portion of the string with the ProductUID to which the Notecard is associated.
- [product_no_prefix] - Same as above, but strips the
product:prefix from the ProductUID. - [sn] - Replace this portion of the string with the Device Serial Number.
- [lat] - Replace this portion of the string with the device's best known latitude (decimal degrees).
- [lon] - Replace this portion of the string with the device's best known longitude (decimal degrees).
- [loc] - Replace this portion of the string with the device's best known human-readable location string.
- [cc] - Replace this portion of the string with the device's best known ISO 3166-1 alpha-2 country code.
- [tz] - Replace this portion of the string with the device's best known
IANA timezone name (e.g.
America/New_York).
For example, an event from a DeviceUID of "dev:1234" using this endpoint URL:
https://webhook.site/89bd3bc4-f8bb-4f7d-b888-3683af6da958/[device]...will resolve to the following URL when routed:
https://webhook.site/89bd3bc4-f8bb-4f7d-b888-3683af6da958/dev:1234Unrecognized Placeholder Strings
Any string inside square brackets that isn't syntactically valid won't be
replaced. For example, [This text in brackets] would be left as-is. However,
if a referenced field is valid, but not available for substitution (i.e. the
field is missing from the event) the placeholder string would be replaced by an
empty string.
For example, given the example event above and the following endpoint URL:
https://webhook.site/123456/[tower_location]...will replace [tower_location] with an empty string. This is because
tower_location is a syntactically valid variable, but is absent from the
provided event:
https://webhook.site/123456/Examples of Using Placeholder Variable Substitution
-
Replace a portion of an endpoint URL with the DeviceUID:
https://test.com/[.device]/ // resolves to: https://test.com/dev:1b7c56aa-1301-4142-accc-a69e1b077146/ -
Replacing a portion of a Twilio API endpoint with the Twilio Account SID, set in an environment variable:
https://api.twilio.com/2010-04-01/Accounts/[$TWILIO_ACCOUNT_SID]/Messages.json // resolves to: https://api.twilio.com/2010-04-01/Accounts/1234567890/Messages.json -
Substituting the
To,From, andBodySMS variables in a Twilio route with variables from thebodyof an event:https://api.twilio.com/2010-04-01/Accounts/1234567890/Messages.json?To=[.body.phoneTo]&From=[.body.phoneFrom]&Body=[.body.message] // resolves to: https://api.twilio.com/2010-04-01/Accounts/1234567890/Messages.json?To=%2B11234567890&From=%2B10987654321&Body=Hello%20World%21 -
Using a JSONata expression to conditionally transform the body of a Twilio SMS. In this scenario, the
Messagefield of the Twilio route would be set to[.body.twilioMessage](wheretwilioMessageis an arbitrary variable that is not present in thebodyof the event prior to the transform):// JSONata expression { "body":{ "twilioMessage": $contains(body.text, "USB" )? "USB string found" : "USB string not found" } } -
Replacing authentication header values in HTTP Header fields:
Authorization: Basic [$TWILIO_BASIC_AUTH_HEADER] // resolves to: Authorization: Basic am9obkBleGFtcGxlLmNvbTphYmqyusa= -
Injecting a project secret into an HTTP Route's
Authorizationheader. Assuming a secret namedapi_keyis set on the project:Authorization: Bearer [$$api_key] // resolves to: Authorization: Bearer sk_live_4eC39H3stcsaDarjtT1zdp7dc23rsdfsd
Transforming JSON when Routing with JSONata
JSONata expressions allow you to transform Notecard-generated JSON into a new structure before it's routed to an external service.
Many Notehub Routes provide a setting to apply a JSONata expression to relevant Notes under the Data tab:

You can also apply a JSONata expression to all events in a project. This allows
for project-wide application (and consistency) of transforms to the body
and/or payload, in lieu of copy-pasting across individual routes. This feature
is available in the Settings for each Notehub project:

Learn more about JSONata in our guide on Using JSONata to Transform JSON.
Inspecting Route Requests as cURL
For HTTP-based routes, Notehub can show you the exact outgoing request it will send to your third-party service — useful when a route is failing and you want to reproduce the call by hand, or share a minimal repro with the service's support team.
Navigate to any event under the Events tab, click Route as cURL, and choose a route. The modal displays the raw cURL command, with secrets (API keys, passwords, etc.) replaced by placeholders so the command is safe to copy and share.

Data Notehub Appends to Events
Notehub automatically appends a variety of metadata fields when it creates an event from an incoming Note. All fields that Notehub adds are eligible for routing.
batch
Notehub appends a series of batch_ prefixed fields to all events that come
from templated Notefiles.
For example:
{
  "batch_received": 1749829774.703917,
  "batch_number": 2,
  "batch_total": 3,
  ...
}-
batch_received: A timestamp that indicates when the batch of Notes from the templated Notefile was received by Notehub. -
batch_number: An integer indicating the position of the current Note within a batch of uploaded Notes. -
batch_total: The total number of templated Notes Notehub received.
best_id
The best identifier for a device. Notehub sets this to the device's serial number if one has been defined.
{
  "best_id": "tracker1",
  ...
}
And to the device's DeviceUID if no serial number is available.
{
  "best_id": "dev:1234567890",
  ...
}
best_location
Notehub appends the best-known location of a device to all events in the following format.
{
  "best_location_type": "gps",
  "best_location_when": 1674749529,
  "best_lat": 42.2636375,
  "best_lon": -84.24809765624,
  "best_location": "Lansing MI",
  "best_country": "US",
  "best_timezone": "America/Detroit",
  ...
}
Devices in Notehub may have locations retrieved by different means. For example, a device may have a GPS/GNSS location, a triangulated location, and a location of the cell tower that most recently handled a cellular request.
Notehub uses a two-step process for determining which of these locations is "best". First,
Notehub checks whether any of the available locations are stale. By default, Notehub considers
any locations over three days old as stale, but you can override this behavior using the
_stale_gps_mins, _stale_tri_mins, and _stale_tower_mins environment variables.
After Notehub has excluded any stale locations, Notehub next selects the best location in
the following order: GPS/GNSS, triangulated, cell tower. Notehub sets the
best_location_type field to "gps", "triangulated", or "tower" to indicate which
location it selected, and which location it used to populate the remaining best_*
location fields. If none of those locations are available, Notehub omits the
best_location_type and best_* fields from the event entirely.
received
A Unix timestamp (in seconds with fractional precision) that indicates when the Note was received by Notehub.
{
  "received": 1749829774.703917,
  ...
}
tower_location
If available, Notehub appends the location of the cell tower most recently used by the device to all events in the following format.
{
  "tower_when": 1706126000,
  "tower_lat": 42.2301375,
  "tower_lon": -71.548921875,
  "tower_location": "Hopkinton MA",
  "tower_country": "US",
  "tower_timezone": "America/New_York",
  "tower_id": "310,410,1041,16152591",
  ...
}
tower_id is the cell tower identifier formatted as MCC,MNC,LAC,CID (Mobile
Country Code, Mobile Network Code, Location Area Code, and Cell ID).
transport
Notehub automatically appends the type of radio (or source) used to create/send the associated event. Possible values include:
| Value | Source |
|---|---|
api:http | Notehub API |
cell:emtc | Cellular (LTE-M) |
cell:gsm | Cellular (GSM) |
cell:lte | Cellular (LTE Cat-1) |
cell:nbiot | Cellular (NB-IoT) |
hub | Generated by Notehub (e.g. a System Notefile) |
lorawan:ttn | LoRaWAN via The Things Network |
ntn:iridium | Starnote for Iridium |
ntn:skylo | Starnote for Skylo |
ntn:udp | UDP via NTN simulation mode |
webhook:myWebhook | Generated by a webhook or simulator |
wifi | WiFi |
tri_location
If available, Notehub appends the last-known triangulated location of a device to all events in the following format.
{
  "tri_when": 1706126581,
  "tri_lat": 30.404954,
  "tri_lon": -97.721145,
  "tri_location": "Wells Branch TX",
  "tri_country": "US",
  "tri_timezone": "America/Chicago",
  "tri_points": 14,
  ...
}
You can learn about how to enable triangulation on a Notecard in Using Cell Tower and WiFi Triangulation.
where_location
If available, Notehub appends the last-known GPS/GNSS location of a device to all events in the following format.
{
  "where_olc": "86JQQ723+WQ22",
  "where_when": 1704717310,
  "where_lat": 42.7522525,
  "where_lon": -84.74562109375,
  "where_location": "Grand Ledge MI",
  "where_country": "US",
  "where_timezone": "America/Detroit",
  ...
}
where_olc is an Open Location Code
(also known as a Plus Code), a compact encoding of the device's latitude and
longitude.
You can learn about how to enable GPS/GNSS tracking on a Notecard in Working with GPS on the Notecard.
Sending Data from Notehub to Notecard
Not only does Notehub receive communications from the Notecard, but it is also capable of sending communications back down to the Notecard. This takes two forms:
Queue Inbound Notes
Inbound Notes are Notes that start from a cloud app or external service and propagate down to the Notecard.
This data is called "inbound" because it originates somewhere else and is synchronized to the Notecard. In other words, it is "inbound" from the perspective of the Notecard. Once synchronized, a host can retrieve this data from the Notecard and respond accordingly.
A typical use case of inbound Notes is to remotely communicate with (and/or control) a device. See our Remote Command and Control guide for more information.
Again, Notecard and Notehub work together to provide bidirectional wireless communication capabilities, both outbound (as documented above) and inbound (from the cloud to your microcontroller or single-board computer):
Inbound Notes in Action
You can use either the Notehub UI or Notehub API to send Notes to your Notecard. Once you've added a Note to Notehub, you'll learn how to retrieve Notes with simple JSON requests.
The instructions below show how to send inbound Notes via the Notehub UI. If you want to learn how to send Notes using the Notehub API instead, see our tutorial that walks you through the process, Using the Notehub API.
If using Notecard for LoRa, all inbound Notes (sent via the UI or API), must use Note templates.
Running the following two commands will set up the necessary template to complete the tutorial below. You can learn how to create your own inbound Note templates in the Notecard for LoRa Quickstart.
{"req":"note.template","file":"data.qi","port":50,"format":"compact","body":{"key1":"50"}}{"req":"hub.sync"}Navigate to Notehub.io, and select your project to see the Device list.
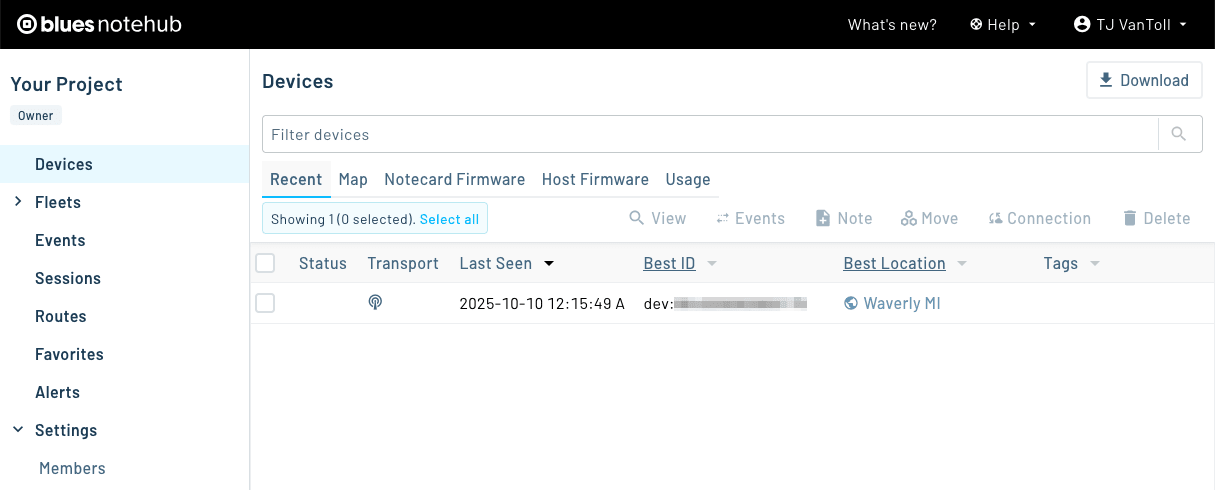
Click on the check mark next to your Device, and then click on the Note button.

You will see a window for adding a Note meant for the selected Device. Select
data.qi from the Select Notefile drop-down menu.
Notehub will place Notes you create in a Notefile called data.qi. The .qi
extension means that the file is an "inbound queue," or a queue that originates
in Notehub and is synchronized with the Notecard.
Copy and paste the following object into the Note JSON section:
{"key1":"val1"}Now, click the Add Note button, and Notehub will queue the Note to be sent to your Notecard during the next sync operation.

To confirm your Note was successfully enqueued by Notehub, click on Events in the sidebar and you should see your Note at the top of the table.

Sync your Note to the Notecard
Once you've queued a Note on Notehub, the Notecard will need to sync again with the service in order to obtain the Note and place it in internal storage.
Copy and paste the following request into the In-Browser Terminal to sync the data from Notehub onto the Notecard.
{"req":"hub.sync"}{}Once hub.sync.status reports a completed time, the sync is complete.
{"req":"hub.sync.status"}{
"time": 1615585299,
"completed": 4
}Read your Note from the Notecard
Your Note should now be on your Notecard! To confirm, copy the following request into your In-Browser Terminal. The request looks at the Notefile in "files", and determines whether there are changes.
{"req":"file.changes","files":["data.qi"]}{
"info": {
"data.qi": {
"total": 1
}
},
"total": 1
}Read the Note out of the Notefile by sending the following request to the Notecard:
{"req":"note.get", "file":"data.qi"}{
"body": {
"key1": "val1"
},
"time": 1589309597
}You should see the Note you sent from Notehub as the response to your request.
Notes synced from Notehub to the Notecard are held in storage until explicitly deleted. This extra step ensures Notes queued on the Notecard are not accidentally deleted just because they were read out.
In software engineering terms, note.get performs a peek of the queue by
default, but will perform a pop if you specify "delete":true.
{"req":"note.get", "file":"data.qi","delete":true}{
"body": {
"key1": "val1"
},
"time": 1589309597
}Sending the file.changes request at this point should tell you that there are
no more pending notes inside of data.qi.
{"req":"file.changes","files":["data.qi"]}{
"info": {
"data.qi": {}
}
}Update Environment Variables
In IoT applications, products often require configuration variables or settings that can be used on an end device, but then be managed and updated once the product is deployed. In addition, these products often need the ability to manage these values at multiple levels, from the device to a fleet or even an entire product and all of its deployed devices.
Environment variables are a Notecard and Notehub feature that enable settings synchronization that "just work," with no special setup or configuration needed. These variables are key-value pairs, can be set in Notehub and propagate to devices in a project or fleet, or set on the Notecard directly using the same synchronization mechanism used for Notes and Notefiles.
Learn more about the use of environment variables in our guide on Understanding Environment Variables.
Managing Notefiles
In the Blues ecosystem, Notefiles are named files that contain one or more Notes. There are three types of Notefiles:
-
Outbound (
.qoand.qos): A queue of Notes that are transferred from Notecard to Notehub. -
Inbound (
.qiand.qis): A queue of Notes that are transferred from Notehub to Notecard. -
Database (
.dband.dbs): A database of Notes that is bidirectionally replicated between a Notecard and Notehub.
You can manage all three types of Notefiles through the Notefiles tab available on all Notehub devices.

The following functionality is available on this tab for each Notefile type.
- Outbound Notefiles
- You can view the file's Note template, if one is defined.
- Inbound Notefiles
- You can create inbound Notefiles with the Create Notefile button.
- You can add Notes to an inbound Notefile using the Add Note button.
- You can view whether your Notes have been received by your Notecard. Pending
Notes are marked as Pending sync to Notecard.

- You can delete Notes that are pending and have not yet been sent to Notecard.
- Database Notefiles
- You can create database Notefiles with the Create Notefile button.
- You can add Notes to a database Notefile using the Add Note button.
- You can view whether your Notes have been received by your Notecard. Pending Notes are marked as Pending sync to Notecard.
- You can view whether a Note was last updated by Notecard or by Notehub.

- You can edit or delete Notes.

- Managing Notefiles is also available through the List Notefiles API.
Exporting Data
Notehub provides the ability to export data from your projects in JSON or CSV format. Follow these instructions to export your data:
-
Within your Notehub project, select Events from the left navigation bar.
-
(Optional) Apply filters to your data, such as adding a time range, or selecting a device or Notefile name.

-
Click the Export button in the top-right corner of the screen.

-
In the dialog, select the event fields you wish to export using the Fields to Export dropdown. (If you wish to export all fields pick the Select All option.)

-
For Export Format select either JSON or CSV, and then click Export.
If all went well, your browser should immediately start downloading your data in JSON or CSV format.
- Exporting data is also available through the Notehub Event API.
Add Collaborators to a Project
If you wish to delegate administration of your Project, share your Project with other developers, or provide read-only access, you can do so by adding team members. Members are easy to add and can be granted varying levels of access explained below.
To add new members to your Notehub project:
-
Select Settings > Members from the left navigation bar.

-
Click the Invite members button.
-
Enter the email address(es) of the new members and choose the appropriate role from the dropdown provided.

Collaborator Roles
Team members can take the role of Owner, Developer, or Viewer. The permissions granted to each role are defined as follows:
| owner | developer | viewer | |
|---|---|---|---|
| ProductUIDs | |||
| Create | ✅ | ✅ | ❌ |
| Read | ✅ | ✅ | ✅ |
| Update | ✅ | ✅ | ❌ |
| Delete | ✅ | ✅ | ❌ |
| Devices | |||
| Create | ✅ | ✅ | ❌ |
| Read | ✅ | ✅ | ✅ |
| Update | ✅ | ✅ | ❌ |
| Delete | ✅ | ✅ | ❌ |
| Fleets | |||
| Create | ✅ | ✅ | ❌ |
| Read | ✅ | ✅ | ✅ |
| Update | ✅ | ✅ | ❌ |
| Delete | ✅ | ✅ | ❌ |
| Events | |||
| Read | ✅ | ✅ | ✅ |
| Update | ✅ | ✅ | ❌ |
| Delete | ✅ | ✅ | ❌ |
| Notes | |||
| Create | ✅ | ✅ | ❌ |
| Read | ✅ | ✅ | ✅ |
| Update | ✅ | ✅ | ❌ |
| Delete | ✅ | ✅ | ❌ |
| Notefiles | |||
| Create | ✅ | ✅ | ❌ |
| Read | ✅ | ✅ | ✅ |
| Update | ✅ | ✅ | ❌ |
| Delete | ✅ | ✅ | ❌ |
| Routes | |||
| Create | ✅ | ✅ | ❌ |
| Read | ✅ | ✅ | ✅ |
| Update | ✅ | ✅ | ❌ |
| Delete | ✅ | ✅ | ❌ |
| Route Details | |||
| Create | ✅ | ✅ | ❌ |
| Read | ✅ | ✅ | ❌ |
| Update | ✅ | ✅ | ❌ |
| Delete | ✅ | ✅ | ❌ |
| Favorites | |||
| Create | ✅ | ✅ | ❌ |
| Read | ✅ | ✅ | ✅ |
| Update | ✅ | ✅ | ❌ |
| Delete | ✅ | ✅ | ❌ |
| Settings | |||
| Create | ✅ | ✅ | ❌ |
| Read | ✅ | ✅ | ✅ |
| Update | ✅ | ✅ | ❌ |
| Delete | ✅ | ✅ | ❌ |
| Members | |||
| Create | ✅ | ❌ | ❌ |
| Read | ✅ | ✅ | ✅ |
| Update | ✅ | ❌ | ❌ |
| Delete | ✅ | ❌ | ❌ |
| Environment Variables | |||
| Create | ✅ | ✅ | ❌ |
| Read | ✅ | ✅ | ✅ |
| Update | ✅ | ✅ | ❌ |
| Delete | ✅ | ✅ | ❌ |
| Firmware | |||
| Notecard | |||
| Read | ✅ | ✅ | ❌ |
| Deploy | ✅ | ✅ | ❌ |
| Host MCU | |||
| Create | ✅ | ✅ | ❌ |
| Read | ✅ | ✅ | ❌ |
| Update | ✅ | ✅ | ❌ |
| Delete | ✅ | ✅ | ❌ |
| Deploy | ✅ | ✅ | ❌ |
Invite Blues Support to a Project
If you require support from the Blues Support team, you may need to share access to your Notehub project. Once shared, you can remove Blues Support access at any time.
Follow these instructions to grant access to your Notehub project:
-
Within the main menu of your Notehub project, click on Members under the Settings heading.
-
Click on the Invite Support button in the upper-right corner of the Members view.

-
In the modal dialog that appears, select the reason for granting this access along with a date range for expiration of access.

-
Upon clicking Send, the Blues Support team will immediately be granted access to your Notehub project. At any time, you may use the Remove button to revoke access (otherwise access will automatically expire on the date listed).

Create a New Fleet
Fleets are a useful tool for grouping and managing devices in a Project. In their simplest form, fleets provide a filtering mechanism for a set of devices. Perhaps more importantly, fleets provide an intermediate level for the creation and application of environment variables.
Let's look at how to create a fleet in the Notehub UI.
Fleets may also be created and managed via the Notehub API.
-
Select Fleets from the left navigation bar.

-
Click the Create Fleet button, in the upper-right corner.

-
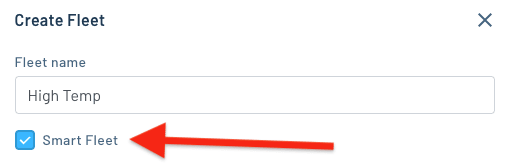
Give the new fleet a name in the Fleet name field, and optionally provide smart-fleet rules.

-
Click Create Fleet.
Add a Device to a Fleet
Upon first connection to Notehub.io, a device is associated with the default fleet of the Notehub project.
The concept of a fleet in Notehub.io is very flexible and can be adapted to
meet most use cases. The standard fleet scheme is to consider the
default fleet, My fleet, a temporary holding place. Then, once a new device
appears in the default fleet, it can be triaged and properly associated with a
production fleet or whatever nomenclature you choose to use.
Devices may also be added to fleets via the Notehub API.
-
From the Devices menu, select the device(s) you would like to assign to one or more fleets and click the Move button.

-
Choose the fleet(s) and click Move to save the assignments.

Using Watchdog Events
In Notehub you can enable watchdog events for any fleet. These events notify you when a device has been inactive for a specified period of time. A device is considered "inactive" when Notehub has not received any events from it.
Watchdog events "emit silence" as a routable _watchdog.qo event that flows
through your normal data pipeline. For silence that should reach a human
directly via Email, Slack, or SMS, see
Heartbeat Alert Monitors. The
Fleet Admin Guide
covers when to use each.
Complete the following steps to enable watchdog events.
-
Open your fleet’s settings and scroll to the Watchdog Events section.

-
Configure the interval at which you want Notehub to publish watchdog events for inactive devices. (NOTE: You can disable watchdog events by setting both days and hours to
0.)
-
Click Save to save your changes.
Once enabled, Notehub will publish events to the
_watchdog.qoNotefile every time a device in your fleet is inactive for your configured interval.
Each _watchdog.qo event contains the following metadata in its body.
-
activity_event: A Unix timestamp (in seconds) marking the most recent event activity from the device. The watchdog fires once the elapsed time since this timestamp exceeds the configured interval. -
activity_session: A Unix timestamp (in seconds) of the last known activity recorded within the device's most recent session. -
fleet: The FleetUID of the fleet that published the watchdog event. -
fleet_name: The name of the fleet that published the watchdog event. -
fleet_watchdog_mins: The watchdog interval (in minutes) set on the fleet that triggered the event.
A complete _watchdog.qo event body looks like this:
{
  "activity_event": 1749829774,
  "activity_session": 1749829100,
  "fleet": "fleet:12345678-90ab-cdef-1234-567890abcdef",
  "fleet_name": "Field Devices",
  "fleet_watchdog_mins": 1440
}
A couple of other notes about _watchdog.qo events:
-
Events published to the
_watchdog.qoNotefile are available for routing to other services. -
Events published to the
_watchdog.qoNotefiles are not considered platform events, and you are charged event credits for their usage. -
Notehub evaluates fleets for inactive devices on a periodic background cycle (roughly every five minutes), so a
_watchdog.qoevent may be published a few minutes after a device's configured interval actually elapses rather than at the exact boundary. Keep this in mind when testing with short intervals.
When Notehub triggers a watchdog event for a device, it also updates the device's "last seen" timestamp to reflect the moment the event occurred. As a result, the radial bar charts on the main Notehub Projects page will count these devices as "active". This timestamp update ensures that Notehub doesn't re-fire watchdog events unnecessarily.
Using Smart Fleet Rules
On a Notehub fleet, providing smart fleet rules lets you dynamically categorize devices based on incoming event data. For example, you can use smart fleet rules to group devices whose most recent temperature reading is above 20, or group devices whose most recent voltage is under 3.2.
To use smart fleet rules you must either select the Smart Fleet checkbox when creating a fleet, or select the Enable Smart Fleet Rules checkbox in an existing fleet’s settings.
Next, to define the rule itself, you must provide a JSONata expression that is evaluated on each event from a device. Optionally, you can use the Notefiles filter to restrict which Notefiles trigger the rule. Leaving the Notefiles filter empty evaluates the expression against events from every Notefile in the project.
Your JSONata expression can use the following three functions as return types to categorize devices:
$addToFleet(): Adds the current device to the fleet.$removeFromFleet(): Removes the current device from the fleet.$leaveFleetAlone(): Neither adds nor removes the current device from the fleet.
Let's look at an example. Suppose your project uses
_temp.qo events
to monitor your devices' temperatures, where each individual _temp.qo event uses the following
structure.
{
  "body": {
    "temperature": 21.875,
    "usb": true,
    "voltage": 5.14
  },
  ...
}
The screenshot below shows an example of smart fleet rules used to create a “High Temp” fleet.
-
Setting the Notefiles list to
_temp.qoensures that the fleet's JSONata Expression is only evaluated on events from the_temp.qoNotefile. -
The JSONata Expression uses a ternary operation. If
body.temperaturefrom the incoming event is greater than20, the expression evaluates to$addToFleet(), and Notehub adds the current device to the “High Temp” fleet. Conversely, ifbody.temperaturefrom the incoming event is less than20, the expression evaluates to$removeFromFleet(), and Notehub removes the current device from the “High Temp” fleet.

Depending on your scenario, you may want to add an additional check to your
JSONata expression that returns $leaveFleetAlone() if the incoming data is invalid.
For example, the expression below uses JSONata’s $exists() function to ensure
body.temperature is present on the event being evaluated before checking its
value.
$exists(body.temperature) ?
  (body.temperature > 20) ? $addToFleet() : $removeFromFleet()
  : $leaveFleetAlone()
You can learn more about how JSONata works in our Using JSONata to Transform JSON tutorial.
Notehub executes the JSONata expression you define on each incoming event, and adds and removes devices from your fleet accordingly. Additionally, you may run your smart fleet rules when creating your fleet by selecting the Apply Smart Rule to the most recent event for each device checkbox, or run your smart fleet rules at any time by using the Apply Now button in your fleet’s settings.

Smart fleet assignments display in your project's device list, as well as on a device's Summary page.

Because a smart fleet is still a fleet, any fleet-level environment variables you define are synced to a device the next time it connects after being added to the fleet. This makes smart fleets a powerful way to automatically adjust a device's behavior—such as its sampling or sync frequency—in response to the data it reports.
Manually Removing a Device from a Smart Fleet
While smart fleet rules add and remove devices automatically, in some cases you may wish to manually remove a device from a smart fleet.
To do so, navigate to the device's Summary tab in Notehub, find the Smart Fleet it is associated with, and click the "X" within the smart fleet badge:

The manual removal of a device is not necessarily permanent. The smart fleet rule may also need to be updated to ensure that the device is not moved back into the smart fleet upon the device's next connection with Notehub.
Organizing Devices by Tag
Notecards can be assigned one or more tags as a complement to fleet membership. Tags offer a simple, flexible way to organize and search for devices in the Notehub UI, or programmatically via the Get Project Devices API. To assign multiple tags, use a comma-separated list.
Tags and fleets serve different purposes: fleets are the right boundary when the grouping drives configuration scope (environment variables, firmware rollouts, route filters), while tags are best for cross-cutting classifications that span fleets. See the Fleet Admin Guide for guidance on choosing between them.

Tag assignments in Notehub automatically update the _tags
reserved environment variable.
They can also be set with the
Set Device Environment Variables API
and retrieved using the
Get Device Environment Variables API.
Manage Firmware
Notehub has the ability to manage the firmware that runs on your Notecards, as well as the firmware that runs on your host MCUs. These both can be managed at the device, fleet, and/or project level.
For more information on performing both types of DFU actions, please consult these guides:
Configuring Your Organization
Every new Notehub account is automatically assigned to the free Essentials Edition. With this plan, event ingress (i.e. data received) is limited only by available event credits. Accounts in the Essentials Edition are automatically topped-up to 5,000 event credits each month.
If you need to purchase additional event credits, set up automatic purchases of event credits, or sign up for premium support plans, you can do so through your organization.
From the account menu in the top-right corner, select Organization to access your organization.

From the organization section, you can purchase event credits, view event usage, purchase history, add members to your organization, and add any information needed on your invoices and receipts.
Adding Event Credits
To purchase event credits, you'll first need to add a payment method to your account on the Payment Settings tab. Once you've done so, click the Purchase Events button.

Next, select the amount of event credits you’d like to purchase, and click the Purchase Events button to complete the transaction.

Once purchased, event credits are available for immediate use in any project associated with your organization.
Configuring Credit Auto-Recharge
To ensure your projects always have event credits available, use the Automatic Event Recharge section on your organization’s Payment Settings tab. From there, you can enable or disable auto recharge, set the balance threshold that triggers a purchase, and choose how many event credits to buy when your balance falls below that threshold

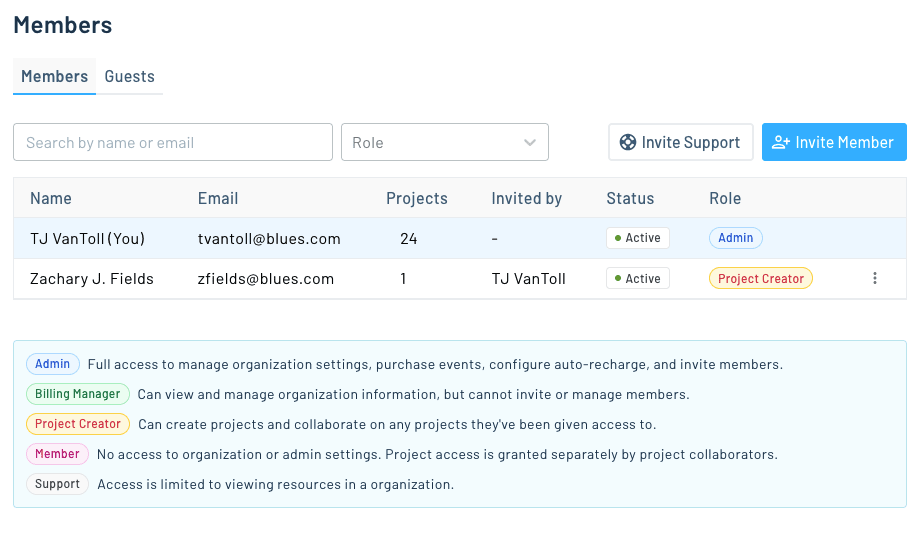
Adding Organization Members
From the Member tab, you can add additional members to your organization with permission to create projects in the organization, manage, or administer the organization on your behalf. Invited members will receive an invitation email and will need to create a Notehub account if they do not already have one.
Moving a Project to a Different Organization
All Notehub projects are associated with an organization. You can view and change a project's organization from the project's Settings.
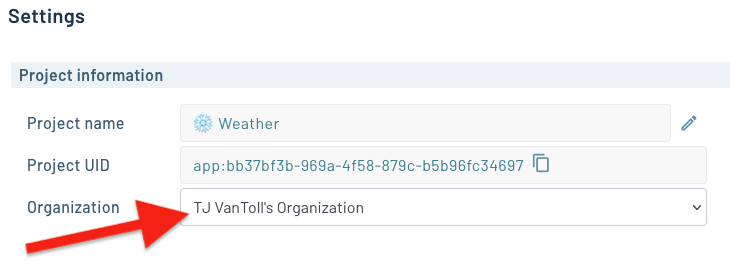
To change a project's organization, you must have Owner access on the Notehub project and Project Creator access (or higher) on the target organization.
When you change the organization, Notehub immediately associates the project with the new organization and sends a confirmation email. Notehub also records the change in the project's Audit Log.
Understanding Event Credits
Notehub charges one event credit for:
- Each event ingressed (i.e. each event that it receives).
- Each megabyte of data uploaded via web transactions.
On Essentials plans, Notehub Organizations are automatically "topped up" to 5,000 event credits each month, and usage beyond that is billed according to the rates listed on blues.com/pricing. Enterprise plans use volume pricing as defined in your agreement.
Notehub does not charge for platform events.
Notehub provides a variety of tools to help you monitor your event usage. To view them, first visit your Organization page by clicking the link from your account menu.
The Organization page’s Event Balance tab allows you to view Event Usage Data and an Event Balance Log.
Event Usage Data
The Event Usage Data section charts your event balance over time so you can see how quickly your Organization is consuming credits. Use the toggle above the chart to switch between two views:
- Event Balance shows your remaining event capacity on each day.
- Events Used shows the number of events consumed across all projects in the organization on each day.
If your Organization is on an Essentials plan, a summary at the top of the section displays your current remaining event balance and a Purchase Events button, and you can use the date range picker to change the window shown in the chart.
For Organizations on an Enterprise agreement, the section instead shows summary boxes for the current agreement period, your initial balance, your remaining balance, the number of events used, and an estimated event depletion date. The depletion estimate is based on your average event usage over the previous 30 days, and is also overlaid on the chart so you can anticipate when you may need additional capacity.
Event Balance Log
The Event Balance Log is a complete, filterable history of every operation that has affected your organization's event balance. Each entry includes:
- Date — when the operation occurred.
- Operation Type — the kind of operation, such as an Event Purchase, an Auto Event Recharge, Connectivity Assurance usage (which also identifies the device involved), or Enterprise Event Capacity added for an agreement period.
- Balance Change — how many credits the operation added to or subtracted from your balance. Credits provisioned without a payment (for example, your monthly top-up or gifted events) are marked as Provisioned.
- Invoice — a link to the receipt or invoice for purchases, or a detailed breakdown for Connectivity Assurance usage.
Use the filters above the log to narrow it by date range, device, or operation type when you need to track down a specific change.
Auto Event Recharge and Low Balance Alerts
To avoid running out of event capacity, Essentials-plan Organizations can configure two safeguards from the credit management section of the Organization page:
- Automatic Event Recharge automatically purchases a set number of event credits whenever your balance falls below a threshold you choose, using the payment method on file. Enabling it requires a saved payment method, and each automatic purchase appears in the Event Balance Log as an Auto Event Recharge operation.
- Low Event Balance Alert emails your Organization's admins when your event balance falls below a threshold you choose, so you can purchase more credits before your balance reaches zero. The alert is sent once when the balance first drops below the threshold and resets after the balance is back above it.
Both features are configured independently, so you can enable a low balance alert without enabling auto recharge (or vice versa).
Managing Connectivity Assurance
When a Notecard runs low on data, Connectivity Assurance will automatically add data to the Notecard SIM's data plan.
Connectivity Assurance is enabled by default if the Notehub Organization associated with the Notecard has a payment method on file. When a Notecard reaches 100MB of remaining data, Connectivity Assurance will add 500MB of data to the Notecard's data plan, and that data is valid for up to 10 years from the date it is added. The additional 500MB of data costs $10 for North America Notecards (e.g. NBNA and WBNA) and $15 for international Notecards (e.g. NBGL and WBEX).
If the Notecard SIM's data plan runs out of data due to an invalid or missing payment method (or if Connectivity Assurance is disabled) the data flow from the Notecard will be paused.
Disabling Connectivity Assurance
Connectivity Assurance governs the cellular data allocation associated with the Notecard's SIM. When you disable it, you stop Notehub from automatically purchasing additional data, but the Notecard can still attach to the cellular network and operate normally as long as existing data remains available.
Disabling Connectivity Assurance is not the same as temporarily blocking device connections.
Connectivity Assurance can be disabled at the following levels:
Disabling Connectivity Assurance at the Organization Level
In Notehub, navigate to the Organization menu.
Select the Payment Settings tab, and uncheck the Connectivity Assurance Charges checkbox.

If Connectivity Assurance is disabled for the Organization, it cannot be overwritten and re-enabled at the Project or Fleet levels.
Disabling Connectivity Assurance at the Project Level
Within a Notehub project, navigate to the Settings menu and uncheck the Connectivity Assurance checkbox.

If Connectivity Assurance is disabled for the Project, it cannot be overwritten and re-enabled at the Fleet level.
Disabling Connectivity Assurance at the Fleet Level
Within a Notehub project, navigate to the Fleet menu, select a Fleet to edit, and click the Settings button.

At the bottom of the Fleet settings page, uncheck the Connectivity Assurance checkbox.

Adding Contact Information
Contact information for a Notehub project appears in the device information tab and is queryable and updatable using the Notecard API card.contact.
Select Settings from the left navigation bar and add your contact information in the Contacts form.

Add a Favorite
Favorites are a way of both saving and organizing query filters you plan on reusing regularly.
By default, the Devices, Fleets, and Events views provide a list of every device, fleet, or event, respectively. To help refine these lists into useful information, a filter box is provided. These filters can become complex and difficult to enter, and you may find you are constantly creating the same filters as part of your workflow.
-
To facilitate a more efficient workflow, there is a Save button located at the bottom right of your filter box.

-
When you click the button, you will be prompted to add a new favorite.
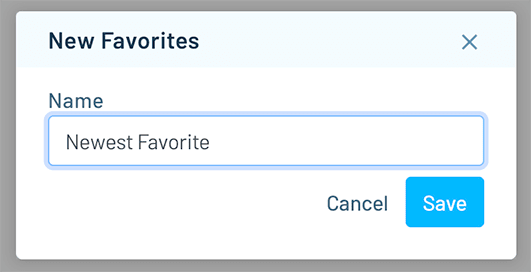
-
Type in the name for your Favorite in the box provided, click Save, and the favorite will appear in your Favorites list.

Creating a Device Dashboard
Deployed IoT products often provide a QR code that users can scan for accessing device configurations or cloud dashboards. For example, the Blues Airnote has a printed QR code that users can scan to change an Airnote's settings and to view a dashboard of device data.

Likewise, included with each Notecard are loose stickers that contain a QR code with a unique URL that can be used as a gateway for your own web-based resource.
For example, here is a URL from a loose sticker included with a Notecard. The second URL segment after the domain is the Notecard's unique DeviceUID and the last URL segment is a random PIN used internally by Notehub.
HTTP://QRGO.ORG/ID/864009060869498/515438Using Notehub you can configure these URLs to resolve into your your own dashboard URLs for printing on devices via QR codes.
How It Works
Notehub provides a domain, qrgo.org, that redirects requests for
qrgo.org/id/[device] to a dashboard URL that you can configure. This
workflow allows you to use the loose stickers provided with each Notecard, or to
print your own QR codes, that point to qrgo.org/id/[device] on physical
devices, and configure the final resolved URL in Notehub.
This workflow also gives you the ability to change your dashboard URLs anytime—even after you deploy your devices. Let's look at how to set a dashboard URL for your Notehub project.
How to Set Up a Device Dashboard
-
Within your Notehub project, select Settings from the left navigation bar, and scroll down to the Device Dashboard URL.
-
Enter a URL in the Edit Device Dashboard URL textbox.

In the URL you can use
[device]as a shorthand for a device's UID, and[product]as a shorthand for the Notehub product UID. For example, the following is a valid Device Dashboard URL that includes shorthands for device UID and product UID.https://mydomain.test/[device]?product=[product]Given a device with a UID of
dev:123456, and a product UID ofcom.blues.hello, a request tohttps://qrgo.org/id/dev:123456would resolve tohttps://mydomain.test/dev%3A123456?product=com.blues.hellousing the Device Dashboard URL above. -
Once you have a Device Dashboard URL configured, you can test it by clicking the Dashboard link while viewing a device in Notehub.

-
When you're ready to deploy devices, you can print QR codes that point to
https://qrgo.org/id/[device]on each device—for examplehttps://qrgo.org/id/dev:123456,https://qrgo.org/id/dev:7890123, etc.
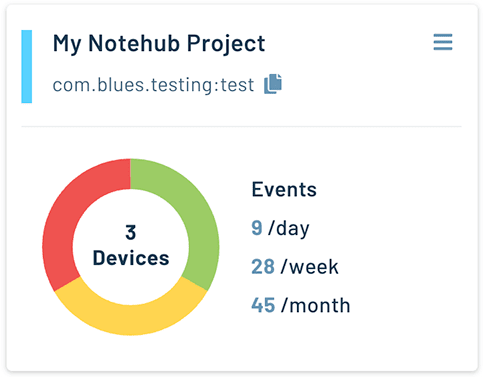
Finding a ProductUID
A ProductUID is an immutable user-generated string generated when you create a new project. After you create a project, you can copy the ProductUID directly from the project tile after logging in to Notehub:
The ProductUID is also available from the project's settings page:

Once you have your ProductUID, you can assign it to one or many Notecards using
the hub.set request.
{
  "req": "hub.set",
  "product": "com.blues.testing:test"
}
A ProductUID is also used in many Notecard example apps
to associate a Notecard with a cloud-based Notehub project. For example, the
Notecard's C, C++, and Arduino samples include the following line of code that
asks you to provide a PRODUCT_UID.
#define PRODUCT_UID "" // "com.my-company.my-name:my-project"Once you have your ProductUID copied from Notehub, you can paste it into your sample's code.
#define PRODUCT_UID "com.blues.testing:test"Assigning a ProductUID to a device in host firmware, as many of the Notecard samples do, is a development convenience. For production workflows we recommend loading Notecard configuration through a setup script, and to avoid placing ProductUIDs in source code.
Creating a New ProductUID
Each Notehub project must have at least one ProductUID and may optionally have multiple ProductUIDs. Devices assigned to any of a projects' ProductUIDs will all sync data to the same project. However, it can be useful to utilize multiple ProductUIDs in scenarios where:
- You need to allocate new devices to specific fleets by ProductUID.
- You need to block network connections for all devices by ProductUID.
Follow these steps to add a new ProductUID to an existing Notehub project:
-
Click the Settings option in the main menu of your Notehub project. Scroll to the ProductUIDs section and click New ProductUID.

-
Select the desired ProductUID prefix, likely using the same prefix used for other ProductUIDs in the same Notehub project. Specify the new ProductUID, add an optional Description, and optionally assign devices associated with this ProductUID to a specific fleet.

-
If so desired, click the checkbox next to Temporarily block incoming connections to prevent devices with this ProductUID from connecting to Notehub. Learn more about this feature in the Notehub Walkthrough section, Temporarily Block Incoming Connections.
Reserving a Domain or ProductUID Prefix
From your organization's Overview page you can reserve two kinds of values that are unique to your organization and cannot be claimed by anyone else on Notehub: a domain and a ProductUID prefix.
-
A reserved domain (e.g.
example.com) lets new Notehub users who register with a matching email address be automatically enrolled into your organization, so you don't have to invite each teammate by hand. Reserving a domain also reserves the reversed domain as a matching ProductUID prefix (for example, reservingexample.comalso reservescom.example.*). -
A reserved ProductUID prefix matches your company/organization domain and prevents your ProductUIDs from being used by any other accounts in Notehub. Since a ProductUID is a globally-unique identifier for your product, Notehub prompts you to create ProductUIDs using a prefix that matches your email address domain (e.g.
com.blues), and you can reserve your own custom prefixes here.
Both kinds of reservations are requested from the same place and reviewed by Blues before they take effect.
Only organization admins can request a reservation. If you don't see the request form, ask an admin on your organization to submit the request for you.
To make a request, first click on your name in the upper-right corner and navigate to the Organization menu option.
Next, on the Overview tab and scroll down to find the Reserve Domain/ProductUID Prefix section.

The next steps depend on whether you wish to reserve a domain or reserve a ProductUID prefix.
Reserving a Domain
When Domain is selected, enter the fully-qualified domain you want to reserve
(e.g. example.com).
Your domain must:
- Be a fully-qualified domain (e.g.
example.com) - Use lowercase letters, digits, and hyphens only
- Be verifiable—Blues staff confirm ownership before granting, and subdomains are covered automatically
You can also optionally enable Auto-add new Notehub users with matching emails. When enabled, any new user who joins Notehub with an email address that matches your reserved domain is automatically added to your organization. Use the Role for auto-added users dropdown to choose the role those users receive.

The auto-add behavior only applies to brand-new accounts as they validate their email address. Reserving a domain doesn’t pull in users who already have existing Notehub accounts—so you’ll have to invite those users to your organization the usual way.
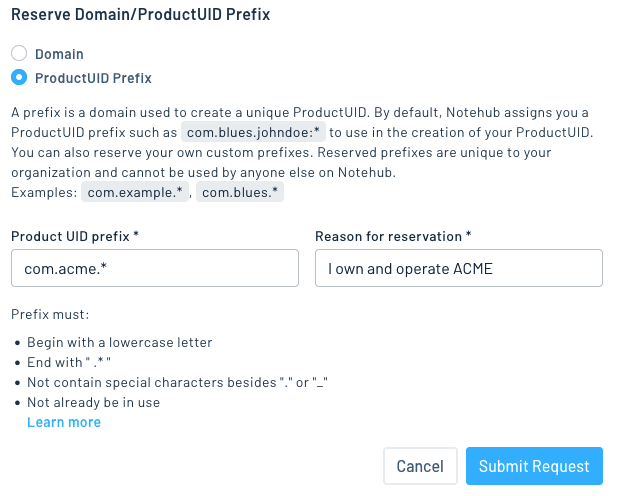
Reserving a ProductUID Prefix
When ProductUID Prefix is selected, enter your desired prefix (e.g.
com.example.*).
Your prefix must:
- Begin with a lowercase letter
- End with
.* - Not contain special characters besides
.or_ - Not already be in use
Once your request has been sent, you will receive an email confirmation, and the request will appear in the list of pending/accepted requests at the bottom of the page. A representative from Blues will be in touch with you within approximately 1-2 business days.

Temporarily Block Device Connections
The Notehub UI allows you to block individual Notecards from connecting to Notehub. The intended use of this feature is to block connections from misbehaving devices until a root cause can be diagnosed.
Temporarily blocking device connections is not the same as disabling Connectivity Assurance. While Connectivity Assurance controls whether additional data is allocated, blocking connections prevents a Notecard from syncing with Notehub until the block is lifted.
Under the Summary tab of the device details, scroll down to the "Danger Zone" section. To temporarily block incoming connections from the selected device, check the appropriate box.

When a Notecard is "blocked", it will likely continue to periodically re-attempt a connection with Notehub. Until it is "unblocked", no data will be received on Notehub. However, each time a Notecard attempts to connect it will use a small amount of its cellular data plan. Since these re-attempts are likely to occur periodically, this setting should not be used to disable a device for a long or indefinite period of time.
Blocking is the first step on a three-step decommissioning ladder — for long-term retirement or deletion, see Decommissioning a Device in the Fleet Admin Guide.
Configuring Alert Monitors
Notehub alert monitors watch your project's activity and send email, Slack, or SMS notifications when something you care about happens.

When you create a new monitor, the first decision is its Monitor Source, which determines what kind of activity the monitor watches:
- Heartbeat monitors track device connectivity and fire when a device has
not communicated with Notehub for a configurable period of time. They send
notifications directly to Email, Slack, or SMS — see
Using Watchdog Events for the alternative path that
"emits silence" as routable
_watchdog.qoevents instead, and the Fleet Admin Guide for guidance on when to use each. - Events monitors evaluate values inside the Notes your devices send and fire when those values cross a threshold you define (for example, when a temperature reading exceeds 80 degrees or a battery voltage falls below 3.4 volts).
All Notehub users can create a single Heartbeat Monitor for free. Creating additional Heartbeat Monitors or any Event Monitor requires a Notehub Enterprise plan. See Blues pricing or contact Blues sales for more information.
Monitors can also be created, updated, and deleted programmatically through the Monitor API.
Creating a Heartbeat Monitor
A Heartbeat Monitor fires an alert when a device stops checking in with Notehub. Heartbeat Monitors are available on the Essentials (free) plan, with a limit of one active Heartbeat Monitor per project; additional Heartbeat Monitors require a Notehub Enterprise plan.
-
Navigate to the top-level Alerts menu within a Notehub project and click the Create Monitor button.
-
Set the Monitor Source dropdown to Heartbeat.
-
Provide a Name and Description for the monitor.
-
Optionally choose one or more Fleets to scope the monitor. If no fleet is selected, the monitor evaluates every device in the project.
-
In the Trigger alert when device is inactive for field, enter the amount of time a device may go without communicating with Notehub before the alert fires. The duration can be specified in days, hours, minutes, and seconds.
-
Choose the notification channel — Email, Slack, or Twilio (for SMS). For Email, enter the recipients. For Slack or Twilio, you'll be prompted to provide the corresponding route configuration (a Slack webhook URL or Twilio account credentials).
-
Click the Create Monitor button to save your changes.
Heartbeat Monitors evaluate each device in the selected fleet (or project) individually. When any device's most recent activity is older than the configured threshold, an alert fires for that device.
Creating an Event Monitor
An Event Monitor evaluates values inside the Notes your devices send and fires when those values cross a threshold. Event Monitors require a Notehub Enterprise plan.
-
Navigate to the top-level Alerts menu within a Notehub project and click the Create Monitor button.
-
Set the Monitor Source dropdown to Events.
-
Provide a Name and Description for the monitor.
-
Under Configuration, optionally choose one or more Fleets to scope the monitor, then choose the Notefile (or Notefiles) that contains the data the monitor should evaluate.
TIP: Make sure you've already sent at least one Note to Notehub that uses the data structure you want to monitor — the field dropdown is populated from the Notes Notehub has already received.

-
Choose the Field within the Note's
bodythat you want to monitor. For instance, if your Note includes abodylike this:"body": { "temp": 72.22, "humidity": 34.2, "voltage": 4.1 },...you have the option of choosing from
temp,humidity, orvoltagefor the alert. -
Under Conditions, choose the operator (
>,<,!=,>=,<=) and the threshold value at which the alert should be triggered.
-
Under Aggregation, choose how Notehub should evaluate incoming data — see Event Monitor Aggregation below for details.
-
Choose the notification channel — Email, Slack, or Twilio (for SMS). For Email, enter the recipients. For Slack or Twilio, you'll be prompted to provide the corresponding route configuration.
-
Click the Create Monitor button to save your changes.
Event Monitor Aggregation
The Aggregation section of an Event Monitor controls two things: whether each device is evaluated independently, and whether the monitor watches individual events or a rolled-up summary over a time window.
Per Device Monitoring
The Per Device Monitoring toggle determines the scope at which the threshold is evaluated.
-
Enabled (recommended for most use cases): Notehub evaluates each device's data separately. The alert fires for any device whose value crosses the threshold, and the resulting alert identifies which device triggered it. Use this when you want to know which specific device reported, for example, a low battery or a high temperature.
-
Disabled: Notehub treats all matching events across the entire scope (the selected fleets, or the whole project if no fleet is selected) as a single stream. The alert fires when the combined value crosses the threshold and is not associated with any individual device. Use this when you care about a project- or fleet-wide condition rather than per-device behavior — for example, "the average humidity across the warehouse fleet exceeded 80%."
Aggregation Method and Timespan
The Method dropdown chooses how Notehub combines values before comparing them to the threshold.
-
None (default): Each incoming event is evaluated individually as soon as it arrives. The alert fires the moment a single event crosses the threshold.
-
Average / Minimum / Maximum / Sum / Count: Notehub combines all matching events over a rolling Timespan window using the selected function, then compares the resulting value to the threshold. The Timespan field is required when Method is anything other than None and can be specified in days, hours, minutes, and seconds.
Some examples of how the aggregation options combine:
-
Alert any time any device reports a temperature above 80°F: set Method to None and enable Per Device Monitoring. Each event is evaluated as it arrives, and the alert identifies which device triggered it.
-
Alert when a fleet's average temperature exceeds 80°F over the last hour: set Method to Average, Timespan to
1h, and disable Per Device Monitoring. Notehub computes one rolling average across every device in the scope and compares it to the threshold. -
Alert when any single device's peak temperature in the last 24 hours exceeds 90°F: set Method to Maximum, Timespan to
24h, and enable Per Device Monitoring. The maximum is computed per device, so one noisy device won't hide behind quieter ones. -
Alert when any device sends more than 100 events in the last hour (useful for catching runaway firmware): set Method to Count, Timespan to
1h, and enable Per Device Monitoring.
Disabling or Muting Alert Monitors
Individual alert monitors can be disabled or muted. Disabling a monitor tells Notehub to completely ignore the specified alert. Muting a monitor, on the other hand, allows you to temporarily suppress notifications from a given alert. This can be useful if your product is in an alert state and you wish to briefly suspend notifications.

Alert Logging
All alert notifications are logged and visible under the Alerts tab:

Notehub Audit Logs
Most actions taken when managing an Organization (e.g. purchasing event credits, changing plans, updating contact information, etc.) are logged and visible under the Audit Log tab of the Organization:

Likewise, project-specific settings changes (e.g. adding/removing members, making changes to ProductUIDs, etc.) are logged and visible after clicking the Audit Log button in the project's Settings:

Each row in the audit log table includes the following columns:
- Time — When the action occurred. Entries are sortable by time and are shown newest-first by default.
- User — The user account that performed the action.
- Source — Whether the action originated from the Notehub UI (
UI) or from a programmatic call to the Notehub API (API). - Description — A short summary of the action.
Click a row to expand it and see the specific fields that were modified, along with their previous and new values.
The audit log captures changes across a wide range of project and organization resources, including memberships and permissions, billing settings, routes, monitors, environment variables (at the project, fleet, and device level), project secrets, ProductUIDs, project and fleet settings, devices, events, jobs, and API keys.
Running Batch Jobs
Notehub batch jobs allow you to provision, configure, and report on large sets of devices at scale using a simple job submission workflow. With batch jobs, you can upload a configuration file that defines device- and fleet-level actions—such as setting environment variables or assigning fleets—then execute those actions across devices in a single operation. Each job is tracked with a detailed history, supports dry runs, and generates downloadable reports.
Batch jobs can be created and run from the Notehub UI (described below) or programmatically via the Jobs API. The JSON format documented in Batch Job JSON Format is the same in both cases.
Creating a Batch Job
You can create and run Notehub batch jobs from the Batch Jobs section of your Notehub project.
-
Navigate to your Notehub project and select the Batch Jobs link.

-
Next, click the Create Job button.

-
On the next screen you'll need to give your job a Name, and upload a
.jsonfile with details about your batch job.
 note
noteBelow, in Batch Job JSON Format, you'll find a complete list of supported values for your
.jsonfile. To try the feature out quickly you can use the example JSON shown here—it generates a report based on your project's device data. Save the text below in a file namedreport.json, then upload it to create your batch job.{ "comment": "Generate a report on all devices", "select":{ "all_devices": true }, "report_options":{ "app_info": true, "app_vars": true, "app_fleets": true, "device_info": true, "device_vars": true, "device_activity": true } } -
With your
.jsonfile uploaded, next click the Save Job button. -
After the job saves you'll see your job listed with two buttons: Dry Run and Run Job.
-
Performing a dry run allows you to see the impact of your job before any changes are actually applied. Because batch jobs have the potential to make large-scale changes to your project, we recommend performing a dry run of any batch job that performs write operations before executing a full run.
-
Performing a full run executes your job's JSON and makes all specified changes. Note that batch jobs are asynchronous, and some jobs may take many seconds or minutes to execute.
noteIf you're using the
report.jsonfile shown earlier to test batch jobs, you can safely perform both a dry run and full run of your job. The test job does not alter your project or devices (it just generates a report), so you can execute it multiple times to get a feel for how batch jobs work. -
-
When the job has completed, you can either double-click the row or click the Download Full Report button to see the results of the job.

Now that you know how to create and run batch jobs, let’s take a closer look at their JSON format to understand the full range of what they can do.
Batch Job JSON Format
Batch jobs are specified in JSON files, where the root object may include any of the following properties.
comment
All jobs should start with a string comment property that describes
the job you intend to run. This comment appears as your job's description in Notehub.
{
  "comment": "A description of your job"
}
select
Next, you can optionally provide a select property to select devices by a
number of different filters.
-
The
all_devicesfilter selects all devices on your Notehub project.{ "select": { "all_devices": true } } -
The
devices_in_fleetsfilter takes an array of FleetUIDs or fleet names, and all devices included in the provided fleets are selected. The filter uses OR logic, so a device only needs to be included in one provided fleet to be included.{ "select": { "devices_in_fleets": ["fleet:c24696d8-f2b9-4594-b743-62e8145c3e54", "MySecondFleet"] } } -
The
devicesfilter takes an array of DeviceUIDs to select for the job.{ "select": { "devices": ["dev:860322068093969"] } } -
The
devices_by_snfilter takes an array of device serial numbers to select for the job.{ "select": { "devices_by_sn": ["WeatherDevice"] } }noteThe
devices_by_snfilter accepts the following characters for pattern matching.*matches any sequence of characters (zero or more)?matches exactly one character[123]matches a single character as any of1,2, or3
For example,
SN-12*matches any serial number starting withSN-12(such asSN-1234orSN-1299), andSN-123[456]matches exactlySN-1234,SN-1235, orSN-1236.
default_requests
The default_requests property allows you to apply changes to all selected devices.
The following options are available.
-
Set the
disableproperty totrueto disable all selected devices.{ "default_requests": { "disable": true } } -
Set the
enableproperty totrueto enable all selected devices.{ "default_requests": { "enable": true } } -
Set the
connectivity_assurance_disableproperty totrueto disable connectivity assurance on all selected devices.{ "default_requests": { "connectivity_assurance_disable": true } } -
Set the
connectivity_assurance_enableproperty totrueto enable connectivity assurance on all selected devices.{ "default_requests": { "connectivity_assurance_enable": true } } -
Use the
sn_to_setproperty to set a serial number on all selected devices. Use a value of-to remove the device serial number.{ "default_requests": { "sn_to_set": "MyDevice" } } -
Use the
vars_to_setproperty to set device-level environment variables on all selected devices. Use a value of-to delete a variable.{ "default_requests": { "vars_to_set": { "test_var": "test_value", "var_to_delete": "-" } } } -
Use the
fleets_to_joinproperty to have all selected devices join all provided fleets. You can use fleet names or FleetUIDs in your list.{ "default_requests": { "fleets_to_join": ["New", "fleet:c24696d8-f2b9-4594-b743-62e8145c3e54"] } } -
Use the
fleets_to_leaveproperty to have all selected devices leave all provided fleets. You can use fleet names or FleetUIDs in your list.{ "default_requests": { "fleets_to_leave": ["New", "fleet:c24696d8-f2b9-4594-b743-62e8145c3e54"] } }
device_requests
The device_requests property allows you to apply changes to individual devices in
the following format.
{
  "device_requests": {
    "dev:1234567890": {
      ...
    },
    "dev:2345678901": {
      ...
    }
  }
}
From there you may use any of the configuration properties available within
default_requests. For example, the following job sets a
serial number on two different devices.
{
  "comment": "Set serial numbers",
  "device_requests": {
    "dev:1234567890": {
      "sn_to_set": "FirstDevice"
    },
    "dev:2345678901": {
      "sn_to_set": "SecondDevice"
    }
  }
}
When used with default_requests, the values provided within device_requests act as device-level overrides to job-level defaults.
For example, the following job uses default_requests to set an interval environment
variable to 10 by default, and uses device_requests to override that value for one
specific device.
{
  "comment": "Setting an environment variable with an override",
  "select": {
    "all_devices": true
  },
  "default_requests": {
    "vars_to_set": {
      "interval": "10"
    }
  },
  "device_requests": {
    "dev:860322068093969": {
      "vars_to_set": {
        "interval": "20"
      }
    }
  }
}
report_options
The report_options property allows you to configure the output of your job through
a number of boolean settings.
-
Set the
app_infoproperty totrueto include information about your Notehub project in your report.{ "report_options": { "app_info": true } } -
Set the
app_varsproperty totrueto include a list of all project-level environment variables in your report.{ "report_options": { "app_vars": true } } -
Set the
app_fleetsproperty totrueto include a list of your Notehub project's fleets in your report.{ "report_options": { "app_fleets": true } } -
Set the
device_infoproperty totrueto include a list of all selected devices in your report.{ "report_options": { "device_info": true } } -
Set the
device_activityproperty totrueto include metadata on device event and session activity, includingrecent_event_count,recent_session_count, andrecent_session_seconds.{ "report_options": { "device_activity": true } } -
Set the
device_healthproperty totrueto include device health information for each selected device in your report.{ "report_options": { "device_health": true } } -
Set the
device_varsproperty totrueto include a list of device-level environment variables for all selected devices. The output includes a list of environment variables defined on the device (environment_variables), as well as a list of environment variables as they will be seen by the device, fully resolved with project/fleet/device prioritization rules (environment_variables_effective).{ "report_options": { "device_vars": true } }
Provisioning Jobs
In Notehub, provisioning is a process that allows you to set up default configuration values for a device. Once set, a device's provisioned configuration will be applied upon its first connection to your Notehub project.
You can create batch jobs that provision devices by providing JSON in the following
format. Note that for provisioning jobs you must include the DeviceUID for each
device you wish to provision in your device_requests.
{
  "default_requests": {
    "provision_product": "com.my-company.my-name:my-project"
    ...
  },
  "device_requests": {
    "dev:1234567890": {
      ...
    }
  }
}
The following fields are available in default_requests for provisioning.
-
The
provision_productis required, and should be set to a valid ProductUID.{ "default_requests": { "provision_product": "com.my-company.my-name:my-project" } } -
The
sn_to_defaultproperty allows you to provision all listed devices with a default serial number.{ "default_requests": { "sn_to_default": "MyDevice" } } -
The
vars_to_defaultproperty allows you to provision all listed devices with preset device-level environment variables.{ "default_requests": { "vars_to_default": { "test_var": "test_value" } } } -
The
fleets_to_defaultproperty allows you to provision all listed devices with a preset list of fleets. You can use fleet names or FleetUIDs in your list.{ "default_requests": { "fleets_to_default": ["New", "fleet:c24696d8-f2b9-4594-b743-62e8145c3e54"] } }
The *_to_default properties above only apply if the corresponding value is
not already set on the device — they are “set if empty” defaults, not
“set unconditionally” overrides. Specifically:
sn_to_defaultonly sets the device serial number if the device currently has no serial number.vars_to_defaultonly sets a given environment variable if that variable is not already defined on the device.fleets_to_defaultonly assigns the listed fleets if the device currently belongs to no fleets.
To unconditionally change these values for existing devices, use
sn_to_set, vars_to_set, fleets_to_join, and fleets_to_leave from
default_requests instead.
As an example that puts it all together, the following JSON defines a job
that provisions two devices, "dev:1234567890" and "dev:abcdefghi". Each device
is given a default environment variable and fleet, and each device is given
a device-specific serial number.
{
  "comment": "Provision new devices on my product",
  "default_requests": {
    "provision_product": "com.your_company.your_name:your_project",
    "vars_to_default": {
      "interval": "30"
    },
    "fleets_to_default": ["New"]
  },
  "device_requests": {
    "dev:1234567890": {
      "sn_to_default": "FirstDevice"
    },
    "dev:abcdefghi": {
      "sn_to_default": "SecondDevice"
    }
  }
}
Whitelisting Blues Servers
When configuring firewalls or access controls for Blues Notehub, it's important to know which IP addresses and ports handle event routing and inbound connections. The ranges below outline the dedicated IP blocks used by Notehub servers for outbound (routed) events and for inbound access to Notehub services.
-
Outbound (routed) events will always come from one of a set of dedicated IP addresses assigned to Blues Notehub servers. If needed, you may whitelist the IP range of
216.245.146.0through216.245.146.63(or216.245.146.0/26in CIDR notation). -
For inbound connections to Blues servers for access to notehub.io and sending Notehub API requests, you may whitelist port
443access to216.245.146.128through216.245.146.191(or216.245.146.128/26in CIDR notation). -
For inbound NTN connections via WiFi/UDP, you may whitelist port
8089access to216.245.146.112through216.245.146.127(or216.245.146.112/28in CIDR notation).