

One of the most popular features of Notecard is its integrated GPS/GNSS module, which allows you to include accurate location readings with the data you send to the cloud.
There are many different ways to configure a Notecard’s GPS/GNSS module, which can be powerful for production applications that need custom settings for large deployments—but can also be overwhelming for new users that just want to see their first tracker to send valid data.
This article is for those new users, and acts as a beginner’s guide to GPS tracking with Notecard. In this article I’ll walk you through each request you need to run to see your first data, step by step, and talk you through the problems you might run into along the way.
Let’s get started.
New to Blues?
Learn what we do in this 3-minute video that walks you through how we simplify wireless connectivity.
Learn what we do in this 3-minute video that walks you through how we simplify wireless connectivity.
Step 1: Hardware Setup
I recommend starting simple for your first project and using only the following components:
- Notecard
- Notecarrier (any Notecarrier works)
- LiPo battery (ideally 2000mAh or more)
Just to show you what that looks like, while testing this article I’ve been using a Notecard Cell+WiFi, a Notecarrier X, and a 2000mAh LiPo battery as shown below:

A few notes about hardware:
-
Using a LiPo battery allows you to take your device anywhere while testing without worrying about being tethered to a cord.
-
It’s important to secure your LiPo battery to your Notecarrier to avoid potential electrical shorts. A bit of tape usually does a good enough job holding the battery in place.
-
The Notecarrier A, Notecarrier F, Notecarrier X, Notecarrier XS all contain a charging circuit for LiPo batteries—meaning, if you provide power to these Notecarriers (usually through their USB ports), they’ll automatically charge connected LiPo batteries.
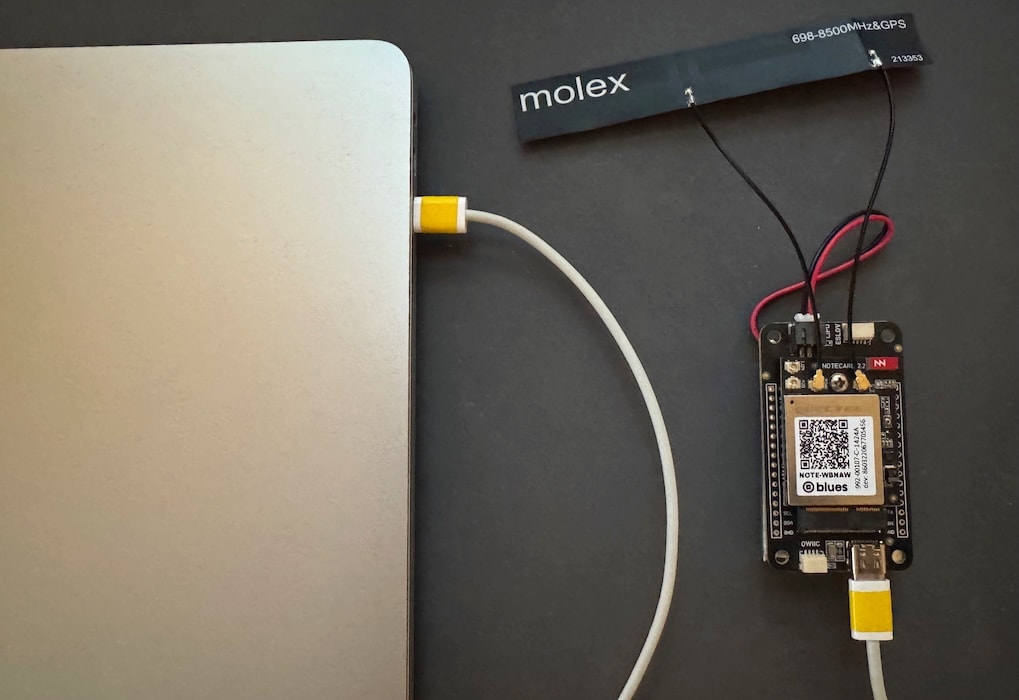
- Finally, make sure both antenna u.fl connectors are securely attached to your Notecard. Weak antenna connections are a common source of connectivity issues.
Now that you have your hardware set up, let’s next look at how to configure your Notecard itself.
Step 2: hub.set
The next few sections detail the requests you need to run on your Notecard to configure it for GPS tracking. The easiest way to run these commands is by connecting to your Notecard via the In-Browser Terminal.
The first request you need to run on any Notecard project is hub.set. Although the hub.set request doesn’t perform any GPS configuration directly, it is the most common source of problems I’ve seen from new users trying to use a Notecard for tracking for the first time. I’ll explain why momentarily. First, here’s my recommended starting hub.set configuration:
{
  "req":"hub.set",
  "product":"your-product-uid",
  "mode":"periodic",
  "inbound":240,
  "outbound":60
}
This config tells a Notecard to perform inbound synchronizations every 240 minutes, or every four hours, and to perform outbound synchronizations every 60 minutes, or every hour.
While this configuration means your Notecard will only sync GPS data with Notehub once per hour, that interval is intentional—and in many cases, it’s more than enough. A few notes:
-
Notecard does not support running its cellular modem and its GPS/GNSS module simultaneously. If you set your
inboundoroutboundto a low number, your Notecard will be too busy sending/receiving data to take location readings. This is the single biggest mistake new Notecard users make. -
If you need more frequent cellular synchronizations from your Notecard, you can try adjusting your
outboundto a lower value after you’ve completed your initial test. When first testing, a largeoutboundvalue ensures the Notecard’s cellular modem isn’t preventing location readings from happening. -
If you need very frequent synchronizations from your Notecard (under 10 minutes), you may want to experiment with buying and connecting an external GPS module, which does allow you to take frequent GPS readings and synchronize frequently.
With your basic configuration in place, let’s next talk about the necessary tracking configuration.
Step 3: card.location.mode
The card.location.mode request sets location-related configuration on your Notecard. The most important value for this request is seconds, as it controls how often a Notecard should retrieve a new GPS/GNSS location. Here is my recommended configuration.
{
  "req":"card.location.mode",
  "mode":"periodic",
  "seconds":300
}
This config tells Notecard to retrieve a new GPS/GNSS location every 300 seconds, or every five minutes. This value is intentionally a bit conservative. A common mistake among new users is setting a low seconds value, which causes the Notecard to continuously use its GPS/GNSS module and prevents it from synchronizing data.
 note
noteNotecard has an onboard accelerometer and will only take new readings if the accelerometer detects movement. Even small movements are enough to trigger this—so you’ll easily get new readings while walking, driving, or biking. Just keep in mind that the Notecard won’t take new readings if it’s sitting still, like on a desk or in a parked vehicle.
At this point your Notecard is taking GPS readings every five minutes. You can test this by taking your device to a location with a clear view of the sky (remember to attach the LiPo battery!) Let the device sit with a clear view for a while (five minutes should be plenty), and then bring the device back to your computer.
Re-attach your device via USB and run the following card.location request.
{"req":"card.location"}If all went well you should see your device’s current latitude and longitude, as well a UNIX timestamp for when the reading happened.
{"req":"card.location"}{
"status": "GPS started {gps-active}",
"mode": "periodic",
"lat": 42.1234567,
"lon": -84.1234567,
"dop": 1.38,
"time": 1743535774
}Next, run a hub.sync request on your device to synchronize all inbound and outbound data with your Notehub project. When the sync completes, open your project’s most recent event, and note that your location data is now appended to your events in the best_ and where_ fields.

At this point, your Notecard is now taking regular location readings and including the most-recent location data on every new outbound Note.
However, to turn your Notecard into a true tracker you need one last request.
Step 4: card.location.track
The card.location.track request allows you to store location data in a Notefile at a periodic interval. My recommendation for this request is fairly straightforward.
{
  "req":"card.location.track",
  "start":true
}
For now, all you need to do is turn on tracking using the "start":true argument. Eventually, you may want to explore additional options like heartbeat, but as you’ve probably noticed is a theme in this article—I recommend starting simple.
Once enabled, your Notecard will regularly create a Note with location data and add it to the _track.qo Notefile. By default, Notecard will create Notes at the interval you provided in the card.location.mode request (which is every 300 seconds if you’re following this article’s recommendations).
The easiest way to test this request is... to go somewhere with your device. Go for a walk, run an errand, take a bike ride, go for a drive, or whatever—just remember to secure your battery, and to stay moving for 30+ minutes so you have a good sample of data to work with.
When you’re back, reconnect your device to the In-Browser Terminal and run a hub.sync request. (Remember that you’re using an outbound of 60, so you can either manually run this request or wait an hour until your Notecard synchronizes all data on its own.)
{"req":"hub.sync"}Next, return to your Notehub project’s events page and refresh. If all went well, you should see a list of _track.qo events taken five minutes apart.
noteWhen viewing tracking events, make sure to change your Uploaded column to Captured. The Uploaded column shows a timestamp for when Notehub received the data, and the Captured field shows when a Notecard created the data. For tracking events the Captured time is almost always what you care about.

At this point, you have a fully functional tracker! Your Notecard will take GPS location readings every five minutes, store those readings in a _track.qo Note, and synchronize those Notes to Notehub every hour.
Before you start messing with your configuration though, I have one last recommendation.
Step 5: Viewing your data on a map
All IoT projects benefit from a dashboard that displays device data in charts and graphs rather than tables or spreadsheets. But for mapping-based projects, a visual dashboard is especially important—it’s much easier to spot issues on a map than to interpret coordinates like 38.897957,-77.036560 in a database column.
At Blues we help connect your data to a wide variety of platforms, so if there’s a dashboarding platform you’re already comfortable with, getting your data there is as easy as completing a tutorial.
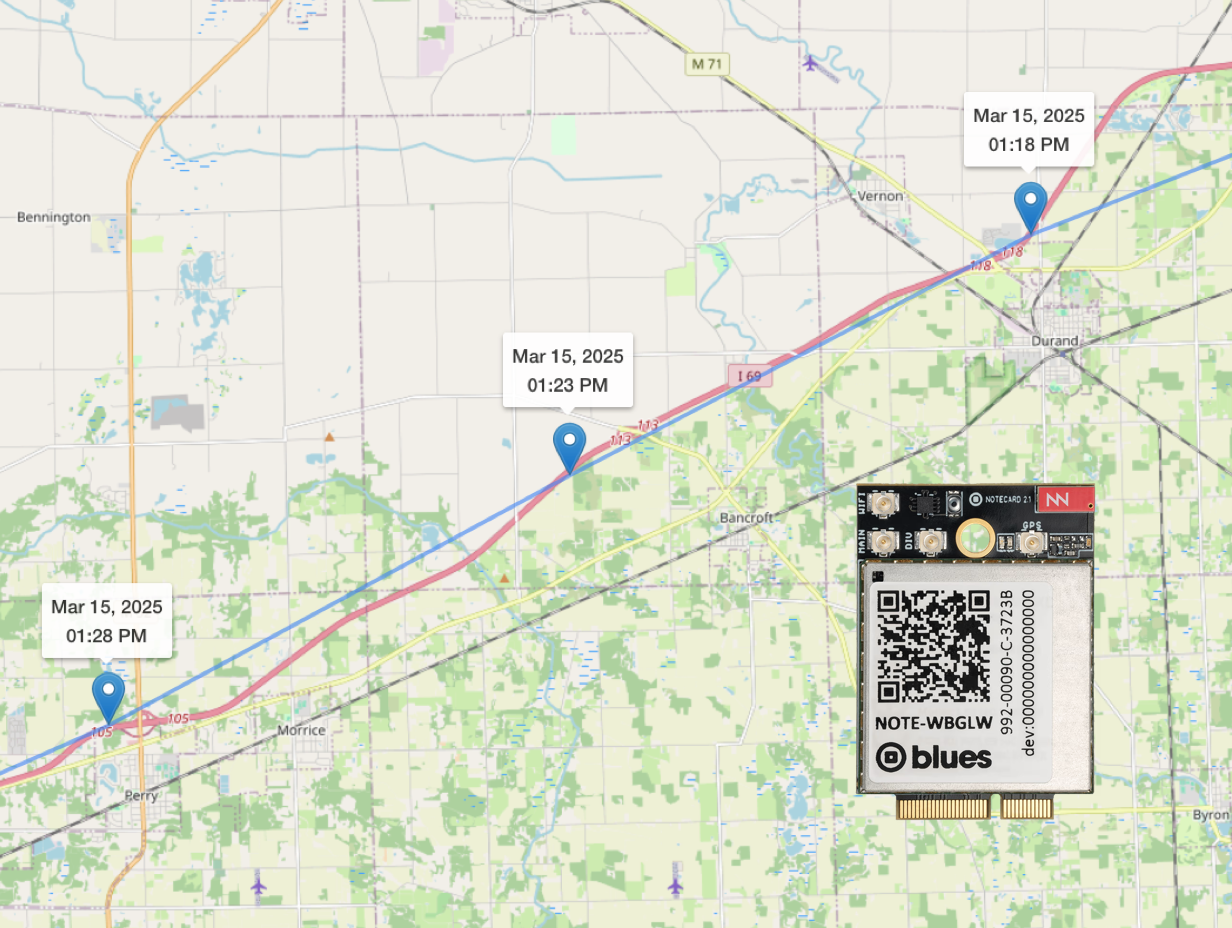
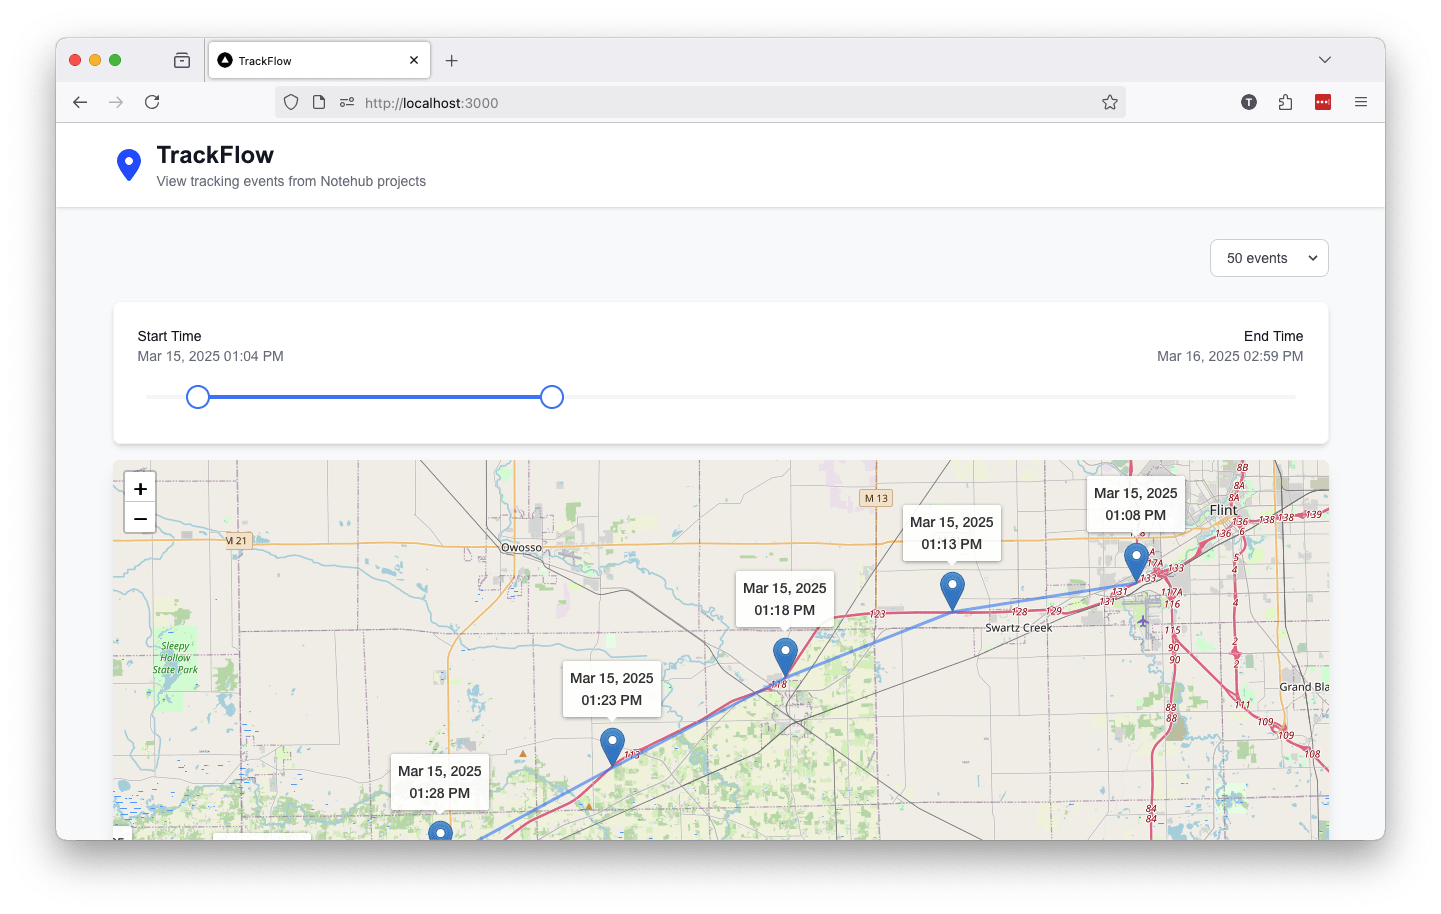
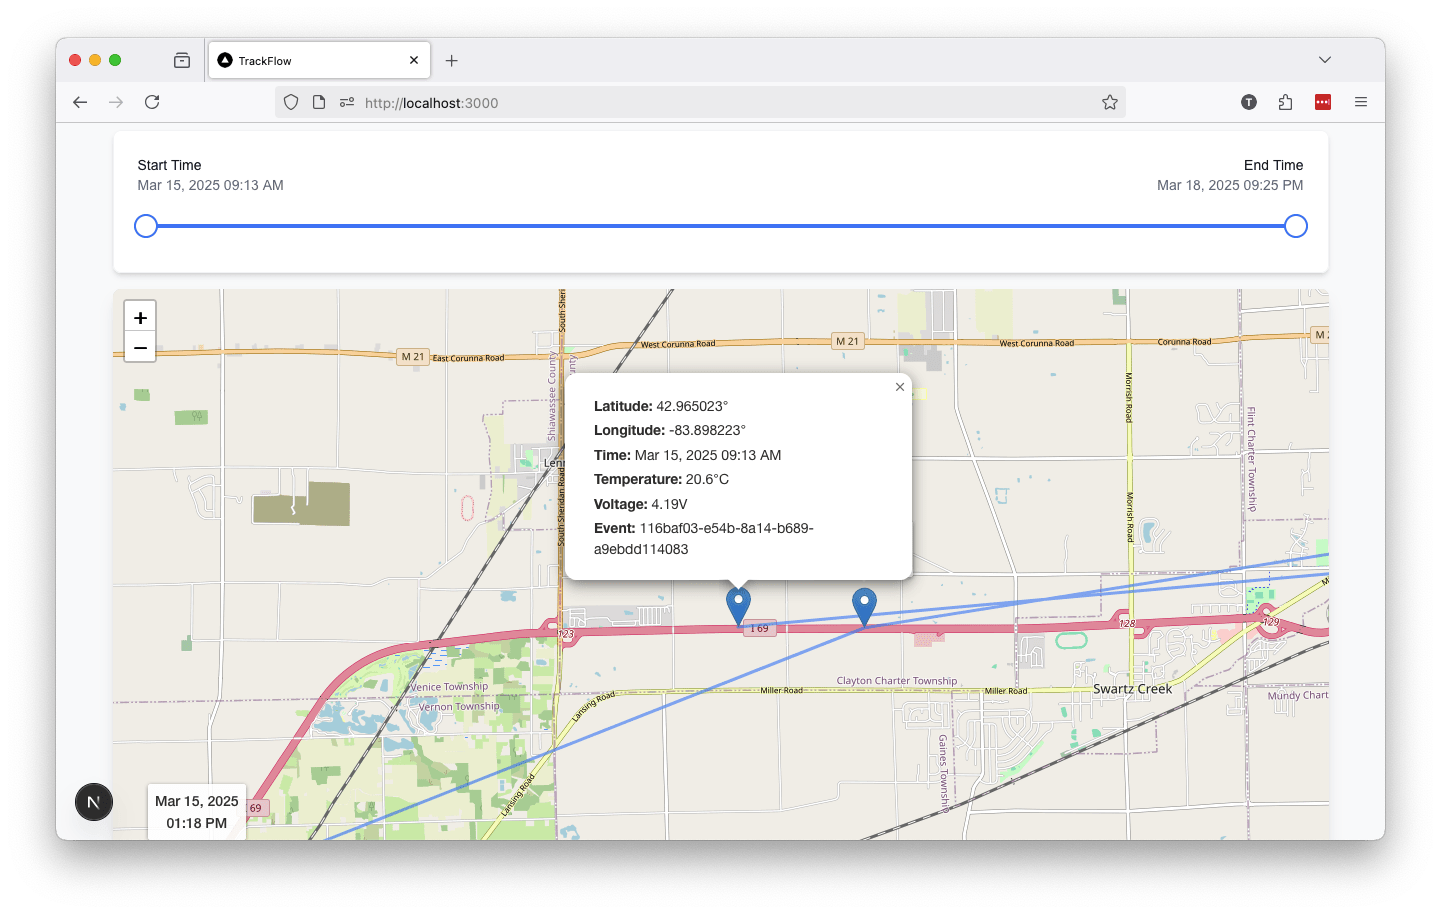
If you’re unsure where to start, I’d recommend trying a simple application I built for viewing _track.qo events in your browser. TrackFlow is open source on GitHub, and you can get it running by installing Node.js and creating one configuration file. Once you have it running, the app lets you view your _track.qo events in a map, with controls for how many events to load, and the time period you want to view.
Each event is shown as a marker with its location and timestamp. Clicking a marker reveals more details about the event, such as its EventUID and the device’s voltage at the time it was captured.
noteI created TrackFlow using vibe coding tools. If you want to see how I did it, sign up for this vibe-coding webinar we’re running tomorrow. (Or watch the video if you’re reading this after April 9th.)
Regardless of whether you try TrackFlow or route your data from Notehub to your favorite platform, I highly recommend setting up a dashboard where you can view your data in a map. Once you have a map set up, you’re ready to start configuring your tracker for your production applications.
Getting help
In this article we looked at how to configure a Notecard for your first tracking project. If you got stuck at any point during this article, or you’re just looking for tips on how you can configure your Notecard or your dashboards, feel free to reach out for help in our community forum.
And finally, here’s a copy-and-paste friendly list of the Notecard configuration I used for reference.
{"req":"hub.set","product":"your-product-uid","mode":"periodic","inbound":240,"outbound":60}{"req":"card.location.mode","mode":"periodic","seconds":300}{"req":"card.location.track","start":true}