
Managing a Notecard's Wi-Fi Network Remotely
Introduction
This sample app shows how to remotely manage a Notecard's Wi-Fi connection using the Notehub API and Notehub SDKs. You'll learn how to determine a Notecard's current connection type and network, and how to queue network changes through reserved environment variables.
Wireless Connectivity with Blues
This sample app is built around Blues Notecard and Blues Notehub.
Blues Notecard is the easiest way for developers to add secure, robust, and affordable pre-paid wireless connectivity to their microcontroller or single-board computer of choice. Notecard is a System-on-Module (SoM) that combines pre-paid data, low-power hardware (~8μA-18μA when idle), and secure communications. It acts as a device-to-cloud data pump to communicate with the Blues cloud service Notehub.
Notehub is the Blues cloud service for routing Notecard-provided data to third-party cloud applications, deploying OTA firmware updates, and securely managing fleets of Notecards. Notehub allows for secure communications between edge devices and the cloud without certificate management or manual provisioning of devices.
General Information
System Hardware
This article's pattern can be implemented with any Notecard that has a Wi-Fi module (aka any Notecard Cell+WiFi or Notecard Wi-Fi), and any host microcontroller.
For demonstration purposes this article uses the following specific hardware.
| Component | Purpose |
|---|---|
| Blues Notecard Cell+WiFi WBGLWT | Wireless connectivity module enabling device-to-cloud data syncing. |
| Blues Notecarrier F | Carrier board for connecting Notecard to an MCU. |
| Blues Swan | Example host MCU. |
 warning
Your Notecard must be running a firmware version >= 8.1.3 for this article's examples to work properly. If you're running an older version, see Notecard Firmware Releases for instructions on how to update.
List of Acronyms
| Acronym | Definition |
|---|---|
| MCU | Microcontroller |
| SoM | System-on-Module |
Summary
Notecard Cell+WiFi and Notecard WiFi offer
many ways to connect to Wi-Fi access points. This example focus on _wifi, an
environment variable
that allows you to remotely control which Wi-Fi networks your devices use.
Using the Notehub API you can set
a _wifi environment variable for a device over HTTP, or using one of the supported
Notehub API SDKs.
This example shows how to use the Notehub API to manage device networks, and
then how to use Notehub JS library
to build a small web application for doing the same.
You'll learn how to determine a device's current network, as well as how
to queue a network change using the _wifi environment variable.
Technical Implementation
Hardware Wiring
For this example all you need is a Notecard wired to a host microcontroller. If you're new to Blues, the easiest way to set this up is with a Starter Kit for Cell+WiFi, as it comes with a Cell+WiFi Notecard, a host microcontroller, and a carrier board for connecting everything with no wiring.

If you're using another host MCU, refer to our hardware-specific guides in Collecting Sensor Data for more information on wiring a Notecard to a host.
Notecard Configuration
Every Notecard must be associated with a cloud-based Notehub project. This is accomplished using the hub.set API.
For this article's approach you must configure your hub.set request to ensure
your Notecard uses Sessions, as we'll be reading
_session.qo Notes
to determine a Notecard's most recent network-connection type.
The sections below show how to implement this configuration depending on whether you wish your Notecard to be in periodic or continuous mode.
 note
noteIf you're unsure whether you want to use periodic or continuous mode, see Configuring Synchronization Modes.
Periodic Mode
In periodic mode ("mode": "periodic") your Notecard will start new Sessions
according to your inbound and outbound intervals. Because this example
uses environment variables, you may wish to set your inbound interval to a
low value during testing (so you see any variable updates quickly). The code
below sets inbound to 5, which tells your Notecard to check for inbound
changes from Notehub every 5 minutes.
{
  "req": "hub.set",
  "product": "<your-product-uid>",
  "mode": "periodic",
  "inbound": 5,
  "outbound": 5
}J *req = NoteNewRequest("hub.set");
JAddStringToObject(req, "product", "<your-product-uid>");
JAddStringToObject(req, "mode", "periodic");
JAddNumberToObject(req, "inbound", 5);
JAddNumberToObject(req, "outbound", 5);
NoteRequest(req);req = {"req": "hub.set"}
req["product"] = "your-productuid"
req["mode"] = "periodic"
req["inbound"] = 5
req["outbound"] = 5
card.Transaction(req)Continuous Mode
In continuous mode ("mode": "continuous") your Notecard will start new
Sessions according to your provided duration. To see environment variable
updates quickly in continuous mode, you can either set your inbound interval
to a low value during testing, or you can use the hub.set request's sync
argument, which has a Notecard immediately receive inbound environment
variable updates.
{
  "req": "hub.set",
  "product": "<your-product-uid>",
  "mode": "continuous",
  "inbound": 5,
  "outbound": 5,
  "duration": 5
}J *req = NoteNewRequest("hub.set");
JAddStringToObject(req, "product", "<your-product-uid>");
JAddStringToObject(req, "mode", "continuous");
JAddNumberToObject(req, "inbound", 5);
JAddNumberToObject(req, "outbound", 5);
JAddNumberToObject(req, "duration", 5);
NoteRequest(req);req = {"req": "hub.set"}
req["product"] = "your-productuid"
req["mode"] = "continuous"
req["inbound"] = 5
req["outbound"] = 5
req["duration"] = 5
card.Transaction(req)Host Firmware
The host firmware for this example is minimal, as all it needs to do is ensure that something gets synchronized to Notehub on a regular cadence.
Feel free to use host firmware you already have for testing, or to use the sample
Arduino code below, which uses Notecard's
card.temp request
to set up automated temperature reporting.
#include <Arduino.h>
#include <Notecard.h>

#define productUID "com.yourcompany.yourname:yourproject"

Notecard notecard;

void setup() {
  static const size_t MAX_SERIAL_WAIT_MS = 5000;
  size_t begin_serial_wait_ms = ::millis();
  // Wait for the serial port to become available
  while (!Serial && (MAX_SERIAL_WAIT_MS > (::millis() - begin_serial_wait_ms)));
  Serial.begin(115200);
  notecard.setDebugOutputStream(Serial);

  notecard.begin();

  {
    J *req = notecard.newRequest("hub.set");
    if (req != NULL) {
      JAddStringToObject(req, "product", productUID);
      JAddStringToObject(req, "mode", "periodic");
      JAddNumberToObject(req, "outbound", 5);
      JAddNumberToObject(req, "inbound", 5);
      notecard.sendRequest(req);
    }
  }

  {
    J *req = notecard.newRequest("card.temp");
    if (req != NULL) {
      JAddNumberToObject(req, "minutes", 5);
      notecard.sendRequest(req);
    }
  }
}

void loop() {
}
After your host firmware has ran on device for a bit, visit your Notehub project
and ensure you see regular _session.qo events.

Open one of your session events that has "opened": true in its body, click the JSON
tab, and scroll down to find the rat property. If your session started with
a Wi-Fi network connection you'll see Wi-Fi related information in this section—
ssid, bssid, etc—and if your session started with a cellular network
connection you'll see cellular-specific data such as cellid.

Now that you know how to check the type of connection your Notecard has most recently
used, let's look at how to use the _wifi environment to change that
connection.
Notehub API
The Notehub API has different endpoints for setting environment variables on devices, device fleets, and projects. In this section we'll use the device endpoint for demonstration, but here are links to all three in case you want to set Wi-Fi networks for multiple devices at a time.
When using the Notehub environment variables APIs you need to
pass an environment_variables argument in the PUT request's body. For example,
you could use the following body to set a single test environment variable to
"value".
{
  "environment_variables": {
    "test": "value"
  }
}
The formatting is a bit trickier when sending _wifi, as the variable expects
a value in the following format.
["FIRST-SSID","FIRST-PASSWORD"],["SECOND-SSID","SECOND-PASSWORD"]When sending data in this format you'll likely have to escape the double quotes—meaning,
the body of your PUT request will look something like this.
{
  "environment_variables": {
    "_wifi": "[\"MyNetwork\",\"MyPassword\"]"
  }
}
As an example, here's what the formatting looks like when sending the request in Postman.

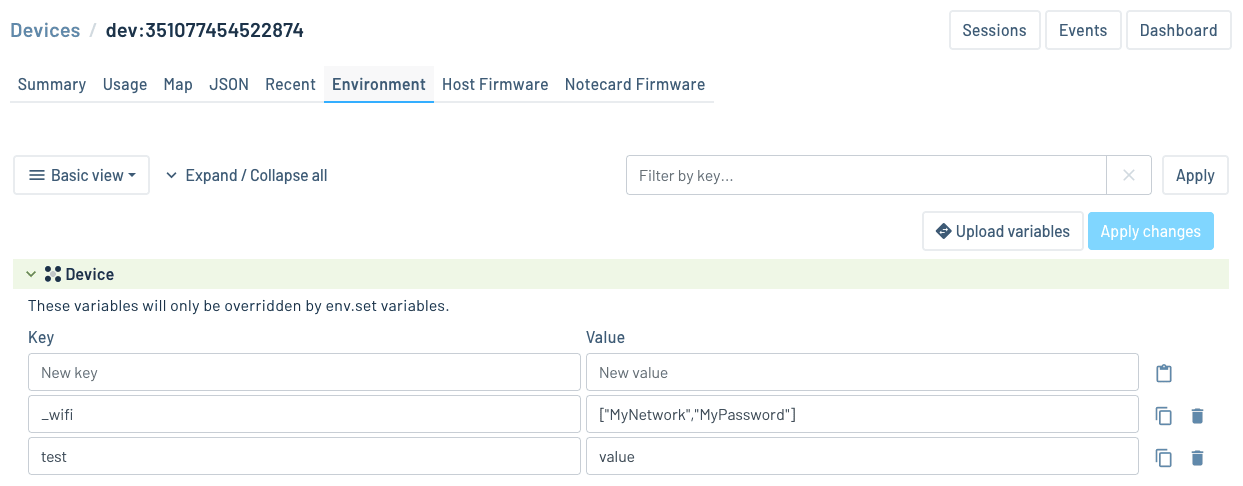
You'll know you did everything correctly by checking your device's environment
variables in Notehub, which will display the _wifi variable without the
escaped quotes.
Once your environment variable is set, you'll have to wait for the following:
-
Your Notecard must perform its next inbound synchronization. For example, if you used
inbound: 5in yourhub.setrequest, you may have to wait up to 5 minutes for your Notecard to synchronize with Notehub and receive this variable update. -
A new session must begin. When a Notecard starts a new session it'll check the
_wifienvironment variable for new information when determining which radio access technology and network to use.
When the session does start and you see a corresponding _session.qo event in Notehub,
you can again check the rat property to make sure your change was successful.

Web Application
In addition to using the Notehub API to manage Wi-Fi networks directly, you can also use the Notehub API SDKs to build scripts or dashboards that access Notecard data and change Notecard configuration.
In this section we'll discuss a sample web application that uses the Notehub JS Library to manage a Notecard's Wi-Fi network.
noteThe full source code for the web application discussed in this section is available on GitHub. Read through the application's README for steps on how to run this app for your own Notehub projects.
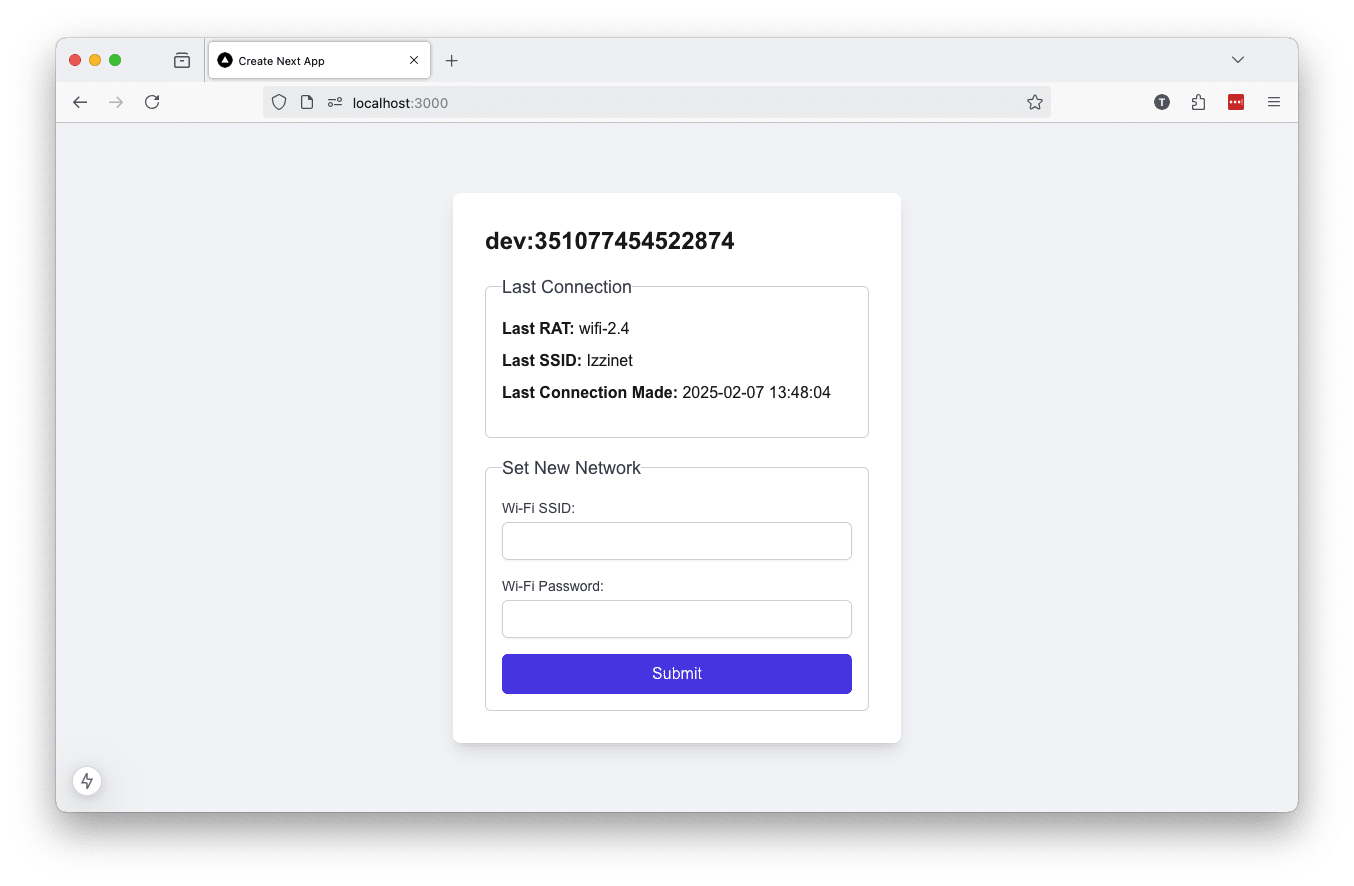
At a high-level, the sample web application performs the same two tasks we discussed when talking about the Notehub API: it detects which network a Notecard has most recently used, and it allows the user to change that network by making an environment variable change.
Detecting the Current Network
In the previous section, we determined which network a Notecard used by manually
visiting Notehub, looking through device's events, finding the most recent
session-start event, and looking at its rat property.
Instead, the sample web application uses the Notehub API's
Get Project Events
endpoint to find the two most recent _session.qo events, filters for the
the session-start event (the one with a "req": "session.begin" property),
and saves the rat, ssid and when properties for displaying in the
user interface.
import * as NotehubJs from "@blues-inc/notehub-js";

const projectUID = process.env.NEXT_PUBLIC_APP_UID;
const deviceUID = process.env.NEXT_PUBLIC_DEVICE_UID;
const eventApiInstance = new NotehubJs.EventApi();

const getLatestNetworkUsed = () => {
  eventApiInstance
    .getProjectEvents(projectUID, {
      deviceUID: [deviceUID],
      files: ["_session.qo"],
      pageSize: 2,
      sortBy: "captured",
      sortOrder: "desc",
    })
    .then((data: EventsResponse) => {
      const startEvent = data.events.filter(
        (event) => event.req == "session.begin"
      )[0];

      setRat(startEvent.rat);
      setSsid(startEvent.ssid);
      setWhen(startEvent.when);
    });
};
The app performs this network check when the page first loads, and then re-runs the logic every minute so that the network information stays up to date.
useEffect(() => {
  // Run the check on page load
  getLatestNetworkUsed();

  // Re-run the check every minute (60000 milliseconds == 1 minute)
  const interval = setInterval(() => {
    getLatestNetworkUsed();
  }, 60000);

  return () => clearInterval(interval);
}, []);
Updating the Network
Next, let's discuss setting the _wifi environment variable. Previously
we used the Notehub API "Set Device Environment Variables" endpoint to
save any changes we wanted to make to the _wifi variable.
In this section, we'll do the same thing using the Notehub JS Library.
The code below shows the relevant portion of the web application's source
code. This code takes the new SSID and password from the user interface,
places it into the expected format, and then sends it to Notehub with the
putDeviceEnvironmentVariables() function.
import * as NotehubJs from "@blues-inc/notehub-js";

const projectUID = process.env.NEXT_PUBLIC_APP_UID;
const deviceUID = process.env.NEXT_PUBLIC_DEVICE_UID;
const deviceApiInstance = new NotehubJs.DeviceApi();

const setWiFiEnvVar = async (newSsid: string, newPassword: string) => {
  const envVars = new NotehubJs.EnvironmentVariables({
    _wifi: `["${newSsid}","${newPassword}"]`,
  });
  await deviceApiInstance.putDeviceEnvironmentVariables(
    projectUID,
    deviceUID,
    envVars
  );
};
Overall, this application is provided as a reference for what is possible when using the Notehub API and Notehub JS Library. Feel free to use the sample code verbatim, or to use it as inspiration for implementing your own dashboards for Notecard-based products.
If you have any questions about using these APIs or building dashboards for Notecard devices, feel free to reach out in our community forum.