Don't see your favorite hardware here? Rest assured the Notecard works with virtually every MCU and SBC available. If you can't figure out how to complete this tutorial let us know in our forum and we can help you out.
Introduction
This tutorial should take approximately 40-50 minutes to complete.
In this tutorial, you'll learn how to take sensor data, queue it on your Notecard, and synchronize it to Blues Notehub. You'll use C/C++ (Arduino/Wiring) running on a Blues Cygnet. If you would like to use a different language or board, modify the dropdowns at the top of this guide. And if you get stuck at any point, feel free to reach out for help in our community forum.
This tutorial uses mock sensor readings for simplicity, but feel free to hook up a physical sensor of your choice and use that instead. The goal of this tutorial is to demonstrate reusable firmware techniques you can apply to your own Notecard-based projects.
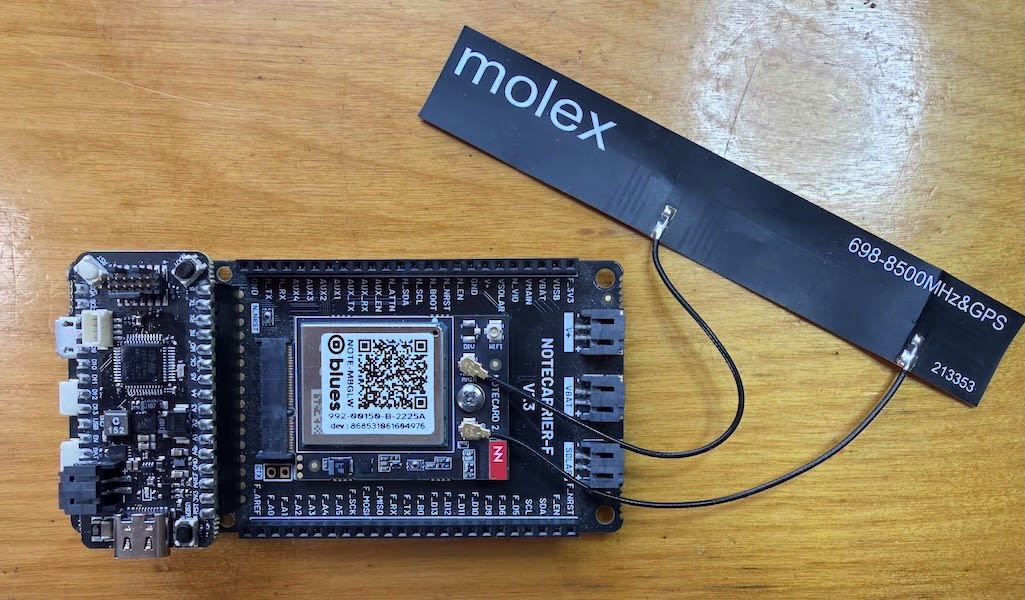
Set up Hardware
This tutorial assumes you have already wired your Notecard to your host. If you haven't, complete the Host Wiring Guide before continuing.
In order to complete this guide, you'll need the following:
-
A Blues Cygnet.
-
A USB-C cable.
If you’re following the Feather Kit for Cell+WiFi Quickstart, all you need to do at this point is plug your Cygnet into the Feather headers on the Notecarrier F, then connect it to your computer using the USB-C port on the Cygnet.
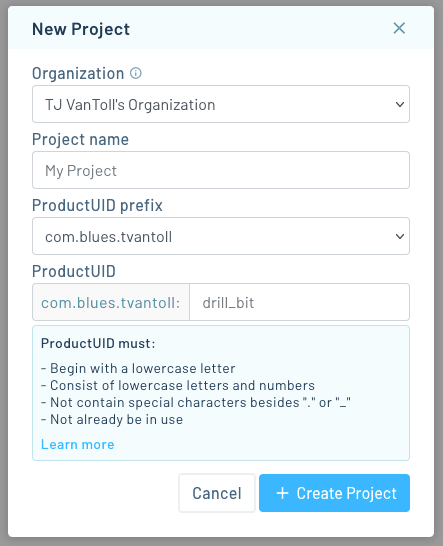
Create a Notehub Project
Now that your hardware is all connected, let's create a new Notehub project to receive sensor readings from your Notecard.
-
Navigate to notehub.io and log in, or create a new account.
-
Click the Create Project button.
-
In the New Project dialog, give your project a name and ProductUID.
 note
noteThe ProductUID must be globally unique, so we recommend a namespaced name like
"com.your-company.your-name:your_product". -
Take note of your ProductUID. This identifier is used by Notehub to associate your Notecard to your project.
Write Firmware
This tutorial shows how to write host firmware by hand so you can understand the fundamentals. In practice, we recommend using an AI coding assistant with Blues Expert MCP for development. Blues Expert MCP connects your AI coding assistant (Claude Code, GitHub Copilot, Cursor) directly to our API docs, providing live request validation and firmware best practices for Arduino, C, Zephyr, and Python. Install the Blues Expert MCP →
For this portion of the guide you'll be writing firmware on your Blues Cygnet that will communicate with the Notecard. You can write the firmware using either PlatformIO (recommended) or Arduino IDE.
Communicating With Your Notecard
When communicating with the Notecard, the easiest approach is to use one of Notecard's official SDKs. Since this tutorial uses Arduino, let's install the Arduino SDK, note-arduino.
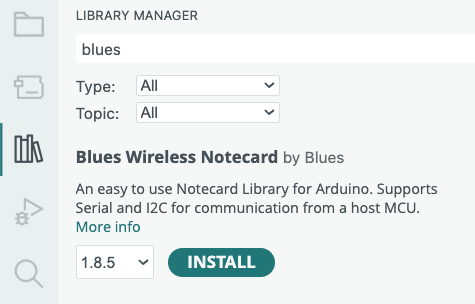
Install the Notecard Arduino Library
-
To use the note-arduino library, you'll need to add it to the Arduino IDE.
-
Click on Tools > Manage Libraries...
-
Search for "Blues" in the input box and click the "Install" button next to the "Blues Wireless Notecard" result.
-
Create a new sketch and select the Sketch > Include Library > Contributed Libraries > Blues Wireless Notecard menu option, to add the following include to your sketch:
#include <Notecard.h>
-
Open PlatformIO within Visual Studio Code.
-
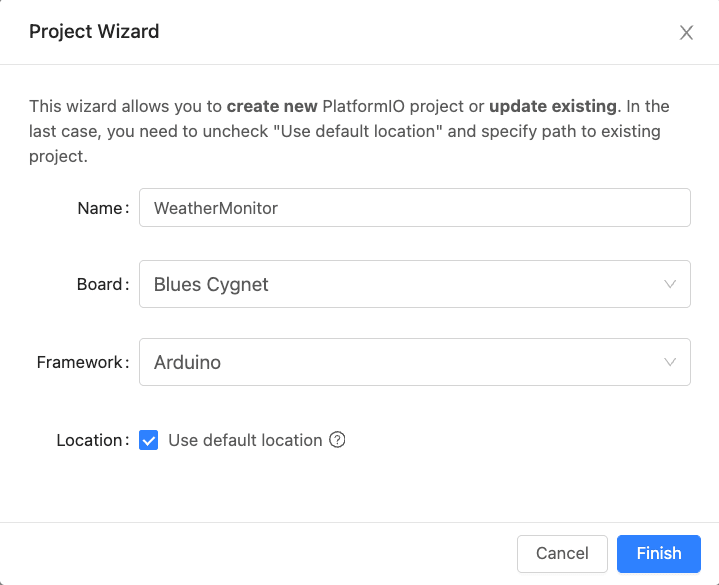
Click the Projects & Configuration menu, and hit the Create New Project button.
-
Give the project a Name, select a board of Blues Cygnet, and click Finish.
-
Open your new project's
platformio.inifile, and replace its contents with the default Cygnet configuration below, which includes the Blues Notecard library in itslib_deps.[env:blues_cygnet] platform = ststm32 board = blues_cygnet upload_protocol = stlink framework = arduino build_flags = -D PIO_FRAMEWORK_ARDUINO_ENABLE_CDC monitor_speed = 115200 lib_deps = Wire blues/Blues Wireless Notecard warning
The above configuration assumes you're connecting to your Cygnet via an STLink programmer like the STLINK-V3MINI. If you instead intend to program your Cygnet using only a USB cable, you'll need to set your
upload_protocoltodfuand follow these instructions to force the Cygnet to jump into its bootloader:Press and hold the
BOOTbutton on the Cygnet, press and releaseRESET, then releaseBOOTevery time you want to upload firmware.
-
Open your project's
main.cppfile, and paste the following include under the existing<Arduino.h>include. Leave yourmain.cppfile open for the steps below.#include <Notecard.h>
Set Up Your Notecard
Select the tab matching the interface you wired up in the Host Wiring Guide, then follow the steps for your chosen interface.
If you're using a Notecarrier CX or Notecarrier F, you're likely using I2C, as those boards connect the host to Notecard over I2C by default.
-
At the top of your sketch, define the Serial interface you'll use for logging.
#define usbSerial Serial -
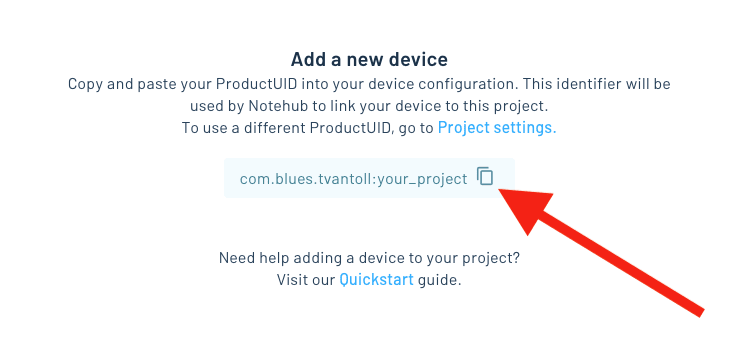
Add a definition for your ProductUID using the value you specified when creating your Notehub project.
#define productUID "com.your-company.your-name:your_product" -
Above the
setup()andloop()functions, declare a global object to represent the Notecard.Notecard notecard; -
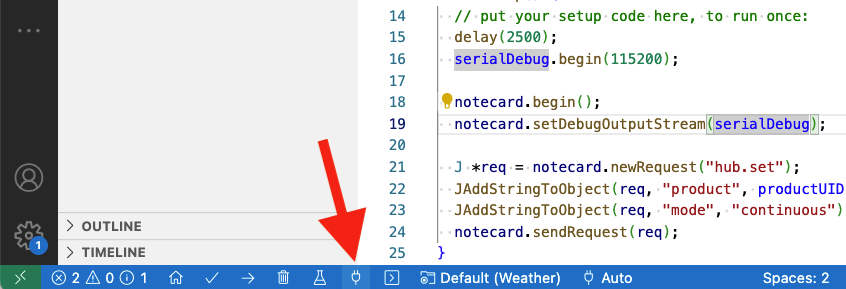
In the
setup()function, initialize theusbSerialobject and tell the Notecard library to use this serial object for sending debug output.delay(2500); usbSerial.begin(115200); -
Initialize the I2C connection to the Notecard using the
notecard.begin()function. Then, usesetDebugOutputStream()to link the debug output tousbSerialwith the following code:notecard.begin(); notecard.setDebugOutputStream(usbSerial);
-
At the top of your sketch, define the Serial interfaces you'll use for logging and Notecard communication.
#define usbSerial Serial #define txRxPinsSerial Serial1 -
Add a definition for your ProductUID using the value you specified when creating your Notehub project.
#define productUID "com.your-company.your-name:your_product" -
Above the
setup()andloop()functions, declare a global object to represent the Notecard.Notecard notecard; -
In the
setup()function, initialize theusbSerialobject.usbSerial.begin(115200); while (!usbSerial) { ; // wait for serial port to connect. Needed for native USB } usbSerial.println("Starting..."); -
Initialize the UART connection to the Notecard using the
begin()function. Then, usesetDebugOutputStream()to link the debug output tousbSerialwith the following code:notecard.begin(txRxPinsSerial, 9600); notecard.setDebugOutputStream(usbSerial);
-
Now, we'll configure the Notecard. Using the
hub.setrequest, we associate this Notecard with the ProductUID of your project and set the Notecard to operate incontinuousmode, which indicates that the device should immediately make a connection to Notehub and keep it active.{ J *req = notecard.newRequest("hub.set"); if (req != NULL) { JAddStringToObject(req, "product", productUID); JAddStringToObject(req, "mode", "continuous"); notecard.sendRequest(req); } }The lines above build up a JSON object by adding two string values for product and mode, and then fires the request off to the Notecard with the
sendRequest()function.
Flash Your Firmware
-
If you're NOT using an STLink programmer like the STLINK-V3MINI, before you upload your compiled sketch to the Blues Cygnet you'll need to enter bootloader mode by pressing and holding the
BOOTbutton, pressingRESET, then releasing both buttons.If you're using Arduino IDE, click the Upload button (right arrow icon) to flash the firmware to your device.
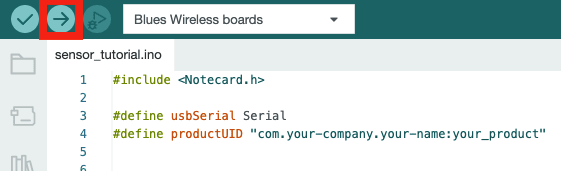
If you're using PlatformIO, click the Upload button (right arrow icon) at the bottom of the VS Code interface to flash the firmware to your device.

View the Serial Log
Now that your firmware is running on your device, you can use a Serial Monitor to view device output. If you are using an STLINK programmer, you will need to connect a second USB cable from your computer directly to your STM32-based host to view serial output.
Complete the instructions below in your preferred IDE.
-
If you're using Arduino IDE, open the Arduino Serial Monitor. If everything has been connected and configured properly, you'll see a few debug messages, including the JSON object you sent, as well as the response from the Notecard
{}.NOTE: You may need to press the
RESETbutton on your board or upload your code a second time to see the result of thehub.setrequest, as the Serial Monitor only captures output when it is actively running.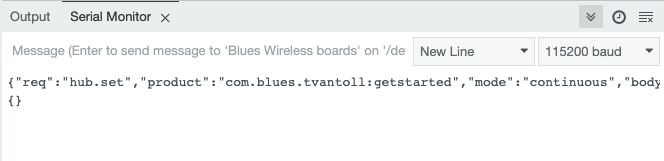
-
If you're using PlatformIO, open the Serial Monitor by clicking the plug icon in the bottom of VS Code.
After selecting the appropriate serial port, you should see a few debug messages, including the JSON object you sent and the response from the Notecard
{}.NOTE: You may need to press the
RESETbutton on your board or upload your code a second time to see the result of thehub.setrequest, as the Serial Monitor only captures output when it is actively running.
Read from the sensor
Now that you've configured your Arduino to communicate with the Notecard, let's grab some sensor readings.
If you have your own sensor, feel free to hook it up and use your own values instead of this tutorial's mocked ones.
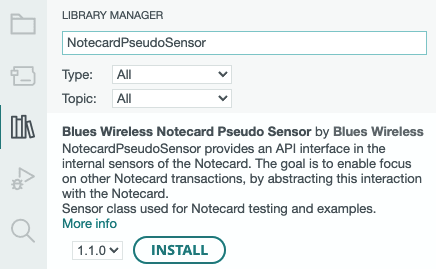
Install the NotecardPseudoSensor Library
To generate mock sensor readings you'll use the NotecardPseudoSensor library.
Complete the instructions below for your preferred IDE.
-
To add the library to Arduino IDE start by clicking on Tools > Manage Libraries...
-
Search for "NotecardPseudoSensor" in the input box and click the Install button next to the "Blues Wireless Notecard Pseudo Sensor" result.
-
Click the Libraries menu within PlatformIO.
-
Search for "Notecard" and scroll a bit to find the NotecardPseudoSensor library.

-
Click the "Add to Project" button and select your project from the dropdown list provided. This will add the library to the
lib_depssection of your project'splatformio.inifile.
Gather Sensor Readings
-
Add the following include to the top of your sketch:
#include <NotecardPseudoSensor.h> -
Next, include the following
namespaceunder your includes.using namespace blues; -
After that, create an instance of
NotecardPseudoSensorwith the line of code below. Place this directly under your existingNotecard notecardstatement.NotecardPseudoSensor sensor(notecard); -
Finally, place the following code in your
loopfunction, which generates mock temperature and humidity readings, prints them to the console, and then waits 15 seconds before exiting the loop.float temperature = sensor.temp(); float humidity = sensor.humidity(); usbSerial.print("Temperature = "); usbSerial.print(temperature); usbSerial.println(" *C"); usbSerial.print("Humidity = "); usbSerial.print(humidity); usbSerial.println(" %"); delay(15000); -
Upload this code to your Blues Cygnet. Open the Serial Monitor and you'll see temperature and humidity readings every 15 seconds.

Send Sensor Readings to the Notecard
Now that we're getting sensor readings, let's send these to our Notecard.
-
To send a sensor reading to the Notecard, we'll need to construct a new JSON request to the
note.addAPI that includes a new Notefile name (sensors.qo), sets thesyncfield to true to instruct the Notecard to sync to Notehub immediately, and finally, sets thebodyto the sensor temperature and humidity. Add the following inloopright after theusbSerialcommands to print out readings.{ J *req = notecard.newRequest("note.add"); if (req != NULL) { JAddStringToObject(req, "file", "sensors.qo"); JAddBoolToObject(req, "sync", true); J *body = JAddObjectToObject(req, "body"); if (body) { JAddNumberToObject(body, "temp", temperature); JAddNumberToObject(body, "humidity", humidity); } notecard.sendRequest(req); } }
-
Upload this code to your device. After reboot, the Serial monitor will update to display the response from the
note.addrequest (the total number of Notes in the notefile) each time you add a new reading.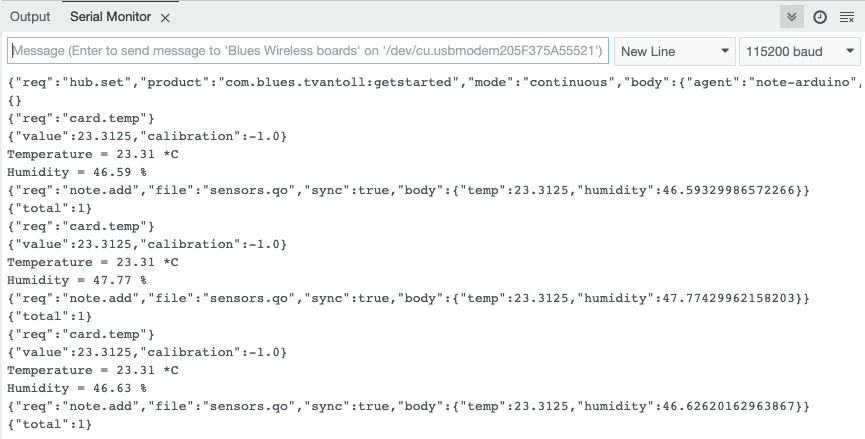
If you're using a Notecard for LoRa to complete this tutorial you have one additional
step. Because the Notecard for LoRa requires a template for every Notefile you use,
you must define a template for the sensors.qo Notefile in your setup() function.
You can add the following code to the bottom of your setup() function to fix the
problem.
{
  J *req = notecard.newRequest("note.template");
  if (req != NULL) {
    JAddStringToObject(req, "file", "sensors.qo");
    JAddNumberToObject(req, "port", 1);
    JAddStringToObject(req, "format", "compact");
    J *body = JCreateObject();
    if (body != NULL) {
      JAddNumberToObject(body, "temp", 14.1);
      JAddNumberToObject(body, "humidity", 14.1);
      JAddItemToObject(req, "body", body);
      notecard.sendRequest(req);
    }
  }
}
Learn more about Notefile templates in Working with Note Templates.
Concerned about the size of note-arduino? You can
communicate with the Notecard without using the library.
View Data in Notehub
Once you start capturing readings, your Notecard will initiate a connection to Notehub and will start transferring Notes. Depending on signal strength and coverage in your area, it may take a few minutes for your Notecard to connect to Notehub and transfer data.
-
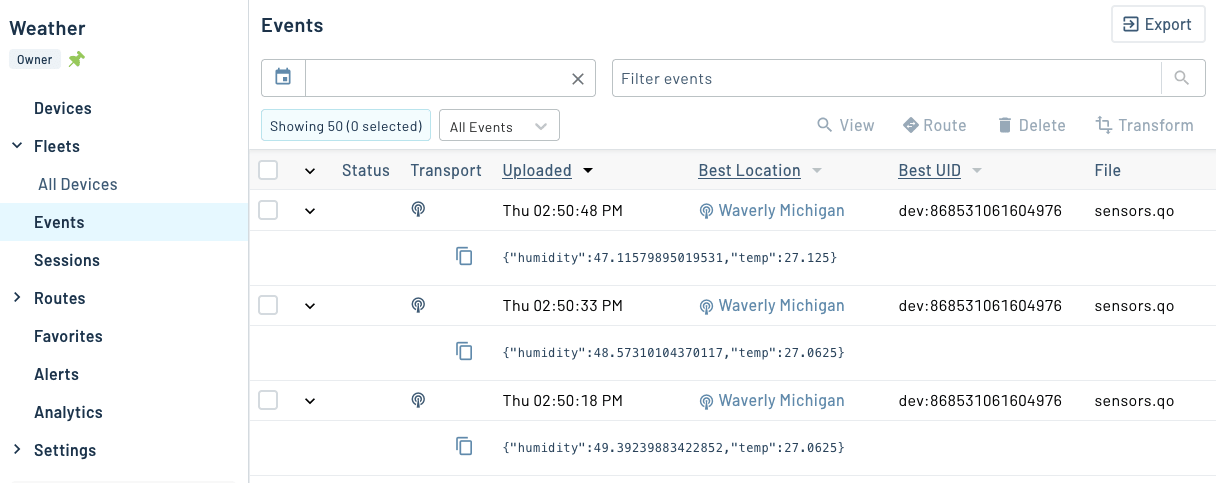
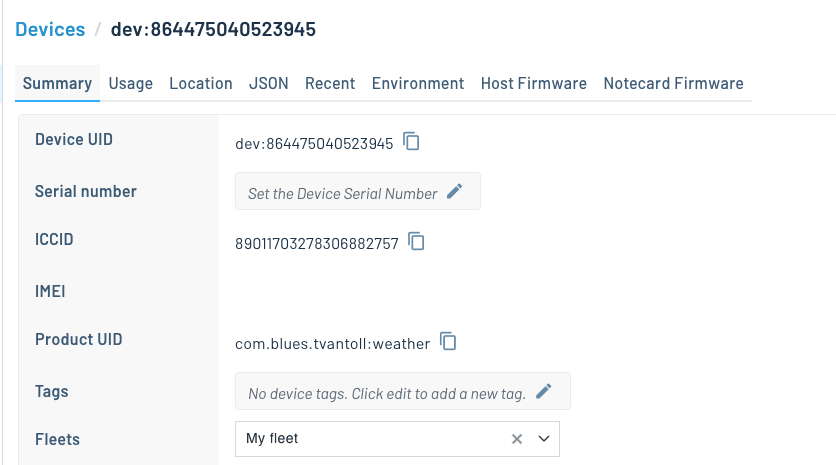
Return to notehub.io and open your project. You should see your Notecard in the Devices view.
 note
noteEach Notecard has a factory-assigned, globally unique identifier known as a DeviceUID. Notehub uses this identifier in the Devices view by default (for example,
dev:868531061604976in the screenshot above).If you’d prefer to use your own identifier—such as a human-readable name or an internal ID—you can assign a serial number to your Notecard in one of the following ways:
- In Notehub Double-click your device in the Devices view to open its details, where you can edit the serial number.
- Via the Notehub API: Set the reserved
_snenvironment variable using the Set Device Environment Variables endpoint. - Via the Notecard API: Include an
snargument in the hub.set request you used to configure your Notecard.
-
Now, click on the Events left menu item. Once your sensor Notes start syncing, they'll show up here. You may need to refresh the page to see newly synced Notes.
Use Environment Variables
Environment variables are a Notehub state and settings management feature that allow you to set variables in key-value pairs, and intelligently synchronize those values across devices and fleets of devices.
In this section you'll learn how environment variables work by creating a variable that determines how often your firmware should take sensor readings.
Using Environment Variables in Firmware
The Notecard provides a set of requests for working with environment variables.
The most common of these requests is env.get,
which allows you to retrieve the value of an environment variable.
Complete the steps below to use the env.get request to retrieve and use the
reading_interval environment variable.
-
In
setup(), adjust your existinghub.setconfiguration to set theinboundargument to5. This tells your Notecard to look for inbound changes from Notehub every 5 minutes.{ J *req = notecard.newRequest("hub.set"); if (req != NULL) { JAddStringToObject(req, "product", productUID); JAddStringToObject(req, "mode", "continuous"); JAddNumberToObject(req, "inbound", 5); // ADD THIS LINE notecard.sendRequest(req); } } -
Next, place the following new function at the bottom of your sketch.
// This function assumes you’ll set the reading_interval environment variable to // a positive integer. If the variable is not set, set to 0, or set to an invalid // type, this function returns a default value of 60. int getSensorInterval() { int sensorIntervalSeconds = 60; J *req = notecard.newRequest("env.get"); if (req != NULL) { JAddStringToObject(req, "name", "reading_interval"); J* rsp = notecard.requestAndResponse(req); int readingIntervalEnvVar = atoi(JGetString(rsp, "text")); if (readingIntervalEnvVar > 0) { sensorIntervalSeconds = readingIntervalEnvVar; } notecard.deleteResponse(rsp); } return sensorIntervalSeconds; } -
Then, add this line after the
#includelines at the top of the file.int getSensorInterval(); -
Next, find the
delay(15000)line at the bottom of yourloop()function, and replace it with the code below.int sensorIntervalSeconds = getSensorInterval(); usbSerial.print("Delaying "); usbSerial.print(sensorIntervalSeconds); usbSerial.println(" seconds"); delay(sensorIntervalSeconds * 1000);noteNotecard for LoRa requires a template for each environment variable you use. If you're using a Notecard for LoRa to complete this tutorial, add the code below to your
setup()to provide a template for thereading_intervalvariable.{ J *req = notecard.newRequest("env.template"); if (req != NULL) { J *body = JCreateObject(); if (body != NULL) { JAddNumberToObject(body, "reading_interval", 21); JAddItemToObject(req, "body", body); notecard.sendRequest(req); } } }Here
21is the type hint for a 1-byte unsigned integer (0–255). If yourreading_intervalmay exceed 255, use22(a 2-byte unsigned integer) instead.
With this code in place, your firmware now uses the reading_interval environment
variable to determine how many seconds to delay in between sensor readings. If you
flash this updated code to your device and open your serial monitor, you can see
the device using the default value for reading_interval of 60 seconds.
Setting an Environment Variable
Now that we have our device programmed to retrieve an environment variable from Notehub, we will create that variable. Environment variables can be set in the Notehub UI or through the Notehub API. In this tutorial you'll learn how to set the values through the Notehub UI. If you'd like to instead set environment variables through the Notehub API, refer to environment variable requests in the Project API.
-
Return to your Notehub project, go to the Devices page, and double click your device. You should see a screen that looks like this.
-
Click the Environment tab.
-
Under the Device environment variables header, define a new environment variable named
reading_intervaland set its value to30.
Now that you have an environment variable set, you'll see it reflected on your device
after your configured inbound interval has passed.

On cellular and WiFi-based Notecards you can use the
hub.set request's
sync argument to immediately receive inbound updates instead of relying on the
inbound interval.
And with that, you've used your first environment variable on your Notecard!
To see the real power of environment variables in action, try returning to Notehub
and updating your device's reading_interval with your serial monitor open.
This tutorial covers several configuration settings that are best used when you have your Notecard connected to mains power.
-
In the
hub.setrequest, settingmodeto"continuous"tells the Notecard to maintain an active network connection. -
In the
hub.setrequest, thesyncargument (when set totrue) tells the Notecard to immediately synchronize inbound Notes and environment variables from Notehub. -
In the
note.addrequest, settingsynctotruetells the Notecard to immediately synchronize all outbound Notes to Notehub.
Because each of these settings cause the Notecard to use more power, you
may wish to disable them if you plan to transition your project to battery power.
You can run the command below to put your Notecard into periodic mode with
the sync argument turned off.
{
 "req": "hub.set",
 "mode": "periodic",
 "sync": false,
 "outbound": 60,
 "inbound": 120
}
For a deeper look at how these settings work together, watch
An In-Depth Guide to Notecard’s hub.set Request.
The video steps through complete configuration scenarios that show how your
choice of mode, outbound, inbound, and sync values determines exactly
when your Notecard connects and syncs with Notehub.
Next Steps
Congratulations! You've successfully connected your Blues Cygnet to your Notecard and built a basic IoT project.
If you're following a Cell+WiFi Quickstart, next we recommend learning how to send (and visualize) your data in a cloud application:
Use the Notecard to Send DataSet Up Your MicrocontrollerBuild Your First IoT App With Blues- Send Data to Your Cloud
At any time, if you find yourself stuck, please reach out on the community forum.