
Routing Data from Notehub to a Custom Cloud Endpoint
Introduction
This sample app showcases how to receive data from a Notehub route on a custom cloud endpoint using several popular backend languages and frameworks. These examples give you the flexibility to self-host a service and integrate Notehub data directly into your own systems.
Wireless Connectivity with Blues
This sample app is built around the Blues Notecard and Blues Notehub.
The Blues Notecard is the easiest way for developers to add secure, robust, and affordable pre-paid wireless connectivity to their microcontroller or single-board computer of choice. Notecard is a System-on-Module (SoM) that combines pre-paid data, low-power hardware (~8μA-18μA when idle), and secure communications. It acts as a device-to-cloud data pump to communicate with the Blues cloud service Notehub.
Notehub is the Blues cloud service for routing Notecard-provided data to third-party cloud applications, deploying OTA firmware updates, and securely managing fleets of Notecards. Notehub allows for secure communications between edge devices and the cloud without certificate management or manual provisioning of devices.
General Information
System Hardware
The event data utilized in these examples can be provided by any combination of Notecard, host microcontroller, and sensor.
Backend Frameworks
The examples are categorized by programming language and each utilizes a specific web framework and/or runtime to simplify the implementation.
| Language | Web Framework/Runtime |
|---|---|
| JavaScript | Node.js and Express.js |
| Python | Flask |
| C# | ASP.NET Core |
Assumptions
The sample code provided assumes the JSON event data you are routing includes at
least a body element. For example:
{
  "event": "d012d460-7992-8414-a4eb-63bc816bf100",
  "when": 1745940562,
  "file": "data.qo",
  "body": {
    "temp": 23.4
  },
  "session": "b68ffcd2-55db-4bb0-806c-b72bd852f2d7",
  "transport": "cell:lte:fdd",
  "best_id": "dev:860322068073292",
  ...
}
JavaScript
Running JavaScript applications on the server requires a runtime environment such as Node.js. Node.js is free, open-source, and runs on any operating system.
Requirements
- Install Node.js (preferably the latest LTS release).
- Install Express.js, which is a free and open-source web framework built on top of Node.js.
- A Windows, macOS, or Linux physical server or VPS.
Implementation
-
Open your terminal (or PowerShell on Windows), create a new directory, and navigate inside it.
mkdir notehub-route && cd notehub-route -
Initialize your application using npm (Node Package Manager).
npm init -y -
Edit your
package.jsonfile so thescriptssection looks like the following. This will instruct Node.js to start the script we are about to create."scripts": { "start": "node index.js" } -
In the root of
notehub-routecreate a file calledindex.js. -
The
index.jsfile is where all of your application logic will exist to receive routed data from Notehub via a POST request. The following is an example implementation with inline comments and a placeholder function where you will want to implement your own functionality to process the event (e.g. insert records into a database).Please note that if you end up using a JSONata expression in your route, you may have to adjust the application logic, as this example assumes there will be a
bodyelement in the routed JSON.const express = require('express'); const app = express(); app.use(express.json()); // POST to /data and extract req.body.body from Notehub event app.post('/data', async (req, res) => { // get the "body" object from incoming Notehub event JSON const payload = req.body && req.body.body; if (!payload) { return res.status(500).json({ error: 'Event is missing body element' }); } try { // the `processPayload` function is where your custom logic will be required // e.g. insert records into a database or forward to another service processPayload(payload); // respond to Notehub with a success res.status(200).json({ status: 'ok' }); } catch (err) { // if your custom logic throws an error, catch it here console.error('Processing error:', err); res.status(500).json({ error: err }); } }); // placeholder function function processPayload(data) { console.log('Received payload:', data); } // start the server on an open and available port const PORT = process.env.PORT || 3000; app.listen(PORT, () => { console.log(`Listening on port ${PORT}`); }); -
Once your
index.jsfile is complete, run the following command to start your service.npm startIf running this locally, you can access the service here:
http://localhost:3000/data -
When testing your service locally, you should see a response like this in your terminal (where
{ test: 1 }is thebodyelement from the POSTed JSON event):> notehub-route@1.0.0 start > node index.js Listening on port 3000 Received payload: { test: 1 }
Python
While Python scripts can run on any server, in order to process POST requests over web protocols, it's best to use a framework like Flask. Flask is a "micro web framework" for Python, designed to be lightweight and flexible.
Requirements
Implementation
-
Create a new directory and navigate inside it.
mkdir notehub-route && cd notehub-route -
In the root of
notehub-route, create a file calledapp.py. -
The
app.pyfile is where all of your application logic will exist to receive routed data from Notehub via a POST request. The following is an example implementation with inline comments and a placeholder function where you will want to implement your own functionality to process the event (e.g. insert records into a database).Please note that if you end up using a JSONata expression in your route, you may have to adjust the application logic, as this example assumes there will be a
bodyelement in the routed JSON.from flask import Flask, request, jsonify app = Flask(__name__) # POST to /data and extract body from Notehub event @app.route('/data', methods=['POST']) def data_endpoint(): payload = request.get_json(force=True, silent=True) or {} body = payload.get('body') if body is None: return jsonify(error='Event is missing body element'), 500 try: # the `process_payload` function is where your custom logic will be required # e.g. insert records into a database or forward to another service process_payload(body) return jsonify(status='ok'), 200 except Exception as e: app.logger.error('Processing error: %s', e) return jsonify(error=e), 500 def process_payload(data): # placeholder function print('Received payload:', data) if __name__ == '__main__': # include debug=False for production app.run(host='0.0.0.0', port=5123) -
Once your
app.pyfile is complete, run the following command to start your service.python3 app.pyIf running this locally, you can access the service here:
http://localhost:5123/data -
When testing your service locally, you should see a response like this in your terminal (where
{ test: 1 }is thebodyelement from the POSTed JSON event):* Serving Flask app 'app' * Debug mode: off WARNING: This is a development server. Do not use it in a production deployment. Use a production WSGI server instead. * Running on all addresses (0.0.0.0) * Running on http://127.0.0.1:5123 * Running on http://192.168.0.189:5123 Press CTRL+C to quit Received payload: {'test': 1} 127.0.0.1 - - [02/May/2025 09:34:53] "POST /data HTTP/1.1" 200 -
C#
Modern C# applications running on .NET are cross-platform and can be deployed on Windows, macOS, or Linux. ASP.NET Core is Microsoft's framework for building and deploying web applications on Kestrel (all platforms) or IIS (Windows only).
Requirements
- Install the .NET 9 SDK.
- Depending on your operating system, you may have to manually add the .NET SDK
to your PATH, for example:
export DOTNET_ROOT="/usr/local/share/dotnet" export PATH="$PATH:/usr/local/share/dotnet" - (Optional - Windows only) Install/enable IIS.
- A Windows, macOS, or Linux physical server or VPS.
Implementation
-
Create a new directory and navigate inside it.
mkdir notehub-route && cd notehub-route -
Initialize a new ASP.NET Core application.
dotnet new web --framework net9.0 -
In the root of
notehub-route, open the file calledProgram.cs. -
The
Program.csfile is where all of your application logic will exist to receive routed data from Notehub via a POST request. The following is an example implementation with inline comments and a placeholder function where you will want to implement your own functionality to process the event (e.g. insert records into a database).Please note that if you end up using a JSONata expression in your route, you may have to adjust the application logic, as this example assumes there will be a
bodyelement in the routed JSON.using System.Text.Json; using Microsoft.AspNetCore.Builder; using Microsoft.Extensions.Hosting; using Microsoft.AspNetCore.Http; var app = WebApplication.CreateBuilder(args).Build(); // POST to /data and extract body from Notehub event app.MapPost("/data", async (HttpContext ctx) => { JsonElement? root = null; try { root = await JsonSerializer.DeserializeAsync<JsonElement>(ctx.Request.Body); } catch { } if (root == null || !root.Value.TryGetProperty("body", out var body)) return Results.BadRequest(new { error = "Event is missing body element" }); try { // the `ProcessPayload` function is where your custom logic will be required // e.g. insert records into a database or forward to another service ProcessPayload(body); return Results.Ok(new { status = "ok" }); } catch (Exception ex) { app.Logger.LogError(ex, "Processing error"); return Results.Json( new { error = "Internal Server Error" }, statusCode: 500 ); } }); app.Run(); static void ProcessPayload(JsonElement data) { // placeholder function Console.WriteLine("Received payload: " + data); } -
Once your
Program.csfile is complete, run the following command to start your service.dotnet run --urls "http://localhost:5123"The
urlsargument is optional; use if you want to override the default 5000 port.If running this locally, you can access the service here:
http://localhost:5123/data -
When testing your service locally, you should see a response like this in your terminal (where
{ test: 1 }is thebodyelement from the POSTed JSON event):Using launch settings from /Users/me/apps/notehub-route/Properties/launchSettings.json... Building... info: Microsoft.Hosting.Lifetime[14] Now listening on: http://localhost:5123 info: Microsoft.Hosting.Lifetime[0] Application started. Press Ctrl+C to shut down. info: Microsoft.Hosting.Lifetime[0] Hosting environment: Development info: Microsoft.Hosting.Lifetime[0] Content root path: /Users/me/apps/notehub-route Received payload: { "test": 1 }
Testing Your Service
-
You should now be able to use your service with a tool like Postman. Simply copy the full JSON from the JSON tab in the Notehub event you'd like to test, and use that as the
bodyof your POST request. -
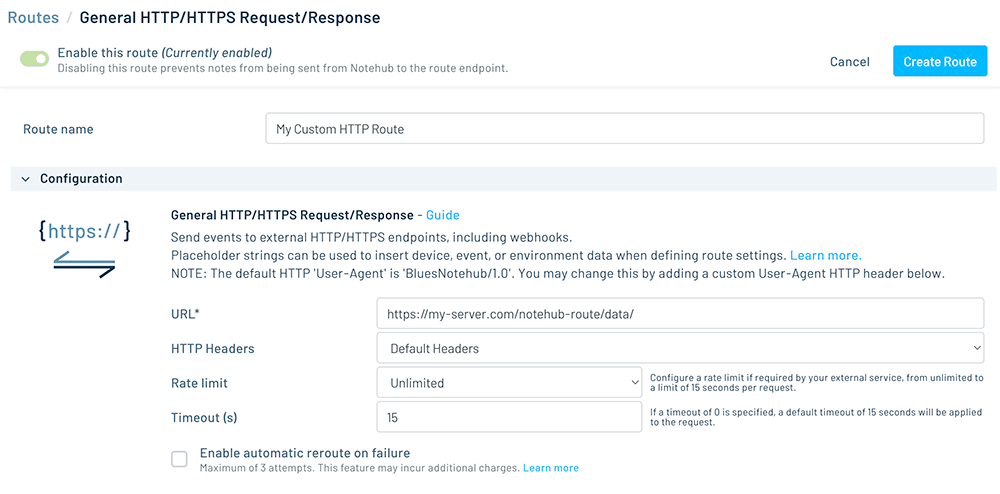
If the service is deployed to a remote server, you can return to Notehub and create a new route using the General HTTP/HTTPS Request/Response type. If you haven't already, follow the provided guide to learn how routing works in Notehub.
When setting up your route, be sure to provide the URL of your remote endpoint in the URL field. If required by your server's firewall, you may also need to whitelist the IPs specified in the Notehub Walkthrough.
-
You can now start routing data from Notehub by either manually routing existing events or allowing new events to utilize the route.