
 Cold Chain Monitor
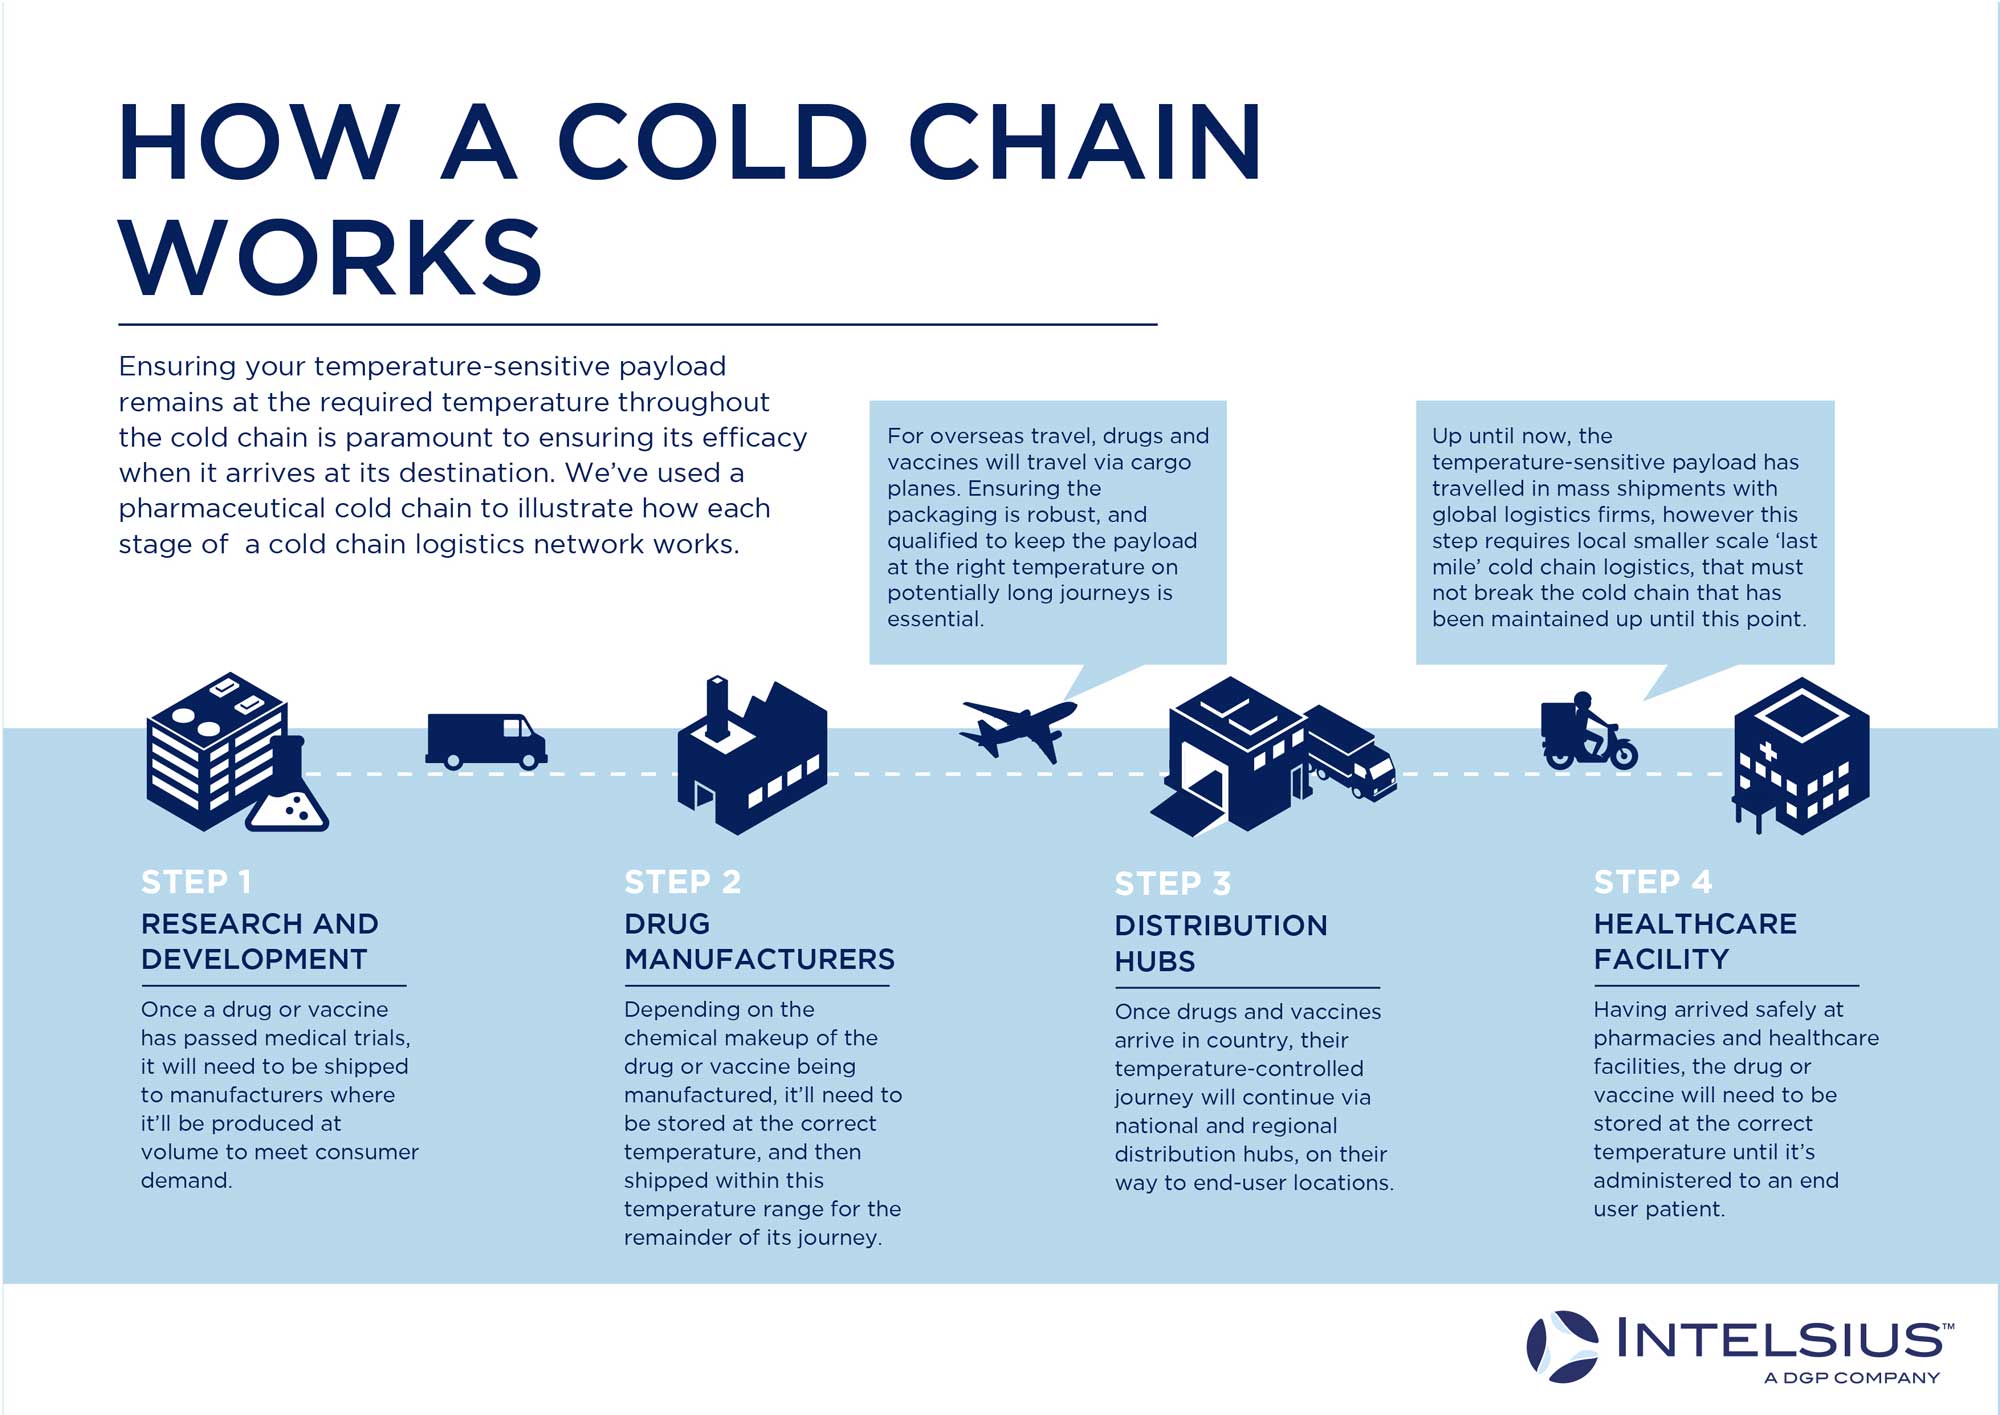
The shelf life of vaccines (and other temperature sensitive medicine), can be prolonged by monitoring temperature and location. It takes a chain of precisely coordinated events in temperature-controlled environments to store, manage and transport these life-saving products. This is called a cold chain.
Using a Notecard, ESP32 and LM75A sensor, an alert condition can be sensed (e.g. the temperature exceeds a predefined threshold). This device will send a Twilio SMS alert providing the exact location of the cold chain asset, so it can be rescued before it is ruined.
The starting point for all medicines is, "Controlled Room Temperature (CRT)"
U.S. Pharmacopeia (USP) USP <659> "Packaging and Storage Requirements"
Controlled room temperature: The temperature maintained thermostatically that encompasses at the usual and customary working environment of 20°-25° (68°-77° F). Excursions between 15° and 30° (59° and 86° F) that are experienced in pharmacies, hospitals, and warehouses, and during shipping are allowed. Provided the mean kinetic temperature does not exceed 25°, transient spikes up to 40° are permitted as long as they do not exceed 24h. Spikes above 40° may be permitted only if the manufacturer so instructs.
NOTE: By default, our device will monitor for CRT, but those thresholds can be dynamically modified using cloud-based environment variables.
Prerequisites
- USB type A-to-micro USB cable
- 2000 mAh Li-Ion battery with JST cable
- Notecarrier B
- Molex Antenna 213353 (included with Notecarrier-B purchase)
- LTE Cat-1 Notecard (North America, EMEA)
- Adafruit Huzzah32 - ESP32 Feather Board (loose headers)
- HiLetgo 2pcs LM75 LM75A Temperature Sensor Module
- Molex Antenna 209142
- Qwiic Cable Breakout
- [OPTIONAL] Cirocomm 5cm Ceramic Active GPS Antenna 32db (High Gain)
- [OPTIONAL] ESP-Prog
Software
Notehub Setup
Sign up for a free account on notehub.io and create a new project.
Twilio Route
When an alert condition is detected a Note is immediately sent to Notehub. In order for you to be informed this event occurred, you must configure a Twilio route.
Follow the Twilio SMS Guide on https://blues.dev to learn the steps required to link your Twilio account to Notehub.
Once you are familiar with the Twilio route, create a new route and set the following fields to forward alert information from the vaccine temperature monitoring solution to your SMS capable endpoint.
Configuration
| Field | Value |
|---|---|
| AccountSID | copy from Twilio's "Account Info" panel |
| AuthToken | copy from Twilio's "Account Info" panel |
| From Number | copy from Twilio's "Account Info" panel |
| To Number | your SMS capable phone number |
| Message | [.msg] |
| Rate limit | Limited Request Rate |
| Requests per second | 1 |
| Timeout(s) | 15 |
Don't Forget: Check the box for "Enable automatic reroute on failure."
Data
| Field | Value |
|---|---|
| Transform Data | JSONata Expression |
Then enter the following JSONata expression in the box:
{
    "msg":$exists(body.alert)
        ? "THERMAL ALARM: " & ((body.temp*9/5)+32) & "F%0A%0A" & best_location_type & " location:%0Ahttps://maps.google.com/maps?q=" & best_lat & "," & best_lon
        : $exists(body.low_batt)
        ? "Warning: Low battery (" & $formatNumber(body.voltage, "#0.00") & "V).%0A%0APlease charge device."
        : $doNotRoute()
}
Hardware Setup
-
Prepare an enclosure for the device. A two-part, open-source enclosure design is provided at the following links:
-
Prepare the Notecarrier-B by removing the header pins. If you are unfamiliar with this procedure, check out this excellent video from Adafruit.
-
Solder the Qwiic breakout cable to the LM75A as shown in the table below:
LM75A Qwiic Cable VCCRED GNDBLACK SDABLUE SCLYELLOW -
Wire the ESP32, LM75A and Notecarrier-B in the following arrangement:
|   LM75A   |
                         |           |
                         | V G S S   |
                         | C N D C O |
                         |_C_D_A_L_S_|
__________________,        | | | | |        ,__________________
      ESP32       |        | | | | |        |   NOTECARRIER-B
                  |        | | | | |        |
                  |        | | | | '--------|AUX1
                  |        | | | |          |
                  |        '-^-^-^----------|<VIO
                  |          | | |          |
              VBAT|----------^-^-^----------|VBAT
                  |          | | |          |
               GND|----------'-^-^----------|GND
                  |            | |          |
               SDA|------------'-^----------|SDA
                  |              |          |
               SCL|--------------'----------|SCL
                  |                         |
                EN|-------------------------|ATTN
                  |                         |
NOTE: "
'" indicates a connection and "^" indicates a bypass.NOTE: You may wish to implement the circuit on a breadboard, to ensure correctness, before soldering.
-
Plug the Qwiic connector into the Notecarrier-B to make the connections described above (leaving only the connection from
OStoAUX1remaining). -
Mount the Notecard into the M.2 (key E) connector on the Notecarrier-B.
-
Connect the antennas to the Notecard as shown in the table below:
Notecard U.FL Antenna MAIN Molex Antenna 213353 (middle) DIV Molex Antenna 209142 GPS Molex Antenna 213353 (end) -
Plug the LiPo battery's JST cable into the Notecarrier-B port labeled
LIPO.
Notecard Firmware Setup
The Notecard should use firmware version 4.4.1 or higher. The simplest way to update firmware is to do an over-the-air (OTA) update.
Host Firmware Setup
-
Open Visual Studio Code.
-
Click the PlatformIO icon on the left hand side and open this project's
firmware/arduinofolder with Quick Access > PIO Home > Open > Open Project. -
Open the file
src/main.cpp. -
Uncomment the following line:
#define PRODUCT_UID "com.your-company:your-product-name" -
Replace
com.your-company:your-product-namewith your ProductUID generated during Notehub Setup. -
Click the PlatformIO icon on the left hand side again and click "Build" under Project Tasks > featheresp32 > General.
You should see "SUCCESS" in the terminal output pane. The firmware image is now ready to be flashed to the host.
-
Click "Upload" under Project Tasks > featheresp32 > General.
You should see "SUCCESS" in the terminal output pane.
Environment Variables
alarm_temperature- The temperature at which the alarm should trigger.alarm_hysteresis- The temperature at which the alarm should reset.sample_interval_s- The temperature and battery sampling interval in seconds.
NOTE: If you modify any environment variables, you must wait until the next synchronization event (max wait: inbound frequency) for the changes to propagate to the host.
NOTE: A table describing the "inbound frequency" can be found in the temperature sampling section below.
Operation
At this point, the host firmware should be running and you should start to see events show up on Notehub under your project's "Events" view.
The primary Notefile associated with the application is status.qo.
Normal Operation
Temperature Sampling
By default, the host will sample time stamped temperature data from the LM75A to
status.qo every 30 minutes. You can change this interval by setting the
environment variable sample_interval_s. Regardless of the sampling interval,
the host will publish the collected data to Notehub based on the amount of
charge remaining on the Li-Ion battery (depicted in table below).
| Charge Level | Outbound Freq (min) | Inbound Freq (min) |
|---|---|---|
| ON POWER | 5 | 5 |
| HIGH | 60 | 120 |
| NORMAL | 120 | 240 |
| LOW | 240 | 480 |
| DEAD | 0 | 0 |
NOTE: Reducing sample_interval_s will cause the application to sample the
temperature and battery condition more frequently and will shorten the expected
battery life of the device.
Normal data:
{
    "temp":18.5,
    "voltage":3.5898438
}
NOTE: Temperature is rendered in Celsius.
Location Sampling
The device is configured to use motion based GPS tracking. As long as motion has been detected, the device will report its location once every 15 minutes. Regardless of whether or not the device moves, it will also report a heartbeat location every 12 hours.
Alarm Conditions
Thermal Event
By default, the firmware will IMMEDIATELY send an alarm if the temperature
exceeds alarm_temperature. An alarm condition will cause the LM75A will trip
the OS pin, which alerts the Notecard and causes it to wake the host from
sleep.
Temperature alert data:
{
    "alert":true,
    "temp":30.5,
    "voltage":3.5898438
}
The alert field is added to the JSON object, when the temperature has exceeded
the alarm_temperature environment variable value. When the alert key is
received by Notehub, then an SMS message containing the temperature data and GPS
coordinates of the device is forwared to Twilio. There a text message is
generated and sent to the phone number specified in the alarm_sms_number
environment variable.
Thermal Event Operation
During a thermal event, time is of the essense and the mode of operation changes accordingly. Instead of sampling every 30 minutes, the temperature and location will be sampled every every 3 minutes. While in this mode, the device will force a GPS fix or timeout after 95 seconds.
Low Battery
The battery voltage is sampled each time the device wakes. During the
configuration step of the firmware, the Notecard is provided the battery
chemistry of the device. This allows the Notecard to be aware of voltages in
relation to overall charge. When the battery is sampled using the card.voltage
API, it will return charge of the battery as mode. When "mode":"low" is
encountered, then the low_batt key is added to the JSON object.
Battery alert data:
{
    "low_batt":true,
    "temp":30.5,
    "voltage":3.5898438
}
When the low_batt key is received by Notehub, then an SMS message containing
the voltage is forwared to Twilio. Again, a text message is generated and sent
to the phone number specified in the alarm_sms_number environment variable.
NOTE: The low battery alert IS NOT considered to be a high-priority alert and will be sent at the regular syncing interval.