Updating Notecard Firmware
Blues frequently releases updated firmware for Notecard, introducing new features and enhancements. The following instructions outline various methods for updating Notecard firmware.
Are you trying to implement OTA firmware updates on a host MCU? Please see our guide on Host Firmware Updates.
 warning
Make sure you read and understand the Blues Firmware Release Policies and Procedures before updating Notecard firmware.
Methods for Updating Notecard Firmware
- Local installation options (works for all Notecards)
- Remote OTA installation (works for Notecard Cellular, Notecard Cell+WiFi, Notecard for Skylo, Notecard WiFi)
DFU with In-Browser Terminal
If your Notecard device is running firmware v5.3.1 or later, you may update Notecard firmware manually using the In-Browser Terminal and no other tools.
 note
noteNotecard for LoRa requires firmware v7.5.2 or later to use this method. On earlier LoRa firmware, use DFU with STM32CubeProgrammer instead.
This method is preferred over using STM32CubeProgrammer because:
- It does not put your Notecard at risk of erasing the entire flash memory.
- It does not require installation of STM32CubeProgrammer.
Terminal Update Process
Connect your Notecard device to your computer via USB and then connect to your Notecard in the In-Browser Terminal.
Once connected, the easiest way to upgrade Notecard firmware is to use the
firmware install latest command, which automatically installs the
most recent Notecard firmware release.
firmware install latestIf you instead wish to install a specific version of the Notecard firmware, you
can enter the firmware list command to list all firmware versions available for
your connected Notecard.
firmware list~ 7 Firmware
~ Date Version Notes
~ 2023-12-22 (2yr ago) notecard-u5-6.1.1 LTS6.1.1 (Outdated)
~ 2024-08-20 (2yr ago) notecard-u5-6.2.5 LTS6
~ 2025-08-12 (9mo ago) notecard-u5-8.2.3 LTS 8
~ 2025-12-10 (5mo ago) notecard-u5-11.1.1 2025 Q4 Developer Release
~ 2025-12-10 (5mo ago) notecard-u5-10.1.1 LTS 10 Release Candidate
~ 2026-04-16 (18d ago) notecard-u5-10.1.2 LTS 10 (Latest LTS)
~ 2026-04-16 (18d ago) notecard-u5-11.2.2 2026 Q1 Developer ReleaseNext, use firmware install <version-name>, where <version-name> is the name
of the firmware binary from the Version column above.
firmware install <version-name>Always copy the exact version name from your own firmware list output when
using firmware install <version-name>. The version names shown by
firmware list are specific to the type of Notecard you’re using, and might use
different prefixes depending on your device.
warningIf you update Notecard firmware to a version less than v5.3.1 (or less than v7.5.2 on Notecard for LoRa), any subsequent firmware updates would have to be performed with either STM32CubeProgrammer or Notehub.
Upon completion of the firmware update, Notecard will restart. Verify Notecard's
firmware has been updated when the In-Browser Terminal reconnects, or by issuing
a card.version request:
{"req":"card.version"}DFU with Notecard CLI
If your Notecard device is running firmware v5.3.1 or later, you may update Notecard firmware manually using the Notecard CLI and no other tools.
noteNotecard for LoRa requires firmware v7.5.2 or later to use this method. On earlier LoRa firmware, use DFU with STM32CubeProgrammer instead.
This method is preferred over using STM32CubeProgrammer because:
- It does not put your Notecard at risk of erasing the entire flash memory.
- It does not require installation of STM32CubeProgrammer.
Prerequisites
- Installation of the latest version of the Notecard CLI.
- A fresh Notecard binary file (downloaded from the list of Notecard Firmware Releases).
CLI Update Process
Connect your Notecard device to your computer via USB. Using a terminal or command prompt, navigate to the folder containing the Notecard firmware binary you want to load, and enter the following command:
notecard -fast -sideload notecard-<version-build>.binThe notecard-<version-build>.bin represents the name of the firmware image you
downloaded and want to install on the Notecard. You may need to prepend
notecard with the absolute path name if it is not in your PATH.
warningIf you update Notecard firmware to a version less than v5.3.1 (or less than v7.5.2 on Notecard for LoRa), any subsequent firmware updates would have to be performed with either STM32CubeProgrammer or Notehub.
Wait while the firmware downloads and installs:
sending DFU binary to notecard
side-loading 8192 bytes (100% 925167 remaining)
side-loading 8192 bytes (99% 916975 remaining)
side-loading 8192 bytes (98% 908783 remaining)
side-loading 8192 bytes (97% 900591 remaining)
...If you see a repeated message about the Notecard being disconnected, simply
exit the process by pressing ctrl-c.
retrying after error: error opening serial port: serial device not available {io}Within a few seconds your Notecard should restart. Verify its firmware has been updated with the following command:
notecard -infoBlues Wireless Notecard
ProductUID: com.your-company.your-name:your_product
DeviceUID: dev:864475040000000
Serial Number:
Notehub Host: a.notefile.net
Firmware Version: notecard-5.3.1
SKU: NOTE-NBGLDFU with STM32CubeProgrammer
You can manually update Notecard firmware by directly connecting to a Notecard over USB and using STM32CubeProgrammer.
warningBlues does not recommend using STM32CubeProgrammer to update Notecard firmware due to the risk of erasing the entire flash memory. If possible, instead use the DFU with In-Browser Terminal, DFU with Notecard CLI, or OTA DFU with Notehub instructions.
Prerequisites
- Serial terminal emulator software (e.g. the In-Browser Terminal, CoolTerm, or TinyTerm). See Using a Serial Terminal with Notecard to set one up.
- A fresh Notecard binary file (downloaded from the list of Notecard Firmware Releases).
- STM32CubeProgrammer (version >= 2.20.0).
 tip
tipIf a Notecard stops responding after a firmware update, follow these instructions to recover it.
STM32CubeProgrammer Installation Notes
Installing STM32CubeProgrammer requires OS-specific instructions.
STM32CubeProgrammer supports Windows 10 and Windows 11.
Download and extract the zip package, then run
SetupSTM32CubeProgrammer-vx.y.z.exe and follow the installer prompts (ignoring
the security warnings from Windows).
The USB DFU driver that Notecard requires is installed alongside
STM32CubeProgrammer. If Windows does not recognize your Notecard after you place
it in bootloader mode, run the STM32 Bootloader.bat file from the DFU driver
folder of the extracted zip package to install that driver manually.
STM32CubeProgrammer supports macOS 15 (Sequoia) and macOS 26 (Tahoe), and runs natively on Apple silicon.
Download and extract the zip package, then run
SetupSTM32CubeProgrammer-vx.y.z.app and follow the installer prompts,
substituting x.y.z with the version you downloaded.
noteIf the installer fails to launch, you can run it in CLI mode instead. Using your terminal app of choice, navigate to the extracted directory and run the following, again substituting the version you downloaded.
sudo ./SetupSTM32CubeProgrammer-x.y.z.app/Contents/MacOs/SetupSTM32CubeProgrammer-x_y_z_macosPrior to installation, make sure you have the following packages installed:
- libusb-1.0-0-dev
- unzip
If you are using a USB port to connect to the STM32 device, install the
libusb1.0 package by typing the following command:
sudo apt-get install libusb-1.0-0-devOn Fedora, install the equivalent package instead.
sudo dnf install libusb1Please note libusb1.0.12 version or higher is required to run STM32CubeProgrammer.
Extract the zip package downloaded earlier from
ST, and execute it,
substituting the version you downloaded for x.y.z.
unzip en.stm32cubeprg-lin_vx-y-z.zip && cd en.stm32cubeprg-lin_vx-y-z && ./SetupSTM32CubeProgrammer-x.y.z.linuxCopy the rules files into /etc/udev/rules.d/. This is needed to use ST-LINK probe
or USB DFU.
sudo cp ~/STMicroelectronics/STM32Cube/STM32CubeProgrammer/Drivers/rules/* /etc/udev/rules.dPlace Your Notecard in Bootloader Mode
Connect your Notecard device to your computer via USB. Verify that your terminal
emulator (e.g. In-Browser Terminal, CoolTerm, or TinyTerm) is able to connect to
the device by sending the card.version request:
{"req": "card.version"}The response should look similar to this:
{
 "version": "notecard-5.3.1.16292",
 "device": "dev:864622040385086",
 "name": "Blues Wireless Notecard",
 "sku": "NOTE-NBNA500",
 "board": "1.11",
 "cell": true,
 "gps": true,
 "api": 5,
 "body": {
  "org": "Blues Wireless",
  "product": "Notecard",
  "target": "r5",
  "version": "notecard-5.3.1",
  "ver_major": 5,
  "ver_minor": 3,
  "ver_patch": 1,
  "ver_build": 16292,
  "built": "Sep 17 2023 20:28:51"
 }
}
Launch the built-in bootloader firmware by sending the
bootloader command via your terminal emulator:
bootloaderNotecard finishes any in-flight requests before it restarts into the bootloader, so the switch may take a moment.
noteIn Windows Device Manager, this causes Notecard to disappear as a "Ports (COM & LPT)/USB Serial Device (VID 0x30A4, PID 0x0001)" and to reappear as a "Universal Serial Bus devices/STM32 BOOTLOADER (VID 0x0483, PID 0xDF11)".
With your device in bootloader mode, your final step is to flash the new firmware on your device using STM32CubeProgrammer. The specific steps you need to complete depend on the type of Notecard you are updating.
- Notecard Cellular, Notecard Cell+WiFi, Notecard for Skylo, Notecard WiFi v1: Complete these steps
- Notecard for LoRa: Complete these steps
Using the STM32CubeProgrammer
Complete the following steps if you’re updating firmware on Notecard Cellular, Notecard Cell+WiFi, Notecard for Skylo, or Notecard WiFi v1.
Open the STM32CubeProgrammer application.
Select "USB" from the dropdown menu provided in the upper-right corner:
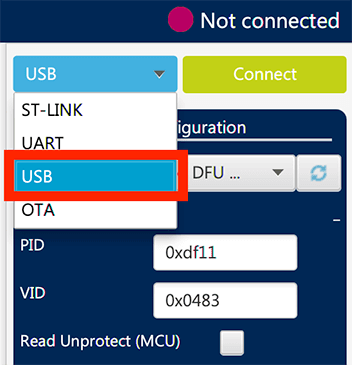
Select the port corresponding to your Notecard in the "Port" dropdown menu (likely "USB1"). You may need to click the button next to the port dropdown to refresh the list.
Click the "Connect" button and the log should update and display
Data read successfully.
Next, access the "Erasing & Programming" screen by clicking the menu button with the arrow pointing down:
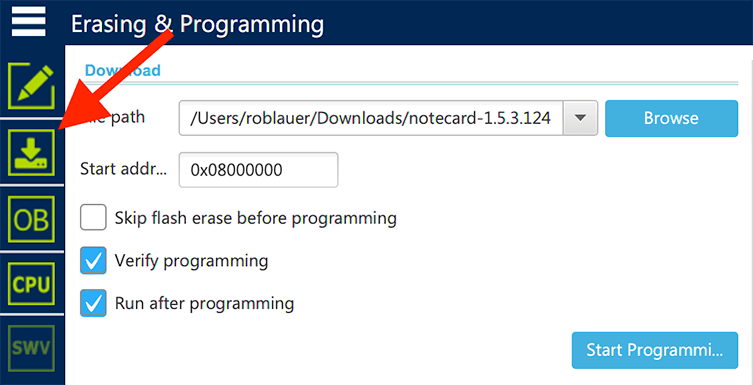
Follow the other configuration options in the image above:
- Select the appropriate firmware
.binfile. - Check the "Verify programming" box.
- Check the "Run after programming" box.
- Finally, click the "Start Programming" button.
warningNever enable the "Full chip erase" option as you will wipe the Notecard in a way that renders it permanently unusable.
After a few seconds of commands displayed in the log, you should see multiple dialog warnings/notifications to click through and confirm.
In lieu of using the STM32CubeProgrammer GUI, you may use the
STM32_Programmer_CLI that is installed alongside the GUI.
Make sure STM32_Programmer_CLI (macOS, Linux) or STM32_Programmer_CLI.exe (Windows)
is in your PATH (or provide its absolute path in the command below). The program
should have been installed in the same directory as STM32CubeProgrammer /
STM32CubeProgrammer.exe.
Run the following command, substituting the path to your desired .bin firmware
file, keeping in mind the serial port specified may be different depending on
your OS:
STM32_Programmer_CLI --connect port=USB1 --write [path/to/binary.bin] 0x08000000 --verify --go 0x08000000Once the update process is complete, your Notecard will reset and reconnect. You
can verify the firmware process was successful by executing another
card.version request and inspecting the version parameter.
{"req": "card.version"}Using the STM32CubeProgrammer (LoRa)
Complete the following steps if you’re updating firmware on Notecard for LoRa.
Open the STM32CubeProgrammer application.
Select "UART" from the dropdown menu provided in the upper-right corner:
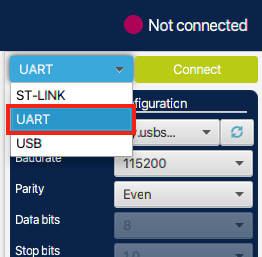
Select the port corresponding to your Notecard in the "Port" dropdown menu (likely something similar to "tty.usbserial-xxxxxx"). You may need to click the button next to the port dropdown to refresh the list.

Click the "Connect" button and the Log at the bottom of the screen should update
and display Data read successfully.
Next, access the "Erasing & Programming" screen by clicking the menu button with the arrow pointing down:
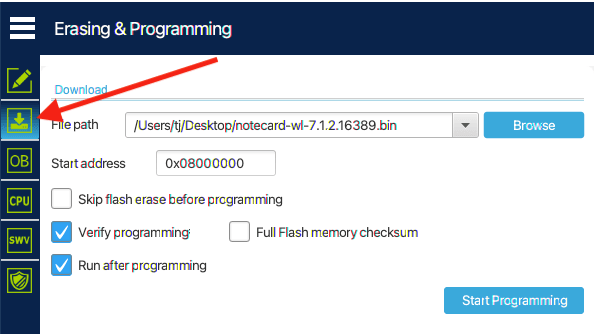
Follow the other configuration options in the image above:
- Select the appropriate firmware
.binfile. - Check the "Verify programming" box.
- Check the "Run after programming" box.
- Finally, click the "Start Programming" button.
warningNever enable the "Full chip erase" option as you will wipe the Notecard in a way that renders it permanently unusable.
After a few seconds of commands displayed in the log, you should see multiple dialog warnings/notifications to click through and confirm.
In lieu of using the STM32CubeProgrammer GUI, you may use the
STM32_Programmer_CLI that is installed alongside the GUI.
Make sure STM32_Programmer_CLI (macOS, Linux) or STM32_Programmer_CLI.exe (Windows)
is in your PATH (or provide its absolute path in the command below). The program
should have been installed in the same directory as STM32CubeProgrammer /
STM32CubeProgrammer.exe.
Run the following command, substituting the path to your desired .bin firmware
file and the port of your device. On macOS and Linux you can use ls /dev/tty.*
to find the appropriate port. On Windows you can use the STM32CubeProgrammer GUI
or the mode command to find the port to use.
STM32_Programmer_CLI --connect port=/dev/tty.usbserial-xxxxx --write [path/to/binary.bin] 0x08000000 --verify --go 0x08000000Once the update process is complete, your Notecard will reset and reconnect. You
can verify the firmware process was successful by executing another
card.version request and inspecting the version parameter.
{"req": "card.version"}OTA DFU with Notehub
Notehub lets you manage the firmware running on your Notecards, making it easy to select from available firmware and deploy it to one or more devices.
tipIn addition to using the Notehub UI as described below, you can manage Notecard and host MCU firmware updates using reserved environment variables or the Notehub API.
Deploy Firmware
-
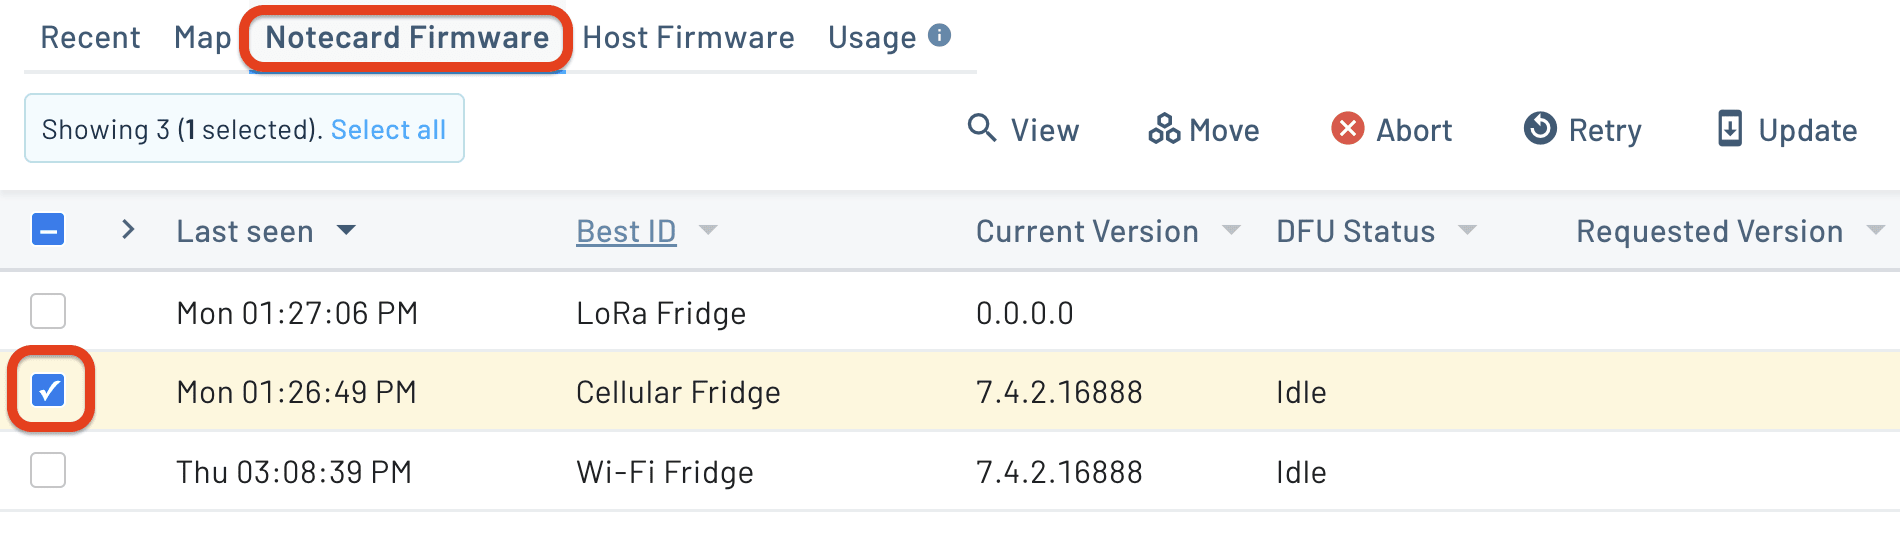
Select Devices from the left navigation bar, open the Notecard Firmware tab, and select one or more devices from the list.
-
Select Update from the available options.

-
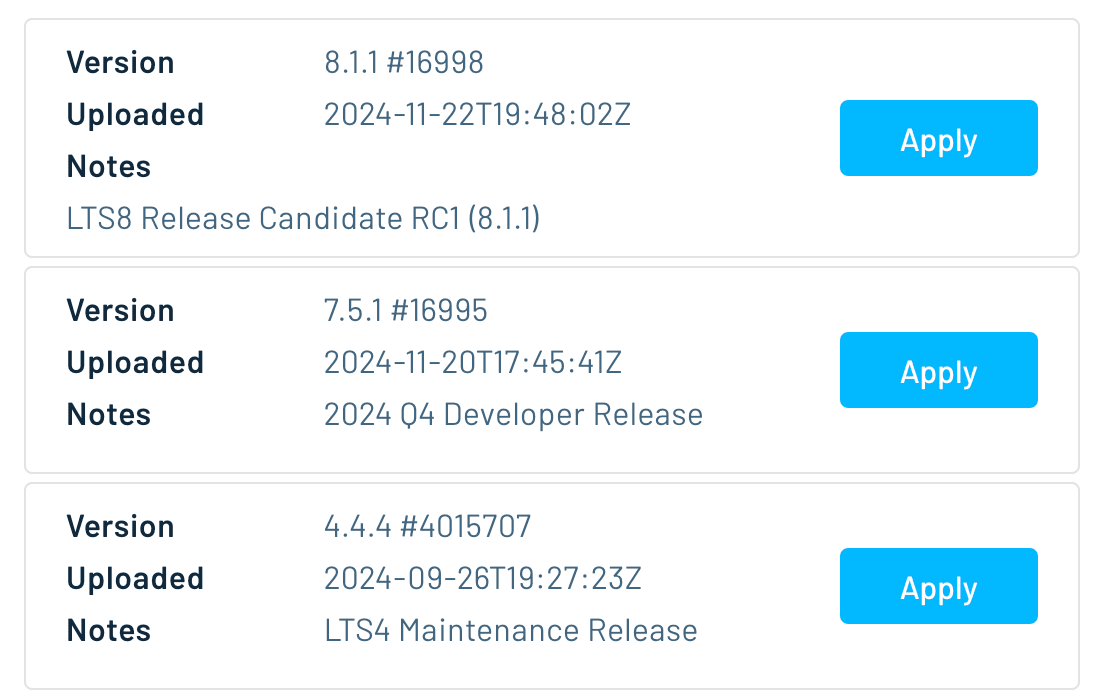
Select the firmware you wish to apply from the list of available firmware, and click Apply.
-
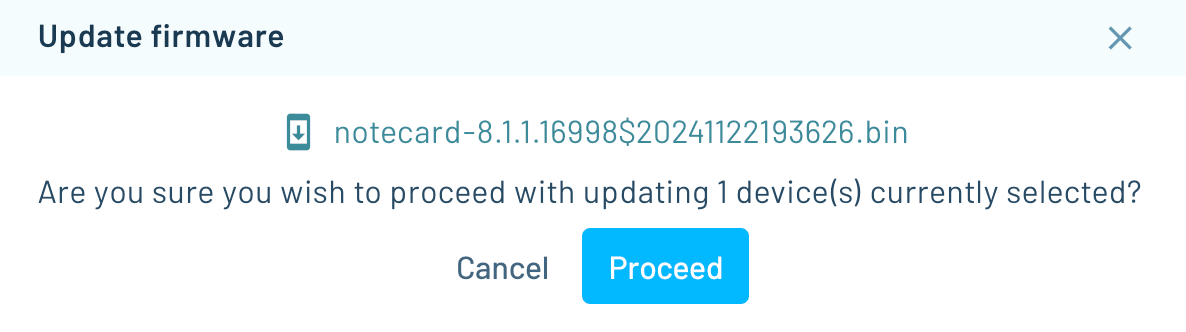
In the Update Firmware dialog that appears, click Proceed to confirm.
-
Now that you have selected your firmware, you will see it in the Requested Version column.

-
The next time the Notecard syncs with Notehub, it will begin the download and installation process. No further action is needed on your part as the Notecard will update itself after it downloads the binary. You can view the current status of the update any time in the DFU Status column of the Notecard Firmware tab, on the Firmware tab of an individual device's details page, or by using the Notehub API to get the status of the DFU.
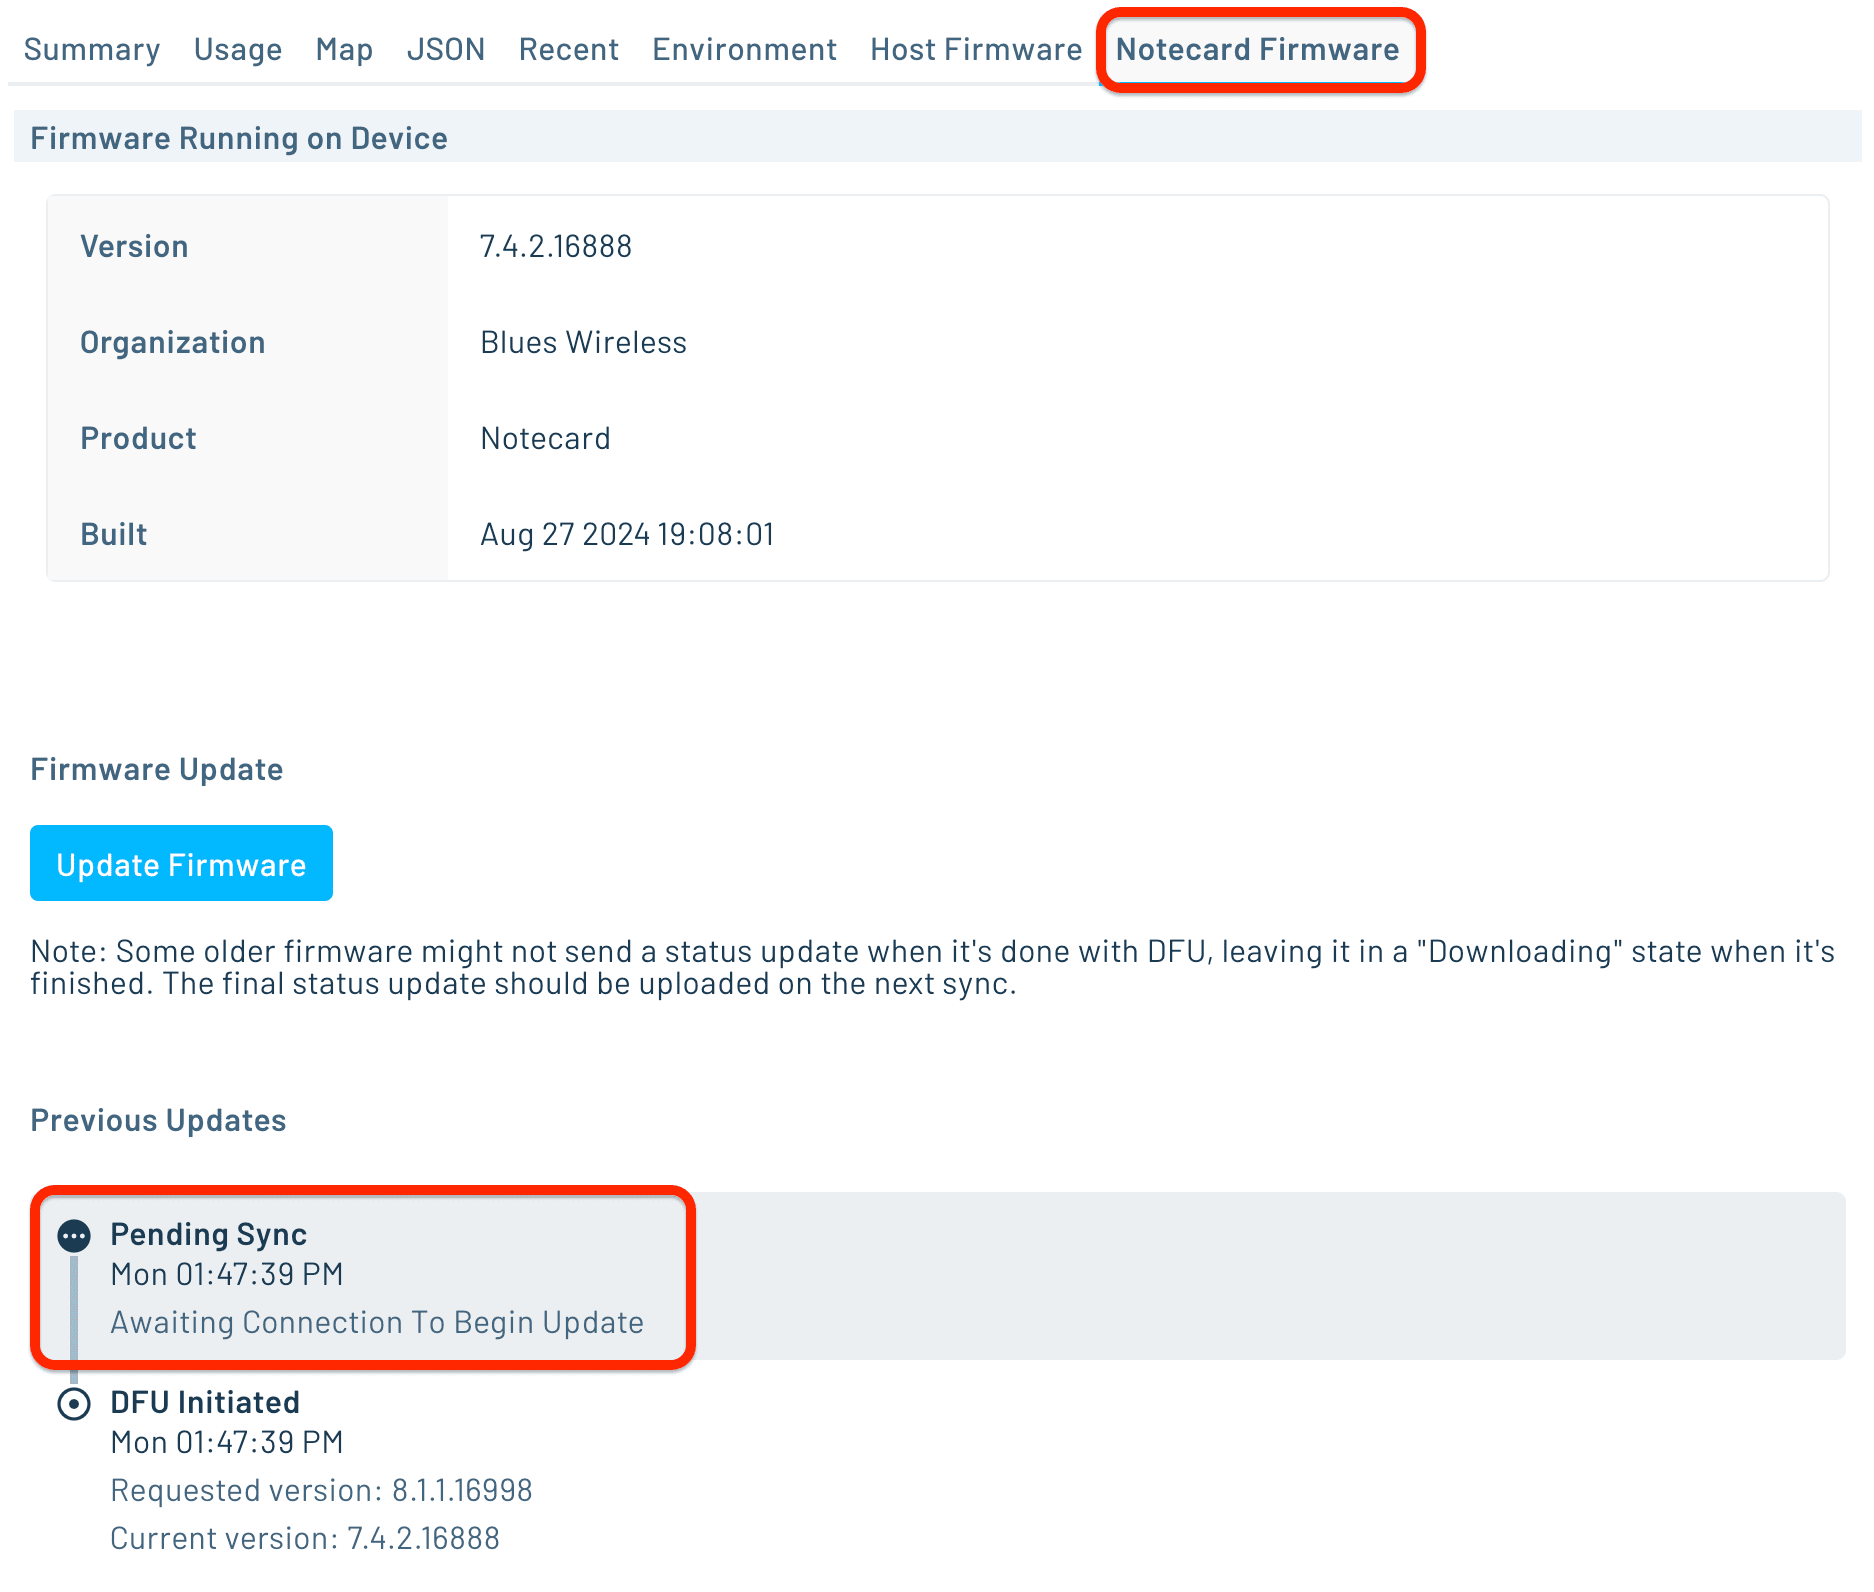
To stop an update that is stuck or no longer wanted, select the device(s) on the Notecard Firmware tab and click Abort. Notehub clears the requested firmware, and a Notecard that is still downloading the binary cancels the update the next time it syncs. Once the download has finished and the update is ready to install, it can no longer be aborted. To try a failed update again, select the device(s) and click Retry.
note- You can also perform Notecard firmware updates using the Perform DFU Action Notehub API.
- If using a Notecard Cellular, please be aware that OTA DFU will use data from your cellular data plan.
- OTA DFU is not supported on a Notecard device when the
hub.set
"mode"argument is"minimum"or"off".
DFU Status Values
The DFU Status column reports where each device is in the update process:
| Status | Meaning |
|---|---|
Idle | No update is queued for this device. |
Downloading (n%) | Notecard is downloading the firmware binary from Notehub. |
Sideloading | The binary is being transferred to Notecard over a local connection. |
Ready to install firmware | The download finished and Notecard is ready to apply the image. |
Ready-Retry | A previous attempt failed and the update will be retried. |
Updating | Notecard is installing the firmware and will restart. |
Completed | The update finished successfully. |
Error | The update failed. Select the status to open the device's firmware page, or expand the table row, to see the underlying error. |
Additional Resources
- Notecard Firmware Releases
- Notehub API Requests for DFU
- Notecard API Requests for DFU
- Environment Variables for DFU
