
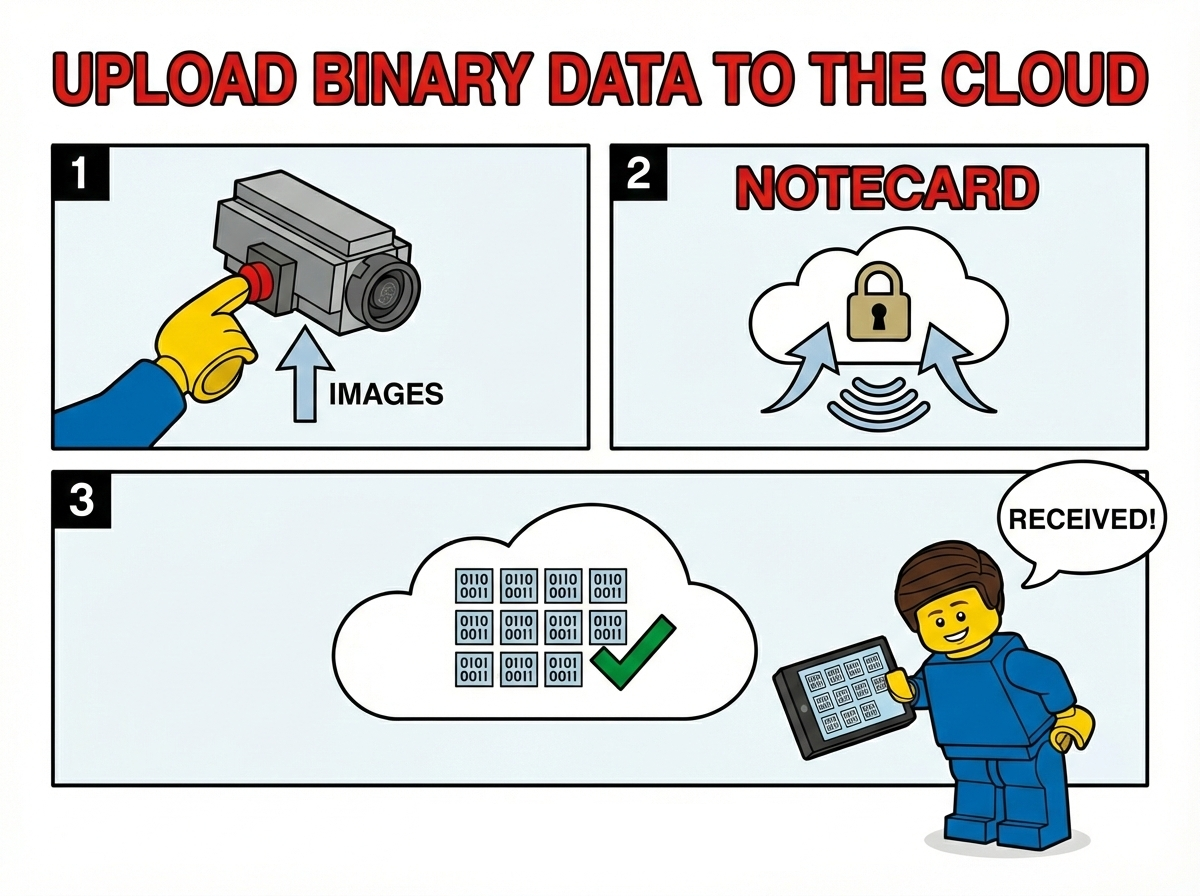
Notecard is great at sending telemetry to the cloud, but what about when you need to send something bigger — like an image, audio recording, or a log file? In this article I'll walk through a new addition to the note-python SDK that makes uploading binary data with Notecard easy.
Why Binary Uploads?
Most IoT projects send small JSON payloads: a temperature reading, a GPS coordinate, a status update. But there are plenty of scenarios where you need to move larger binary data from a device:
- Camera images from a wildlife monitor or security camera
- Data logs captured over days or weeks
- Audio recordings from an environmental sensor
- File captures from any sort of sensor (e.g. a video camera)
Notecard has a built-in binary buffer that can stage raw binary data before
sending it to Notehub via a web.post request. The new
upload function in note-python handles all the complexity of
chunking, encoding, verification, and retry logic for you.
 note
noteSending binary data, as shown in this article, will rapidly consume your data plan. It can also be power intensive, so you should consider how frequently you need to send binary data.
How It Works
At a high level, the upload process works like this:
- Query the Notecard's buffer capacity — The SDK asks
Notecard how much binary data it can hold at once via
card.binary. - Chunk the data — If the file is larger than the buffer, it's split into chunks that fit.
- Stage each chunk — Each chunk is
COBS-encoded
(so binary data can safely travel over the serial connection)
and written into Notecard's binary buffer via
card.binary.put. - Verify the transfer — After staging, the SDK checks
card.binaryto confirm the data arrived intact. - Send to Notehub — A
web.postrequest withbinary: truetells Notecard to forward the staged binary data to a Notehub proxy route. Theoffsetandtotalfields let Notehub reassemble multi-chunk uploads. - Retry on failure — Both the binary staging step and the
web.poststep have built-in retry logic with backoff.
Let's look at how to use it in practice.
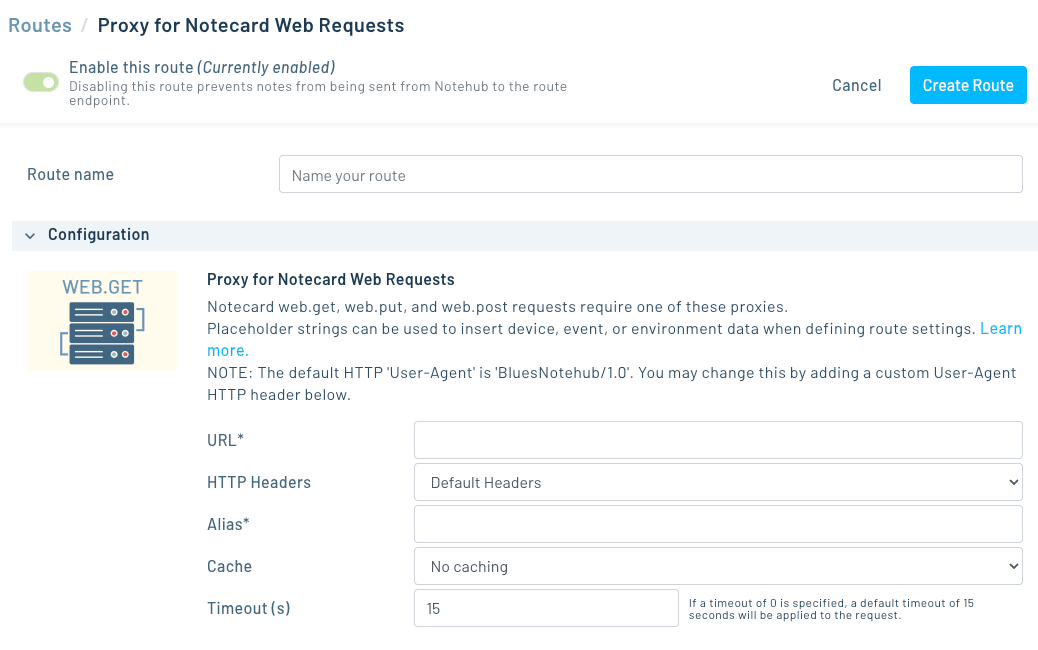
Setting Up a Notehub Route
Before uploading, you need somewhere for the data to go. In Notehub, create a Proxy for Notecard Web Requests proxy route that points to your server:
- Navigate to your project's Routes page.
- Create a new Proxy for Notecard Web Requests route.
- Set the URL to your server's endpoint (during development, ngrok is a great way to expose a local server).
- Give it a Alias (e.g.
upload) — you'll reference this in code.
Uploading a File with Python
Here's a complete example that uploads a PNG image through the Notecard:
import serial
import notecard
from notecard import hub
from notecard.upload import upload

# Connect to Notecard over serial
port = serial.Serial('/dev/ttyUSB0', 115200)
card = notecard.OpenSerial(port)

# Connect Notecard to Notehub
hub.set(card, product='com.your-company:your-product', mode='continuous')

# Read the file to upload
with open('photo.png', 'rb') as f:
    data = f.read()

# Upload it
result = upload(
    card,
    data,
    route='upload',
    label='photo.png',
    content_type='image/png',
)

print(f'Uploaded {result["bytes_uploaded"]} bytes '
      f'in {result["duration_secs"]:.1f}s '
      f'({result["bytes_per_sec"]:.0f} B/s)')
The upload function handles chunking, COBS encoding,
MD5 verification, and retries automatically.
Setting Chunk Size
By default the SDK uses the full capacity of Notecard's binary
buffer (~250 KB) as the chunk size. This is optimal when you're
connected over USB serial, but over cellular you may want smaller
chunks to avoid timeouts on the web.post request:
result = upload(
    card,
    data,
    route='upload',
    label='photo.png',
    max_chunk_size=65536,  # 64 KB chunks
)
A chunk size of 64 KB is a good starting point for cellular connections. If you're on a slow network, try 32 KB.
Tracking Progress
For larger files, you may want to show upload progress.
The progress_cb parameter takes a callback that fires after
each chunk:
def on_progress(info):
    print(f'  Chunk {info["chunk"]}/{info["total_chunks"]} '
          f'- {info["percent_complete"]:.1f}% '
          f'- {info["avg_bytes_per_sec"]:.0f} B/s '
          f'- ETA {info["eta_secs"]:.0f}s')

result = upload(
    card,
    data,
    route='upload',
    label='firmware.bin',
    max_chunk_size=65536,
    progress_cb=on_progress,
)
The callback receives a dictionary with chunk, total_chunks,
bytes_sent, total_bytes, percent_complete, bytes_per_sec,
avg_bytes_per_sec, and eta_secs.
Receiving the Upload
On the server side, Notehub forwards the binary data as a standard HTTP POST to whatever URL you configured in your proxy route. You can use any HTTP framework to receive it. The note-python repo includes a minimal Python receive server that saves incoming files to disk:
python receive_binary.pyThis listens on port 8000 and saves files to the current directory,
using the X-Notecard-Label header (set from the label field
in web.post) as the filename.
Exposing your server with ngrok
Notehub routes need a publicly reachable URL, so if you're running the receive server on your local machine you'll need a tunnel. ngrok is the easiest way to do this during development.
In a separate terminal, run:
ngrok http 8000This gives you a public HTTPS URL (e.g.
https://abc123.ngrok-free.app) that tunnels traffic to your
local server. Copy that URL and paste it into your Notehub route's
URL field. Now when the Notecard sends a web.post, Notehub
forwards it to ngrok, which forwards it to your local
receive_binary.py — no cloud deployment needed.
Where you can send your data
The ngrok + local server setup is great for testing, but in production you'll want a permanent destination. Because Notehub routes are just standard HTTP requests, you can point them at almost any cloud service that accepts file uploads:
- Cloudflare Workers — Write a lightweight Worker that receives the POST and stores the file in R2 (Cloudflare's S3-compatible object storage). No servers to manage and generous free tier.
- AWS S3 — Use an API Gateway + Lambda function to receive the upload and write it to an S3 bucket.
- Google Cloud Storage — A Cloud Function triggered by an HTTP request can write directly to a GCS bucket.
- Azure Blob Storage — An Azure Function can receive the POST and store the binary in a blob container.
- Your own server — Any web framework (Flask, Express,
FastAPI, etc.) running on a VPS or container platform can
receive the upload. The
receive_binary.pyscript in the repo is a good starting point.
In each case, the setup is the same: deploy your endpoint, set its URL as the Notehub proxy route, and the upload function handles the rest.
Behind the scenes
If you're curious about the implementation details, here's what happens for each chunk:
-
The SDK calls
card.binary.putwith the COBS-encoded size, then transmits the raw encoded bytes directly over the serial or I2C connection. This bypasses the normal JSON request/response flow for maximum throughput. -
After the transfer,
card.binaryis called to verify the decoded length matches what was sent. If there's a mismatch or a{bad-bin}error, the SDK retries automatically. -
Once verified,
web.postis issued withbinary: true, which tells Notecard to send the contents of its binary buffer to the specified Notehub route. Theoffset,total, andstatus(MD5 hash) fields allow Notehub to reassemble and verify multi-chunk uploads. -
If the
web.postfails (network error or HTTP status >= 300), the SDK waits 15 seconds, re-stages the binary data, and retries.
Using note-cli
If you don't want to use the Python SDK, you can also use the note-cli tool to upload binary data using the same mechanism.
note-cli upload --file <path-to-file> --route <route-name>You'll need at least version 1.9.6 of the note-cli tool to use this feature.
Get Started
The upload functionality is available in the latest version of note-python. To try it out:
- Install or update the SDK:
pip install note-python - Check out the complete upload example in the repo
- Read the web request guide for more on Notecard web transactions
If you have questions or run into issues, let us know on the Blues community forum.