Collecting Sensor Data
C/C++ (Arduino/Wiring), Arduino Nano 33 BLE Sense, and Notecarrier A
Don't see your favorite hardware here? Rest assured the Notecard works with virtually every MCU and SBC available. If you can't figure out how to complete this tutorial let us know in our forum and we can help you out.
Introduction
This tutorial should take approximately 40-50 minutes to complete.
In this tutorial, you'll learn how to take sensor readings from a Device and send readings to your Notecard and the Blues Notehub. You'll use C/C++ (Arduino/Wiring) running on a Arduino Nano 33 BLE Sense wired up to Notecarrier A hardware. If you would like to use a different language, board, or Notecarrier, modify the dropdowns at the top of this guide. And if you get stuck at any point, the full source code for each example is available on GitHub.
The tutorial uses mock sensor readings for simplicity, but feel free to hook up a physical sensor of your choice and use that instead.
Set up Hardware
First, you'll need to get all of your hardware connected. Follow the instructions below to connect your Arduino Nano 33 BLE Sense and Notecard mounted on a Notecarrier A.
In order to complete this guide, you'll need the following:
- Notecard mounted to Notecarrier A.
- Any Arduino-capable Microcontroller (MCU). We will be using the Arduino Nano 33 BLE Sense, but any MCU that can be programmed with the Arduino IDE will do.
- Micro USB to USB-A cable.
NOTE: For this tutorial, you'll be powering the Notecard through the MicroUSB connection of your Arduino Nano 33 BLE Sense. Some Arduino-compatible devices cannot handle 2 Amp pulses from the Notecard when connected to GSM, so if you experience resets or other power-related issues, we suggest powering your Notecard separately through the USB or LiPo connector on the Notecarrier.
If you need additional help finding the correct I2C, Power, GND, and Serial pins on your Arduino, be sure to visit the Arduino Boards & Modules page to find your board, along with its corresponding pinout diagram under the "Documentation" tab.
For example, here are the pinout diagrams for the Arduino Nano 33 BLE Sense.
Connect the Arduino Nano 33 BLE Sense to your Notecard
Now, let's connect your Notecard using a Serial connection.
- Connect
TXfrom the Notecarrier A to theRXpin on your Arduino Nano 33 BLE Sense. - Connect
RXfrom the Notecarrier A to theTXpin on your Arduino Nano 33 BLE Sense. - Connect
GNDfrom the Notecarrier A to aGNDpin on your Arduino Nano 33 BLE Sense. - Connect
V+from the Notecarrier A to the+5Vpin on your Arduino Nano 33 BLE Sense.
NOTE: For the Arduino Nano series, the
+5Vpin is not wired as an output, by default. However, you will need to use a 5V supply to the Notecard to ensure it always has enough power for network communication. Following the guide here, create a solder bridge between the two pads markedVUSBon the back of the board, then make sure to power your project with a USB cable.

Create a Notehub Project
Now that your hardware is all connected, let's create a new Notehub project to receive sensor readings from your Notecard.
-
Navigate to notehub.io and log-in, or create a new account.
-
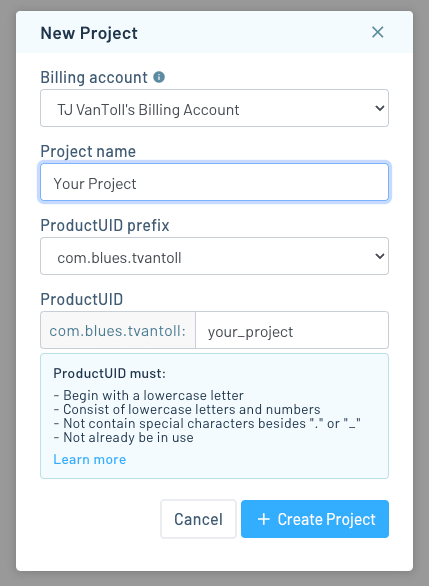
Using the New Project card, give your project a name and ProductUID.

note
The ProductUID must be globally unique, so we recommend a namespaced name like
"com.your-company.your-name:your_product". -
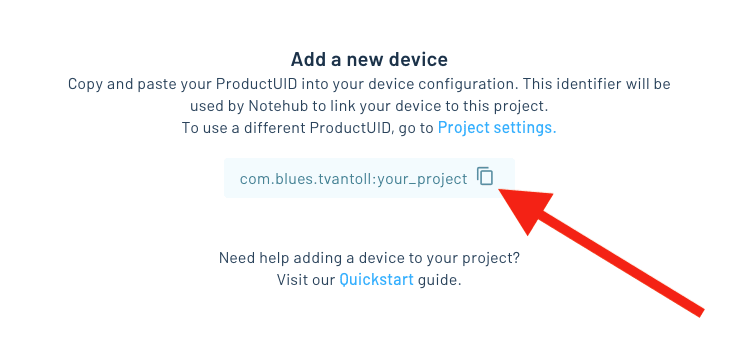
Take note of your ProductUID. This identifier is used by Notehub to associate your Notecard to your project.

Write Firmware
Configure the Arduino IDE
For this portion of the guide, we'll be using the Arduino IDE, so be sure to install version 2.0+ if you haven't already.
Once installed, we'll need to add support for your Arduino Nano 33 BLE Sense Board.
Configure the Arduino Boards Manager to use the Arduino Nano 33 BLE Sensor
-
Start the Arduino IDE, then select the Tools > Board: [board name] > Boards Manager... menu.

-
In the search box, type "nano 33 BLE" and press the Enter key. Select Arduino Mbed OS Nano Boards from the list, and press the Install button.

-
Once the installation completes, click Close.
-
Now select Arduino Nano 33 BLE from the Tools > Board: menu.
-
Finally, select your device from the Tools > Port > Serial Ports list.
Communicating With Your Notecard
When communicating with the Notecard, you can manually send requests using the
Serial.println function and passing-in JSON objects, or use the
note-arduino library. The code snippets below
show how to use note-arduino. You can refer to
this article
for more information on communicating with the Notecard without a library.
Install the Notecard Arduino Library
-
To use the note-arduino library, you'll need to add it to the Arduino IDE.
-
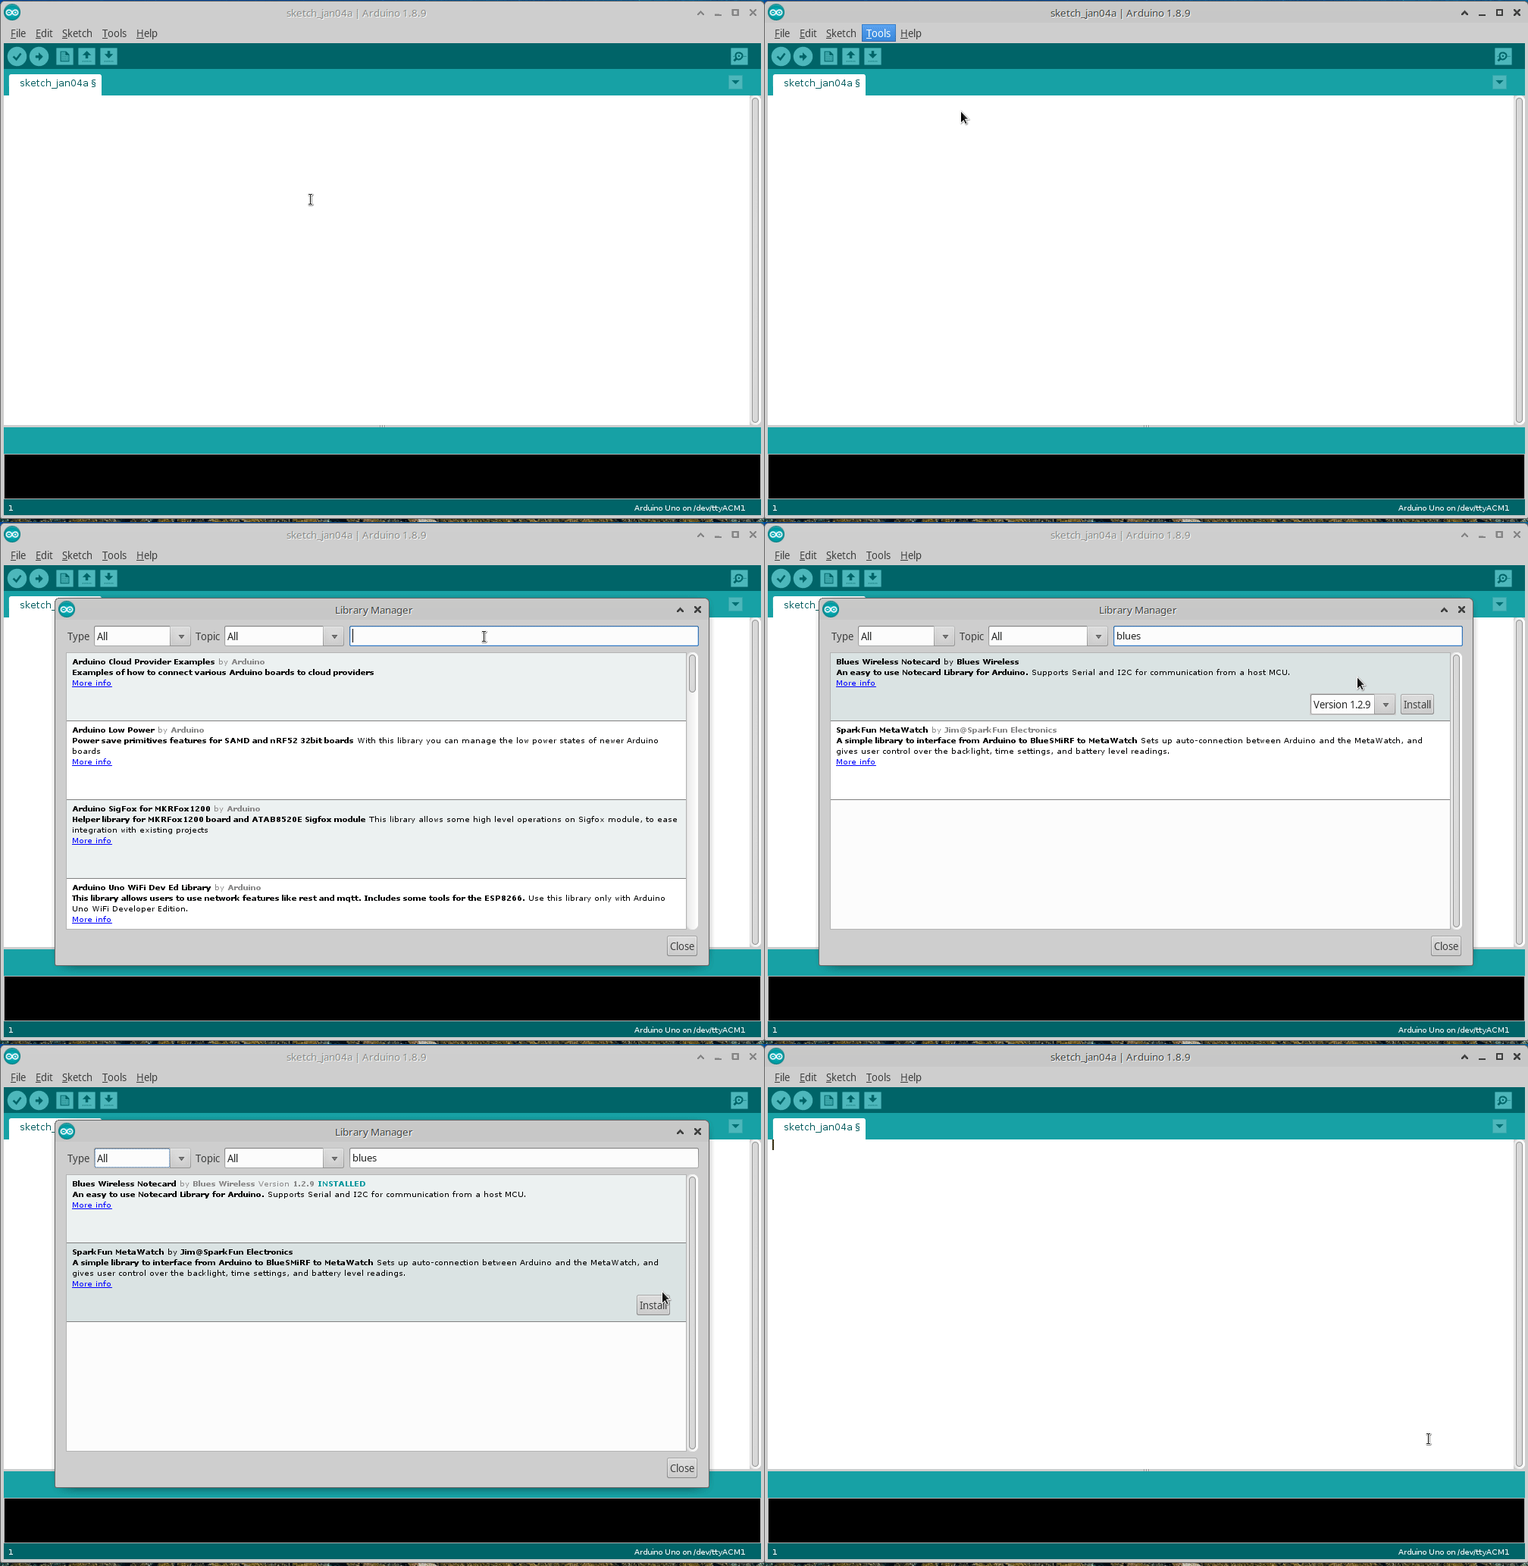
Click on Tools > Manage Libraries...
-
Search for "Blues" in the input box and click the "Install" button next to the "Blues Wireless Notecard" result.

-
Create a new sketch and select the Sketch > Include Library > Contributed Libraries > Blues Wireless Notecard menu option, to add the following include to your sketch:
#include <Notecard.h>
Write Code
-
First, let's alias the Serial interfaces at the top of your program in the Arduino IDE. The first,
Serialwill be used to log information to the Serial Monitor of the Arduino IDE. The second,Serial1represents the connection between your Arduino and Notecard. Paste the following code at the top of your sketch:#define usbSerial Serial #define txRxPinsSerial Serial1 -
Next, add a definition for your ProductUID using the value you specified when creating your Notehub project.
#define NOTE_PRODUCT_UID "com.your-company.your-name:your_product" -
Above the
setup()andloop()functions, declare a global object to represent the Notecard.Notecard notecard; -
In the
setup()function, initialize theusbSerialobject.usbSerial.begin(115200); while (!usbSerial) { ; // wait for serial port to connect. Needed for native USB } usbSerial.println("Starting..."); -
Next, initialize the serial connection to the Notecard using the
begin()function. Then, usesetDebugOutputStream()link the debug output tousbSerialwith the following code:notecard.begin(txRxPinsSerial, 9600); notecard.setDebugOutputStream(usbSerial); -
Now, we'll configure the Notecard. This one-time operation, also belongs in the
setup()function. We will use thehub.setrequest to associate this Notecard with the ProductUID of your project, as well as set the Notecard to operate incontinuousmode (indicating the device should immediately make a connection to Notehub and keep it active).{ J *req = notecard.newRequest("hub.set"); if (req != NULL) { JAddStringToObject(req, "product", NOTE_PRODUCT_UID); JAddStringToObject(req, "mode", "continuous"); notecard.sendRequest(req); } }The lines above build-up a JSON object by adding two string values for product and mode, and then fires the request off to the Notecard with the
sendRequest()function. -
Now, it's time to watch the logs and validate the firmware. Open the Serial Monitor, by selecting Tools > Serial Monitor from the menu. The default baud rate is 9600 baud, be sure to select 115200 baud from the drop down menu.

-
Click the upload button (right arrow icon) to save and flash the firmware to your device.

If you haven't saved your file yet, you will be prompted to do so. Name your sketch (for example,
nano-with-library), and click Save. Once your device is flashed and comes back online, check the serial monitor to confirm your Notecard has been properly configured.
Read from the Sensor
Now that you've configured your Arduino to communicate with the Notecard, let's grab some pseudo sensor readings.
 note
noteIf you have your own sensor, feel free to hook it up and use your own values instead of this tutorial's mocked ones.
-
To generate mock sensor readings you'll use the NotecardPseudoSensor library.
-
Start by clicking on Tools > Manage Libraries...
-
Then, search for “NotecardPseudoSensor” in the input box and click the Install button next to the “Blues Wireless Notecard Pseudo Sensor” result.

-
Add the following include to the top of your sketch:
#include <NotecardPseudoSensor.h> -
Next, include the following
namespaceunder yourNotecardPseudoSensorincludes.using namespace blues; -
After that, create an instance of
NotecardPseudoSensorwith the lines of code below. Add it right under theNotecard notecard;line of code.Notecard notecard; NotecardPseudoSensor sensor(notecard); -
Finally, place the following code in your
loopfunction, which generates mock temperature and humidity readings, prints them to the console, and then waits 15 seconds before exiting the loop.float temperature = sensor.temp(); float humidity = sensor.humidity(); usbSerial.print("Temperature = "); usbSerial.print(temperature); usbSerial.println(" *C"); usbSerial.print("Humidity = "); usbSerial.print(humidity); usbSerial.println(" %"); delay(15000); -
Upload this code to your Arduino Nano 33 BLE Sense. Open the Serial Monitor and you'll see temperature and humidity readings every 15 seconds.

Send Sensor Readings to the Notecard
Now that we're getting sensor readings, let's send these to our Notecard.
-
To send a sensor reading to the Notecard, we'll need to construct a new JSON request to the
note.addAPI that includes a new Notefile name (sensors.qo), sets thesyncfield totrue(to instruct the Notecard to sync to Notehub immediately), and finally, sets thebodyto the sampled temperature and humidity. Add the following to theloop()function, after theusbSerialcommands used to print out the readings.{ J *req = notecard.newRequest("note.add"); if (req != NULL) { JAddStringToObject(req, "file", "sensors.qo"); JAddBoolToObject(req, "sync", true); J *body = JAddObjectToObject(req, "body"); if (body) { JAddNumberToObject(body, "temp", temperature); JAddNumberToObject(body, "humidity", humidity); } notecard.sendRequest(req); } } -
Upload the code to your device. After rebooting, the Serial Monitor will update to display the response from the
note.addrequest (the total number of Notes in the Notefile) each time you add a new reading.
 note
noteIf you're using a Notecard for LoRa to complete this tutorial you have one additional
step. Because the Notecard for LoRa requires a template for every Notefile you use,
you must define a template for the sensors.qo Notefile in your setup() function.
You can add the following code to the bottom of your setup() function to fix the
problem.
{
  J *req = notecard.newRequest("note.template");
  if (req != NULL) {
    JAddStringToObject(req, "file", "sensors.qo");
    JAddNumberToObject(req, "port", 1);
    JAddStringToObject(req, "format", "compact");
    J *body = JCreateObject();
    if (body != NULL) {
      JAddNumberToObject(body, "temp", 14.1);
      JAddNumberToObject(body, "humidity", 14.1);
      JAddItemToObject(req, "body", body);
      notecard.sendRequest(req);
    }
  }
}
Learn more about Notefile templates in Working with Note Templates.
 note
noteConcerned about the size of note-arduino? You can
communicate with the Notecard without using the library.
View Data in Notehub
Once you start capturing readings, your Notecard will initiate a connection to Notehub and will start transferring Notes. Depending on signal strength and coverage in your area, it may take a few minutes for your Notecard to connect to Notehub and transfer data.
-
Return to notehub.io and open your project. You should see your notecard in the Devices view.

-
Now, click on the Events left menu item. Once your sensor Notes start syncing, they'll show up here. You may need to refresh the page to see newly synced Notes.

Use Environment Variables
Environment variables are a Notehub state and settings management feature that allow you to set variables in key-value pairs, and intelligently synchronize those values across devices and fleets of devices.
In this section you'll learn how environment variables work by creating a variable that determines how often your firmware should take sensor readings.
Using Environment Variables in Firmware
The Notecard provides a set of requests for working with environment variables.
The most common of these requests is env.get,
which allows you to retrieve the value of an environment variable.
Complete the steps below to use the env.get request to retrieve and use the
reading_interval environment variable.
-
In
setup(), adjust your existinghub.setconfiguration to set theinboundargument to5. This tells your Notecard to look for inbound changes from Notehub every 5 minutes.{ J *req = notecard.newRequest("hub.set"); if (req != NULL) { JAddStringToObject(req, "product", productUID); JAddStringToObject(req, "mode", "continuous"); JAddNumberToObject(req, "inbound", 5); // ADD THIS LINE notecard.sendRequest(req); } } -
Next, place the following new function at the bottom of your sketch.
// This function assumes you’ll set the reading_interval environment variable to // a positive integer. If the variable is not set, set to 0, or set to an invalid // type, this function returns a default value of 60. int getSensorInterval() { int sensorIntervalSeconds = 60; J *req = notecard.newRequest("env.get"); if (req != NULL) { JAddStringToObject(req, "name", "reading_interval"); J* rsp = notecard.requestAndResponse(req); int readingIntervalEnvVar = atoi(JGetString(rsp, "text")); if (readingIntervalEnvVar > 0) { sensorIntervalSeconds = readingIntervalEnvVar; } notecard.deleteResponse(rsp); } return sensorIntervalSeconds; } -
Then, add this line after the
#includelines at the top of the file.int getSensorInterval(); -
Next, find the
delay(15000)line at the bottom of yourloop()function, and replace it with the code below.int sensorIntervalSeconds = getSensorInterval(); usbSerial.print("Delaying "); usbSerial.print(sensorIntervalSeconds); usbSerial.println(" seconds"); delay(sensorIntervalSeconds * 1000);note
Notecard for LoRa requires a template for each environment variable you use. If you're using a Notecard for LoRa to complete this tutorial, add the code below to your
setup()to provide a template for thereading_intervalvariable.{ J *req = notecard.newRequest("env.template"); if (req != NULL) { J *body = JCreateObject(); if (body != NULL) { JAddNumberToObject(body, "reading_interval", 21); JAddItemToObject(req, "body", body); notecard.sendRequest(req); } } }
With this code in place, your firmware now uses the reading_interval environment
variable to determine how many seconds to delay in between sensor readings. If you
flash this updated code to your device and open your serial monitor, you can see
the device using the default value for reading_interval of 60 seconds.
Setting an Environment Variable
Now we have our device programmed to retrieve an Environment Variable from Notehub, we will create that variable. Environment variables can be set in the Notehub UI or through the Notehub API. In this tutorial you'll learn how to set the values through the Notehub UI. If you'd like to instead set environment variables through the Notehub API, refer to environment variable requests in the Project API.
-
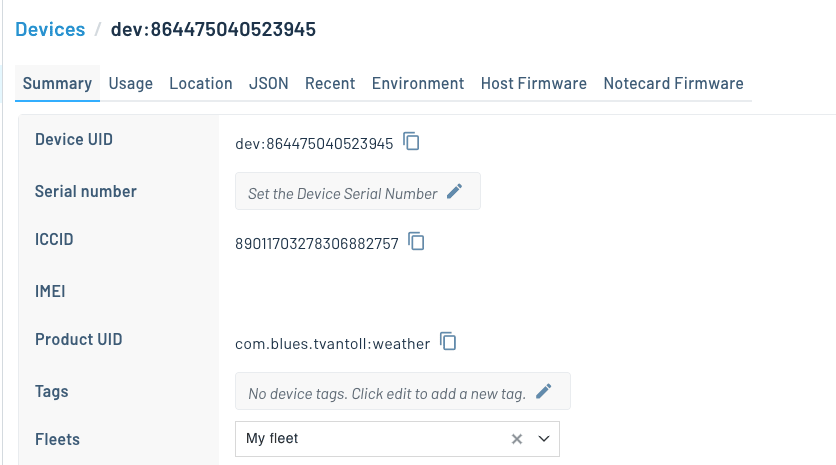
Return to your Notehub project, go the the Devices page, and double click your device. You should see a screen that looks like this.

-
Click the Environment tab.
-
Under the Device environment variables header, define a new environment variable named
reading_intervaland set its value to30.
Now that you have an environment variable set, you'll see it reflected on your device
after your configured inbound interval has passed.

 note
noteOn cellular and Wi-Fi-based Notecards you can use the
hub.set request's
sync argument to immediately receive inbound updates instead of relying on the
inbound interval.
And with that, you've used your first environment variable on your Notecard!
To see the real power of environment variables in action, try returning to Notehub
and updating your device's reading_interval with your serial monitor open.
 note
noteThis tutorial had you use several configuration settings that are best used when you have your Notecard connected to mains power.
-
In the
hub.setrequest, settingmodeto"continuous"tells the Notecard to maintain an active network connection. -
In the
hub.setrequest, settingsynctotruetells the Notecard to immediately synchronize inbound Notes and environment variables from Notehub. -
In the
note.addrequest, settingsynctotruetells the Notecard to immediately synchronize all outbound Notes to Notehub.
Because each of these settings cause the Notecard to use more power, you
may wish to disable them if you plan to transition your project to battery power.
You can run the command below to put your Notecard into periodic mode with
the sync argument turned off.
{
 "req": "hub.set",
 "mode": "periodic",
 "sync": false,
 "outbound": 60,
 "inbound": 120
}
Learn more about optimizing the Notecard for low-power scenarios in Low Power Design.
Next Steps
Congratulations! You've successfully connected your Arduino Nano 33 BLE Sense to your Notecard and built a basic IoT project.
If you're following the Blues Quickstart, next we recommend learning how to send (and visualize) your data in a cloud application:
Use the Notecard to Send DataSet Up Your MicrocontrollerBuild Your First IoT App With Blues- Send Data to Your Cloud
At any time, if you find yourself stuck, please reach out on the community forum.
