
Connecting to a Wi-Fi Access Point
The Notecard WiFi and Notecard Cell+WiFi have the ability to connect to Wi-Fi access points and transmit data over Wi-Fi networks. In this guide you'll learn two different ways to set up a connection.
 note
noteTo connect a Notecard WiFi to a Wi-Fi access point, you must first connect the Notecard to a companion Notecarrier board. If you're not sure how to do so, refer to our guide on connecting a Notecard to a Notecarrier.
Once you have your Notecard seated on a Notecarrier, you're ready to connect it to a local Wi-Fi access point. There are two ways to accomplish this:
 warning
Before you continue, please note that Notecard WiFi and Notecard Cell+WiFi are only compatible with 2.4 GHz Wi-Fi access points. Access points that combine 5 GHz and 2.4 GHz with the same SSID may cause issues using the Notecard. Also, your ensure your Notecard firmware version is at least v3.3.1.
Using a Notecard API Command
Connect your Notecarrier to your computer via USB. You should see a red LED flash repeatedly, letting you know it's booting up. Using your terminal program (or the In-Browser Terminal), send this request to your Notecard:
{"req":"card.wifi","ssid":"<ssid name>","password":"<password>"}In return, you'll get a confirmation that your Notecard is set to connect to the specified SSID using a specific security protocol. For example:
{
  "secure": true,
  "version": "3.12.3",
  "ssid": "<ssid name>",
  "security": "wpa2-psk"
}
Follow the instructions provided below to validate your Wi-Fi connection.
Using Your Smartphone
Alternatively, you can set up your Notecard WiFi using your smartphone.
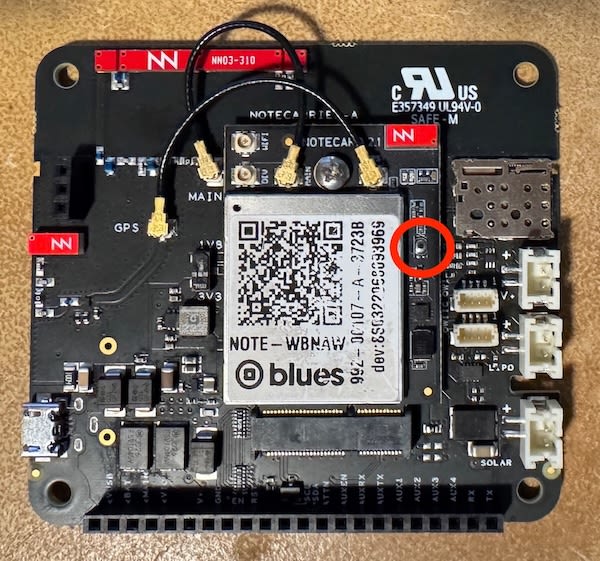
With your Notecard and Notecarrier plugged into a power supply, locate the AP button on your Notecard (see images below). Press and hold the button for at least one full second, and then release.
| Notecard WiFi v1 | Notecard WiFi v2 |
|---|---|
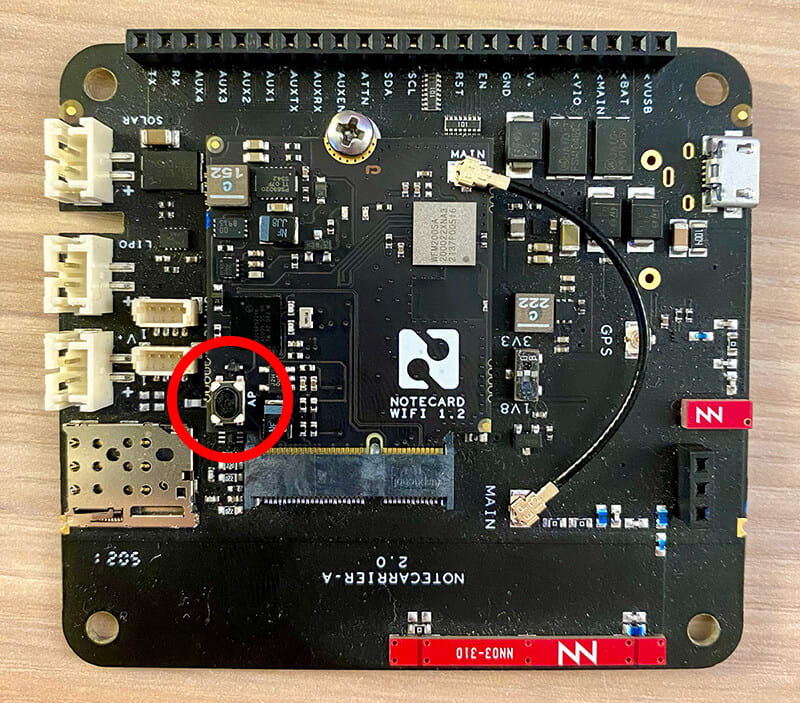 |  |
| Notecard Cell+WiFi |
|---|
 |
Next, open up your smartphone and browse for available Wi-Fi access points. Within a minute or so, you should see "Notecard" as an option:

Connect to "Notecard" on your phone and you'll be redirected to a window where you can enter the SSID and password. You can also use the "Scan networks" button to look for available access points, then tap on an access point to fill the SSID.
noteIf the browser window doesn't automatically appear after connecting to the Notecard SSID, enter the following IP address in your phone's web browser:
- Notecard WiFi v1, Notecard Cell+WiFi:
10.10.0.1 - Notecard WiFi v2:
10.0.0.1

Tap "Connect" to complete your Wi-Fi configuration. Your Notecard should reboot (note the flashing red LEDs), at which point you'll have successfully connected.
Finally, follow the instructions provided below to validate your Wi-Fi connection.
Validating Your Wi-Fi Connection
You'll know that your Notecard is actively connected to Notehub when
the green LED (Notecard WiFi v1) or red LED (Notecard WiFi v2, Notecard Cell+WiFi)
is on. Don't worry if it's not on right now, as it only turns on after you
make your first hub.set request and sync with Notehub via a hub.sync request.
If you're unsure how to send these commands, refer to the
Notecard quickstart.
As of
Notecard firmware v3.3.1,
you can also issue a card.wireless request to verify the SSID, IP address of
the Notecard, and the IP address of the gateway. For example:
{"req":"card.wireless"}{
"status": "{network-up}",
"mode": "auto",
"count": 5,
"net": {
"imei": "89:DE:E5:11:XX:00",
"ssid": "<ssid name>",
"bssid": "A6:12:35:ED:F0:10",
"rat": "wifi-2.4",
"rssi": -32,
"bars": 5,
"ip": "192.168.0.200",
"gateway": "192.168.0.1",
"cid": 9,
"updated": 1669834743
}
}The LED remains on only when the connection to Notehub is active. If you set the
Notecard's mode to
"continuous", the Notecard will maintain a connection to your access point. If
you set the Notecard's mode to "periodic", the Notecard will only connect when
it needs to transfer data.
If you change your Wi-Fi configuration and the hub.sync.status command returns
"status": "connect delayed...", power cycle the Notecard to have it
immediately use the new Wi-Fi configuration.
| Notecard WiFi v1 | Notecard WiFi v2 |
|---|---|
 |  |
| Notecard Cell+WiFi |
|---|
 |
Specifying Multiple Access Points
As of Notecard firmware v7.5.2,
you can specify multiple Wi-Fi access points for a Notecard to attempt to use.
The sections below detail the two ways you can do this: the text argument
in a card.wifi request, and the reserved _wifi environment variable.
Providing Access Points Through the card.wifi Request
If your Notecard will only ever use one Wi-Fi network you can use the card.wifi
request's ssid and password arguments as covered in an earlier section.
{"req":"card.wifi","ssid":"your-ssid","password":"your-password"}However, if your Notecard needs the ability to connect to multiple networks
at different times (for example a device that moves between two buildings),
you can use the card.wifi request's text argument. The text argument
takes a string in the following format:
["FIRST-SSID","FIRST-PASSWORD"],["SECOND-SSID","SECOND-PASSWORD"]When passing this string to a Notecard you may need escape the quotes within the string. For example, the following is a valid request to pass to a Notecard through the In-Browser Terminal.
{"req":"card.wifi", "text":"[\"FIRST-SSID\",\"FIRST-PASSWORD\"]"}Providing Access Points Through the _wifi Environment Variable
You can also pass a list of Wi-Fi access points for a Notecard to use through
the _wifi environment variable.
The environment variable takes the format as the card.wifi request's
text argument:
["FIRST-SSID","FIRST-PASSWORD"],["SECOND-SSID","SECOND-PASSWORD"]The advantage of using the environment variable approach is it gives you the ability to remotely change your Notecard's network configuration.
How a Notecard Selects an Access Point
When you provide a Notecard multiple access points (through any of the methods above), the Notecard does the following to select an access point to use:
-
If both the
_wifienvironment variable and thecard.wifirequest are used, the Notecard will attempt to use access points provided in the_wifienvironment variable first. -
The Notecard performs a Wi-Fi scan for all SSIDs it has credentials for, and attempts to connect to them in order of strongest RSSI (signal strength).
-
After a successful connection, the Wi-Fi SSID, password, and security mode that were used are cached in RAM, and subsequent connections will attempt to use this connection first.
Common Connection Failure Issues
There are a variety of reasons why a Notecard may be unable to connect to a Wi-Fi access point (SSID). As of Notecard firmware v3.3.1, one of the following error messages may be returned when a Notecard is unable to connect:
authentication failure- The provided password is incorrect.invalid parameter- The password is too short or the SSID is too long.AP not found- The SSID is incorrect, out of range, or no password was supplied.