Building Your First LoRa App
Introduction
This tutorial should take approximately 30-40 minutes to complete.
In this tutorial, you'll learn how to configure multiple Notecard LoRa devices to send temperature and voltage readings to a cloud-based dashboard like this:
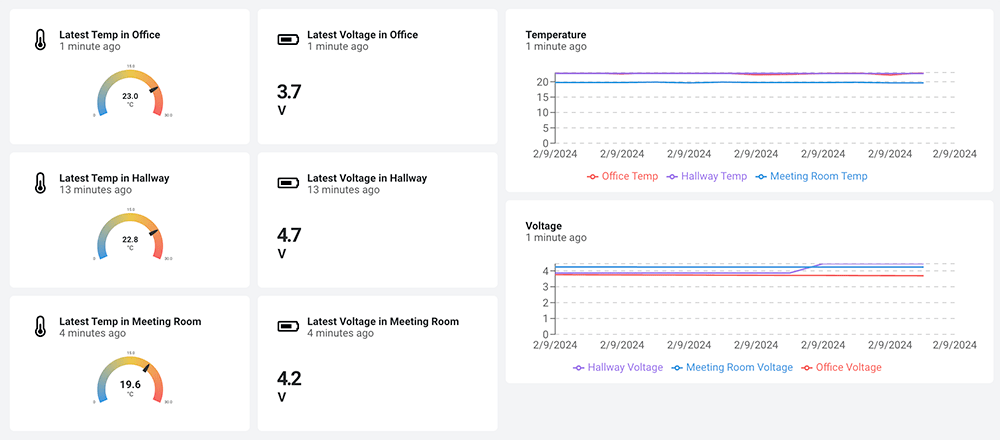
This tutorial doesn't require usage of a host MCU, so no programming is required, and all commands to configure your Notecard LoRa devices will be sent using the In-Browser Terminal.
 note
noteBuilding more advanced applications based on the Notecard LoRa is effectively the same as any other Notecard device. When you're done with this tutorial, we recommend checking out the open source Blues Accelerators and the wide variety of community projects available.
Set Up Hardware
First, you'll need to get your hardware connected. The Blues LoRaWAN Starter Kit includes the following components and is a great way to get started with LoRaWAN:
-
One pre-provisioned Blues LoRaWAN gateway. If you haven't already, consult these instructions on how to set up your Blues gateway. If you don't have a Blues-provided gateway, you may use any public LoRaWAN gateway on The Things Stack.
-
Three Notecard LoRa devices with LoRa antennas.
-
Three Notecarrier B devices.
-
Three LiPo batteries that provide power to each Notecarrier and Notecard.
You will also need a Micro USB to USB-A (or USB-C) cable to connect the Notecarriers to your computer. TIP: Be sure the cable is NOT a charge-only cable.
Connect Your Hardware
-
Slot each Notecard LoRa into a Notecarrier B.
-
Each Notecard LoRa must also have an antenna attached to the u.FL connector on the Notecard.
-
Lastly, connect a LiPo battery to each Notecarrier B via the JST connector.
Repeat this process for every Notecard LoRa + Notecarrier B you have.

TIP: Your LiPo batteries will charge when they are connected to a Notecarrier while the Notecarrier is connected to your computer via USB.
Create Notehub Project
Now that your hardware is all connected, let's create a new Notehub project to receive temperature and voltage readings from your Notecard LoRa devices.
-
Navigate to notehub.io and log-in, or create a new account.
-
Using the New Project card, give your project a name and
ProductUID.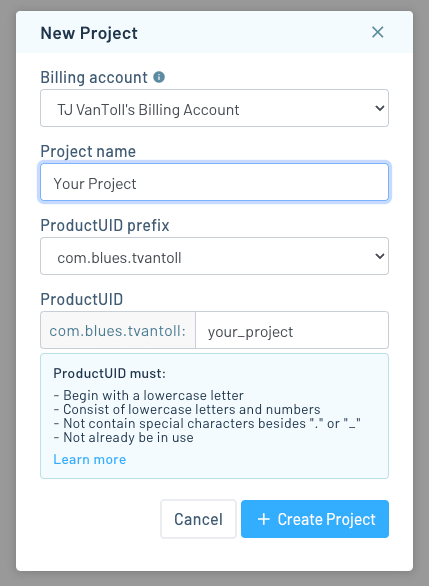
note
The
ProductUIDmust be globally unique, so we recommend a namespaced name like"com.your-company.your-name:your_product". -
Take note of your
ProductUID. This identifier is used by Notehub to associate your Notecard with your project.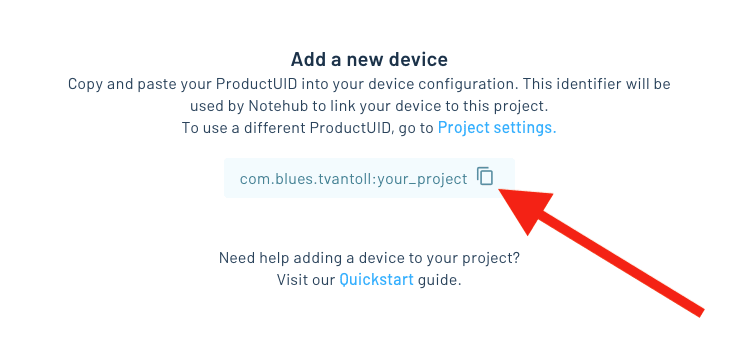
Configure Notecards
Each Notecard LoRa device will need to be configured to perform two functions:
-
Connect to the Notehub project you just created.
-
Gather temperature and voltage readings from the Notecards' onboard sensors and send that data to Notehub on a regular cadence.
Let's start by using the hub.set API to configure each Notecard to communicate with your Notehub project.
-
Connect a Notecarrier to your computer via a USB cable.
-
Open the In-Browser Terminal and connect to your device by clicking on the USB Notecard button.
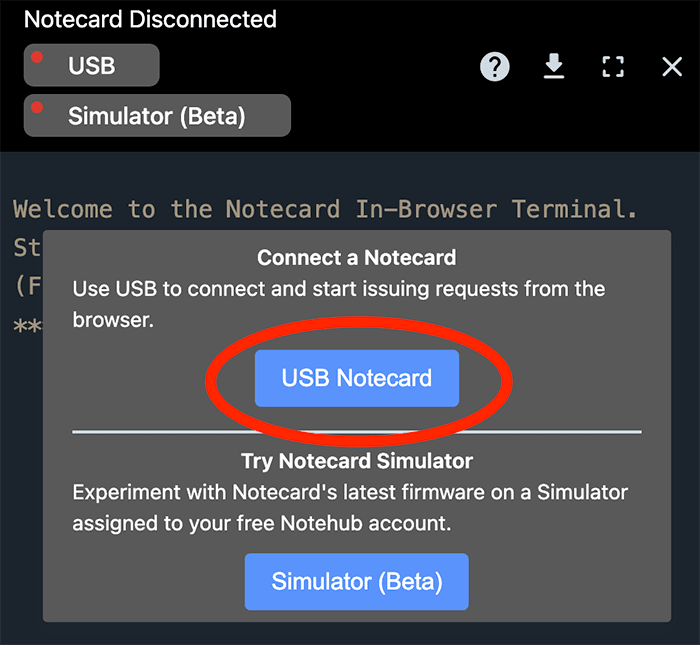
note
If you're on Windows and unable to connect to the Notecard LoRa over serial, you may need to install the CP210x drivers from SILabs.
-
Send a
hub.setrequest to the Notecard, using theProductUIDfrom your Notehub project and an optionalsnargument to apply a "serial number" (a user-supplied identifier) for the device.{"req":"hub.set", "product":"com.your-company.your-name:your_product", "sn": "lora-office"} -
Next, manually initiate a sync with Notehub using the hub.sync API. This will help to verify that your Notecard and LoRaWAN gateway are properly configured and communicating with Notehub.
{"req":"hub.sync"} -
It may take a minute or so, but you should see your device appear on the Devices page in your Notehub project. If not, please double check the previous steps and validate that the gateway you are using is properly configured to operate on The Things Stack. If your device still isn't connecting, please reach out on the Blues community forum.

-
Finally, send a card.temp request to the Notecard which, when using the optional
minutesargument, will automatically send temperature and voltage data to Notehub at the specifiedminuteinterval. Addsync:trueargument to have this data immediately synced with Notehub.{"req":"card.temp", "minutes": 5, "sync": true}Events like this are sent to Notehub as JSON-based Notes, in Blues parlance.
For example, this is what a Note might look like in Notehub from the previous request:
{ "event": "827cc167-7860-41b1-9f03-7789d98c2173", "best_id": "dev:0080e11500088461", "device": "dev:0080e11500088461", "product": "com.blues.xxx:yyy", "app": "app:13b22b6c-f96b-4c78-8d15-2a3d0a3f5694", "received": 1707409825.187589, "req": "note.add", "when": 1707409825, "file": "_temp.qo", "body": { "count": 9, "temperature": 23.826086, "usb": true, "voltage": 4.9453125 }, "fleets": [ "fleet:39913633-cc58-4e3f-9a61-84215a934b57" ] } -
Repeat this process for each of your Notecard LoRa devices. When you are finished, you may distribute them throughout your home or office and start gathering distinct temperature and voltage readings.
note
Most real-world applications built with the Notecard will also use a host MCU. After you've completed this tutorial, we recommend looking at the Sensor Tutorial to better understand usage of the all-important note.add API.
IMPORTANT: When using a Notecard LoRa, Notes sent MUST use a Note Template to save memory on flash, and save bandwidth in transit. The above
card.temprequest automatically uses a template.
View Data in Notehub
Once you start capturing temperature and voltage readings, your Notecard LoRa
devices will initiate connections to Notehub and start transferring accumulated
_temp.qo Notes.
-
Return to Notehub and open your project. You should see all of your Notecard LoRa devices in the Devices page.
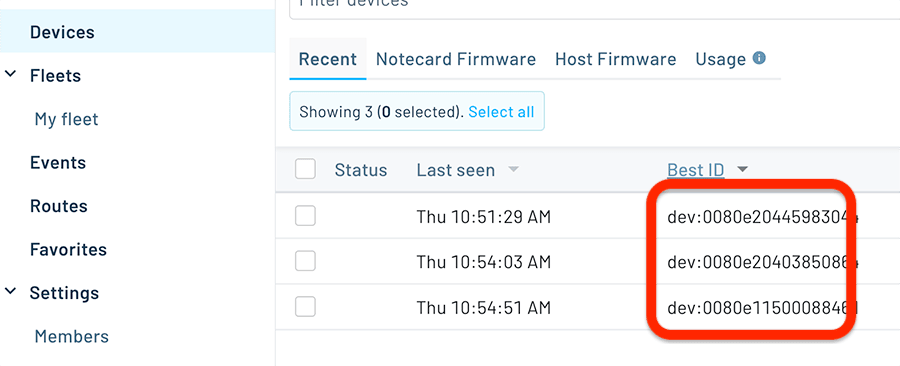
-
Click on the Events menu item and you should also see accumulated
_temp.qoNotes syncing (depending on theminutescadence you previously specified).
-
Congratulations! You're sending sensor readings with the Notecard LoRa over LoRaWAN to Notehub! Next, routing that data to your cloud application starts to prove out the real value of Notehub.
Create Notehub Route
One powerful feature of Notehub is routes, which allow you to forward your data from Notehub to a public cloud like AWS, Azure, or Google Cloud, a messaging platform like MQTT, a data cloud like Snowflake, or a custom HTTP endpoint.
The next sections of this tutorial guide you through sending data to two different cloud services, and teach you how to build a cloud-based dashboard using accumulated temperature and voltage data.
What is a Notehub Route?
A Route is an external API, or server location, where Notes can be forwarded upon receipt.
Routes are defined in Notehub for a Project and can target Notes from one or more Fleets or all Devices. A Project can have multiple routes defined and active at any one time.
Configure a Route to webhook.site
We'll start with a simple route that passes Notecard events through to webhook.site, a free resource that lets you view the full JSON payload sent by Notehub. Using this service is a useful way to debug routes, add a simple health-check endpoint to your app, and familiarize yourself with Notehub's Routing capabilities.
-
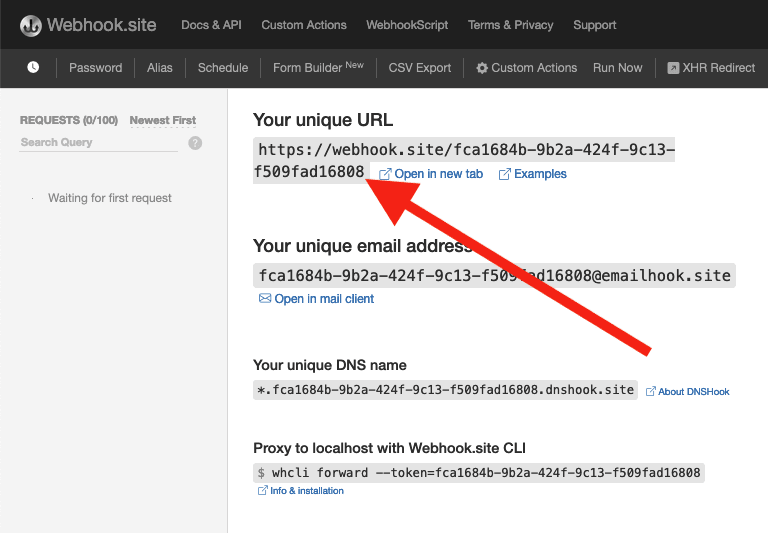
Navigate to webhook.site. When the page loads, you'll be presented with a unique URL that you can use as a Route destination. Copy that URL for the next step.
-
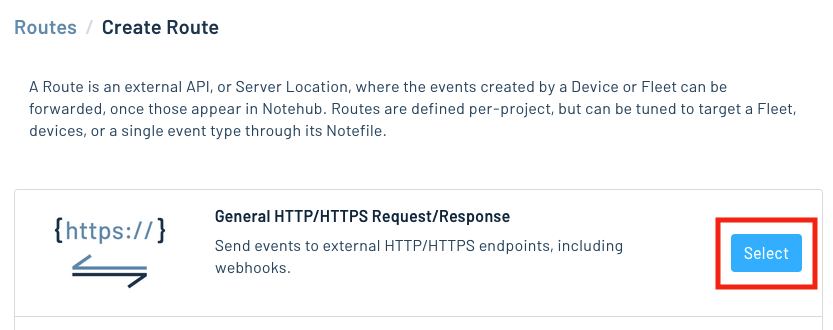
Next, navigate to the Routes menu item, click the Create Route button, and select the General HTTP/HTTPS Request/Response route type.
-
Give the route a name and for the Route URL, use the unique URL you obtained from webhook.site.

-
Under the Filters section, in the Notefiles dropdown, choose Select Notefiles and enter the name of the Notefile to monitor. In this case, you'll want to choose the
_temp.qoNotefile.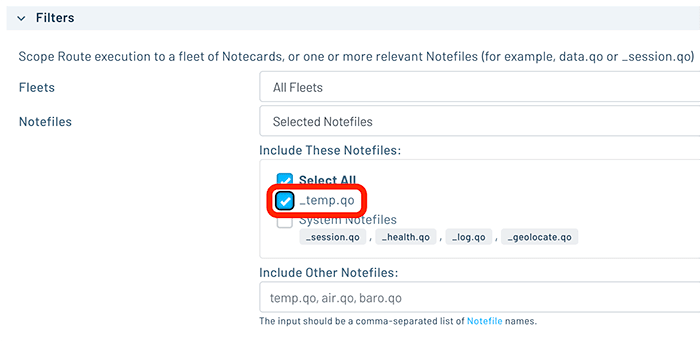
-
Make sure the Enabled switch remains selected, and click Create Route.
-
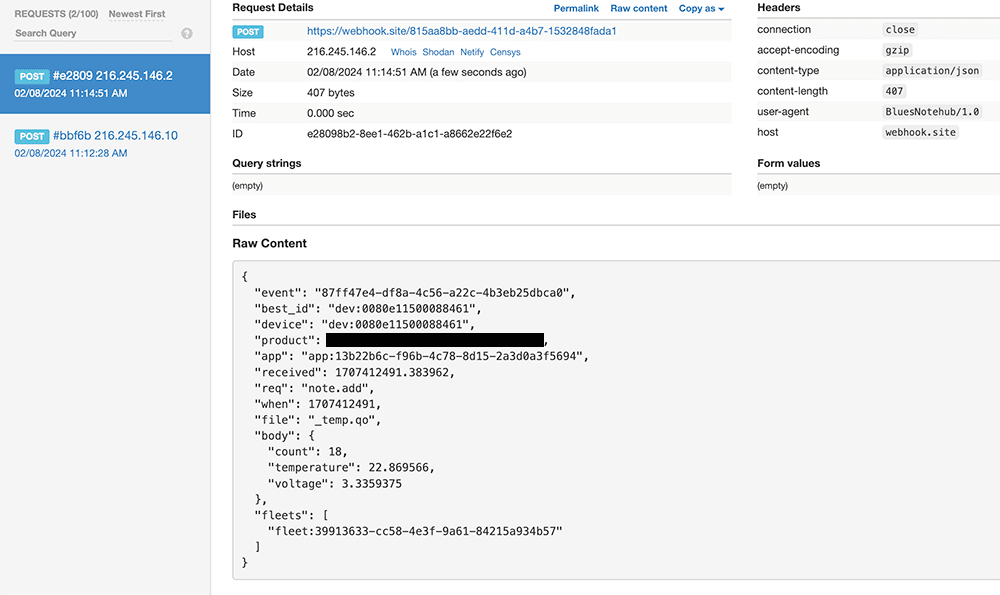
Return to webhook.site. This page will update automatically with data from all of your Notecard LoRa devices as it is received by Notehub. Notice that Notehub provides you with additional metadata by default. In the next section, we'll look at using transformations to customize what Notehub sends in a Route.
Use JSONata to Transform JSON
Before moving on to routing data to another external cloud service, let's briefly explore using JSONata to transform the data Notehub routes on-the-fly.
As mentioned above, Notehub provides additional information in each Route request. You may want to trim down what you send to the external service, or you might need to transform the payload to adhere to a format expected by the service. Either way, Notehub supports shaping the data sent to a Route using JSONata.
 note
noteTo learn more about JSONata, have a look at the Blues JSONata Guide.
Transform Your Data
Let's try a simple query to the webhook.site route created in the last section.
-
Navigate to your Routes in Notehub and click on the webhook.site Route you just created.
-
Towards the bottom of the screen, in the Transform JSON drop-down, select JSONata Expression.

-
In the JSONata expression text area, add the following JSONata expression to select the
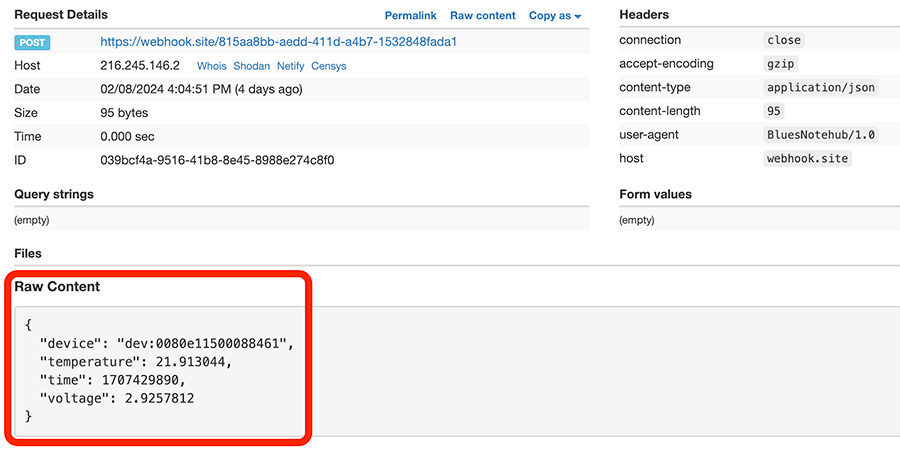
temperatureandvoltagefrom thebodyof the Note, create atimefield based onwhenthe event was saved to the Notecard, and pass on the uniqueDeviceUID.{ "temperature": body.temperature, "voltage": body.voltage, "time": when, "device": device } -
Click Apply changes and navigate back to your webhook.site url. As requests come in, you'll see your custom, JSONata-transformed payload in the Raw Content section.
JSONata is simple, powerful, and flexible, and will come in handy as you create additional Routes for your external services. To explore JSONata further, visit our JSON Fundamentals guide.
Create Cloud Dashboard
Now that you've created your first Route and learned how to use JSONata to shape the data sent by a Route, you'll now connect Notehub to another external service.
In this section of the tutorial, you'll connect your app to Datacake, which is a low-code platform for creating cloud-based IoT applications and reporting dashboards.
 note
noteNotehub supports routing data to virtually any cloud endpoint! Learn more about routing data in the Notehub Walkthrough and explore other routing options in our Routing Data to Cloud guides.
Create an Account and Set Up Your Devices
If you haven't already, create your Datacake account. The free account option includes accessing data from up to five devices.
After completing the registration process, you will be redirected to your default workspace in Datacake. A workspace is a collection of products, devices, team members, and dashboard reports.
A product in Datacake is comprised of one or more devices and includes your dashboards, database fields, and payload decoder for processing inbound data.
A device in Datacake can be thought of as a literal hardware device (in this case, a Notecard LoRa). A device can be part of multiple products, but for the purposes of this tutorial you will associate all of your Notecard LoRa devices with a single product.
-
Navigate to the Devices menu and click on Add Device.

-
Choose the API device type, select New Product from template, select the Blues Wireless Notecard template, and then click the Next button.

-
Next, you need to associate your first Notecard LoRa device with this Datacake device. An easy way to do this is by using the Notecard's globally unique Device UID. Open Notehub and navigate to the Devices page. Copy a single Device UID.
If you supplied a serial number (
sn) in yourhub.setrequest, you may have to click on the column header to show the Device UID.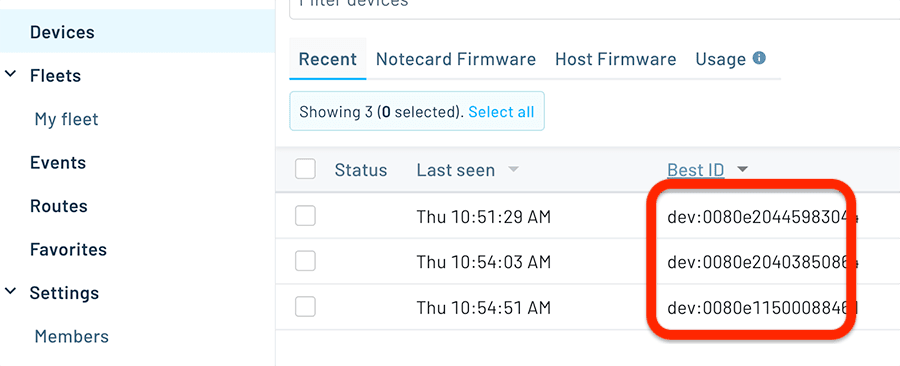
-
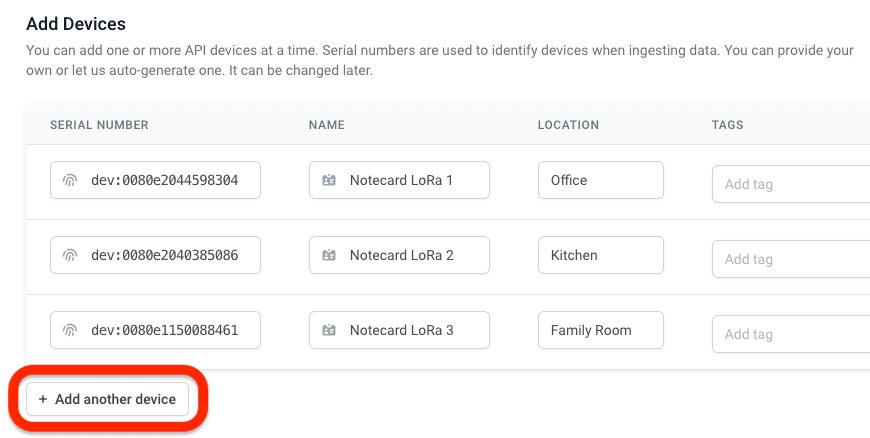
Back in the Datacake device creation screen, paste your Device UID in the Serial Number field and provide a Name to label the device.

-
Repeat this process by using the Add another device button for your other Notecard LoRa devices.
-
In the next step, choose the Datacake plan most appropriate for your needs. You can always start with a free account and upgrade later.
Configuring a Datacake Device
Upon successful creation of your devices in Datacake, you will be redirected to an overview of all your Datacake devices. Click on any newly-created device to open the device view.
 note
noteWhen you make a change to a device configuration or dashboard, those changes will be reflected on all devices in the same Datacake product.
-
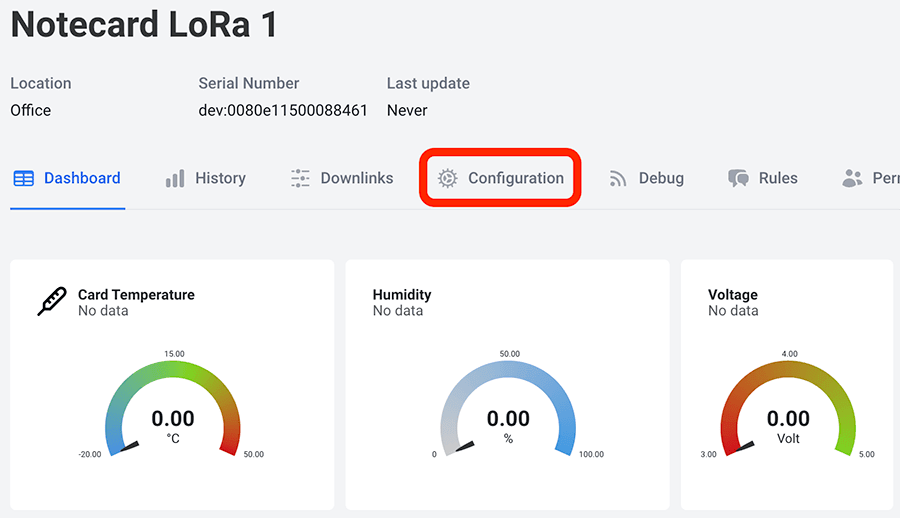
Within the device view, click on the Configuration tab to configure your Datacake devices to accept data from Notehub.
-
Scroll down and look for the Fields section. Since you chose the Blues template for this device, there are numerous existing fields that correspond to metadata sent by default from Notehub. For this tutorial, you only need
temperatureandvoltage, which already exist.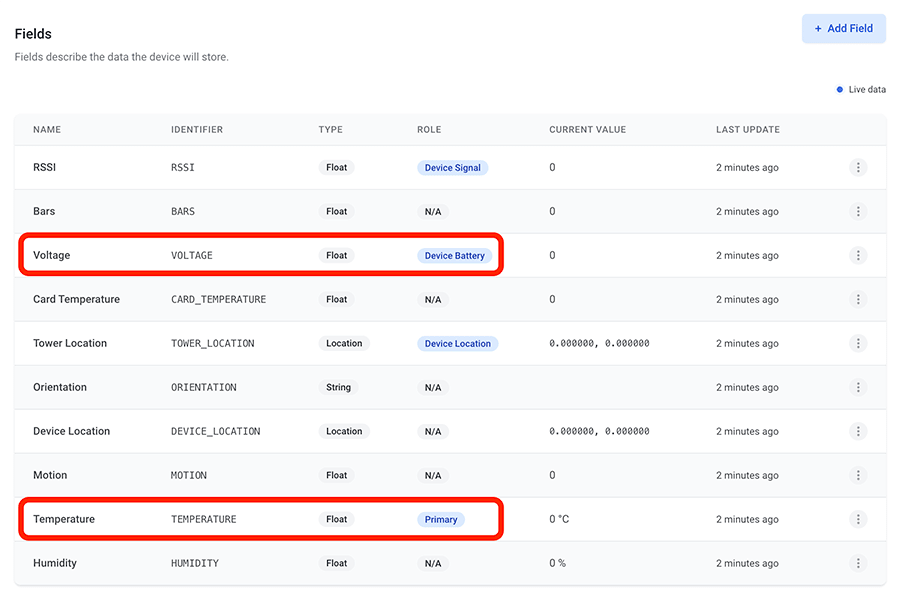
-
With the fields in place, it's time to configure the HTTP Payload Decoder. Scroll up to the HTTP Payload Decoder section, which contains a code editor with syntax highlighting.
Decoderis a JavaScript function that converts the payload from Notehub into a JSON object corresponding to the database fields that were set in the previous section. The function willreturna one-dimensional array of values pulled from thedecodedobject.You can safely remove everything in the editor window and replace it with the following:
function Decoder(request) { var data = JSON.parse(request.body); var decoded = {}; var device = data.device; decoded.temperature = data.temperature; decoded.voltage = data.voltage; // Array where we store the fields that are being sent to Datacake var datacakeFields = [] // take each field from decodedElsysFields and convert them to Datacake format for (var key in decoded) { if (decoded.hasOwnProperty(key)) { datacakeFields.push({field: key.toUpperCase(), value: decoded[key], device: device}) } } // forward data to Datacake return datacakeFields; } -
Scroll down to find a Save button, and click it to save your configuration changes.
-
For the next section, you'll need to copy the provided HTTP Endpoint URL from Datacake.

Create a Notehub Route for Datacake
-
Back in Notehub, open the Routes page, click the Create Route button, and select the Datacake route type.

-
Provide a Route name and paste in the HTTP Endpoint URL you copied earlier for the URL. Just like when you created the webhook.site route, choose Select Notefiles and specify the
_temp.qoNotefile. Lastly, use the same JSONata expression as before.{ "temperature": body.temperature, "voltage": body.voltage, "time": when, "device": device }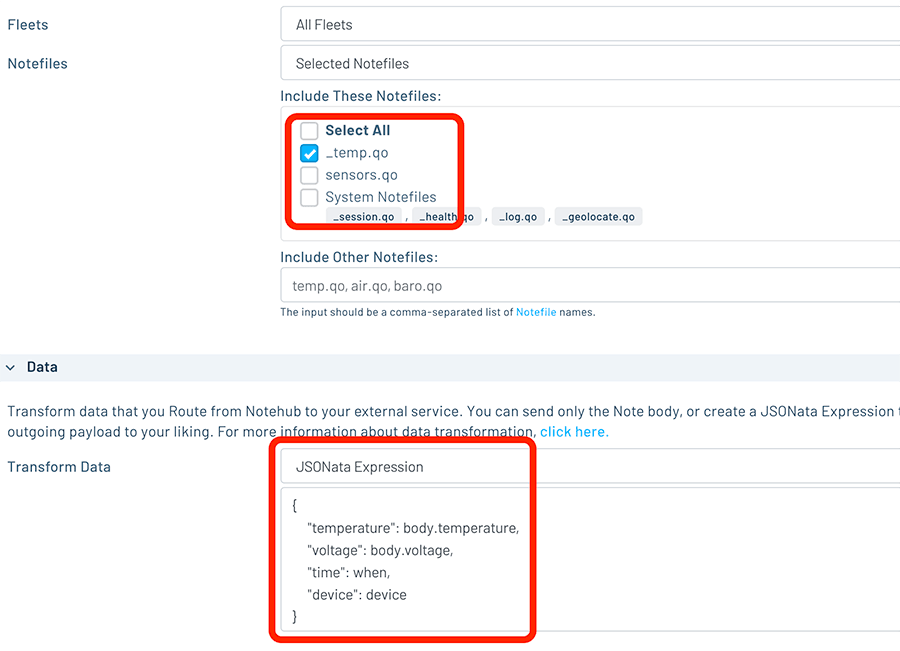
-
Click the Create Route button to save your new Datacake route.
As new sensor readings are delivered to Notehub from all of your Notecard LoRa devices, they will be actively routed to Datacake. Your next step is to create a dashboard report using the Datacake UI.
Build Data Visualizations
-
Navigate to the Dashboard tab to view the default dashboard provided by Datacake for the Blues template you selected earlier. In a matter of minutes this can be customized to show only the temperature and voltage data you are sending.
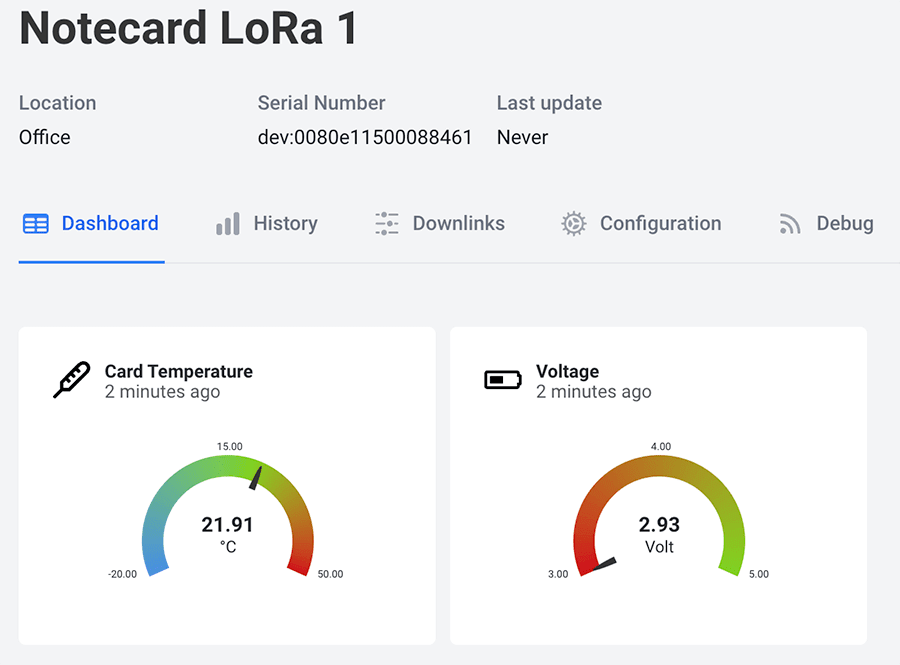
This is a great start, but since we are sending data from multiple devices, let's build a new dashboard that aggregates data from all devices.
-
Click the Add Dashboard menu item and provide a name for the new dashboard.
-
Toggle the switch to edit the dashboard and click the Add Widget button to add your first widget.
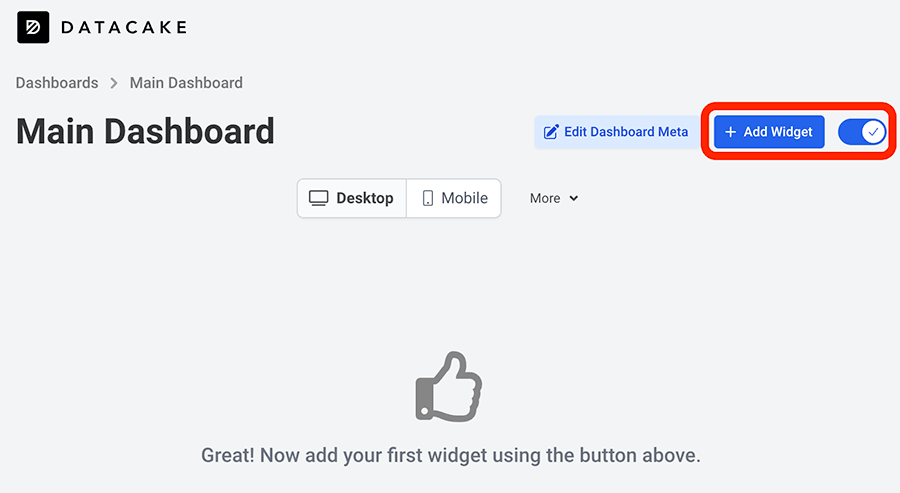
-
Create a new Value widget to display the most recent temperature value.
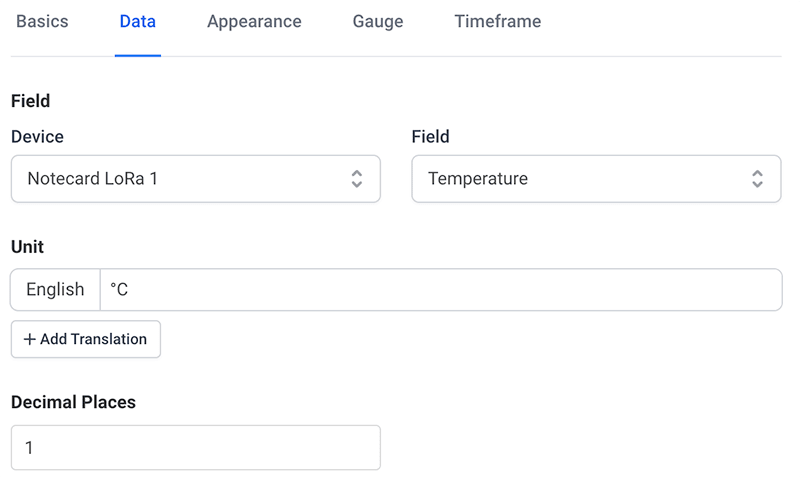
-
Customize the widget with a circular gauge and provide reference values for cold/medium/hot temperatures.
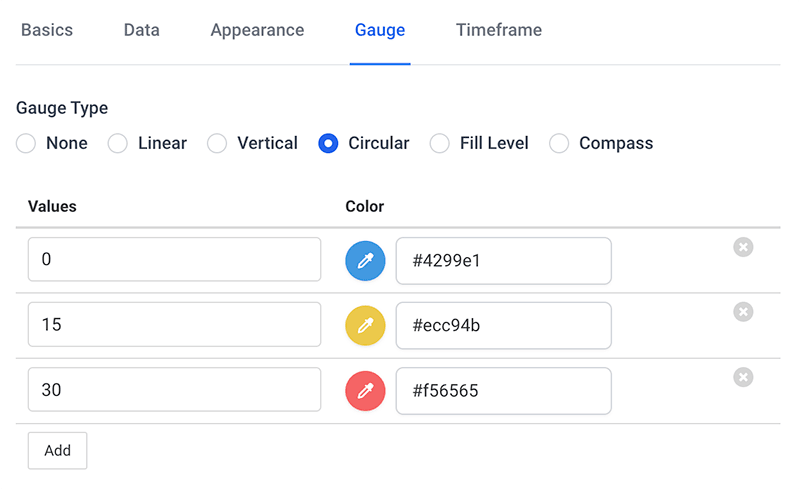
-
Once the first widget is created, create copies for all three devices to display temperature, and again to display voltage values (with or without the gauge, it's your choice).
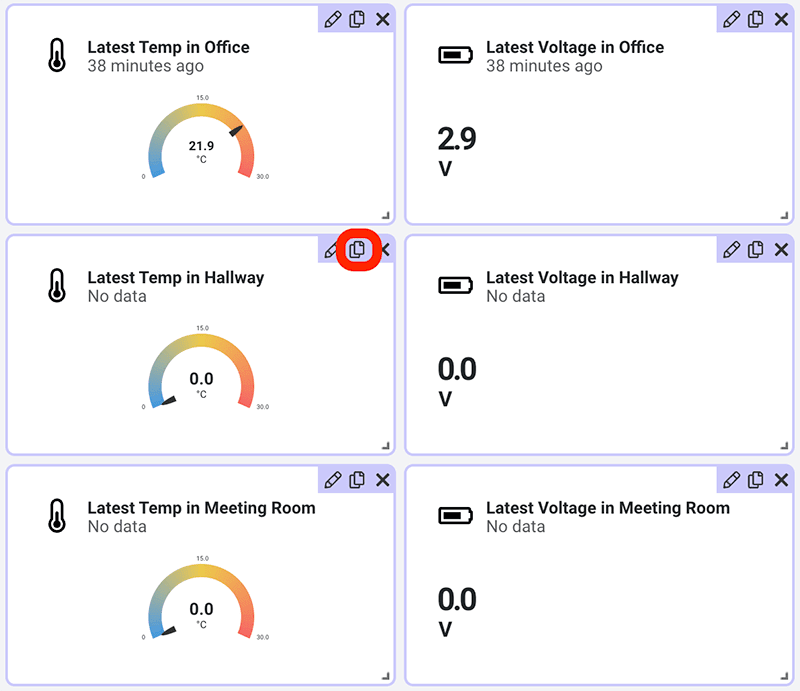
-
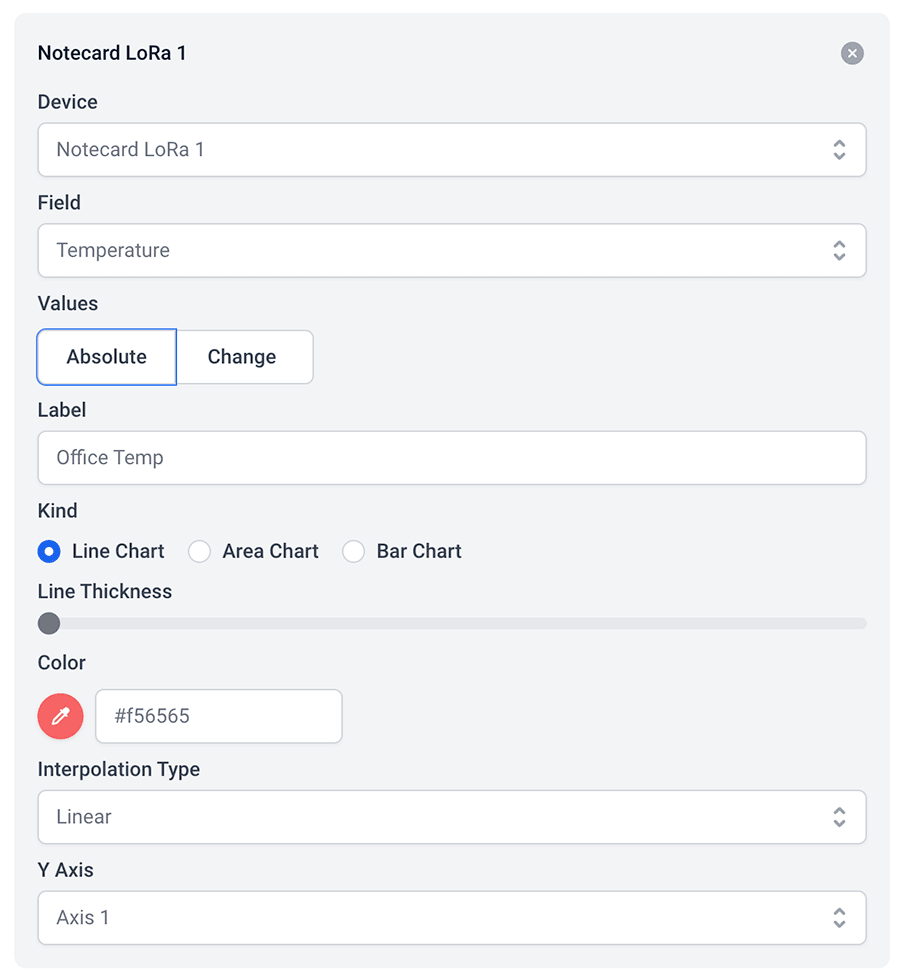
Create a new Chart widget to display longitudinal data about temperature over time. In this widget, you will want to add each device under the Data tab.
-
Again, duplicate this widget and customize it to display voltage data. Click the switch again to save your changes. Your dashboard should now look something like this.

 note
noteThis tutorial had you use several configuration settings that are best used when you have your Notecard connected to mains power.
-
In the
card.temprequest, settingsynctotruetells the Notecard to immediately synchronize outbound Notes with Notehub. -
Also in the
card.temprequest, settingminutesto5tells the Notecard to create Notes every 5 minutes (likely more frequently than you need).
Because each of these settings cause the Notecard to use more power, you may wish to disable them if you plan to transition your project to battery power. You can run the command below as a more power-friendly alternative.
{"req":"card.temp", "minutes": 60}Alternatively, you may tell the Notecard to stop sending temperature and
voltage readings by issuing a card.temp request with the "stop":true
argument:
{"req":"card.temp", "stop": true}Learn more about optimizing the Notecard for low-power scenarios in Low Power Design.
Next Steps
Congratulations! You've just deployed multiple Notecard LoRa devices, created a Notehub route, and connected your device data to an external cloud-based dashboard.
If you're following the LoRaWAN Quickstart, you're done! But we do have some suggestions for next steps:
- Learn some Notecard and Notehub best practices with the open source Blues Accelerators.
- Build an app with a host MCU by following the Sensor Tutorial.
- Get inspired by our extensive list of community projects.
At any time, if you find yourself stuck, please reach out on the community forum.
