Blues Sparrow
 warning
The Sparrow project is no longer under active development. We have applied our learnings from Sparrow to Notecard LoRa, which you can start with using our LoRaWAN Starter Kit and LoRaWAN Quickstart tutorial.
We do offer Sparrow support for customers that have previously purchased Sparrow hardware.
Introduction to Sparrow
Sparrow is a set of reference designs that enable one or more Nodes to communicate with a paired Gateway using a LoRa radio. The following articles will help you get started with Sparrow, and then dive deeper into exactly how the Sparrow hardware and firmware works.
-
Sparrow Quickstart: The place to start. This step-by-step guide helps you set up, configure, and start collecting data from a Sparrow Development Kit.
-
Sparrow Datasheet: View detailed documentation on the Sparrow architecture's specifications.
-
What To Do With Sparrow Data: Information on what to do with Sparrow data in Notehub, including tips on routing data to your own services, and how to use the Sparrow Reference Web App.
-
Sparrow Firmware Updates: A step-by-step guide for downloading firmware binaries, and uploading those binaries to your devices.
-
Sparrow Hardware Behavior: A detailed guide to the how buttons, LEDs, and DIP switches work on Sparrow hardware.
-
Sparrow Builder's Guide: A guide to building custom solutions on top of the Sparrow architecture.
Reference Projects
-
Sensor Clusters Made Easy w/LoRa and Blues Sparrow: Learn how to use a Sparrow Development Kit to monitor temperature, humidity, and motion at various locations around a home.
-
Refrigerator Fleet Monitoring Made Easy with LoRa: Monitor temperature, humidity, and door open/close state across fleets of refrigerators with low-cost, LoRa-based sensors.
-
“I love checking on mousetraps,” said no one ever: Get an SMS alert when there's a mouse in your live trap as we build a smarter mousetrap for the Internet of Things.
What To Do With Sparrow Data
Once you have data flowing into Notehub from your Sparrow hardware, you'll likely want to send that data to other cloud applications or services.
One powerful feature of Notehub is routes, which allow you to forward your data from Notehub to a public cloud like AWS, Azure, or Google Cloud, a messaging platform like MQTT, or a custom HTTP/HTTPS endpoint.
For the most part Sparrow projects work like any other Notehub-based project. As such, you can refer to the following Notehub resources for more information on routing data.
-
Routing Data with Notehub: A list of the the available route types and how to use them.
-
Routing Tutorial: A step-by-step tutorial to routing Notehub data to a variety of popular services, such as Azure and AWS, as well as routing to general HTTP/HTTPS endpoints.
However, there are a few routing considerations that are unique to Sparrow projects. In this article we'll look at how to differentiate between multiple Sparrow nodes in routes, and how to use the Sparrow Reference Web Application to view and manage your data.
Distinguishing Between Nodes
In most Notehub-based apps the main identifier you care about is the DeviceUID, which uniquely identifies the Notecard that is sending data. In Sparrow apps, however, you usually are more interested in knowing which Node data originated from.
Each Sparrow Node also has a unique identifier, and by convention it appears in the
file field of each of your project's *.qo events. For example, the air.qo event
below originated from a Node with an id of 2037335832365003004e001d.

You can derive this identifier in your route's end destination, however, if you want
this identifier to appear as a top-level property in your JSON, you can also use
JSONata to pull the identifier out of the file field.
To do so, create a new route in Notehub and scroll down to the Data section. In this section, set Transform Data to JSONata Expression, and paste in the code below.
$merge([$, {
    "node": $substringBefore(file, "#")
}])
Now, Notehub will apply this new JSONata expression before routing your data, and add a
new node field that contains your node's identifier. You can see an example of how this
works in the JSONata Exerciser below.
Sparrow Reference Web App
The Sparrow Reference Web App is an open-source project for jump-starting professional Sparrow solutions, by providing a customizable dashboard for viewing and updating Sparrow data.
The Sparrow Reference Web App allows you to:
-
Easily start a Sparrow-based web application.
-
Route your data from Notehub, and store it in a Postgres database.
-
View, and manage your data on an interactive web dashboard.
-
Host your web app and database on a number of popular hosting platforms.
If you're curious what the app looks like in action, check out the official Blues demo to see live sensor data from around the United States. And when you're ready, check out the project's README on GitHub for more information on how to get up and running with your own data.

Sparrow Firmware Updates
This article is a step-by-step guide for downloading firmware releases and uploading those firmware binaries to your Sparrow devices.
 note
noteThe Sparrow Essentials Board and Sparrow Reference Nodes run the same firmware, and you can use this article's instructions to update the firmware of each.
Downloading Firmware Binaries
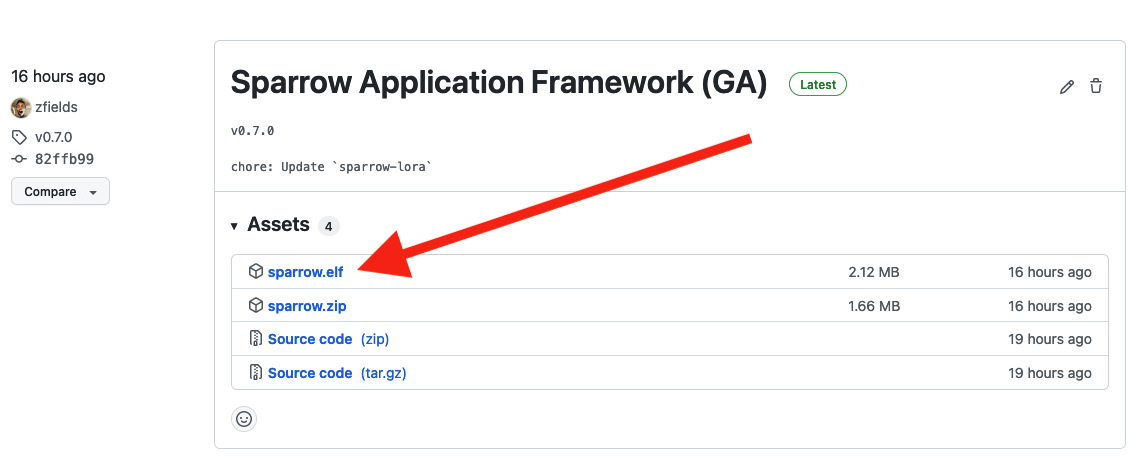
The Sparrow reference firmware is open source and available on GitHub. You can view all firmware releases on the repository's releases page. The steps below you show you how to download a firmware binary.
-
Open the firmware repository's release list in a web browser.
-
Select the appropriate release. (The most recent version will be on top.)
-
Scroll down to find the release's
.elffile, and click it to download the firmware.

Now that you have the firmware binary downloaded, you're ready to push the binary out to your device.
 warning
To complete this section you'll need to have STM32CubeProgammer installed. So if you haven't already, install STM32CubeProgrammer, and make sure to follow these installation notes.
-
Ensure your Sparrow device has power, either from a LiPo battery, a Qwiic connection, or a USB connection.
-
Connect your STLINK-V3MINI to your Sparrow Essentials Board, or Sparrow Reference Node.

-
Use a micro USB cable to connect the other end of your STLINK-V3MINI to your laptop or computer.
-
Open STM32CubeProgrammer on your laptop or computer, and select ST-LINK from pulldown menu (shown below).

-
Select Reset mode: Hardware Reset.

-
Click the Connect button.

-
Click the "Erasing & programming" button.

-
Click the Browse button, and select a local copy of the
sparrow.elffile you just downloaded.
-
Click the Start Programming button.

-
Wait for the download to complete and your Sparrow device to reboot.
At this point you've now successfully updated the firmware on your Sparrow board.
(Optional) You can verify the installation succeeded by completing the following steps in a serial terminal application, such as CoolTerm or TerraTerm.
-
Connect to the STLINK-V3MINI serial terminal at 9600-8-N-1.
-
Press the
RESETbutton on your Sparrow device. -
Verify the updated firmware by referencing the banner message (example shown below).
===================
===== SPARROW =====
===================
Feb 24 2022 15:19:28You can also update Sparrow firmware with STM32_Programmer_CLI by following the
steps below.
 warning
To complete this section you'll need to have STM32CubeProgammer installed. So if you haven't already, install STM32CubeProgrammer, and make sure to follow these installation notes.
-
Ensure your Sparrow device has power, either from a LiPo battery, a Qwiic connection, or a USB connection.
-
Connect your STLINK-V3MINI to your Sparrow Essentials Board, or Sparrow Reference Node.

-
Upload the local copy of the
sparrow.elffile you just downloaded:STM32_Programmer_CLI --connect port=SWD reset=HWrst --write ~/Downloads/sparrow.elf --verify --go -
Wait for the download to complete and your Sparrow device to reboot.
(Optional) You can verify the installation succeeded by completing the following steps in a serial terminal application, such as CoolTerm or TerraTerm.
-
Connect to the STLINK-V3MINI serial terminal at 9600-8-N-1.
-
Press the
RESETbutton on your Sparrow device. -
Verify the updated firmware by referencing the banner message (example shown below).
===================
===== SPARROW =====
===================
Feb 24 2022 15:19:28
Sparrow Hardware Behavior
The following is a reference for the behavior of the buttons, LEDs, and DIP switches on Sparrow hardware.
 note
noteThis guide applies both to the Sparrow Essentials Board and Sparrow Reference Sensor Node.
The behavior of some buttons and LEDs can depend whether the board is currently operating as part of a gateway or a sensor node. In those cases, this guide uses Gateway to denote the behavior when the board is operating as part of a gateway, and Node when the board is operating as a sensor node.
-
PAIR-
Hold at boot — Enables tracing logs over debug UART.
-
Press
-
Gateway — Enters pairing mode.
-
Node
-
If the node is unpaired — Enters pairing mode.
-
If the node is paired — Sends a test message to the gateway.
-
-
-
Press & hold — Enables a soft access point on the attached Notecard WiFi.
-
Press & hold (30 seconds) — Resets the board to factory settings.
-
-
RESET- Press — Power cycles the device.
-
BOOT- Press — Enters bootloader mode (DFU).
LED Behaviors
-
Blue (
PAIR) — Pairing mode-
Gateway — The gateway will accept incoming pairing requests.
-
Node — The node will be pinging, searching for a gateway.
-
-
Green (
RX) — Receive mode- Sparrow is waiting for an application to send it data.
-
Red (
TX) — Transmit mode- The radio is actively sending data.
-
Blue & Green
- The node is scanning for a gateway (Red will blink with each ping).
-
Red & Green
- Sparrow is attempting to send data, but waiting for clear air (i.e. listening before speaking).
-
Red & Green & Blue
-
Steady on — Sparrow is booting.
-
Crawling
-
On start up — The gateway is connecting to Notehub.
-
On
PAIRbutton hold — The soft access point on the attached Notecard WiFi is active.
-
-
Flashing — Last operation acknowledgment.
- Three flashes — Factory reset has completed.
-
DIP Switch Behaviors
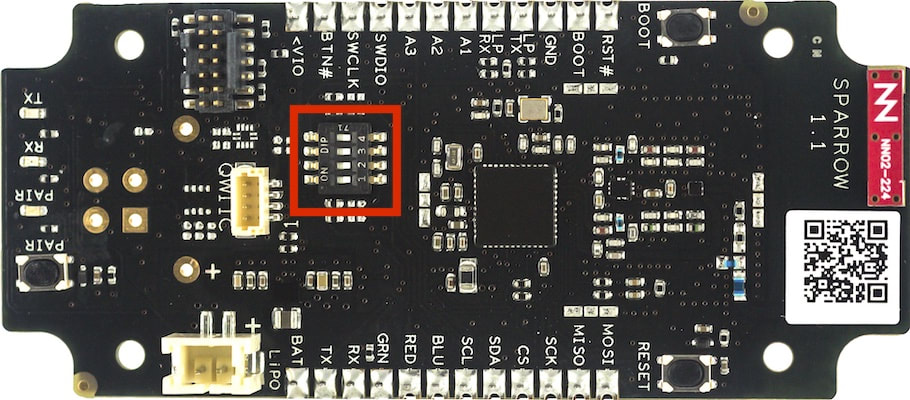
All Sparrow boards have four DIP switches that control the frequency ranges that the device's LoRa radio operates within.

The LoRa protocol operates on the ISM (industrial, scientific, medical) radio band, which allows anyone to transmit without the need for a license, permit, or transmission rights. Unfortunately the ISM band is not standardized globally, so the frequency of LoRa-based devices must be set to operate the region in which it is being used.
Sparrow allows you to set your board to multiple common LoRa frequency plans by setting the board's DIP switches. For legal operation in the United States and Canada, the Sparrow DIP switches MUST be set to the OFF position on all boards. For other regions, refer to the board's datasheet for more information on setting a frequency plan.
Sparrow Builder's Guide
In this guide you'll learn how to go beyond the basics, and build custom solutions on top of the Sparrow architecture.
The easiest place to start building is by running the Sparrow Reference Firmware. The reference firmware is open-source, and allows you to tweak your devices' behavior, as well as make entirely new sensors work in your Sparrow systems.
Let's look at how to download, flash, and debug the reference firmware.
Installing Firmware Prerequisites
All the different Sparrow configurations run off the same firmware, which is open source and available on GitHub in the Sparrow Reference Firmware repository.
To start, you'll first need to clone the firmware's repository (making sure to include
the --recursive flag).
git clone https://github.com/blues/sparrow-reference-firmware.git --recursiveFrom there you must additionally install a series of prerequisites.
The Sparrow Reference Firmware repository contains a Docker container that includes all of the firmware's prerequisites.
To use the Docker container you must have both Docker, and the the Visual Studio Code “Remote - Containers” installed.
Why is the Docker container only available on Linux?
The Sparrow Reference Firmware's Docker container can compile firmware on Windows, macOS, and Linux.
However, the container only has USB access on Linux, and therefore you can only flash and debug firmware over USB on Linux.
To build, flash, and debug the Sparrow Reference Firmware on your development machine locally you'll need to have the following tools natively installed.
-
CMake (must be v3.14 or greater)
-
Make
-
A terminal Program (choose one)
- (macOS) CoolTerm
- (Linux) GTKTerm
- (Windows) PuTTY
- Arduino Serial Montior (Arduino IDE)
-
(OPTIONAL) GNU ARM toolchain (also packaged with STM32CubeIDE)
Additionally, if you intend to use Visual Studio Code to build and flash firmware (recommended), you must install the following.
With all of these tools installed, next ensure all tools and libraries are in your system
path. This may be necessary of all tools, but is especially important for ST-LINK_gdbserver
and its shared library dependency, libSTLinkUSBDriver.so (or platform-specific equivalent).
You can use the code below to add those libraries to your system path.
Linux:
export PATH=/opt/st/stm32cubeide_1.8.0/plugins/com.st.stm32cube.ide.mcu.externaltools.gnu-tools-for-stm32.9-2020-q2-update.linux64_2.0.0.202105311346/tools/bin:${PATH}
export PATH=/opt/st/stm32cubeide_1.8.0/plugins/com.st.stm32cube.ide.mcu.externaltools.cubeprogrammer.linux64_2.0.100.202110141430/tools/bin:${PATH}
export PATH=/opt/st/stm32cubeide_1.8.0/plugins/com.st.stm32cube.ide.mcu.externaltools.stlink-gdb-server.linux64_2.0.100.202109301221/tools/bin:${PATH}
export LD_LIBRARY_PATH=/opt/st/stm32cubeide_1.8.0/plugins/com.st.stm32cube.ide.mcu.externaltools.stlink-gdb-server.linux64_2.0.100.202109301221/tools/bin/native/linux_x64:${LD_LIBRARY_PATH}
macOS (set in your ~/.bashrc file or whatever terminal you prefer):
export PATH="/Applications/STM32CubeIDE.app/Contents/Eclipse/plugins/com.st.stm32cube.ide.mcu.externaltools.gnu-tools-for-stm32.9-2020-q2-update.macos64_2.0.0.202105311346/tools/bin:$PATH"export PATH="/Applications/STM32CubeIDE.app/Contents/Eclipse/plugins/com.st.stm32cube.ide.mcu.externaltools.gnu-tools-for-stm32.9-2020-q2-update.macos64_2.0.0.202105311346/tools/bin:$PATH"
export PATH="/Applications/STM32CubeIDE.app/Contents/Eclipse/plugins/com.st.stm32cube.ide.mcu.externaltools.cubeprogrammer.macos64_2.0.100.202110141430/tools/bin:$PATH"
export PATH="/Applications/STM32CubeIDE.app/Contents/Eclipse/plugins/com.st.stm32cube.ide.mcu.externaltools.stlink-gdb-server.macos64_2.0.100.2109301221/tools/bin:$PATH”
export DYLD_LIBRARY_PATH="/Applications/STM32CubeIDE.app/Contents/Eclipse/plugins/com.st.stm32cube.ide.mcu.externaltools.stlink-gdb-server.macos64_2.0.100.202109301221/tools/bin/native/mac_x64:$DYLD_LIBRARY_PATH”
Building, Flashing, and Debugging Firmware
Now that you have the prerequisites in place, let's next look at how you can build, flash, and debug the Sparrow Reference Firmware.
 note
noteMake sure to connect your Sparrow board to your computer via the STLINK-V3MINI using a USB cable before continuing.
The easiest way to build, flash, and debug the Sparrow Reference Firmware is within Visual Studio Code.
As a first step, open the sparrow-reference-firmware repository you cloned
within the Visual Studio Code editor.
 note
noteIf you're on Linux and using the firmware's Docker container, make sure to open the firmware project in its container.
Be sure to attach your Sparrow device to your machine before you launch the
development environment, so /dev/bus/usb can be captured by the container.
You can open the firmware project in its container by first clicking the small green box in the lower-left corner of the Visual Studio Code window.
![]()
Next, select “Reopen in Container” from the drop-down menu.

Building
Hotkey: Ctrl + Shift + B (Cmd + Shift + B on macOS)
- In the Visual Studio menu (top of screen), click Terminal > Run Build Task...
Flashing
-
In the Visual Studio menu (top of screen), click Terminal > Run Task...
-
Next, Sparrow: Flash Firmware Using STM32_Programmer_CLI.
Debugging
Hotkey: Ctrl + Shift + D (Cmd + Shift + D on macOS), or F5.
-
Within Visual Studio select the Run and Debug menu from the leftmost toolbar.
-
Press the green “Play” button next to Cortex Debug.

You can also build, flash, and debug Sparrow firmware within STM32CubeIDE. To start, you'll need to open the firmware in the IDE with the following steps.
-
Open the STM32CubeIDE application.
-
Navigate to File > Open Projects from File System...

-
Press the Directory... button.
-
Open the hidden folder,
.STM32CubeIDE, from your newly cloned firmware repository. (On macOS you may need to typeCmd+Shift+.within the dialog to see hidden files and folders.) -
Press the Finish button.
Building
-
Select the sparrow project in the Project Explorer on the left-side of the IDE.
-
Click the hammer icon in the toolbar to build “Debug” for project sparrow.

Flashing
Before you can install binaries you must first specify a Run Configuration by following the steps below.
-
Select Run > Run Configurations... from the menu.
-
From the Run Configurations dialog select STM32 Cortex-M C/C++ Application > sparrow Debug.
-
All the default values should be correct, so next press the Run button.

Once you have specified a Run Configuration, you can then use perform subsequent runs directly from the toolbar. To do so complete the following steps.
-
Select the sparrow project in the Project Explorer on the left-side of the IDE.
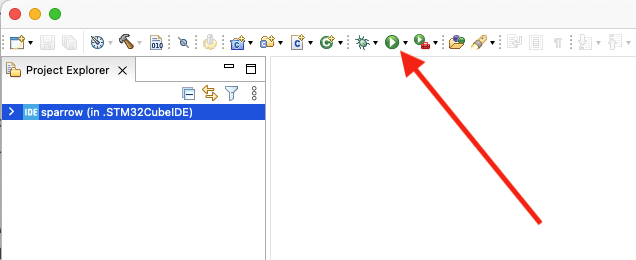
-
Click the green play icon in the toolbar to debug project sparrow.

Debugging
-
Select the sparrow project in the Project Explorer on the left-side of the IDE.
-
Click the bug icon in the toolbar to debug project sparrow.

Collecting Firmware Logs
If you connect an STLINK-V3MINI to your device, you can use a terminal emulator to view the debugging output on the serial port that appears on your computer.
Connect your computer to your STLINK-V3MINI using a USB A-to-Micro, then connect the STLINK-V3MINI to your device using the Cortex debug connector.
You can use the following settings to configure your logging terminal.

Writing Custom Firmware
Now that you've set everything up, you're ready to start writing custom Sparrow firmware.
For details on next steps, including how to write custom Sparrow applications, check out the Reference Firmware's README on GitHub.
And if you have any questions about what you can do next, feel free to reach out in our community forum.
