Configuring a Slack Route
Notehub allows you to route data to Slack, making it easy to send chat messages for some or all of your events. Let's look at how it works.
To route events to Slack you must have admin access to a Slack channel, and have created a Slack app. If you haven't built a Slack app before, you can start a new one here.
Configuring the Route
To create a Slack route, open your Notehub project, head to the Routes tab, click the Create Route button, and then find the Slack option. Click Select to get started.

On the next screen you'll be asked to provide a variety of values to configure your route.
-
The Route name controls the name of your route within Notehub.
-
The Slack Route Type lets you choose between two different ways to interact with the Slack API.
-
(Recommended) A type of Webhook is the easiest way to interact with Slack. If you choose this option you'll create a webhook URL that can post to a single Slack channel.
-
A type of Bearer uses OAuth authentication to allow your Slack app to send messages. With this option you'll need to generate an OAuth token and add permissions to your app, but you'll be able to send Slack messages to different channels.
-
Webhook Routes
Complete these steps if you're using a Slack Route Type of Webhook.
-
To find your WebhookURL, select your Slack app on api.slack.com/apps, select Incoming Webhooks in the menu, and enable the Activate Incoming Webhooks switch.
-
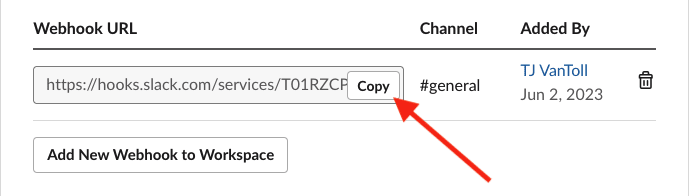
After you activate incoming webhooks, scroll down the same page and find the Add New Webhook to Workspace button. Click that button and complete the subsequent steps to generate a Webhook URL. Copy that URL and paste it in the WebhookURL on your Notehub route.
Bearer Routes
Complete these steps if you're using a Slack Route Type of Bearer.
-
Provide the Channel ID you would like to send your messages to. The easiest way to get your channel ID is to right click on a channel within Slack, select Copy, and then Copy Link. The channel is in the URL you just copied, and is in the format
CXXXXXXXXXX.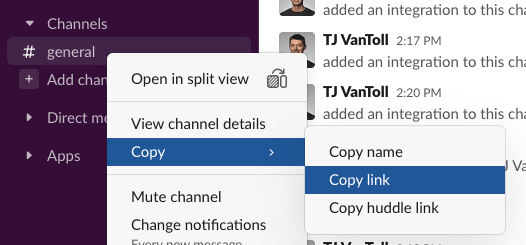
-
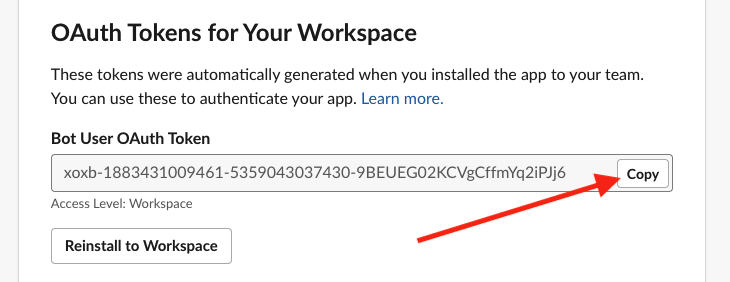
To generate a Bearer Token, select your Slack app and click the OAuth & Permissions menu. Scroll down and find the OAuth Tokens for Your Workspace heading. Click the Install to Workspace button and complete the subsequent steps. When you're done use the Copy button to get the token you need for your Notehub route.
In order to successfully use your token to post to a channel you'll need to complete a few additional steps.
-
While still on the same OAuth & Permissions settings page, scroll down to the Scopes section, click the Add an OAuth Scope button, and add the
chat:writepermission. You'll likely be prompted to restart your app for the permission change to take effect. -
In your Slack client, you need to invite your app to every channel you intend to send messages to. The easiest way to do this is with the
/invitecommand.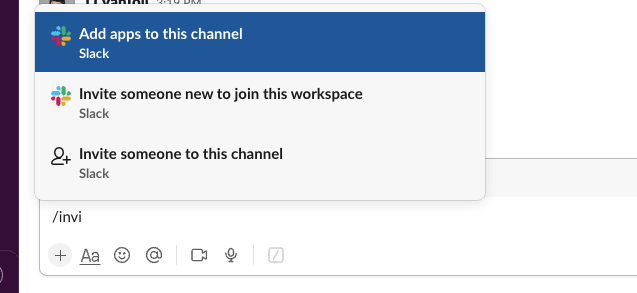
All Route Types
- For Message Type you can select either Text or Blocks. Selecting Text allows you to provide simple strings. Use Blocks if you need to generate richer Slack messages, and use the Slack Block Kit Builder to generate the syntax you need.
You can use placeholder variables
to include event-specific information in your messages. If you're building a Slack route
for the first time, try using [.body] as Text, as it sends your Note's body
as your message.
-
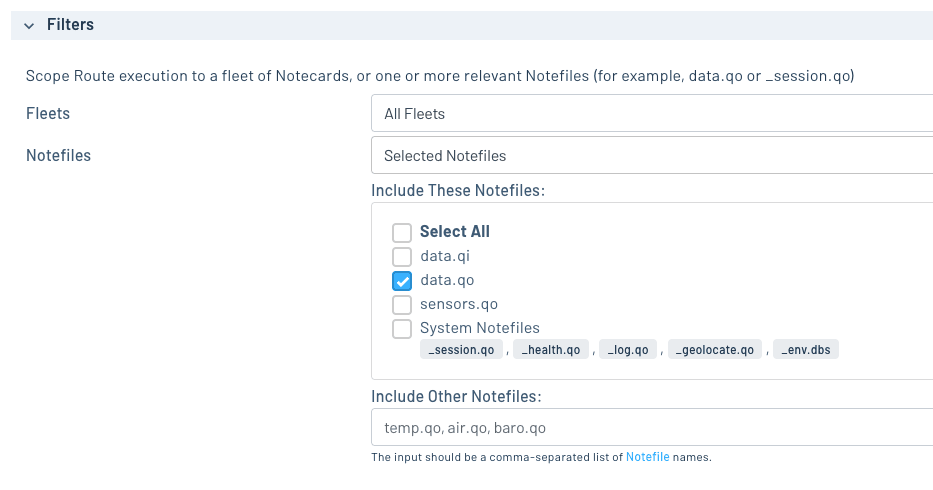
Scroll to the Filters section, set the Notefiles dropdown to Selected Notefiles, and select the Notefile you want to use this route for.
-
When you're all set, click the Create Route button to save your new route.
Testing the Route
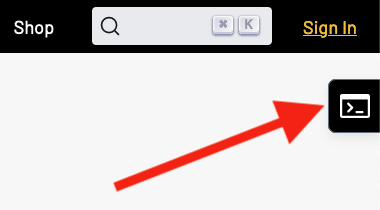
With the route created you're now ready to test it out. The easiest way to make sure everything is working is by sending a Note using the Notecard's In-Browser Terminal.
-
Use the In-Browser Terminal to connect to your Notecard via USB. (If you're unsure how to do this check out the Notecard quickstart.)
-
Once connected, associate your Notecard with a Notehub project (if it isn't already).
{ "req": "hub.set", "product": "com.example.yourname:yourproject" } -
Next, run the command below to queue a Note onto the
data.qoNotefile. You may wish to change thefileandbodyof your command, depending on how you configured your route.{ "req": "note.add", "file": "data.qo", "body": { "temp": 22 } } -
Finally, run the
hub.syncrequest to send this data to your Notehub project.{ "req": "hub.sync" }
When the data reaches your Notehub project, Notehub will automatically route your
sensor data to Slack. And if all goes well, you should see your message appear
in your channel. For example, if you use a Text of [.body], you should see
a message that looks like this.

To debug a route or inspect the exact request Notehub sends to your third-party service, open an event in Notehub, click Route as cURL, and choose the appropriate HTTP-based route. The modal shows a cURL command that reproduces the same request Notehub makes, with secrets (API keys, passwords, etc.) replaced by placeholders.
