Notecard CLI
The Notecard CLI is a command-line utility for interaction with a Notecard connected directly to a computer over USB. It is meant to serve as a development and debugging aid as you build Notecard-powered applications.
Use the In-Browser Terminal to interact with your Device
This site provides an In-Browser Terminal that emulates much of the functionality of the Notecard CLI. Access the terminal via the Terminal or the expansion button at the top right of your screen, assuming you're using a supported browser (Chromium-based browsers like Chrome and Microsoft Edge, or Firefox).
Installation
To install the Notecard CLI, you can use either a package manager, a pre-built binary, or build the binary from source.
Using a Package Manager
The Notecard CLI is available for the following package managers:
Homebrew
Homebrew is a package manager that supports both MacOS and Linux. It can also be used to install the Notecard CLI for Windows Subsystem for Linux (WSL).
brew install --cask blues/note-cli/note-cliIf you are upgrading from a version older than v1.9.4 to a newer version,
using brew, you will need to uninstall first using brew uninstall note-cli.
Installing from Source
If you prefer to install the Notecard CLI from source, you can do so by following the instructions below.
Option 1: Download a Pre-Built Binary
To install the Notecard CLI, visit the
releases page of the note-cli repository
and download the binary for your operating system. Extract the notecard
utility and place it in your PATH.
Option 2: Build a Binary From Source
Alternatively, if you have Go and the Go tools installed and want to build from source, you can clone the note-cli repo and build the Notecard CLI directly with the following commands:
cd notecard && go get -u . && go build .Usage
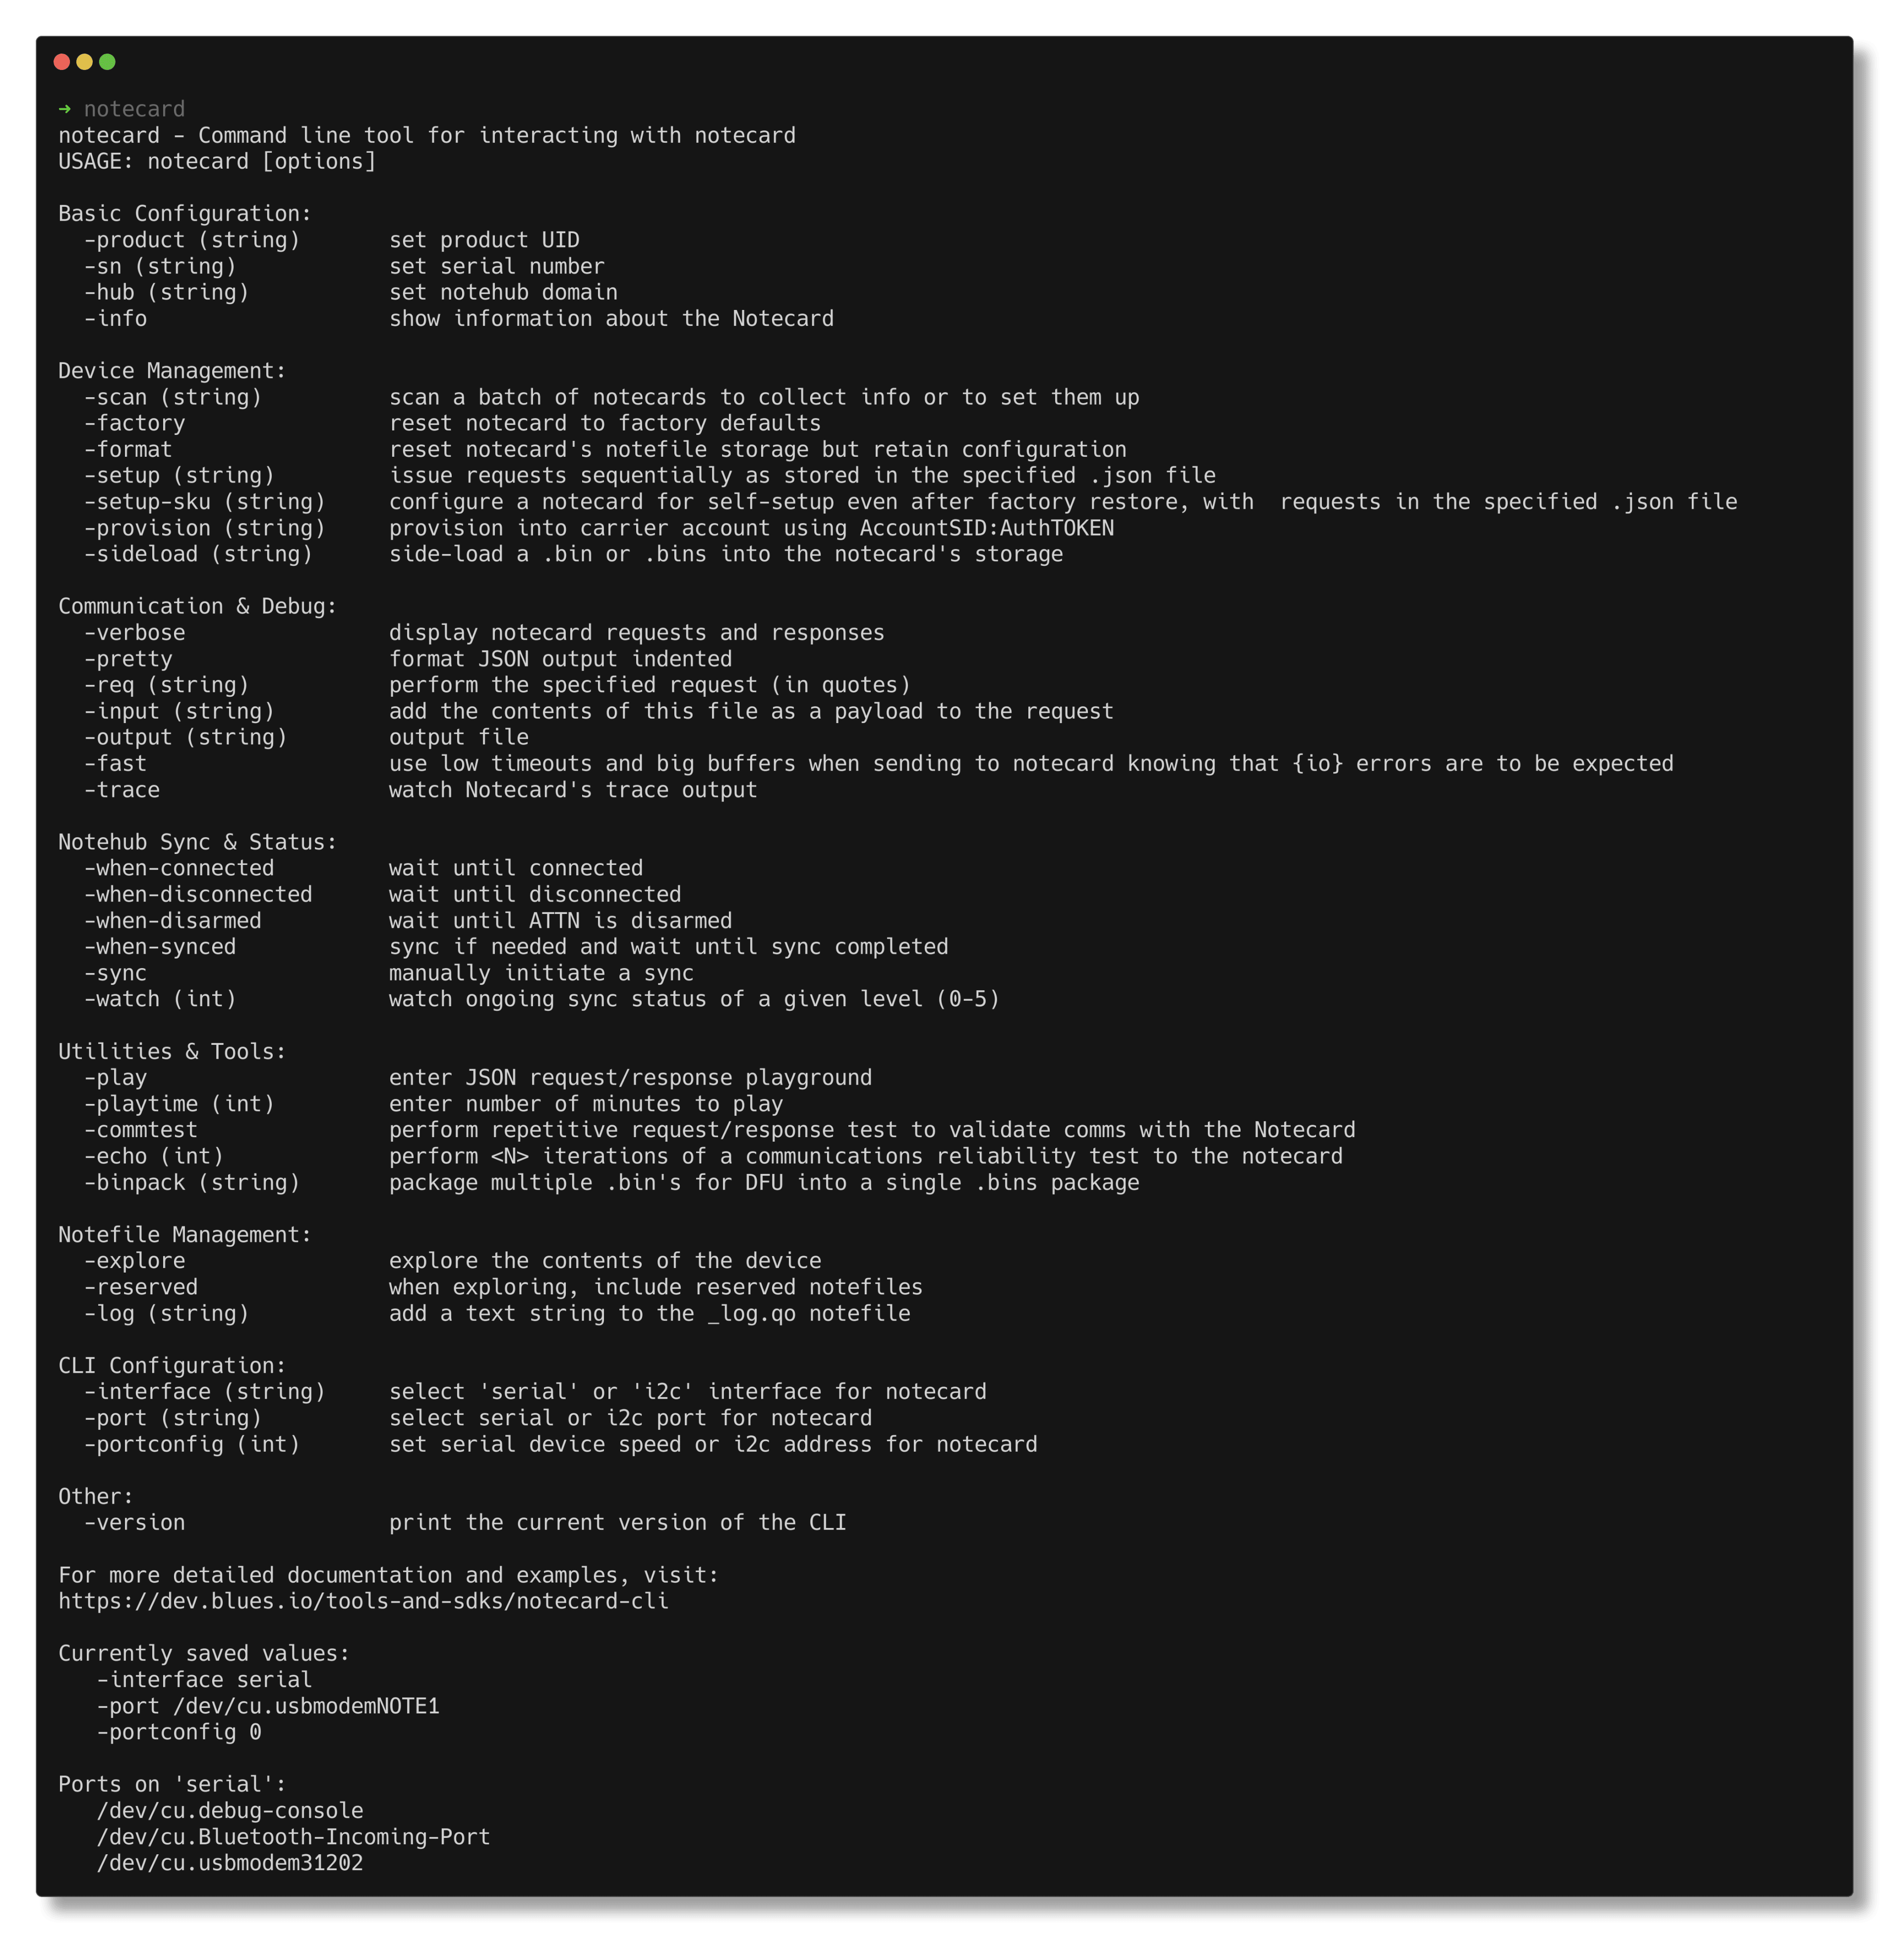
Once the Notecard CLI is installed, use the notecard or notecard -help command to view available
arguments, as well as a list of available serial ports detected by
the utility.
Selecting a Device
How the Notecard CLI selects a Notecard for issuing further commands depends on the type of Notecard you're using.
Notecard Cellular, Notecard Cell+WiFi, Notecard WiFi
If you're connecting to a Notecard Cellular, Notecard Cell+WiFi, or Notecard WiFi, your
device's serial port will show up as tty.usbmodemNOTE1, ttyACM0, and
COMx on macOS, Linux, and Windows respectively.
Ports on 'serial':
   /dev/cu.usbmodemNOTE1 ***
   /dev/cu.usbmodem3
If the CLI detects a single Notecard available via serial it will issue all
commands to that device. If you have multiple Notecards connected, you can use
the port flag followed by the device port to tell the Notecard CLI which device to
use.
notecard -port /dev/cu.usbmodem0You can tell which device the Notecard CLI will use by running the notecard command
and noting which serial port has three asterisks (***) next to it.
Ports on 'serial':
   /dev/cu.usbmodemNOTE1
   /dev/cu.usbmodem0 ***
Notecard LoRa
If you're connecting to a Notecard LoRa, your device's serial port will show up as
either /dev/cu.usbserial-xxxxx or COMx depending on your operating system.
Ports on 'serial':
   /dev/cu.usbserial-11130
To run Notecard CLI commands on Notecard LoRa you must provide the
-port <your-serial-port> and -portconfig 115200 flags on every request. To avoid
having to type the flags repeatedly, you can use the command below to make the Notecard
CLI remember your port and portconfig values for all subsequent commands.
notecard -port <your-serial-port> -portconfig 115200Now that you have a device selected, the rest of this guide details a number of common CLI commands you can run.
Port and Interface Configuration
The portconfig flag is used to configure the baud rate for the Notecard. The default baud rate is 115200, shown as 0 or default in the output below.
notecard -portconfig 115200The interface flag is used to configure the communication interface for the Notecard. The default interface is serial, i2c is also supported.
notecard -interface i2cThe currently saved values can be viewed by running notecard without any flags.
Currently saved values:
   -interface serial
   -port /dev/cu.usbmodemNOTE1
   -portconfig 0

Ports on 'serial':
   /dev/cu.usbmodemNOTE1 ***
/dev/cu.usbmodem0Setting the interface to i2c is useful for connecting to Notecard from a Raspberry Pi or other single-board computer.
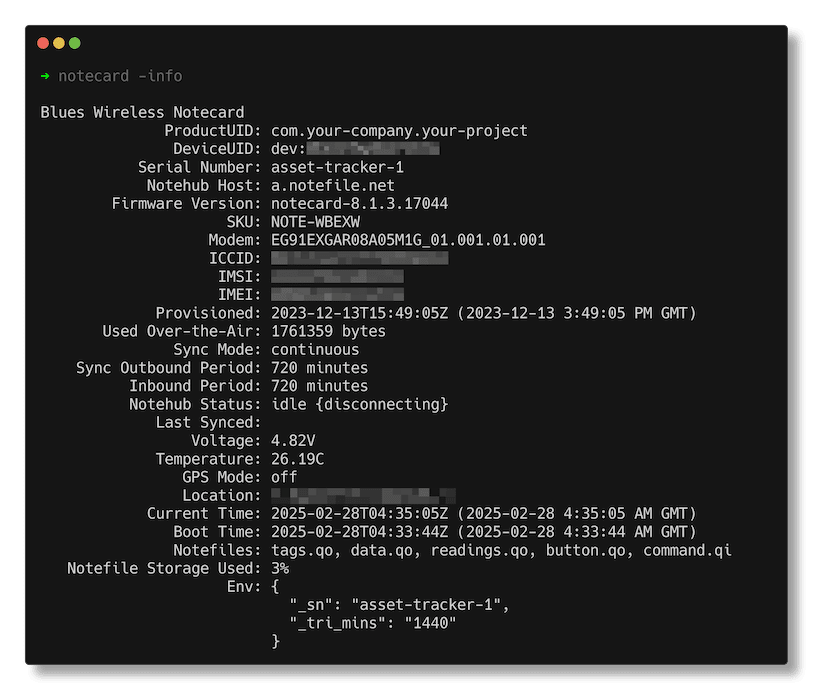
Obtain Notecard Info
Use the info flag to obtain a view of Notecard configuration, network state,
sensors, and onboard storage.
notecard -infoThis command returns a formatted view of data.
Make a Single Request
To make a single request, use the req flag, followed by the full JSON
request string, as outlined in the
Notecard API Reference.
notecard -req '{"req":"hub.get"}'This command sends the specified request to the Notecard and returns the result.
When using the Notecard CLI with the Windows Command Prompt (cmd.exe), make sure to escape any double quotes used in the request before executing the command, like so:
notecard -req "{\"req\":\"hub.get\"}"Use Interactive Request Mode
If you need to issue a number of requests to the Notecard, you can also
use the play flag to enter interactive mode. In this mode, the Notecard
expects direct JSON requests and returns JSON responses. Note: This
is the same mode supported in our In-Browser Terminal.
notecard -play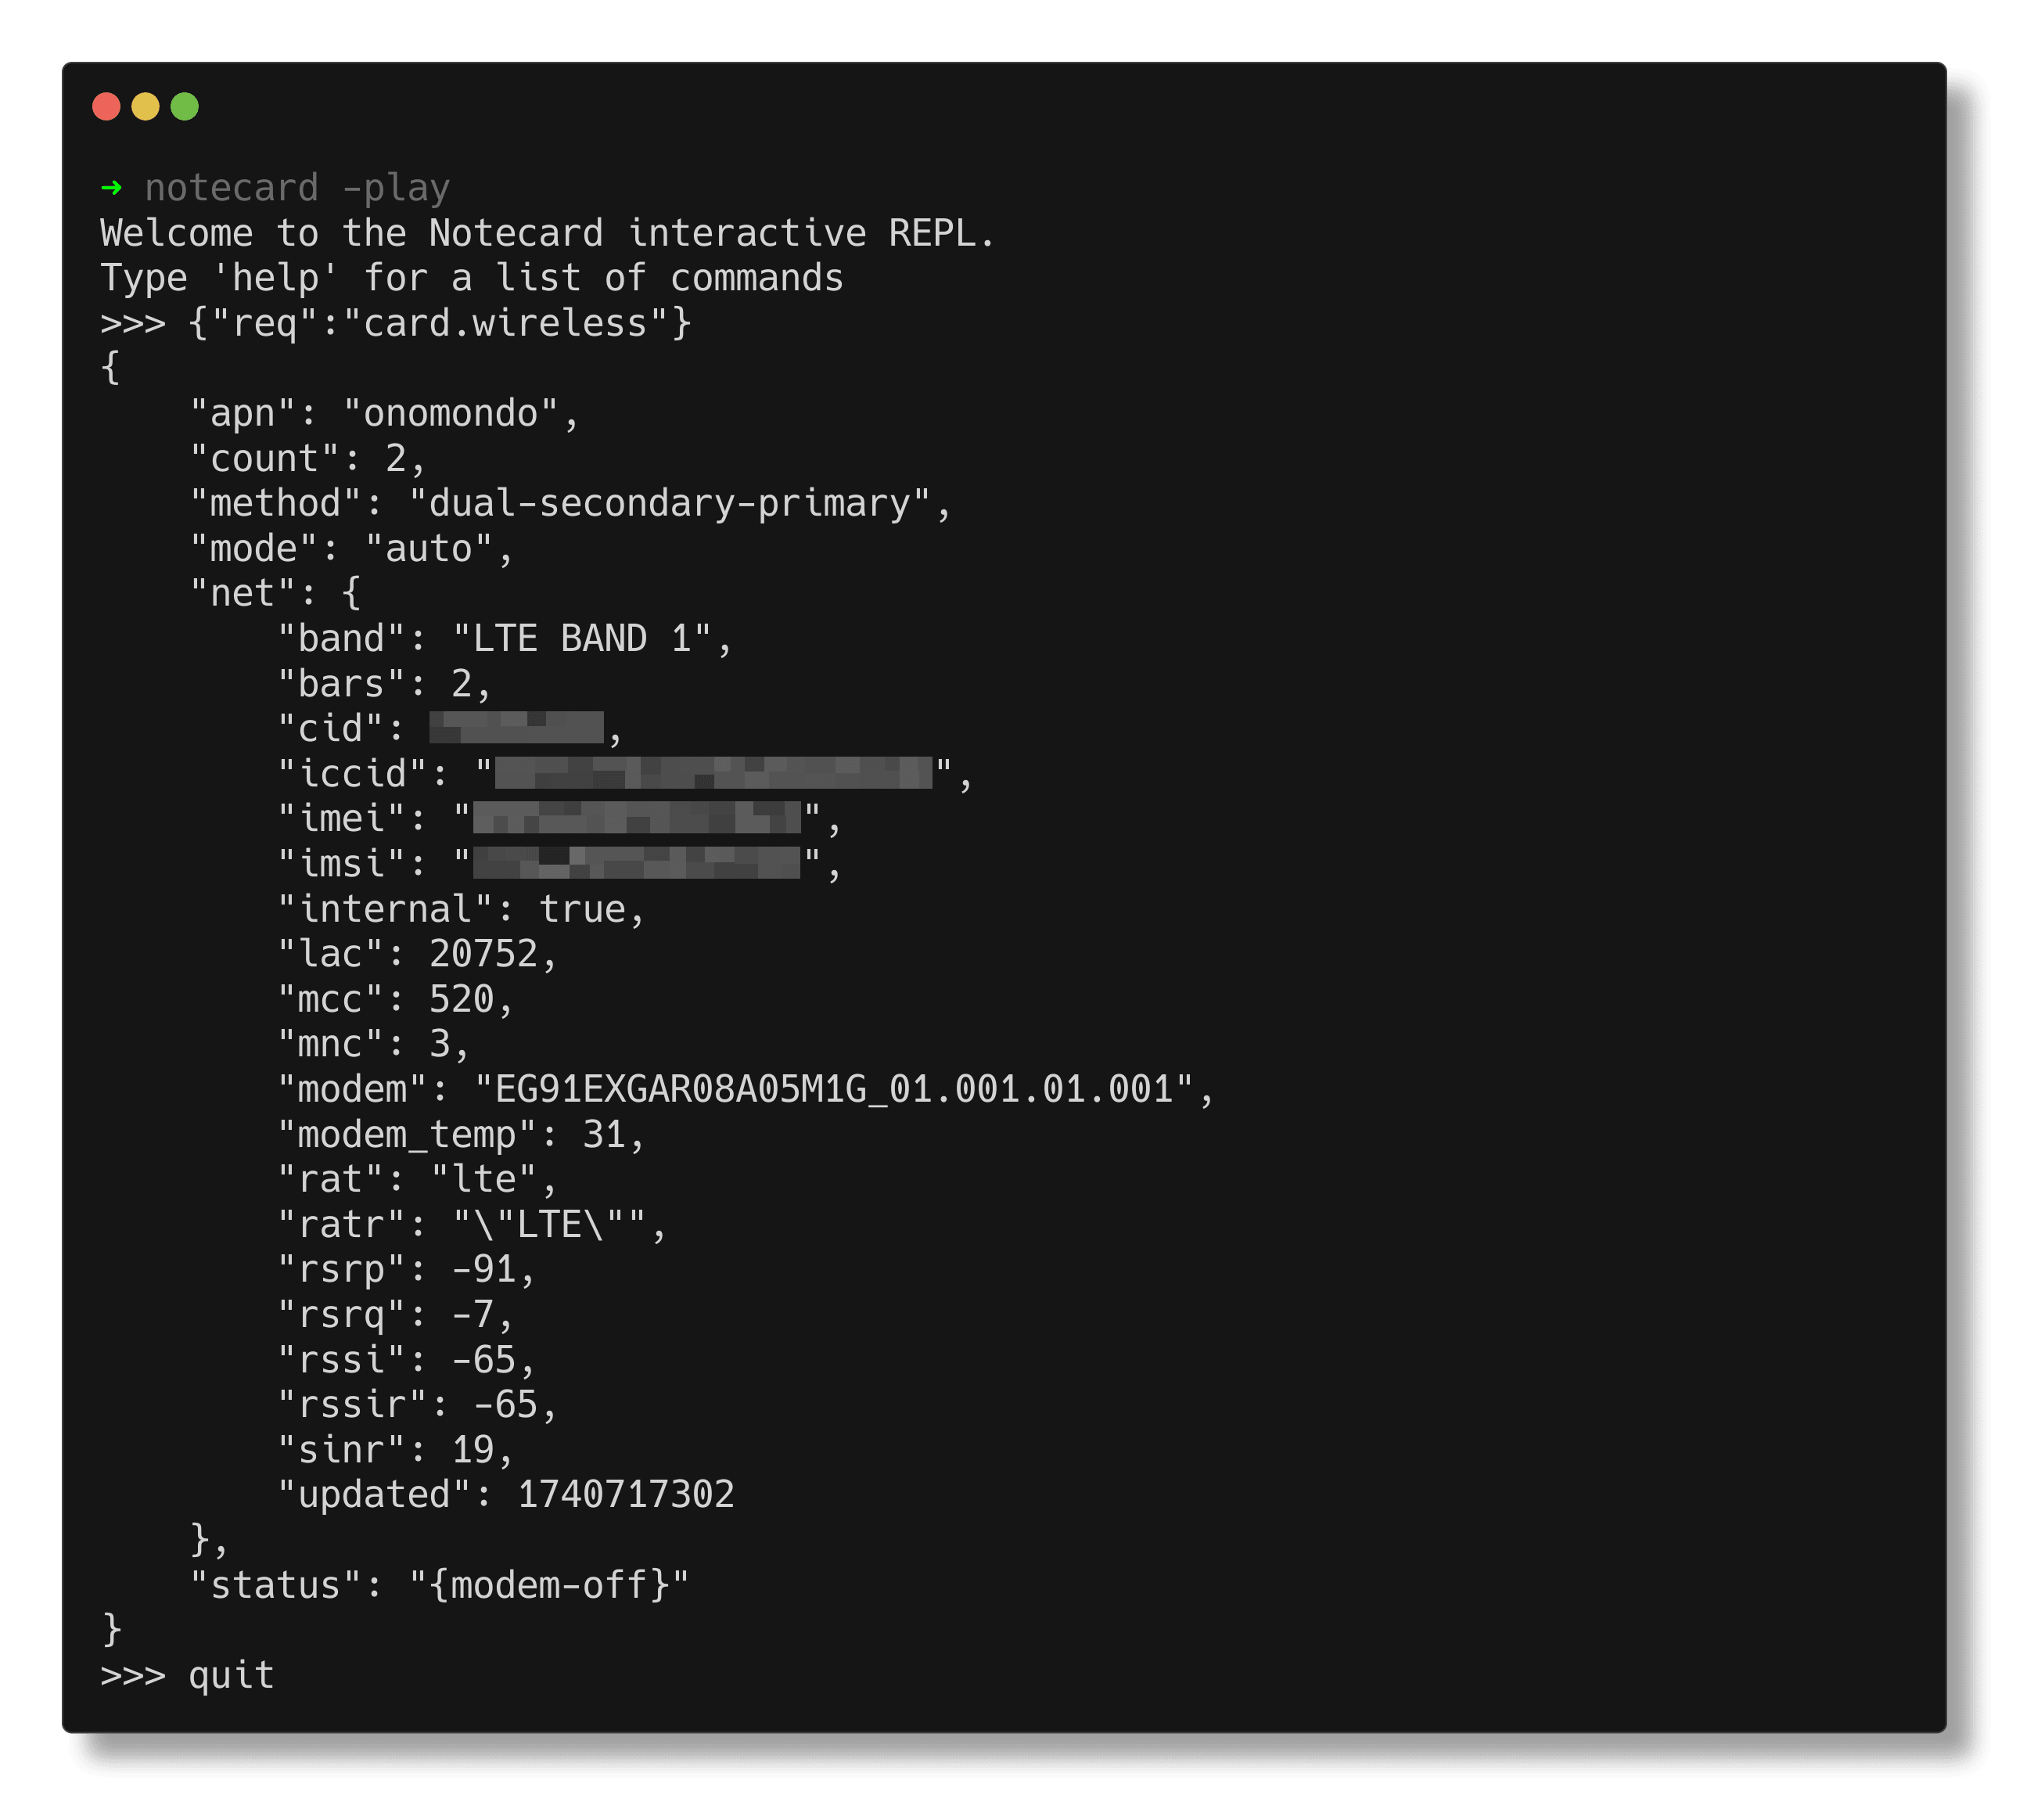
Exit interactive mode by typing q or quit.
Set the ProductUID and Serial number
The product and sn flags provide a shorthand way to set the
ProductUID and Serial Number on the Notecard. Both flags issue a
hub.set
request to the Notecard.
notecard -product 'com.your-company.your-name:your_product'{"req":"hub.set","product":"com.your-company.your-name:your_product"}
{}notecard -sn 'Scranton-12'{"req":"hub.set","sn":"Scranton-12"}
{}Manually Initiate a Notehub Sync
To manually initiate a sync between the Notecard and Notehub, use the
sync flag.
notecard -sync{"req":"hub.sync"}
{}Trace Notecard Output
To trace the Notecard's activity, use the trace flag. This mode is similar to
play in that it accepts interactive JSON requests, but also outputs
trace messages from the Notecard.
notecard -trace> t
on
> {"req":"hub.sync"}
{}
S9705:14.08 sync: sync triggered by manual sync request
S9705:14.08 sync: work: begin (anything pending) {sync-begin}
S9705:14.08 sync: request: get notebox change summary
S9705:15.64 sync: work: completed (nothing was pending) {sync-end}
S9705:15.64 sync: advancing last sync time from 16:05:45Z to 16:08:00ZRun a Setup Script
You can instruct the CLI to send a series of requests
to the Notecard with the setup flag. This command is useful for applying
Notecard configuration requests across a number of similar devices.
The requests should be defined in a file with a .json extension and a request
on each line of the file. For example, the following script contains a series
of requests for configuring the Notecard as a standalone asset tracker:
# Tracking Device setup script version no. is published in an env var so
# that it's visible within the Notehub's Device Environment Variable UI
{"req":"env.default","name":"setup_script_version","text":"1.1.1"}

# Set product UID to one that's registered in our product
{"req":"hub.set","product":"com.your-company.your-name:your_product"}

# Hourly sync if data is available; daily check for inbound data
{"req":"hub.set","mode":"periodic","outbound":60,"inbound":1440,"align":true}

# Daily sampling of the tracker's location
{"req":"card.location.mode","mode":"periodic","seconds":86400}

# Track location in the _track.qo Notefile and add a daily heartbeat if no movement
{"req":"card.location.track","start":true,"heartbeat":true,"hours":168}

# Configure voltage monitoring for a device powered by a LiPo battery
{"req":"card.voltage","mode":"lipo"}
As of version 1.9.1 of the Notecard CLI, you may alternatively provide the requests in an array so that text editors and IDEs recognize the content as valid JSON. Note, however, that you cannot use comments with this approach.
[
  {"req":"env.default","name":"setup_script_version","text":"1.1.1"},
  {"req":"hub.set","product":"com.your-company.your-name:your_product"},
  {"req":"hub.set","mode":"periodic","outbound":60,"inbound":1440,"align":true},
  {"req":"card.location.mode","mode":"periodic","seconds":86400},
  {"req":"card.location.track","start":true,"heartbeat":true,"hours":168},
  {"req":"card.voltage","mode":"lipo"}
]
With your desired configuration saved in a .json file, you can use
notecard -setup <path-to-json-file> to apply the requests to a connected
Notecard.
notecard -setup config-tracker.jsonWrap a Binary for Outboard Firmware Update
You use the Notecard utility to create a binpack image, which is a
thin wrapper around a base binary that the Notecard uses to optimize binary
installation to a known memory address, or package multiple binaries and their
destination memory addresses into a single file. This capability is typically
used when performing Notecard Outboard Firmware Updates
on a host MCU.
The syntax of binpack is as follows:
notecard -binpack <host_arch> <memory_addr>:<binary.bin> [<memory_addr>:<binary.bin> ...]<host_arch>- Replace with the architecture of your host MCU. (See thecard.dfurequest'snameargument for a list of possible values.)<memory_addr>- The address* where the binary should be installed.<binary.bin>- The binary file to package.
* Minimally, the page of memory associated with the address provided will be completely erased and rewritten.
Targeting an STM32 device and performing binpack on the Arduino example
provided above would result in the following syntax:
notecard -binpack stm32 0x8000000:Example1_NotecardBasics.ino.binAfter the command executes, you will see output similar to the following:
2022-10-20-205150.binpack now incorporates 1 files and is 28999 bytes:

HOST: stm32
LOAD: Example1_NotecardBasics.ino.bin,0x08000000,0x70a8,0x70a8
Output Notecard Details into a Text File
If you need to output device details or certificates from a single or batch of
Notecards, you can use the scan flag, followed by the name of a file in which
to output details. When run, the Notecard CLI will create the output JSON file,
and a CSV file containing the DeviceUID for the Notecard.
notecard -scan configured.json*** new file: configured.json
*** new file: configured.csv
dev:000000000000000
*** please remove the notecardscan can be used with multiple devices in sequence, without rerunning the
utility.
notecard -scan configured.jsondev:000000000000000
*** please remove the notecard
*** please insert the next notecard, or enter q to quit
dev:000000000000000
*** please remove the notecardWhen used together, scan and setup allow developers to quickly configure a
set of Notecards for deployment.
notecard -setup config-tracker.json -scan configured.jsonProvisioning a Notecard with an Alternative Embedded SIM
If you are working with a variant of the Notecard that uses an alternative
embedded SIM from a partner (for example, Twilio), you'll need to perform an
additional provisioning step to ensure that the SIM on your device is properly
registered with that carrier. You can do so with the provisioning flag, which
embeds a token for your carrier onto the device.
As an example, for Twilio, your provisioning token is your Account SID and Auth
Token, separated by a colon. This flag can be used with scan and setup to
provision multiple Notecards at once.
notecard -provision <your_twilio_sid>:<your_twilio_token>dev:000000000000000
twilio: device provisioned: status:newFormat and Factory Reset a Notecard
To reset a Notecard's Notefile storage but retain configuration, use the format flag. This will delete all Notefiles stored on the Notecard.
notecard -formatTo factory reset a Notecard, use the factory flag. This will complete a factory reset of the Notecard, including deleting all Notefiles and configuration.
notecard -factoryExplore the Notecard's Filesystem
To examine the contents of the Notecard's filesystem, use the explore flag. This will list all Notefiles and entries in the Notecard's filesystem. This utility is useful for debugging and understanding the contents of the Notecard's filesystem.
notecard -explore