Feather MCU Low Power Management
While the Notecard possesses the ability to completely power down your host MCU (using the card.attn command), you may need to run your host MCU in a low power mode.
This can be useful for a variety of reasons, including when you need to conserve battery power but still need to handle external events from sensors or peripherals,
or if you need to preserve the state of your host MCU while saving power (storing variables, data, etc.).
This guide supports the Swan and Cygnet as host MCUs.
If you are using a different MCU, please refer to your manufacturer's documentation for information on how to configure your MCU into various low power modes/states.
Arduino Low Power Library
Within the Arduino framework, you can use the STM32LowPower library to put the Feather MCU into a selection of low power modes. This library supports the following low power modes, with increasing power savings:
Idle
- CPU clock is stopped while peripherals continue to operate
- Main voltage regulator remains active
- This is the lightest low power mode with quickest wake-up time
- This maps to the
SLEEPmode on the STM32 family
Sleep
- This implementation tries to use low power regulator for improved power savings
- For the Feather MCUs, the code decreases CPU frequency
- This maps to the
SLEEPmode on the STM32 family (slightly more power efficient than Idle due to low power regulator)
Deep Sleep
- This is the most power-efficient mode that supports wake-up from external events
- All high-speed clocks are stopped, voltage regulator in low-power mode
- The library code explicitly configures wake-up clock source and handles system reconfiguration after wake-up
- This maps to the
STOP2mode on the STM32 family
Shutdown
- The library tries to use the lowest power mode available but has fallbacks
- For STM32 devices with Shutdown mode capability, it checks if RTC is using LSE before enabling Shutdown mode
- This is the most power-efficient mode, but it will not wake up from external events and requires a restart to wake up
- This maps to the
SHUTDOWNmode on the STM32 family
The STM32 power modes are described in the STM32 Reference Wiki.
Calling LowPower.shutdown() will result in your application restarting when the device wakes up. This means that any volatile variables or states you have, will be reset.
Consider using the payload parameter along with sleep mode for card.attn to save important data for resuming operation after a shutdown.
Examples
To find a complete supported example of all the available low power modes, please see to our reference code.
Timed Deep Sleep
In order to use the low power library, you first need to initialize the library in your sketch. The following example will put the Feather MCU into deep sleep for 1 second, toggling the LED once per second.
#include <STM32LowPower.h>

void setup() {
  // Configure LED pin
  pinMode(LED_BUILTIN, OUTPUT);
  // Initialize the low power library
  LowPower.begin();
}

void loop() {
  digitalWrite(LED_BUILTIN, HIGH);
  LowPower.deepSleep(1000); // Deep sleep for 1 second
  digitalWrite(LED_BUILTIN, LOW);
  LowPower.deepSleep(1000);
}
Wakeup from External Events
In order to wake up from external events, you need to configure LowPower.begin() followed by LowPower.attachInterruptWakeup().
The following example will wake up from an external interrupt on the user button and blink the LED for the number of times specified by the repetitions variable.
#include "STM32LowPower.h"

// Blink sequence number
volatile int repetitions = 1;

const int pin = USER_BTN;

void setup() {
  pinMode(LED_BUILTIN, OUTPUT);
  // Configure the user button as an input with a pull-up resistor
  pinMode(pin, INPUT_PULLUP);
  // Initialize the low power library
  LowPower.begin();
  // Attach a wakeup interrupt on pin, calling repetitionsIncrease when the device is woken up
  // Last parameter (LowPowerMode) should match with the low power state used: in this example LowPower.sleep()
  LowPower.attachInterruptWakeup(pin, repetitionsIncrease, RISING, SLEEP_MODE);
}

void loop() {
  for (int i = 0; i < repetitions; i++) {
    digitalWrite(LED_BUILTIN, HIGH);
    delay(500);
    digitalWrite(LED_BUILTIN, LOW);
    delay(500);
  }
  // Triggers an infinite sleep (the device will be woken up only by the registered wakeup sources)
  LowPower.sleep();
}

void repetitionsIncrease() {
  // This function will be called once on device wakeup
  // You can perform small operations here (like changing variables which will be used in the loop)
  // Avoid calling delay() and long running computations since this functions executes in interrupt context
  repetitions ++;
}
Advanced Usage
Low Power Logging
If you want to use low power logging (e.g. LPUART), you'll need to use the HardwareSerial class along with the VCP pins.
This requires an STLINK-V3MINI programmer connected to the Feather MCU's debug header.
HardwareSerial stlinkSerial(PIN_VCP_RX, PIN_VCP_TX);If you are using USB serial (Serial) on the Cygnet, you'll need to close the serial interface before entering into a low power mode.
The clock used by the USB serial is not available in low power mode and leaving it open will cause the device to hang.
The following example shows how to close the serial interface before entering into a low power mode.
void setup() {
  Serial.begin(9600);
}

void loop() {
  Serial.println("Hello, world!");
  Serial.end(); // Close the serial interface
  LowPower.shutdown(10); // Shutdown for 10 seconds
}
Powering Down Attached Sensors and Actuators
If you have attached sensors and actuators, you can power them down independently using the 3V3 regulator enable pin and 3V3 discharge pin.
void disable3V3Regulator() {
  digitalWrite(ENABLE_3V3, LOW); // Disable the regulator
  digitalWrite(DISCHARGE_3V3, ENABLE_DISCHARGING); // Drain capacitance from the external circuitry
}

void enable3V3Regulator() {
  digitalWrite(DISCHARGE_3V3, DISABLE_DISCHARGING); // Allow capacitance in the external circuitry
  digitalWrite(ENABLE_3V3, HIGH); // Enable the regulator
}
Disabling GPIO
For an additional power saving measure, you can disable all GPIOs. This is useful if you need to reduce power consumption when the GPIOs are not in use.
void disableGpio () {
  // Analog Pins A0-A5
  pinMode(A0,OUTPUT);
  digitalWrite(A0,LOW);
  pinMode(A1,OUTPUT);
  digitalWrite(A1,LOW);
  ...

  // Digital Pins D5,D6,D9-D13
  pinMode(5,OUTPUT);
  digitalWrite(5,LOW);
  pinMode(6,OUTPUT);
  digitalWrite(6,LOW);
  ...
}
Additional Resources
Using Notecard to Control Host MCU Power
Similar to the low power Shutdown mode, the card.attn command can be used to disable power to the Feather MCU by using the sleep mode.
This is useful for conserving power when the MCU is not in use but comes at the cost of losing the state of the MCU application.
To preserve the state of the MCU application, you can choose to use the payload parameter to pass a base64 encoded object, such as a configuration struct or a state variable, to the Notecard before entering sleep mode.
Upon wake up, the MCU can request the payload from the Notecard, decode it, and resume operation with the state it had when it went to sleep.
If you don't want to use the payload parameter, you can still use the card.attn command with the sleep mode.
This will put the MCU into sleep mode without saving or restoring any state.
The easiest way to implement this is to use a Notecarrier F, which connects the EN pin of the Feather MCU to the ATTN pin of the Notecard.
This allows the Notecard to control the power to the Feather MCU, by pulling the ATTN pin low when the card.attn (with sleep mode) request is issued.
If you decide to use the payload parameter, you must first encode the object you want to save into a base64 string.
This can be done using any base64 encoder, or more easily using the Arduino base64 library.
To use the ATTN to EN connection of the Notecarrier F, you will need to ensure the switch on the back of the Notecarrier F is set to the N_ATTN position.
Examples
The following example shows how to encode a struct into a base64 string and send it to the Notecard using the card.attn command with the sleep mode.
The note-arduino library provides helper functions to encode and decode the payload.
If you want to use the payload parameter without the helper functions, you will need to implement the encoding and decoding of the payload yourself.
See the Putting a Host to Sleep Between Sensor Readings example app for a complete example of using the
card.attnrequest.
Arduino
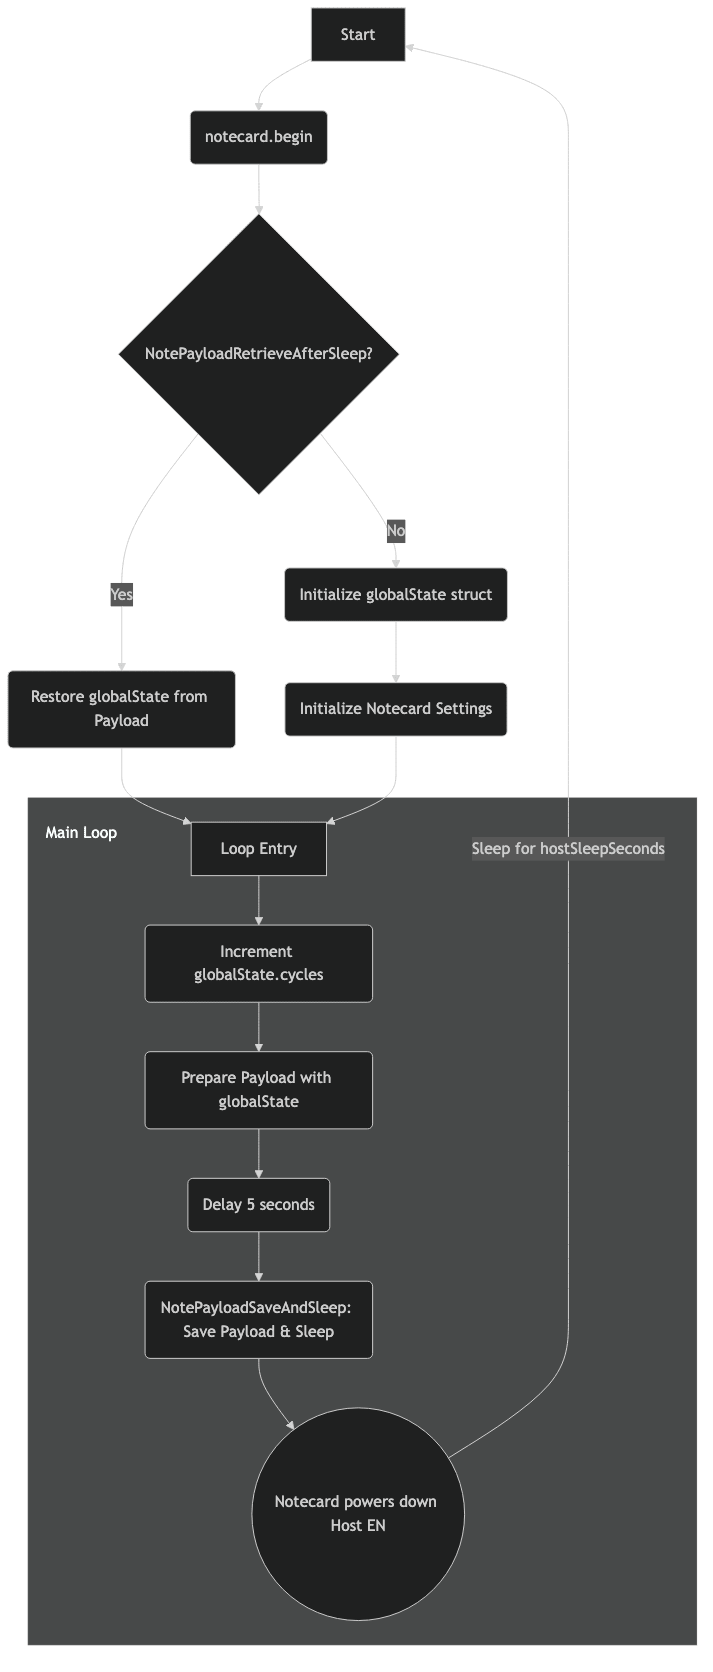
This code example counts the number of times the MCU has woken up from sleep, using a global variable, globalState.cycles.
The globalState struct is encoded into a base64 string and sent to the Notecard using the card.attn request with the sleep mode.
Upon waking up, the MCU requests the payload from the Notecard, decodes it, and restores the state of the globalState struct.
#include <Notecard.h>

#define hostSleepSeconds 15

Notecard notecard;

struct {
  int cycles;
} globalState;

const char globalSegmentID[] = "GLOB";

void setup()
{
    // Wait for the serial connection to be established. This is only necessary
    // if you're testing, otherwise consider a timeout instead.
    Serial.begin(115200);
    while (!Serial)
    {
        ;
    }

    Serial.println("Starting Notecard...");
    notecard.begin();

    // Determine whether or not this is a 'clean boot', or if we're
    // restarting after having been put to sleep by the Notecard.
    NotePayloadDesc payload;
    bool retrieved = NotePayloadRetrieveAfterSleep(&payload);

    // If the payload was successfully retrieved, attempt to restore state from
    // the payload
    if (retrieved)
    {
        Serial.println("Payload retrieved, restoring Global State...");
        // Restore the various state data structures
        retrieved &= NotePayloadGetSegment(&payload, globalSegmentID, &globalState, sizeof(globalState));
        // We're done with the payload, so we can free it
        NotePayloadFree(&payload);
    }

    // If this is our first time through, initialize the Notecard and state
    if (!retrieved)
    {
        Serial.println("First time through, initializing Global State...");
        // Initialize operating state
        memset(&globalState, 0, sizeof(globalState));

        // Now initialize the Notecard, hub.set, etc.
    }
}

void loop()
{
    globalState.cycles++;
    Serial.print("Global state: ");
    Serial.println(globalState.cycles);

    // Put ourselves back to sleep for a fixed period of time
    NotePayloadDesc payload = {0};
    NotePayloadAddSegment(&payload, globalSegmentID, &globalState, sizeof(globalState));
    Serial.println("Saving and sleeping in 5 seconds...");
    delay(5000); // wait 5 seconds to see the payload printed
    NotePayloadSaveAndSleep(&payload, hostSleepSeconds, NULL);

    // We should never return here, because the Notecard put us to sleep. If we
    // do get here, it's because the Notecarrier was configured to supply power
    // to this host MCU without being switched by the ATTN pin.
    delay(15000);
}
Code Diagram
To visualize how the Arduino code works, see the following diagram.