
As described in Ray Ozzie's blog post, Soul of a New Machine, the Airnote was born as a part of a global volunteer response to the Fukushima nuclear disaster. It is a self-contained, cellular-connected air quality monitoring device, designed to be rapidly and broadly deployed. The Airnote can be easily installed within minutes; with no software setup required.
Functional Description
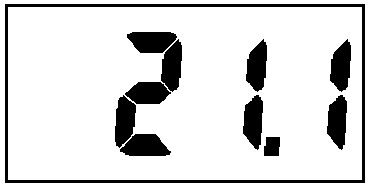
The Airnote continuously monitors local atmospheric conditions. The device will continuously show the PM2.5 count on its display and periodically upload detailed atmospheric data including temperature, humidity, pressure, and detailed particulate counts to the cloud.
Historical data from your Airnote, as well as any device in the Airnote community is available by scanning the QR code printed on the device.
Features
- Deploy and Forget. Airnote is compact, wireless, portable, and autonomous.
- Self Configuring. Automatically connects over cellular to the Notehub.io cloud service.
- Low Power Consumption. Optimized to provide long, unattended operation using a rechargeable battery, recharged by a solar panel.
- Atmospheric Monitoring. Samples particulate counts, temperature, humidity, and barometric pressure.
- Rugged. Designed for long-term outdoor use.
- Compact. At 90mm x 88mm x 126mm, it can be installed almost anywhere.
- Connected. Automatically connects to LTE-M, NB-IoT, or GSM cellular service in over 135 countries using its built-in SIM.
- Position Aware. Reports both GPS and cell tower positions to the backend cloud service.
- Automatic Firmware Updates Updates are performed over-the-air, so its always up-to-date, with zero hassle.
Package Configuration
Airnote Enclosure
Designed with the outdoors in mind, the Airnote's rugged construction allows it to remain outdoors, indefinitely, in almost all conditions.

Hardware Composition
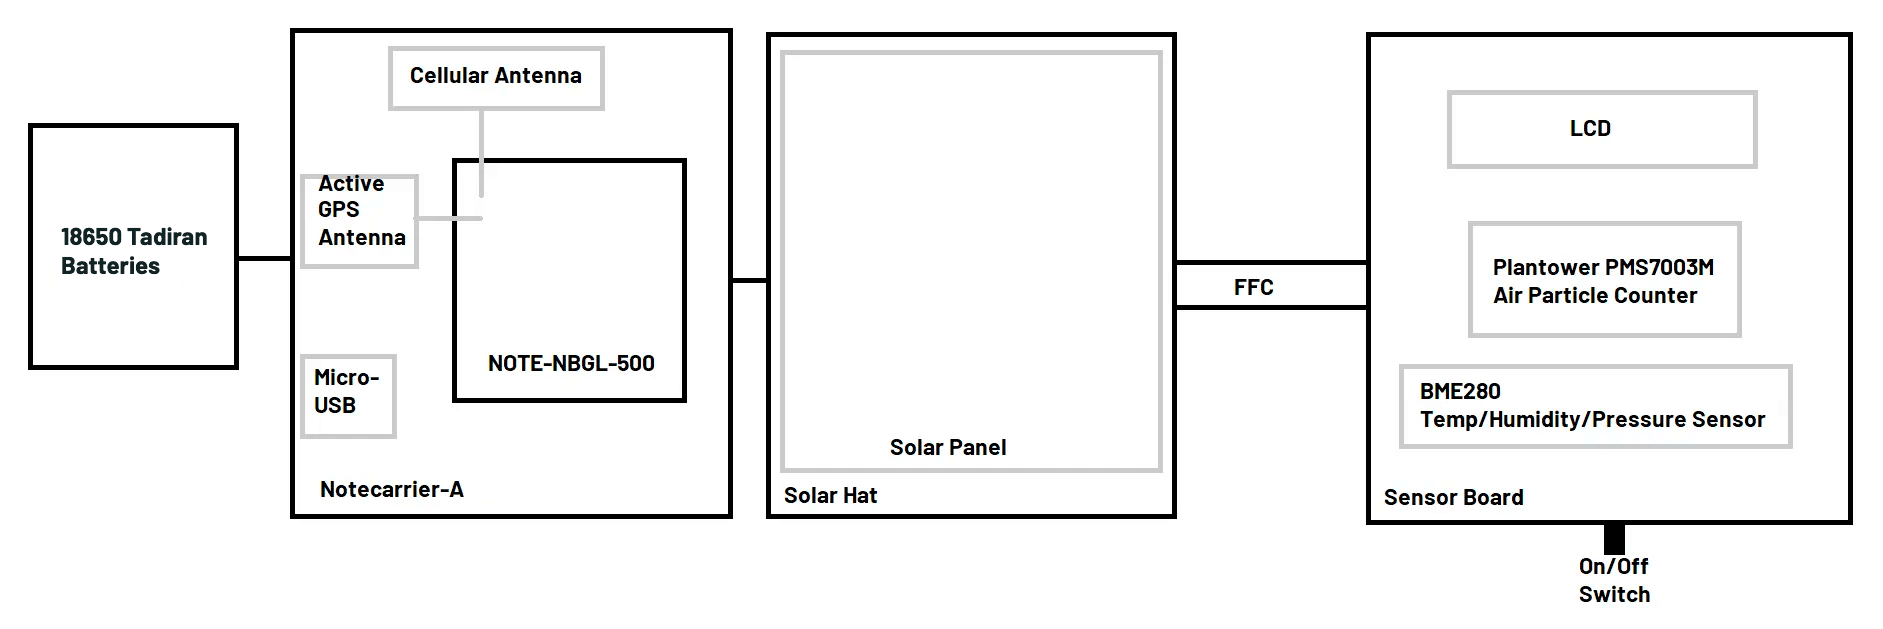
The Airnote is composed of five key components:
- Notecard - Narrowband Global - NOTE-NBGL
- Notecarrier A
- Sensor Board
- Solar Hat
- 2x Tadiran 18650 Batteries
Power Information
What do I do if the battery dies?
Airnote's battery is capable of powering the unit for weeks of normal operation. If the rear display of airnote is blank for more than 15 seconds after turning on the power switch, you can either wait for the sun to recharge the battery or follow this procedure to power the unit and recharge the battery via USB:
- Remove the two screws on the bottom of the Airnote with a Phillips screwdriver.
- Remove the bottom cover.
- Attach a Micro-USB cable to the port near the front of the unit.
- The Airnote will power up and the battery will begin charging.
- If you wish to leave the USB cable permanently attached, you can break off the tab covering the USB Access Port in the corner of the bottom case and feed the USB cable through this port when you reinstall the bottom cover.
- To reinstall the bottom cover:
- Position the bottom cover tabs above the rib along the back wall of the unit.
- Pivot the cover on these tabs until the tab on the front of the bottom cover snaps into the front of the top case.
- Reinstall the two screws on the bottom of airnote.
Voltage can be monitored via the cloud service. The battery may also be charged via internal Micro USB charging port and a USB cable may be threaded through the access slot in bottom cover.
Operation Instructions
Installation
You can deploy Airnote anywhere there's LTE-M, NB-IoT, or GSM cellular service and direct sunlight, by following these simple steps, or visit https://start.airnote.live for detailed instructions.
- Charge your Airnote overnight by removing the back panel and plugging in a micro USB cable.
- Turn on Airnote using the power switch on the bottom.
- Deploy your Airnote by mounting it on the outside of a window with plenty of sunlight, and airflow around the mesh on the underside of Airnote.
- Watch as Airnote's built-in display shows the current PM2.5 reading at your location.
- Scan the QR code with a mobile phone to customize your Airnote and see your personal air quality dashboard.
- Visit https://airnote.live to view graphs of your historical fine particulate matter, temperature, barometric pressure, and humidity readings.
 note
noteThe cloud service must be aware of the Airnote, before it can assigned to you. Therefore, you must ensure the device has been powered on and given ample time to connect to Notehub.io before scanning the QR code.
Self Testing Sequence
When the Airnote is powered on, it will cycle through the following screens:
-
After a few seconds, three dots (...) will appear to indicate that the device is initializing:

-
After approximately 10 seconds, the screen will update with a visual self-test of the "LOBAT" warning and number segments. This is a visual check ONLY. If any of these items does not appear on the display, then there is a failure in the LCD screen.

-
After 5 seconds, the screen will display the Notecard voltage in Volts:

-
After 1 second, the screen will display the sensor board BME280 temperature in degrees Celsius:
-
After 1 second, the screen will display the sensor board BME280 relative humidity in %RH:

-
After 1 second, the screen will display the sensor board BME280 air pressure in kPa:

-
After 1 second, the screen will count down from 5. Each decrement of the counter corresponds to a frame received from the Plantower air particle sensor. The Airnote will report a sensor error if it does not receive 5 frames within 30 seconds, but it typically takes less than 5 seconds.

-
Once all the tests have passed, the Airnote will display the unique identifier for the device. This is the same ID printed on the QR code and can be used in case the sticker is damaged or removed.
-
Finally, the word "Go" is displayed to indicate that all tests have passed, and the Airnote will then enter its normal operational mode.
 warning
If a failure occurs at any of the above test steps (except for the visual display check in Step 2), an error code will be displayed for 60 seconds. If this occurs, please visit the Blues forum for assistance.
Sensor Capability
Air Quality/Device Metrics Collected
- Particulate matter 1.0µg/m³ (PM)
- Particulate matter 2.5µg/m³ (PM)
- Particulate matter 10.0µg/m³ (PM)
- Count of particles 0.3µm in diameter per 100cm³ (PM)
- Count of particles 0.5µm in diameter per 100cm³ (PM)
- Count of particles 1.0µm in diameter per 100cm³ (PM)
- Count of particles 2.5µm in diameter per 100cm³ (PM)
- Count of particles 5.0µm in diameter per 100cm³ (PM)
- Count of particles 10.0µm in diameter per 100cm³ (PM)
- Samples collected for particulate count values
- Relative Humidity (%RH)
- Absolute barometric pressure (kPa)
- Air temperature (°C)
- Duration of tests (in seconds)
- Motion events since last report
- Battery Voltage (V)
- Battery charging state
- USB connection state
Sensor Information
noteIf any sensor in the sensor array were to fail, the Airnote will continue to function, but will no longer report values for that particular sensor.
Specifications
Cellular Coverage
Electrical Characteristics
DC Characteristics
| Description | Minimum | Maximum | Unit |
|---|---|---|---|
| Supply Voltage | 2.5 | 5.5 | V |
| Supply Current | 500 | 2000 | mA |
Absolute Maximum Ratings
| Description | Minimum | Maximum | Unit |
|---|---|---|---|
| Storage temperature | -35 | 70 | °C |
noteActual values may vary based on local conditions such as atmospheric conditions and distance to the cell tower.
Ordering Information
- Please visit the Airnote product page for ordering information.
Design Files
Open source hardware designs for all Notecarriers are maintained in the note-hardware GitHub repository.
Terms and Conditions
Visit Blues Hardware Terms & Conditions.
Revision History
| Author | Date | Summary |
|---|---|---|
| Ray Ozzie | 2019-2020 | Document drafted |
| John Wiedey | 18 FEB 2020 | Various improvements |
| Zachary J. Fields | 03 MAR 2021 | Updated information and translated to markdown |
| Rob Lauer | 31 JAN 2023 | Updated datasheet for Airnote v2.0 |
Contact Information
For other questions about the Airnote, visit the Blues Forum.
Blues Inc.
https://blues.com
50 Dunham Ridge Suite 1650
Beverly, MA 01915
support@blues.com