
Mojo Quickstart
In this tutorial you'll learn how to use Mojo (short for “More Joules”), a small, inexpensive Notecard companion device that measures energy usage in a battery-powered system.
Inspired by the Joulescope and powered by a low-power coulomb counter, Mojo is designed to give product builders an inexpensive way of measuring the performance, charge, and state of deployed applications intended to operate on battery power over long periods of time.

In this quickstart tutorial you'll learn how to connect a Mojo to your hardware, configure a Mojo using a Notecard, and learn how to view Mojo data in Notehub.
Let's get started.
Before You Begin
To complete this quickstart, make sure you have access to the following:
-
- You'll also need the included JST and Qwiic cables.
-
- Mojo is supported on all Notecard Cellular, Notecard Cell+WiFi and Notecard WiFi models. However, Mojo does not currently work with Notecard for LoRa.
-
Blues Notecarrier with JST and Qwiic connectors.
-
Connecting Mojo to a Notecarrier is the easiest way to get started with Blues hardware. However, Mojo's hardware designs are all open source in case you later wish to incorporate Mojo into your own boards.
-
The Notecarrier A, Notecarrier F, Notecarrier X, and Notecarrier XS all have JST and Qwiic connectors.
-
-
A battery with a JST connector, such as a LiPo battery.
-
A computer with an available USB port.
-
A browser that supports the Web Serial API, like Chrome or Microsoft Edge.
Connect a Mojo
To use Mojo to measure energy consumption you must:
-
Connect a battery to Mojo's
BATJST connector. -
Connect the device you want to measure energy consumption for to Mojo's
LOADJST connector. For this tutorial you can connect your Mojo'sLOADJST connector to your Notecarrier'sLIPOorVBATJST connector. -
Connect Mojo to a Notecard over I2C, which is most easily done through one of Mojo's Qwiic connectors.
 warning
-
Notecard will only detect the presence of a Mojo if they are connected prior to Notecard being powered on.
-
If using your Mojo with a Notecarrier F the Feather must stay plugged in and awake, since QWIIC is powered from the Feather's 3.3V rail. Putting the Feather to sleep will cut power to QWIIC and when power is re-applied, Mojo will be in an unknown/unitialized state.
The image below shows one way to wire this up using a LiPo battery, a Notecarrier X, and a Notecard Cell+WiFi.

 note
noteYou can use either of Mojo's two Qwiic connectors to make an I2C connection with a Notecard. The Mojo offers two Qwiic connectors in case you want to daisy chain additional I2C peripherals.
Configuring Mojo with Notecard
Notecard detects the presence of a Mojo on the I2C bus automatically, without the need for any configuration. To get data from Mojo though you need to take one of two approaches.
Using the card.power Request
The Notecard offers a
card.power request you
can use to take a power consumption reading from Mojo at any time.
To try it, connect a USB cable from the Notecarrier's USB port to your computer's USB port, and then connect your Notecard to the In-Browser Terminal.
Once connected run the command below from the Terminal.
{"req":"card.power"}You should see a response like the one below.
{
 "temperature": 19.154992675781273,
 "voltage": 4.201925659179688,
 "milliamp_hours": -74.61733499999998
}To use Mojo your Notecard must be running a firmware version >= 8.1.3. You
can check which firmware version you're using with the
card.version request.
If you're running an older version you must
upgrade your Notecard's firmware to
continue. You can upgrade your Notecard's firmware from the In-Browser Terminal
using the firmware install latest command.
Here, temperature is a reading from your Notecard's onboard temperature
sensor, voltage is your current device voltage, and milliamp_hours is
the number of milliamp hours (mAh) consumed by your device, as measured
by Mojo.
It's likely that your initial milliamp_hours reading will be negative,
as Mojo measures cumulative energy readings (aka both charge and discharge
from the connected battery). All Blues Notecarriers have the necessary
wiring to charge connected LiPo batteries when they have a powered USB
connection, so your battery has likely charged more than discharged at
this point in the tutorial.
The milliamp_hours field that Notecard tracks is cumulative. You can reset
the counter at any time using the card.power request's reset argument.
{"req":"card.power","reset":true}Enable Power Logs
Another approach you can take for taking readings from Mojo is to enable
automated logging. With this approach, your Notecard will automatically
take a reading from Mojo every time it powers its modem on and off, and
will store that data in a _log.qo Notefile.
To enable power logs, you first need to set the _log environment variable
on your Notecard. To do so complete the following steps:
-
Ensure your Notecard is connected to a Notehub project. If you're new to Notecard and not sure how to do this, refer to the Notecard Quickstart tutorial.
-
Open your Notehub project, double click on your device, and visit its Environment tab.

-
Create a new environment variable with a Key of
_logand a Value ofpower.
-
Click the Apply changes button to save your new variable.
-
Return to your Notecard in the In-Browser Terminal, and run a
hub.syncrequest to pull down the new environment variable to your device.{"req":"hub.sync"} -
With the
_logenvironment variable set, your Notecard will now automatically collect energy-usage data in_log.qoNotes every time its modem is powered on and off. To try it out, perform an additionalhub.syncrequest on your device:{"req":"hub.sync"} -
After this sync completes, return to your Notehub project and visit the Events tab. You should see a new
_log.qoevent.
Each _log.qo event contains the cumulative mAh count in the milliamp_hours
field, as well as information on the energy consumed since the last modem
power on/off in the text field.
If you'd like to take additional energy readings that are not tied to the
device's modem, you can enable them with the card.power request's
minutes argument. For example, the request below enables hourly _log.qo
entries.
{"req":"card.power","minutes":60}Testing Mojo
With power logs enabled, let's do one last test so you can see Mojo in
action. In this section you'll use the
card.temp request
to take regular temperature readings, and monitor the energy used in the
process.
-
Run the command below on your Notecard using the In-Browser Terminal. This request tells your Notecard to take a temperature reading from its onboard sensor every minute, and to immediately synchronize that data to Notehub.
{"req":"card.temp","minutes":1,"sync":true} -
Next, unplug your Notecarrier from your computer so your device is running on battery power.
-
After that, wait a few minutes to give your Notecard some time to take and send a few readings.
-
Finally, reopen your Notehub project and visit its Events page. You should see a list of
_log.qoevents with an increasing amount ofmilliamp_hoursused. (Tip: You may wish to filter for_log.qoevents as I'm doing in the screenshot below, as it allows you to see only your energy-consumption data.)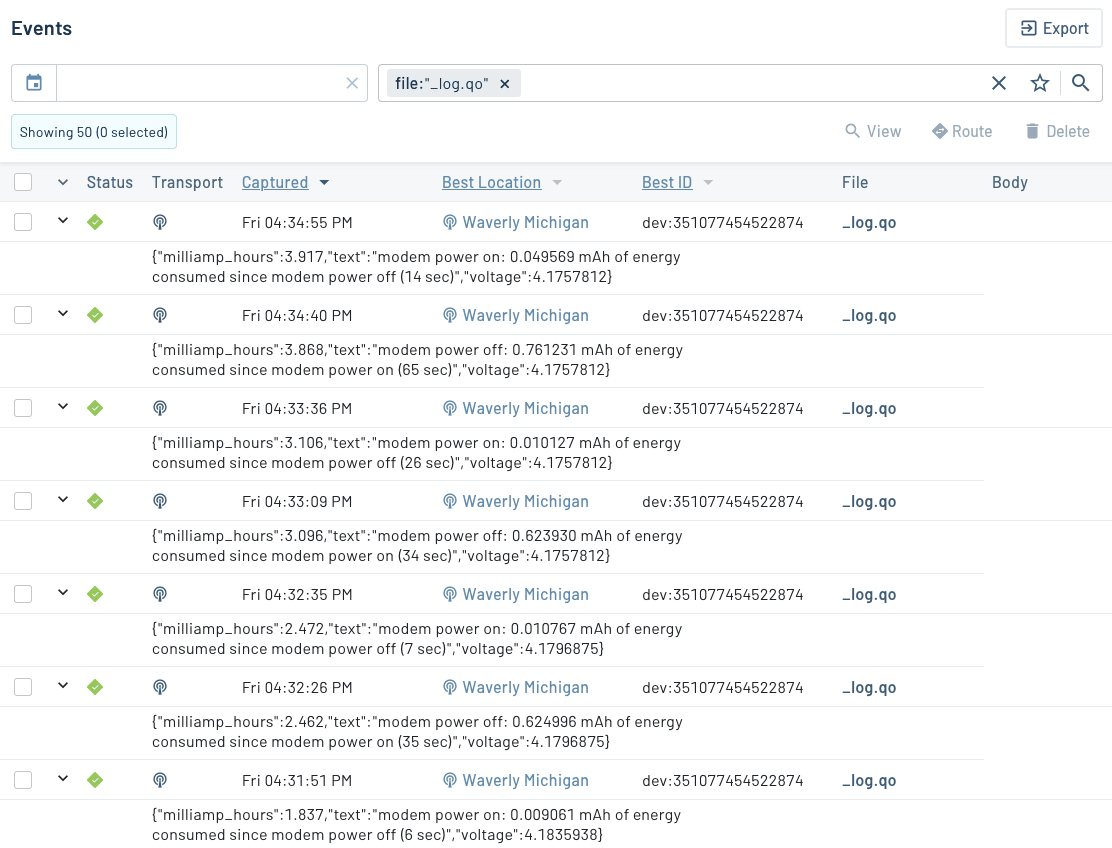
-
Once you've gathered enough data to see how Mojo works, you may wish to reconnect your Notecard to the In-Browser Terminal and run the following command, which turns off automated temperature reporting.
{"req":"card.temp","stop":true}
Next Steps
Now that you know the basics of how Mojo works, you're ready to start using it to measure energy consumption in your own projects. Here are some resources you may find useful as you start experimenting with Mojo.
-
Easily Track Your Project’s Energy Usage with Google Sheets:
- A guide to connecting to a Mojo, and routing Mojo data to Google Sheets.
-
- A great place to ask questions, or to get help as you start tinkering with Mojo.
-
- The best way to stay up to date on all things Blues, including new hardware announcements.