
Sparrow Quickstart
 warning
The Sparrow project is no longer under active development. We have applied our learnings from Sparrow to Notecard LoRa, which you can start with using our LoRaWAN Starter Kit and LoRaWAN Quickstart tutorial.
We do offer Sparrow support for customers that have previously purchased Sparrow hardware.
The goal of this guide is to provide everything you need to set up, configure, and start collecting data from a Sparrow Development Kit. You'll start by learning what Sparrow is, then look at what's in your Sparrow Development Kit box, and finally get everything up and running.
What is Sparrow?
Sparrow is a set of reference designs that enable one or more Nodes to communicate with a paired Gateway using a LoRa radio. That gateway, in turn, can then communicate with the cloud over WiFi or cellular.
This architecture allows you to add cloud connectivity to a local cluster of devices while keeping per-device costs as low as possible.
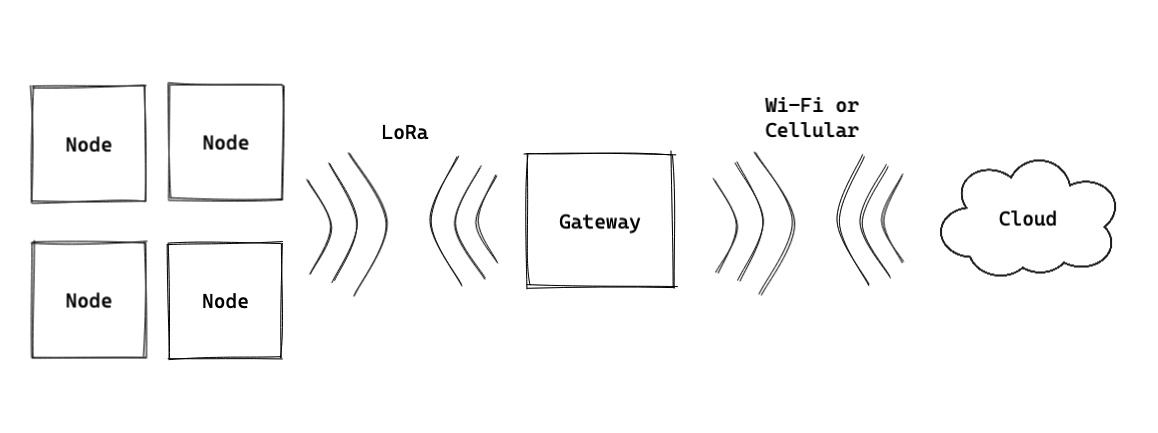
This quickstart covers getting started with a Sparrow Development Kit, which contains a set of hardware that implements the Sparrow architecture as shown in the diagram below.
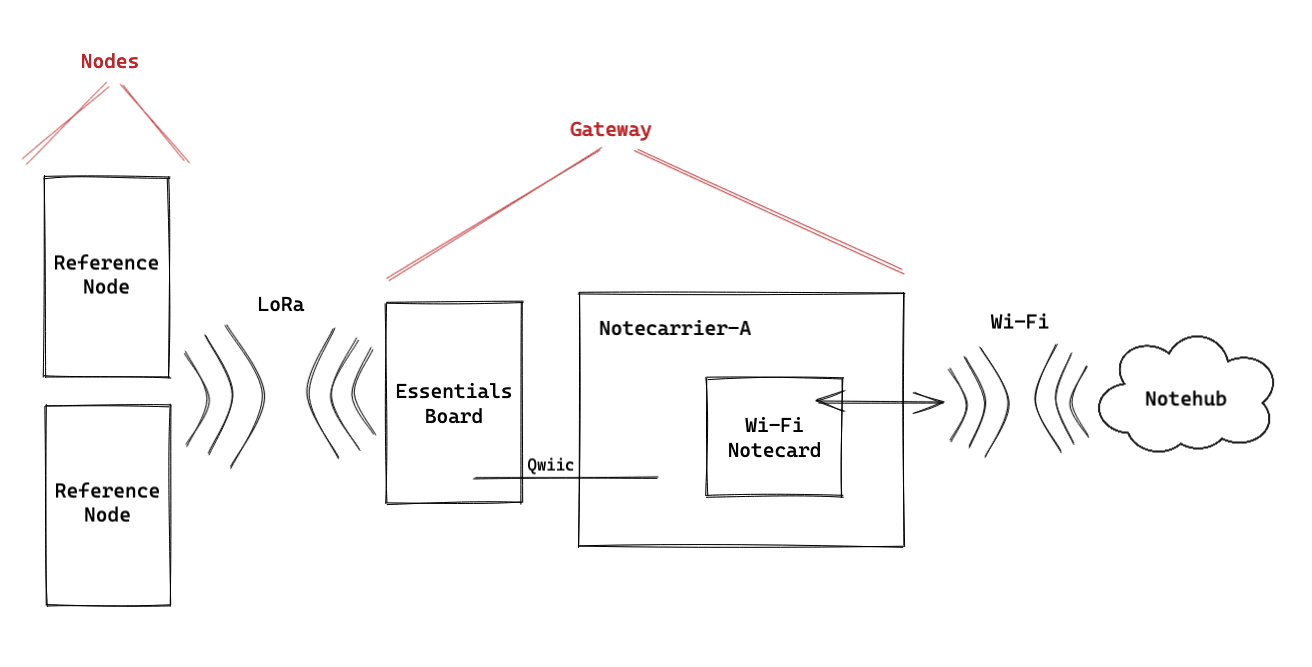
To understand how everything fits together, let's next look at the specific pieces of Sparrow hardware.
What is in the Box
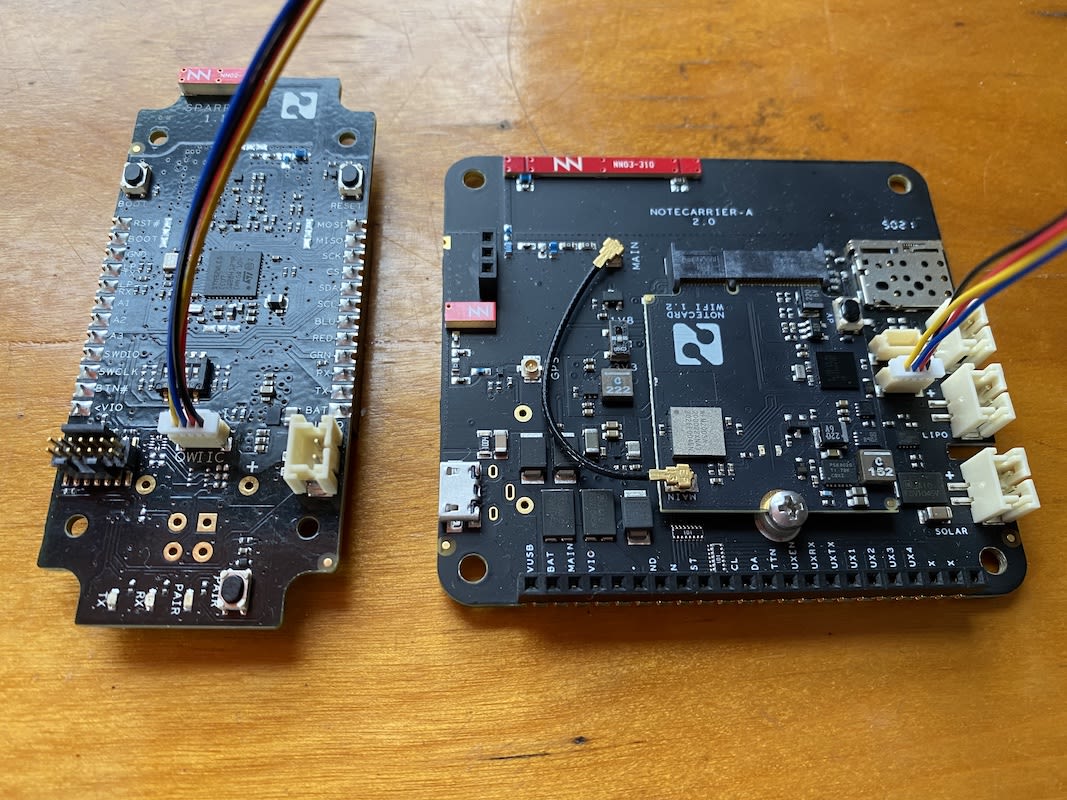
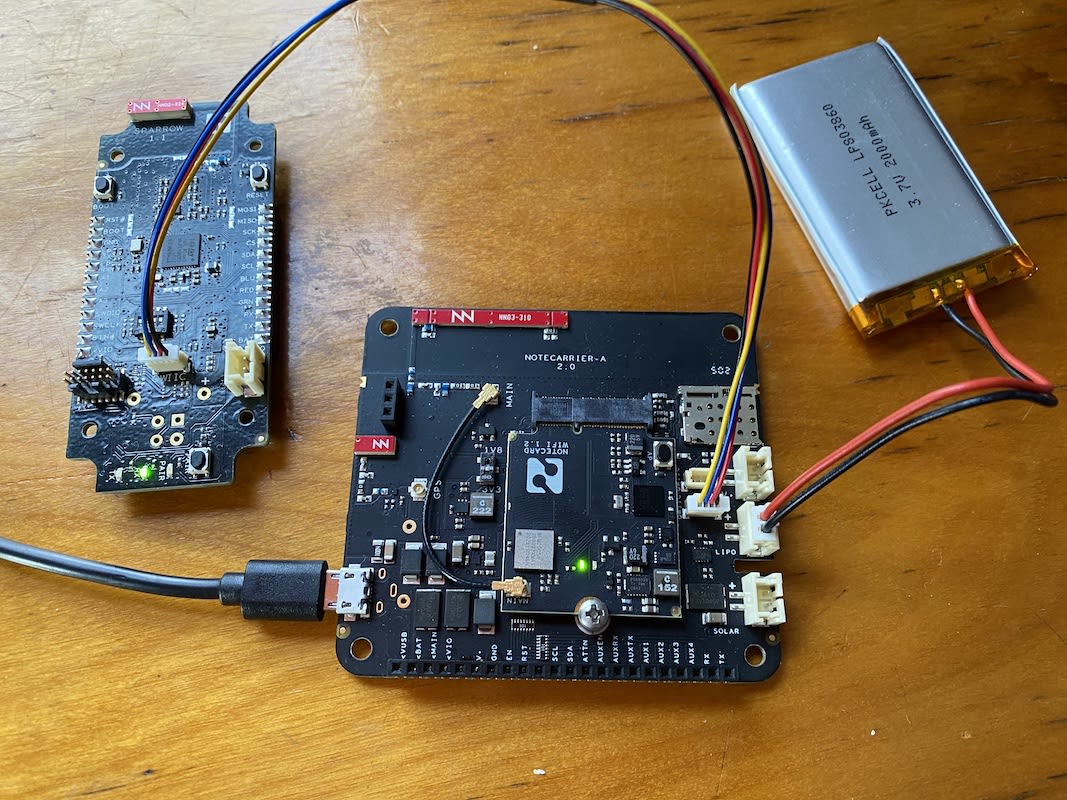
Your Sparrow Developer Kit contains the items shown below. Let's quickly define what each of these items are before discussing how to hook everything up.

1. Notecarrier A with a pre-installed Notecard WiFi
The Notecard WiFi is a System-on-Module that makes it easy to send data over a WiFi network. The Notecarrier A is a companion board that houses the Notecard.
2. Essentials Board
A microcontroller that acts as the radio that performs the LoRa-based communication with the Sparrow Reference Nodes. The Essentials board also provides connectors for power (Lipo and coin cell) and external sensors with Qwiic and female headers.
3. Reference Nodes
Enclosed boards that include a temperature/humidity sensor, a PIR motion sensor, and a dual-AAA-battery holder for power.
4. Female-to-Female JST SH (Qwiic) connector
A Qwiic JST connector you'll use to attach the Essentials Board to the Notecarrier A.
5. STLINK-V3MINI
A stand-alone debugging probe for STM32 microcontrollers. You can use this to debug and update firmware on both the Essentials Board and Reference Nodes
Setting Up Your Hardware
Now that you know what you're working with, let's look at the steps you need to take to get your hardware up and running.
- Remove the four screws from the back of each of the two Reference Node enclosures, and insert two AAA batteries in each. Leave the backs of the enclosures off for now.

- Connect your Essentials Board to your Notecarrier A using the included Qwiic cable.
- Ensure the DIP switch on the Notecarrier A is set to 3V3, as 3V3 is a requirement when using a Notecard WiFi.
 note
note
- Ensure the DIP switches on the Essentials Board are all set to OFF—aka ensure the
switches point towards the numbers
1,2,3,4, and notON.
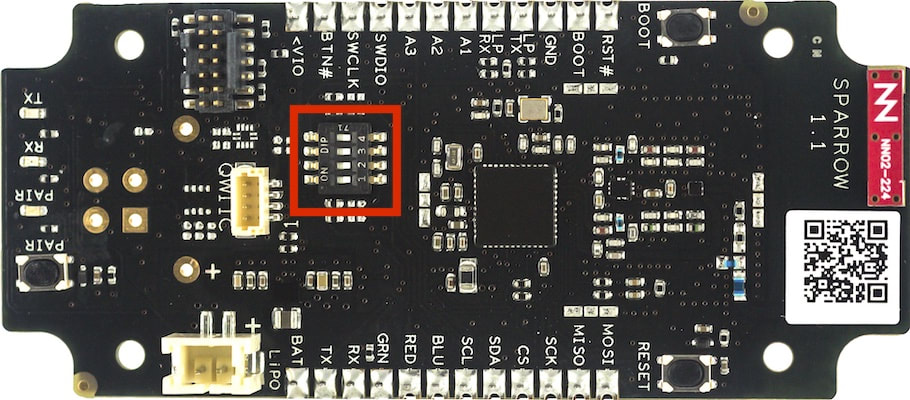
noteThe DIP switches on the Essentials Board control the frequency on which Sparrow operates. Sparrow uses the LoRa protocol, and operates on the ISM (industrial, scientific, medical) band, which allows anyone to transmit without the need for a license, permit, or transmission rights. Unfortunately, the ISM band is not standardized globally, so the frequency of the Sparrow must be set to operate the region in which it is being used.
We recommend all Sparrow users start with the DIP switches set to off during your initial testing. For legal operation in the United States and Canada, the Sparrow DIP switches MUST remain OFF on all boards. For other regions, refer to the board's datasheet for instructions on setting a frequency plan for your location.
- Use the included Micro USB to USB-A data cable to connect the Notecarrier A to your computer. After a few seconds you should see green LED lights on both the Notecarrier A and Essentials Board.

- (OPTIONAL) Connect a LiPo battery to the JST connector labeled LIPO on the Notecarrier A. Because the gateway requires continuous power, the LiPo battery can act as an uninterruptible power supply—ensuring your gateway continues to operate if your regular power source fails, or if you need to plug your gateway in at a different location.
Now that you have your hardware set up, let's next look at how to set up a cloud backend to accept data from your hardware.
Set Up Notehub
Notehub is a secure proxy cloud service that communicates with the Notecard, provides tooling for managing fleets of devices, allows you to perform over-the-air Notecard firmware updates, and makes it easy for you to securely route data to your own cloud applications or services.
You'll need to set up a Notehub account and project to receive sensor data from your reference nodes.
In this section, you'll start simple by setting up a Notehub Project and creating your first ProductUID. A ProductUID is the unique identifier you will use to associate a Notecard to a Notehub Project, and ensure that data from the Notecard ends up in the right location.
To set up Notehub complete the following steps.
-
Navigate to Notehub at notehub.io, and create a new account if you haven't already.
-
Once you're on the Notehub dashboard, click the Create Project button.
-
Give the project a Project Name, and then click the Create Project button.
NOTE: The ProductUID must be globally unique. To reduce collisions, Notehub prepends a generated namespace based on your account email, for instance
com.your-company.your-name:. Enter any identifier you like in the input on the right.

- Copy your new project's ProductUID, as that's the identifier Notehub uses to associate your Notecard to your project.

And with that, you now have a Notehub project set up and ready to go. Your next step is to associate your hardware with your new cloud backend.
Set Up Notecard
In this part of the exercise you'll configure your Notecard so that it knows where to send data. You do this by assigning the ProductUID created in the last step to your Notecard.
Setting the ProductUID associates a Notecard to a given Project in Notehub. A Notecard can easily be moved between Projects over time, but it can only belong to one project at a time.
-
With the ProductUID on your clipboard from the previous step, next open the Notecard's In-Browser Terminal (if it isn't already open) by clicking the terminal button in the top-right corner of your browser.

-
The In-Browser Terminal allows you to communicate, over USB, with your Notecard. To connect, click the USB Notecard button within the In-Browser Terminal. A browser prompt will appear asking for permission to connect to a USB Serial device:
-
If you're on a Mac, select either
Notecard (cu.usbmodemNOTE1)orNotecard (tty.usbmodemNOTE1). -
On Windows, the option will show up as
USB Serial Device (COMx). -
On Linux the option will show up as
Notecard (ttyACM0).
noteNot seeing your Notecard? Make sure you've connected your Notecarrier A to your computer with a micro-USB-to-USB-A cable.
Once you are connected, you will see the connection indicator change from Notecard Disconnected to Notecard Connected. Now that you can communicate with your Notecard, you have to associate it with the Notehub project you just created.
- Issue the following command in the In-Browser Terminal, making sure to substitute
com.your-company.your-name:your_productwith the ProductUID you copied to the clipboard in a previous step.
NOTE: An empty JSON object (
{}) from the Notecard indicates a successful request. If an error occurs, the Notecard will return a JSON object with anerrkey and a string describing the error that occurred.
{"req":"hub.set", "product":"com.your-company.your-name:your_product","mode":"continuous"}{}
- Next, issue the following command to connect your Notecard WiFi to your home WiFi
network, making sure to substitute
<ssid name>and<password>with your own values.
{"req":"card.wifi","ssid":"<ssid name>","password":"<password>"}{
"secure": true,
"ssid": "<your-ssid>"
}Please note that Notecard WiFi is only compatible with 2.4 GHz WiFi access points. Access points that combine 5 GHz and 2.4 GHz with the same SSID may cause issues using the Notecard. Also, your ensure your Notecard firmware version is at least v3.3.1.

And with that, you now have Notehub set up, and your Notecard is ready to send local data to Notehub from your hardware. Your last step is to pair your devices so you can see data flow all the way through.
Pair Your Devices
The Sparrow Essentials Board must pair with each Reference Node before it can communicate with them over LoRa. Pairing the two is as easy as pressing a few buttons.
-
Press and release the
PAIRbutton on the Essentials Board. -
Press and release the
PAIRbutton on each Reference Node.

While pairing, both the Essentials Board and Reference Nodes should show a solid blue LED light, which indicates the devices are in pairing mode. Pairing can take several seconds, and can sometimes take up to a minute. When pairing finishes you'll see a flash of various LEDs on the Reference Nodes to acknowledge that the pairing succeeded.
note-
Having trouble pairing? Pairing LoRa devices works best if the devices are separated from each other (opposite sides of the table should be fine).
-
Check our Sparrow Hardware Behavior guide for detailed information on what the various LEDs on the Sparrow boards indicate.
And with that, you're now completely set up and ready to go. If all went well, your Reference Nodes should already be collecting data, sending that data to your gateway via LoRa, and your gateway should be sending that data to your Notehub project.
Let's go back to Notehub to make sure everything is working as expected.
Viewing Your Data
-
Open your web browser, return to Notehub, and open up your Sparrow project.
-
Click Events to open your project's event list.
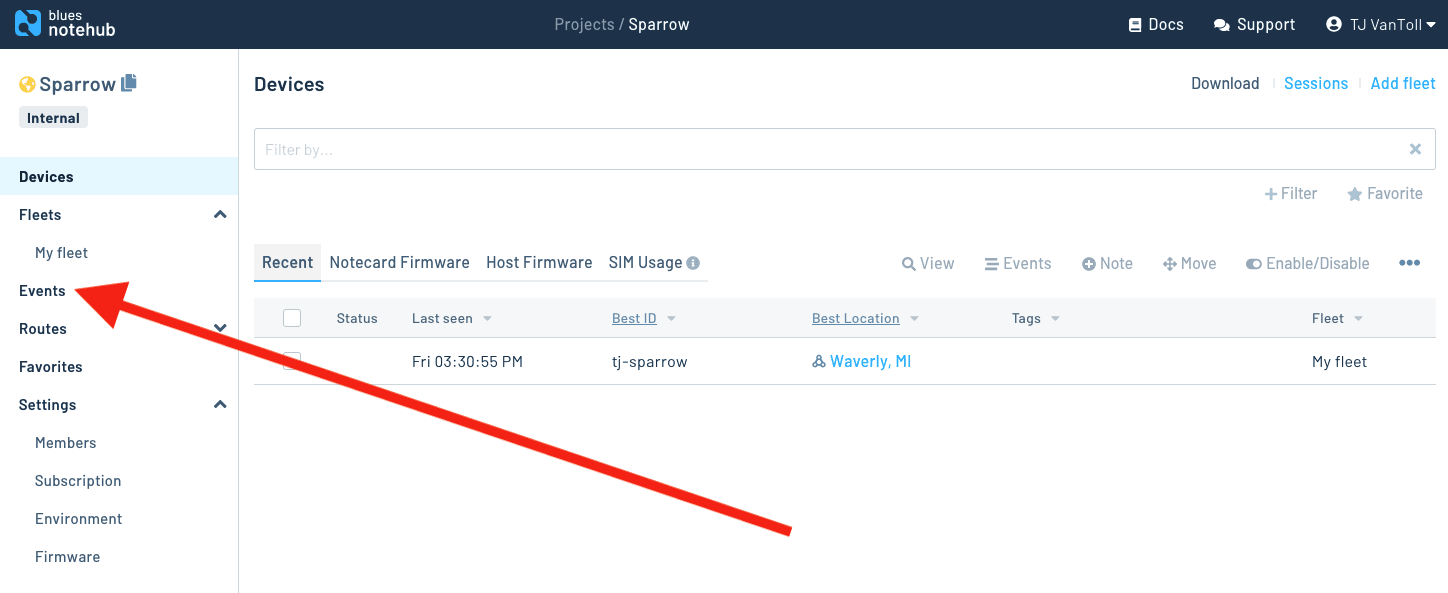
- On the Events page locate the textbox to the right of the “All Devices” dropdown.
Type
sensors.dbin this textbox as a filter (see image below). If all went well, you should see onesensors.dbevent for each Reference Node you paired.

Over time you'll see two additional types of events in Notehub.
-
air.qoevents report the temperature, humidity, and barometric pressure from the node's onboard BME280 environmental sensor. The nodes take hourly environmental readings by default. -
motion.qoevents report motion detected from the node's onboard PIR motion sensor. The node reports motion as soon as the sensor detects it, however, the node will only send onemotion.qoevent every 15 minutes to save on battery. The event'scountreports the number of times the sensor detected motion since the previousmotion.qo, and the event'stotalreports the number of times the sensor detected motion since the device was last reset.
And with that, you have now completed the setup of your Sparrow Development Kit! Let's look at one more tip before you re-attach the backs of your Reference Node enclosures.
Distinguishing Between Nodes
Each reference node in your Sparrow Development Kit has a unique identifier. You can
view this identifier in the File field of each of the node's air.qo and
motion.qo events. For example, the screenshot below shows how to find a node's
identifier on a motion.qo event. (You can double click the event to view the full
identifier, and to copy the value to your clipboard.)

Having the identifier can be useful whenever you need to differentiate between multiple nodes—aka whenever you need to tell which node is which.
As another option, you can also determine a node's identifier by pressing and
releasing the node's PAIR button. Doing so creates and syncs a _health.qo
event that contains the pressed node's identifier in its body.

If you'd like, make note of any of your nodes' identifiers using the steps above, and when you're ready, go ahead and re-attach the backs of your Reference Node enclosures.
Next Steps
Now that you have everything connected and communicating, this is what we recommend as next steps.
- Move your hardware to different locations. Go ahead and reposition your Essentials Board and Reference Nodes to get readings from different locations.
NOTE: There are no hard-and-fast rules that dictate how far apart you can place LoRa devices because the optimal distance depends on whether your devices have a clear line-of-sight, or the signal needs to penetrate walls, concrete, and the like. Out in the open, devices can reach one another across 1 KM or more. In a home or building, devices will need to be placed closer together, ideally less than a hundred meters apart. As with anything, we strongly suggest you test your application under real-world circumstances prior to deployment.
- Read more about what you can do with Sparrow. This quickstart helped you get your Sparrow Development Kit up and running, but there's a lot more you can do with Sparrow. As a next step, we recommend checking out our Sparrow documentation hub, for example projects, guides and on what you can do with your Sparrow data, and information on how to customize and extend the Sparrow firmware.