
Arduino Library
note-arduino is the official Arduino library for communicating with the Notecard over serial or I2C. The library works on any Arduino compatible microcontroller, and can be installed from the Arduino Library Manager or PlatformIO.
See
note-arduinoin action in these accelerator projects.
Installation
You can install and use the note-arduino library from Arduino IDE or PlatformIO using the steps below.
-
Open Arduino IDE.
-
Click on the Tools > Manage Libraries... menu.
-
Search for "Blues" in the input box and click the "Install" button next to the "Blues Wireless Notecard" result.
-
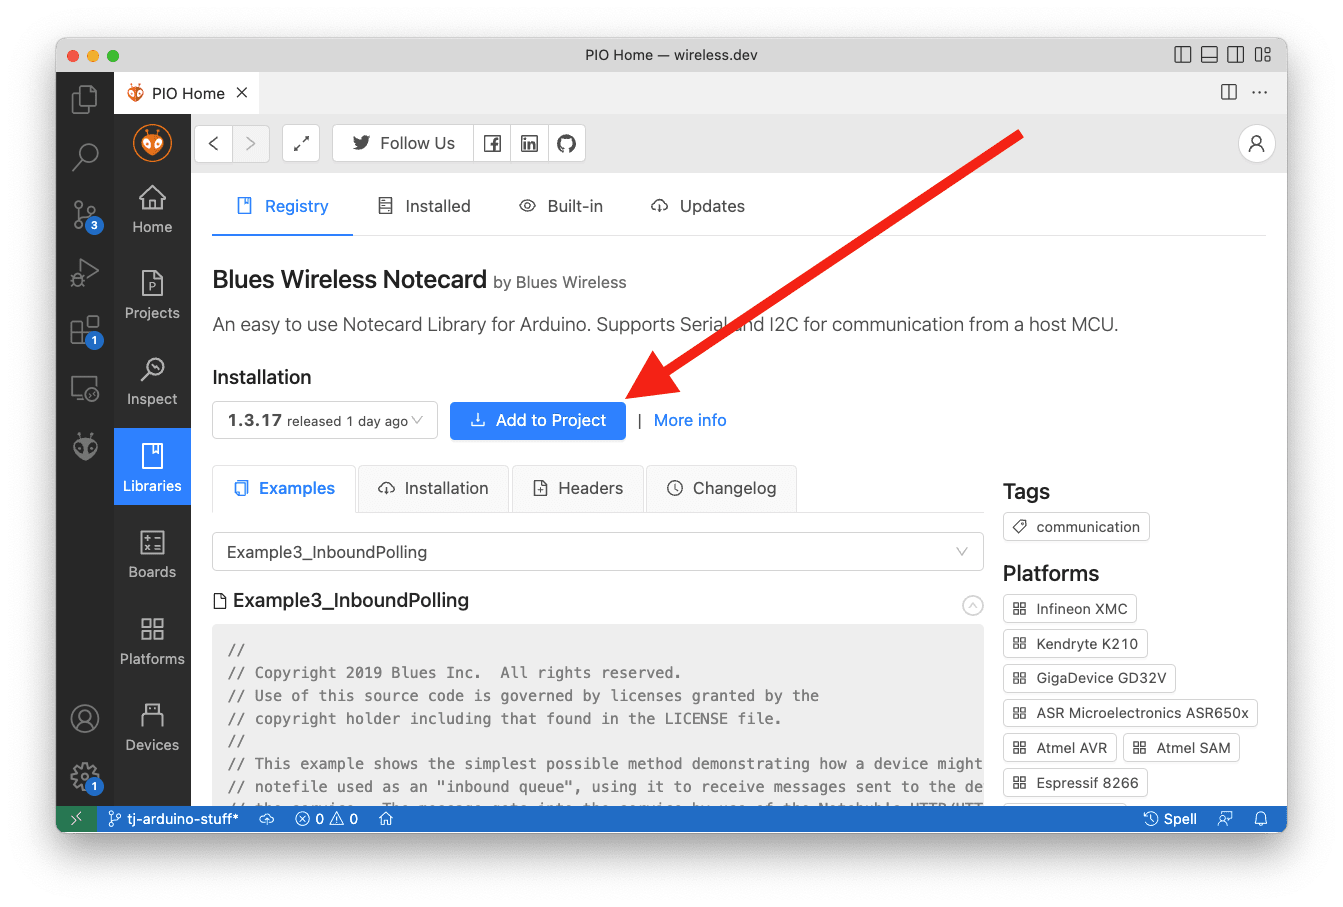
Open PlatformIO within Visual Studio Code, and click the Libraries menu.
-
Type "Blues" in the search input.
-
Click the blue search button.
-
Click the "Blues Wireless Notecard" result.

- Click the Add to Project button, which adds note-arduino to the
lib_depssection of your project'splatformio.inifile.
Usage
To use the note-arduino library in Arduino IDE you need to create a new sketch, and then select the Sketch > Include Library > Contributed Libraries > Blues Wireless Notecard menu option, which adds the following include to your sketch:
#include <Notecard.h>To use the note-arduino library in PlatformIO, create a new project (if you haven't
already), and then add the following include to the top of your src/main.cpp file.
#include <Notecard.h>With the library included, you next must initialize the Notecard over serial or I2C.
Serial Configuration
To initialize the Notecard over Serial, instantiate a Notecard object, then use
the begin() method and provide the Serial object as a parameter.
The Notecard object will initialize the serial bus on your behalf.
Default Serial Initialization
Notecard notecard;

void setup(void) {
    # Initialize Notecard serial interface (with defaults)
    notecard.begin(Serial1);
}
Serial Initialization with Baud Rate
Notecard notecard;

void setup(void) {
    # Initialize Notecard serial interface
    notecard.begin(Serial1, 9600);
}
I2C Configuration
To initialize the Notecard over I2C, instantiate a Notecard object, then use
the begin() method with zero, one, two, or three parameters. Use
as many parameters as needed to match your implementation.
Default I2C Initialization
Notecard notecard;

void setup (void) {
    # Initialize Notecard I2C interface (with defaults)
    notecard.begin();
}
I2C Initialization with Address
uint32_t i2cAddress = 0x24;

Notecard notecard;

void setup (void) {
    # Initialize Notecard I2C interface
    notecard.begin(i2cAddress);
}
note
noteBy passing an I2C address to notecard.begin() you are not assigning an
address to the Notecard. Instead, you are telling the Arduino library to
look for a Notecard at an I2C address that you set on the Notecard with
a card.io request.
I2C Initialization with Address and Max Transaction Length
uint32_t i2cAddress = 0x17;
uint32_t i2cMax = 32;

Notecard notecard;

void setup(void) {
    # Initialize Notecard I2C interface
    notecard.begin(i2cAddress, i2cMax);
}
I2C Initialization with Address, Max Transaction Length and I2C Bus
uint32_t i2cAddress = 0x17;
uint32_t i2cMax = 32;

Notecard notecard;

void setup(void) {
    # Initialize Notecard I2C interface
    notecard.begin(i2cAddress, i2cMax, Wire);
}
Debug Mode
If you're connected to the Serial Monitor (located in the "Tools" menu of
Arduino IDE), you can put the Notecard library in debug mode using the
setDebugOutputStream method, which will output raw JSON requests and
responses.
#define serialDebug Serial
Notecard notecard;

void setup() {
  // Initialize Debug Output
  serialDebug.begin(115200);
  while (!serialDebug) {
    ; // wait for serial port to connect. Needed for native USB
  }
  notecard.setDebugOutputStream(serialDebug);
}
Sending Notecard Requests
Whether using Serial or I2C, sending Notecard requests and reading responses follows the same pattern:
- Create a JSON object that includes a valid Notecard API Request.
- Call one of the
notecardmethods and pass in the request JSON object. - If you called a method that returns a response, make sure the response contains the data you need.
#define productUID "com.your-company.your-name:your_product"
Notecard notecard;

void setup() {
    J *req = notecard.newRequest("hub.set");
    if (req) {
        JAddStringToObject(req, "product", productUID);
        JAddStringToObject(req, "mode", "continuous");
        JAddBoolToObject(req, "sync", true);
        if (!notecard.sendRequest(req)) {
            notecard.logDebug("FATAL: Failed to configure Notecard!\n");
            while(1);
        }
    }
}
notecard Methods
The Notecard provides a variety of methods for performing requests.
newRequest()creates a JSON (J) object for the specified Notecard request. This method returns a JSON object with thereqkey set.
J *req = notecard.newRequest("card.status");sendRequest()sends a JSON (J) request to the Notecard.
J *req = notecard.newRequest("hub.sync");
if (req) {
    notecard.sendRequest(req);
}requestAndResponse()sends a JSON (J) request to the Notecard, and additionally returns the Notecard's JSON response in aJobject that you can parse.
J *req = notecard.newRequest("card.status");
if (req) {
    J* rsp = notecard.requestAndResponse(req);
    // do something with the response
    notecard.deleteResponse(rsp);
}In some situations, you may need to send the Notecard a request and you cannot
receive a response. For example, when using
card.attn request's sleep argument to disable a host MCU,
the host will be disabled and incapable of receiving a response.
For these scenarios the note-arduino library provides a newCommand method. The
newCommand method creates a new JSON (J) object for sending the Notecard a command
rather than a request. You can send commands to the Notecard using the same
sendRequest method you use for requests.
J *cmd = notecard.newCommand("card.attn");
if (cmd) {
    JAddStringToObject(cmd, "mode", "sleep");
    JAddNumberToObject(cmd, "seconds", 3600);
    notecard.sendRequest(cmd);
}
JSON Handling
The note-arduino library uses a J JSON object for many of its APIs, and provides
a number of functions for helping you create and parse J JSON objects.
Creating JSON Objects
The note-arduino library's sendRequest and
requestAndResponse functions both expect a J JSON object
as an argument. You can create the initial J object with a call to
newRequest, which allocates the appropriate memory
and returns a JSON object that contains a "req" key-value pair.
J *req = notecard.newRequest("example.request");
if (req) {
    // At this point req represents a JSON object with the structure:
    // { "req": "example.request" }
}
From there, the following functions are available for helping you populate your JSON object with the data you need.
JAddBoolToObjectJAddNumberToObjectJAddStringToObjectJAddObjectToObjectJAddArrayToObjectJAddItemToArray
To see how to use these functions, suppose you need to create a J JSON object
that contains the following JSON data.
{
    "req": "example.request",
    "key-1": true,
    "key-2": 2,
    "key-3", "3",
    "key-4": {
        "key-a": ["a"]
    }
}
The code below constructs the above JSON structure, and then passes that object
to the Notecard using sendRequest.
J *req = notecard.newRequest("example.request");
if (req) {
    JAddBoolToObject(req, "key-1", true);
    JAddNumberToObject(req, "key-2", 2);
    JAddStringToObject(req, "key-3", "3");
    J* key4 = JAddObjectToObject(req, "key-4");
    J* keyA = JAddArrayToObject(key4, "key-a");
    JAddItemToArray(keyA, JCreateString("a"));

    notecard.sendRequest(req);
}The note-arduino library includes several functions for creating "items"
of a JSON object, such as JCreateArray, JCreateObject, JCreateNumber,
JCreateBool, and JCreateString.
You only need these functions if you're using an API that requires a JSON item as
an argument, such as JAddItemToArray.
Parsing JSON Objects
The note-arduino library's requestAndResponse function
returns a J JSON object that contains response data from the Notecard. For example,
the code below calls performs a card.status request on the Notecard, and
and stores the returned data in a J object.
if (J *req = notecard.newRequest("card.status")) {
    J *rsp = notecard.requestAndResponse(req);
    notecard.logDebug(JConvertToJSONString(rsp));
    notecard.deleteResponse(rsp);
}
After requestAndResponse runs, the JSON that rsp points at will have the
structure below.
{
  "connected": true,
  "status": "{normal}",
  "storage": 2,
  "time": 1667924973,
  "cell": true
}
There are a number of functions you can use to parse individual fields out of a JSON object.
JIsPresentJGetBoolJGetIntJGetNumberJGetObjectJGetString
For example, the following code shows an example of how to access fields from
the card.status response.
char status[20];
if (J *req = notecard.newRequest("card.status")) {
    J *rsp = notecard.requestAndResponse(req);
    notecard.logDebug(JConvertToJSONString(rsp));

    bool connected = JGetBool(rsp, "connected");
    char *tempStatus = JGetString(rsp, "status");
    strlcpy(status, tempStatus, sizeof(status));
    int storage = JGetInt(rsp, "storage");
    int time = JGetInt(rsp, "time");
    bool cell = JGetBool(rsp, "cell");

    notecard.deleteResponse(rsp);
}
When the response contains nested objects you can parse them using JGetObject.
For example, the file.changes request returns a JSON object with a structure
that looks like the one below.
{
  "info": {
    "data.qo": {
      "total": 1
    },
    "data.qi": {
      "total": 2
    },
    "total": 3
  }
}
Given this response, you could use the following code to parse out the total
from within the "data.qo" object.
if (J *req = notecard.newRequest("file.changes")) {
    J *rsp = notecard.requestAndResponse(req);
    notecard.logDebug(JConvertToJSONString(rsp));

    J *info = JGetObject(rsp, "info");
    J *data = JGetObject(info, "data.qo");
    int total = JGetInt(data, "total");
    notecard.logDebugf("Total: %d", total); // 1

    notecard.deleteResponse(rsp);
}
Examples
We provide several examples for using note-arduino in a number of different scenarios. If you're using Arduino IDE you can access the examples from the File > Examples > Blues Wireless Notecard menu.

If you're using PlatformIO you can copy the source code for the examples from the links below.
- Example 0: Libraryless Communication
- Learn how to communicate with a Notecard in Arduino without using the note-arduino library.
- Example 1: Notecard Basics
- Learn the basics of communicating with a Notecard, including running a
hub.setandnote.addrequest.
- Learn the basics of communicating with a Notecard, including running a
- Example 2: Periodic Communications
- Learn how to communicate with a Notecard in periodic mode, gathering sensor measurements "offline", and performing uploads on a periodic basis.
- Example 3: Inbound Polling
- Learn how to use the Notecard to poll for inbound messages at a defined interval.
- Example 4: Inbound Interrupts
- Learn how to use the Notecard to manage an inbound queue of messages using interrupts.
- Example 5: Using Templates
- Learn how to use Note templates to send outbound Notes that use minimal bandwidth.
- Example 6: Sensor Tutorial
- Learn how to collect sensor data and send it to the cloud using the Notecard. This code is also used by the sensor tutorial.
- Example 7: Power Control
- Learn how the Notecard can be used to put a host to sleep, save some state for the host, wake it up periodically and return saved state to the host.
- Example 8: Send/Receive Binary Data
- Learn how to both send and receive large binary data objects with the Notecard.
- Example 9: Send/Receive Binary Data (Chunked)
- Learn how to send and receive large binary data objects that are split into smaller "chunks" for more efficient processing.
API Reference
Library Classes
| Class | Usage | Description |
|---|---|---|
class Notecard | #include "Notecard.h" | Class that stores state and functions for interacting with the Blues Notecard. |
Notecard Class Reference
The class that stores state and functions for interacting with the Blues Notecard.
Class Notecard
| Method | Description |
|---|---|
public void begin (uint32_t i2cAddress, uint32_t i2cMax, TwoWire & wirePort) | Initialize the Notecard for I2C. This function configures the Notecard to use the I2C bus for communication with the host. |
public void begin (HardwareSerial & serial, int speed) | Initialize the Notecard for Serial communication. This function configures the Notecard to use Serial for communication with the host. |
public void setDebugOutputStream (Stream & dbgserial) | Set the debug output source. This function takes a Stream object (for example, Serial) and configures it as a source for writing debug messages during development. |
public void clearDebugOutputStream (void) | Clear the debug output source. |
public J * newRequest (const char * request) | Creates a new request object for population by the host. This function accepts a request string (for example, "note.add") and initializes a JSON Object to return to the host. |
public J * newCommand (const char * command) | Creates a new command object for population by the host. This function accepts a command string (for example, "note.add") and initializes a JSON Object to return to the host. |
public bool sendRequest (J * req) | Sends a request to the Notecard. This function takes a populated J JSON request object and sends it to the Notecard. |
public bool sendRequestWithRetry(J *req, uint32_t timeoutSeconds) | Sends a request to the Notecard, retrying for timeoutSeconds until it succeeds or times out. |
public J * requestAndResponse (J * req) | Sends a request to the Notecard and returns the JSON Response. This function takes a populated J JSON request object and sends it to the Notecard. |
public J * requestAndResponseWithRetry (J * req, uint32_t timeoutSeconds) | Sends a request to the Notecard, retrying for timeoutSeconds until it succeeds or times out, and returns the JSON Response. |
public void deleteResponse (J * rsp) | Deletes a J JSON response object from memory. |
public void logDebug (const char * message) | Write a message to the serial debug stream. |
public void logDebugf (const char * format,...) | Write a formatted message to the serial debug stream. |
public bool debugSyncStatus (int pollFrequencyMs,int maxLevel) | Periodically show Notecard sync status, returning true if something was displayed to the debug stream. |
public bool responseError (J * rsp) | Determines if there is an error string present in a response object. |
begin (I2C)
Initialize the Notecard for I2C. This function configures the Notecard to use the I2C bus for communication with the host.
i2caddress
uint32_t (optional)
The I2C Address to use for the Notecard.
(default value: NOTE_I2C_ADDR_DEFAULT)
i2cmax
uint32_t (optional)
The max length of each message to send from the host to the Notecard. Used to ensure the messages are sized appropriately for the host.
(default value: NOTE_I2C_MAX_DEFAULT)
wirePort
TwoWire class instance (optional)
The TwoWire implementation to use for I2C communication.
(default value: Wire)
Notecard notecard;
...

// Initialize I2C using default parameters
notecard.begin();Notecard notecard;
...
// Initialize I2C specifying all parameters
notecard.begin(0x17, 30, Wire);begin (Serial)
Initialize the Notecard for Serial communication. This function configures the Notecard to use Serial for communication with the host.
selectedSerialPort
HardwareSerial class instance
The HardwareSerial bus to use.
selectedSpeed
int
The baud rate to use for communicating with the Notecard from the host.
(default value: 9600) (optional)
Notecard notecard;
...

// Initialize Serial using default parameters
notecard.begin(Serial1);Notecard notecard;
...
// Initialize Serial specifying all parameters
notecard.begin(Serial1, 9600);setDebugOutputStream
Set the debug output source. This function takes a Stream object (for example, Serial) and
configures it as a source for writing debug messages during development.
dbgserial
Stream interface instance
The Stream object to use for debug output.
Notecard notecard;
...

notecard.setDebugOutputStream(Serial);
clearDebugOutputStream
Clear the debug output source.
Notecard notecard;
...

notecard.clearDebugOutputStream();
newRequest
Creates a new request object for population by the host. This function accepts a
request string (for example, "note.add") and initializes a JSON object to return
to the host.
noteThe newRequest function allocates memory to create a JSON object, which
can fail if system resources are low. We recommend using the following
pattern to check for this condition, which works because newRequest returns
nullptr if the request fails.
if (J *req = notecard.newRequest("hub.sync")) {
  ...
}request
const char *
The request name, for example, note.add.
Notecard notecard;
...

J *req = notecard.newRequest("card.status");
Returns
A pointer to a J JSON Object populated with the request name.
See also
newCommand
Creates a new command object for population by the host. This function accepts a
command string (for example, "note.add") and initializes a JSON object to return
to the host.
noteThe newCommand function allocates memory to create a JSON object, which
can fail if system resources are low. We recommend using the following
pattern to check for this condition, which works because newCommand returns
nullptr if the request fails.
if (J *req = notecard.newCommand("hub.sync")) {
  ...
}request
const char *
The command name, for example, note.add.
Notecard notecard;
...

J *req = notecard.newCommand("card.status");
Returns
A pointer to a J JSON Object populated with the request name.
See also
sendRequest
Sends a request to the Notecard. This function takes a populated J JSON
request object and sends it to the Notecard.
req
J * class instance pointer
A pointer to a J * JSON request object.
Notecard notecard;
...

if (J *req = notecard.newRequest("hub.sync")) {
    notecard.sendRequest(req);
}
Returns
true if the message was successfully sent to the Notecard, false if there
was an error.
See also
sendRequestWithRetry
Sends a request to the Notecard, retrying for timeoutSeconds until it succeeds
or it times out. This function takes a populated J JSON request object and sends it to the
Notecard.
req
J * class instance pointer
A pointer to a J * JSON request object.
timeoutSeconds
_uint32_t
Time limit for retries, in seconds, if there is no response, or if the response contains an I/O error.
Notecard notecard;
...

if (J *req = notecard.newRequest("hub.sync")) {
    notecard.sendRequestWithRetry(req, 5);
}
Returns
true if the message was successfully sent to the Notecard, false if there
was an error.
requestAndResponse
Sends a request to the Notecard and returns the JSON Response. This function takes
a populated J JSON request object and sends it to the Notecard.
req
J * class instance pointer
A pointer to a J * JSON request object.
Notecard notecard;
...

if (J *req = notecard.newRequest("card.status")) {
    J *rsp = notecard.requestAndResponse(req);
    notecard.logDebug(JConvertToJSONString(rsp));
    notecard.deleteResponse(rsp);
}
Returns
J * JSON object pointer with the response from the Notecard,
or NULL if there was an error sending the request.
See also
 warning
You are responsible for managing the memory associated with the JSON response object.
requestAndResponseWithRetry
Sends a request to the Notecard, retrying for timeoutSeconds until it succeeds
or it times out and returns the JSON Response. This function takes a populated J JSON request
object and sends it to the Notecard.
req
J * class instance pointer
A pointer to a J * JSON request object.
timeoutSeconds
_uint32_t
Time limit for retries, in seconds, if there is no response, or if the response contains an I/O error.
Notecard notecard;
...

if (J *req = notecard.newRequest("card.status")) {
    J *rsp = notecard.requestAndResponseWithRetry(req, 5);
    notecard.logDebug(JConvertToJSONString(rsp));
    notecard.deleteResponse(rsp);
}
Returns
J * JSON object pointer with the response from the Notecard,
or NULL if there was an error sending the request.
See also
warningYou are responsible for managing the memory associated with the JSON response object.
deleteResponse
Deletes a J JSON response object from memory.
rsp
J * class instance pointer
A pointer to a J JSON response object.
Notecard notecard;
...

if (J *req = notecard.newRequest("card.status")) {
    J *rsp = notecard.requestAndResponse(req);
    notecard.logDebug(JConvertToJSONString(rsp));
    notecard.deleteResponse(rsp);
}
See also
logDebug
Write a message to the serial debug stream.
message
const char *
A string to log to the serial debug stream.
Notecard notecard;
...

notecard.logDebug("Hello, World!\n");
logDebugf
Write a formatted message to the serial debug stream.
format
A format string to log to the serial debug stream.
... (variadic)
One or more values to interpolate into the format string.
Notecard notecard;
bool excited;
...

notecard.logDebugf("High-%d!\n", (excited ? 10 : 5));
debugSyncStatus
Periodically show Notecard sync status, returning true if
something was displayed to the debug stream.
pollFrequencyMs
int
The frequency to poll the Notecard for sync status.
maxLevel
int
The maximum log level to output to the debug console. Pass -1 for all.
Supported logging levels:
0 - Major
1 - Minor
2 - Detailed
3 - Programmatic
Notecard notecard;
...

// Poll for programmatic level (3) sync status every 1.5s (1500ms)
notecard.debugSyncStatus(1500, 3);
Returns
true if a pending response was displayed to the debug stream.
warningSpecific log messages are NOT considered to be part of the stable API, and therefore should NEVER be programmed against. There is no guarantee of consistency of message or logging level for any given message.
responseError
Determines if there is an error string present in a response object.
rsp
J * class instance pointer
A pointer to a J JSON response object.
Notecard notecard;
...

if (J *req = notecard.newRequest("card.status")) {
    J *rsp = notecard.requestAndResponse(req);
    if (notecard.responseError(rsp)) {
        notecard.logDebug("Error response returned!");
    } else {
        // process response
    }
    notecard.deleteResponse(rsp);
}
Returns
true if the response object contains an error.