Asset Tracking with GPS
One of the most common and valuable use cases for IoT is asset tracking. Whether for a vehicle, trailer, or shipping container, asset tracking is a powerful way for developers and companies to understand where an asset has been, where it is, and where it's headed—all while monitoring the conditions of the asset itself.
The Blues Starter Kit contains everything you need to build a cellular-powered asset tracker. This guide provides instructions for configuring your Notecard as a standalone asset tracker as well as a host-controlled tracker.
What You Need to Get Started
This guide provides instructions for using the Notecard as both a standalone GPS tracker, and with an MCU host. For both approaches, you'll need the following:
- A Cellular Notecard.
- A Notecarrier with either external or onboard Cellular and GPS/GNSS antennas, and battery support. The Notecarrier A includes onboard antennas and the Notecarrier F comes with an external antenna. Both provide connectors for a LiPo battery.
- A Micro USB cable.
If you're building a standalone Notecard tracker, you'll need the following:
- The Notecard CLI or the provided In-Browser Terminal for configuring the Notecard.
If you're building a host-controlled tracker, you'll need the following:
- A microcontroller or single-board computer for communicating with the Notecard. The code samples in this guide target the Feather-compatible Swan running Arduino code, but can easily be adapted for your board of choice.
- Optional: An external sensor for gathering additional information about your asset.
- A text editor for writing firmware, such as the Arduino IDE or VS Code.
Tracker Configuration Requests
To configure your Notecard as a GPS tracker, you'll need to do the following:
1) (Optional) Perform a factory restore on the Notecard.
A card.restore request will perform a factory reset on the Notecard and
clear out Notes and Notefiles from previous applications.
{
  "req": "card.restore",
  "delete": true
}J *req = NoteNewRequest("card.restore");
JAddBoolToObject(req, "delete", true);
NoteRequest(req);req = {"req": "card.restore"}
req["delete"] = True
card.Transaction(req)2) Set a Product UID, mode, and sync times with hub.set.
Setting mode to "periodic" is recommended for cases where your tracker
will need to operate on
battery power for extended periods of time. The outbound and inbound
fields specify the interval, in minutes, that the Notecard should
process outbound and inbound requests. These values also affect battery
life, so use a value that makes sense for your application's power and data
sync needs. The Notecard will only sync on the outbound interval
if un-synced tracking information is available, but will always sync on the
inbound interval in order to process new Notes and environment variables
from Notehub.
{
  "req": "hub.set",
  "product": "your-productuid",
  "mode": "periodic",
  "outbound": 60,
  "inbound": 720
}J *req = NoteNewRequest("hub.set");
JAddStringToObject(req, "product", "your-productuid");
JAddStringToObject(req, "mode", "periodic");
JAddNumberToObject(req, "outbound", 60);
JAddNumberToObject(req, "inbound", 720);
NoteRequest(req);req = {"req": "hub.set"}
req["product"] = "your-productuid"
req["mode"] = "periodic"
req["outbound"] = 60
req["inbound"] = 720
card.Transaction(req)3) Set the Notecard to use periodic or continuous location mode.
Setting mode to "periodic" is recommended for battery-powered applications, and "continuous"
for cases where low-latency location tracking is needed and power consumption is not a concern. When using
periodic, the seconds field defines the interval at which to activate
GPS and capture a location sample. Note: When in periodic mode,
the GPS module will only activate to take a reading if the Notecard detects
movement through its onboard accelerometer between interval periods.
{
  "req": "card.location.mode",
  "mode": "periodic",
  "seconds": 3600
}J *req = NoteNewRequest("card.location.mode");
JAddStringToObject(req, "mode", "periodic");
JAddNumberToObject(req, "seconds", 3600);
NoteRequest(req);req = {"req": "card.location.mode"}
req["mode"] = "periodic"
req["seconds"] = 3600
rsp = card.Transaction(req)-
Notecard's cellular radio and internal GPS module cannot be enabled at the same time. When building a location-aware product, be sure one or both are in
periodicmode and that you allot enough time for Notecard to switch between cellular and GPS functions, which can take 1-2 minutes depending on the strength of the cellular connection and/or the visibility of GPS satellites.Alternatively, you can use an external GPS module to enable both cellular and GPS connectivity simultaneously.
-
Notecard will not enable its internal GPS module until it has made a successful cellular connection upon startup to obtain the current time.
4) Configure the Notecard to store tracking results in a tracking file that will be synced to Notehub, and set a heartbeat to check-in even if the device has not moved.
card.location.track will store tracking-related data like
location and temperature (as well as velocity, bearing, and distance if
card.location.mode is set to mode:continuous, or mode:periodic and
seconds < 300). This data is saved in a Notefile that will be sent
to Notehub on each sync. The default file is _track.qo, but you can specify
your own name with the file field. If you anticipate that your asset may be
stationary for long periods of time, you can use heartbeat and hours to
instruct the Notecard to create a tracking entry at a defined interval,
regardless of motion. The Notecard does not switch on the GPS for heartbeats,
since no movement has occurred. However the heartbeat provides confirmation that
the Notecard tracker is still functioning correctly.
{
  "req": "card.location.track",
  "start": true,
  "heartbeat": true,
  "hours": 12
}J *req = NoteNewRequest("card.location.track");
JAddBoolToObject(req, "start", true);
JAddBoolToObject(req, "heartbeat", true);
JAddNumberToObject(req, "hours", 12);
NoteRequest(req);req = {"req": "card.location.track"}
req["start"] = True
req["heartbeat"] = True
req["hours"] = 12
rsp = card.Transaction(req)Once these requests have been sent to the Notecard, your tracker is ready to be deployed! The following two sections provide the specific steps for sending these requests for a standalone or host-controlled tracker.
To further customize your tracker, you can consult the Advanced Tracker Configuration section below.
The above commands will only work if the Notecard accelerometer is enabled. The accelerometer can be enabled with the following request if previously disabled.
{
  "req": "card.motion.mode",
  "start": true
}J *req = NoteNewRequest("card.motion.mode");
JAddBoolToObject(req, "start", true);
NoteRequest(req);req = {"req": "card.motion.mode"}
req["start"] = True
card.Transaction(req)Configure a Standalone Tracker
There are times when you simply want to track the location of your Notecard-connected asset and don't need to gather data from an external sensor, or control how and when your Notecard should track and sync after deployment. In these cases, you can configure your Notecard as a standalone tracker by issuing a few requests from a connected computer, connect a battery, and deploy it to the asset to be tracked.
The fastest way to configure the Notecard in this way is with the
Notecard CLI,
which allows you to connect to a Notecard over USB Serial and issue
requests. The requests above can be sent individually using the req or play
flag, or you can place all of the requests into a file with a json extension
and use the setup flag to send them all at once. This is a handy approach
when configuring multiple trackers for deployment.
notecard -setup configure-standalone-tracker.jsonThe Notecard will send each request in turn and output the result, like so:
{"req":"card.restore","delete":true}
{}

{"req":"hub.set","product":"com.veritas.delivery-fleet.tracker","mode":"periodic","outbound":60,"inbound":720}
{}

{"req":"card.location.mode","seconds":3600,"mode":"periodic"}
{"seconds":3600,"mode":"periodic"}

{"req":"card.location.track","start":true,"heartbeat":true,"hours":12}
{"start":true,"hours":12,"heartbeat":true}
Once these requests complete, your Notecard will self-provision with Notehub and start tracking location and movement.
Configure a Host-Controlled Tracker
If your application needs to capture and sync additional location-tagged data during tracking, or you wish to control tracking modes and intervals at runtime, you can build a host-controlled tracker. In this scenario, Notecard receives the same requests as above, with the difference being that these requests are sent from a host MCU and can be adjusted by that host depending on the needs of your application.
When host-controlled, you'll configure the tracker in firmware after boot, and before entering the application loop. For instance, the following Arduino program applies the necessary configuration requests to establish a Notecard for tracking.
Although this section uses Arduino-based firmware, you can perform these same requests with any of Notecard's other firmware libraries, including its SDKs for C, Go, Python, or Zephyr.
#include <Arduino.h>
#include <Notecard.h>

#define serialDebug Serial
#define productUID "com.your-company.your-name:your_product"

Notecard notecard;

void setup() {
  // Wait for the serial port to become available
  static const size_t MAX_SERIAL_WAIT_MS = 5000;
  size_t begin_serial_wait_ms = ::millis();
  while (!serialDebug && (MAX_SERIAL_WAIT_MS > (::millis() - begin_serial_wait_ms)));
  serialDebug.begin(115200);

  notecard.setDebugOutputStream(serialDebug);
  notecard.begin();

  J *req = notecard.newRequest("hub.set");
  JAddStringToObject(req, "product", productUID);
  JAddStringToObject(req, "mode", "periodic");
  JAddNumberToObject(req, "outbound", 60);
  JAddNumberToObject(req, "inbound", 720);
  notecard.sendRequest(req);

  req = notecard.newRequest("card.location.mode");
  JAddStringToObject(req, "mode", "periodic");
  JAddNumberToObject(req, "seconds", 600);
  notecard.sendRequest(req);

  req = notecard.newRequest("card.location.track");
  JAddBoolToObject(req, "start", true);
  JAddBoolToObject(req, "heartbeat", true);
  JAddNumberToObject(req, "hours", 12);
  notecard.sendRequest(req);
}
From there, your application loop can capture sensor readings and add
them as location-tagged Notes. The following Arduino loop() function
demonstrates how to create a new Note every 15 minutes. While the example
uses mock data, in a real application you would replace these values with
data from your own sensors or application logic.
void loop() {
  J *req = notecard.newRequest("note.add");
  if (req != NULL) {
    JAddStringToObject(req, "file", "sensors.qo");

    J *body = JCreateObject();
    if (body != NULL) {
      JAddStringToObject(body, "test_string", "value");
      JAddNumberToObject(body, "test_number", 123);
      JAddBoolToObject(body, "test_boolean", true);
      JAddItemToObject(req, "body", body);
    }

    notecard.sendRequest(req);
  }

  // Wait 15 minutes before capturing the next reading (15 * 60 * 1000 ms)
  delay(900000);
}
Once the application firmware has been deployed to your device and tested, you can add a battery to your project and deploy it to your asset.
A host-controlled tracker has the added benefit of allowing you to adjust
Notecard tracking settings in response to sensor readings or certain external
conditions. For instance, you can change the mode or increase reading interval
when the asset is in motion, and decrease it when the asset is idle for a
period of time.
To further customize your tracker, you can consult the Advanced Tracker Configuration section below.
Viewing Tracker Data
Once your tracker is deployed and the Notecard is provisioned,
it will synchronize tracking data in accordance with the configuration
settings you specified. Upon synchronization, you will be able to view your data in Notehub.io. For
both types, tracking entries will show up as Notes from the
_track.qo Notefile (or the Notefile name
you specified).
![]()
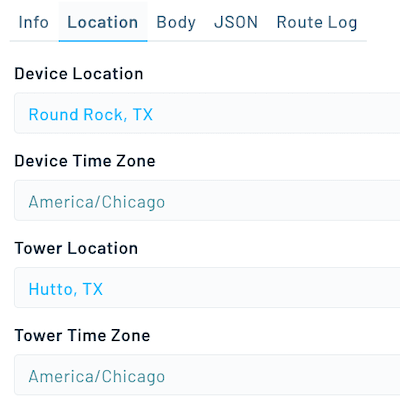
If you open an individual Note, you can view the Device location and Time Zone under the location tab.
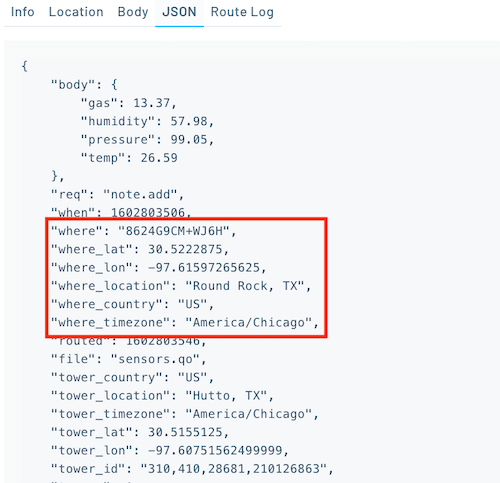
In the JSON tab, you can see tracking data like bearing, distance and
velocity in the Note body (which appear if the card.location.mode is set to
mode:continuous, or mode:periodic and seconds < 300), as well as the
location fields, all of which begin with where and are available whenever a
GPS location is acquired.
![]()
If you're using a host-controlled tracker and sending sensor readings in a
Notefile, each Note is also tagged with the same where fields as tracking Notes.
Routing Tracker Data to Third-Party Services
Once your tracker is deployed and is synching to Notehub, you can use Routes to send tracker data to any third-party service (including your own custom endpoint) for additional processing and visualization. Notehub Routes can be configured to connect to any external service. Routes also give you the ability to send everything from all your Notecards, targeted fleets, or even Notefiles, and to transform event data before you route it to an external service.
For example, if you wanted to
create a Route to send only the data you need from a _track.qo Note to an
external service, you could use a JSONata transformation like this:
{
  "location": {
    "where": where,
    "latitude": where_lat,
    "longitude": where_lon,
    "location": where_location,
    "country": where_country,
    "time_zone": where_timezone
  },
  "motion": {
    "bearing": body.bearing,
    "distance": body.distance,
    "seconds": body.seconds,
    "velocity": body.velocity
  },
  "captured_time": when,
  "sync_time": routed
}
JSONata is a powerful data-transformation language built into Notehub, and you can learn more about it in our Using JSONata to Transform JSON guide and learn about the process of creating third-party Routes in the Route Tutorials.
Advanced Tracker Configurations
The Notecard API commands provided above allow you to configure a basic asset tracker with settings applicable to the most common tracking scenarios. However, your scenario may be unique, which is why diving into the Notecard APIs can reveal additional customizations to optimize your trackers.
Fine-Grained Location Tracking
Use the
card.location.mode API
and its seconds argument to control how often the device samples its GPS
location. Keep in mind that the Notecard cannot sample updated GPS data more
frequently than once every 5 seconds. If you require both frequent location
sampling and frequent cellular syncs, you should use an
external GPS module.
{
  "req": "card.location.mode",
  "mode": "continuous",
  "seconds": 5
}J *req = NoteNewRequest("card.location.mode");
JAddStringToObject(req, "mode", "continuous");
JAddNumberToObject(req, "seconds", 5);
NoteRequest(req);req = {"req": "card.location.mode"}
req["mode"] = "continuous"
req["seconds"] = 5
rsp = card.Transaction(req)Changing Accelerometer Sensitivity
When in periodic mode, the Notecard will only attempt to sample its GPS
location when the onboard accelerometer has detected motion. You can increase
the sensitivity of the accelerometer with the
card.motion.mode
API and its sensitivity parameter:
{
  "req": "card.motion.mode",
  "sensitivity": 2
}J *req = NoteNewRequest("card.motion.mode");
JAddNumberToObject(req, "sensitivity", 2);
NoteRequest(req);req = {"req": "card.motion.mode"}
req["sensitivity"] = 2
card.Transaction(req)Attempt to Sync Data Immediately
In order to save battery life, the Notecard will only attempt to sync
accumulated tracking data on the intervals provided in the outbound parameter
of your hub.set request. However, if you would like to attempt to sync data
with Notehub immediately, you can set the "sync":true parameter of the
card.location.track
API:
{
  "req": "card.location.track",
  "sync": true
}J *req = NoteNewRequest("card.location.track");
JAddBoolToObject(req, "sync", true);
NoteRequest(req);req = {"req": "card.location.track"}
req["sync"] = True
rsp = card.Transaction(req)Continuous Cellular & Continuous GPS
The Notecard does not support running both a continuous
cellular connection ({"req":"hub.set", "mode":"continuous"}) and continuous
GPS. If you attempt to set both cellular and GPS to continuous mode, the
Notecard will return an error. This applies both to card.location.mode
when the cellular connection is continuous, as well as hub.set if GPS has
been set in continuous mode.
{"err": "cannot simultaneously use continuous card.location.mode and hub.set modes"}If concurrent use of cellular and GPS is required in your solution, we recommend usage of an external GPS module.
Battery Optimization
Since asset trackers are often in the field for extended periods of time, it is
generally wise to optimize battery consumption. By using the
card.voltage API's mode
parameter, you can specify the type of battery being used:
{
  "req": "card.voltage",
  "mode": "lipo"
}J *req = NoteNewRequest("card.voltage");
JAddStringToObject(req, "mode", "lipo");
NoteRequest(req);req = {"req": "card.voltage"}
req["mode"] = "lipo"
rsp = card.Transaction(req)The mode value is subsequently used in both the hub.set and
card.location.track calls to specify the frequency at which outbound, inbound,
and GPS location sampling should occur (i.e. you want the device to make these
calls less frequently as battery voltage decreases).
To set the frequency of syncing outbound data with Notehub:
{
  "req": "hub.set",
  "voutbound": "usb:30;high:60;normal:120;low:240;dead:0",
  "vinbound": "usb:30;high:360;normal:720;low:1440;dead:0"
}J *req = NoteNewRequest("hub.set");
JAddStringToObject(req, "voutbound", "usb:30;high:60;normal:120;low:240;dead:0");
JAddStringToObject(req, "vinbound", "usb:30;high:360;normal:720;low:1440;dead:0");
NoteRequest(req);req = {"req": "hub.set"}
req["voutbound"] = "usb:30;high:60;normal:120;low:240;dead:0"
req["vinbound"] = "usb:30;high:360;normal:720;low:1440;dead:0"
card.Transaction(req)To set the frequency of gathering GPS location data:
{
  "req": "card.location.mode",
  "mode": "periodic",
  "vseconds": "usb:1800;high:3600;normal:7200;low:43200;dead:0"
}J *req = NoteNewRequest("card.location.mode");
JAddStringToObject(req, "mode", "periodic");
JAddStringToObject(req, "vseconds", "usb:1800;high:3600;normal:7200;low:43200;dead:0");
NoteRequest(req);req = {"req": "card.location.mode"}
req["mode"] = "periodic"
req["vseconds"] = "usb:1800;high:3600;normal:7200;low:43200;dead:0"
rsp = card.Transaction(req)The Low Power Design guide dives into additional configuration options that can be used to optimize power consumption on the Notecard.
Wake Host or Send Note on Motion Status Change
When building a power-conscious tracking solution, you may want to put the host to sleep when the asset is not moving. You may also want to send a Note when the asset stops, then starts moving again. As of Notecard firmware v6.1.1, this is now possible using a combination of the card.motion.mode, card.attn, and card.motion APIs.
Start by configuring card.motion.mode to monitor motion in, for example, 60
second buckets/groups of motion events. Using the motion argument, you can
then specify how many motion events (in this example it's >= 10) within that
60 second period will trigger a "moving" status change (versus "stopped" if
it's < 10 motion events). You can optionally change the sensitivity argument
so the Notecard is more sensitive to detecting all motion.
if (J *req = notecard.newRequest("card.motion.mode"))
{
    JAddNumberToObject(req, "seconds", 60);
    JAddNumberToObject(req, "motion", 10);
    JAddNumberToObject(req, "sensitivity", 3);
    notecard.sendRequestWithRetry(req, 5);
}
Next, if you want to put your host to sleep and wake it up when the Notecard
changes motion state, use a card.attn request to cause the ATTN pin to fire
whenever the mode field returned by card.motion changes from "moving" to "stopped" (or
vice versa).
if (J *cmd = notecard.newCommand("card.attn"))
{
    JAddStringToObject(cmd, "mode", "arm,motionchange,sleep");
    JAddNumberToObject(cmd, "seconds", sleepTime); // sleepTime could be, say 1 hour.
    notecard.sendRequest(cmd);
}
Last, use a card.motion request to detect whether the current state of the
Notecard is "moving" or "stopped". If your host doesn't need to be powered
off, you could periodically poll on this request to see if there has been a
change of state (e.g. "moving" -> "stopped" or "stopped" -> "moving").
bool moving = false;
if (J *rsp = notecard.requestAndResponse(notecard.newRequest("card.motion")))
{
    const char *mode = JGetString(rsp, "mode");
    // strcmp returns 0 when the strings match
    moving = (mode && strcmp(mode, "moving") == 0);
    NoteDeleteResponse(rsp);
}
Advanced Logging
When prototyping an asset tracking solution, it may be useful to gather as much
data about the device as possible in the field. To do so, you can set the _log
environment variable
to all. Note that this will use additional cellular data on your Notecard due
to the extensive log data sent to Notehub.
{
  "req": "env.default",
  "name": "_log",
  "text": "all"
}J *req = NoteNewRequest("env.default");
JAddStringToObject(req, "name", "_log");
JAddStringToObject(req, "text", "all");
NoteRequest(req);req = {"req": "env.default"}
req["name"] = "_log"
req["text"] = "all"
card.Transaction(req)Taking an Immediate Reading
For some projects you may want a tracker to take an immediate GPS/GNSS reading. For example, your firmware may need to send an SOS with an immediate, accurate location.
To take an immediate reading you must be using a host microcontroller or single-board computer to control your Notecard. Once you have that in place, complete the following steps.
1) Store the time value from the last location reading
The Notecard stores its last-known location so that you can retrieve it with a
card.location request.
{
  "req": "card.location"
}J *req = NoteNewRequest("card.location");
NoteRequest(req);req = {"req": "card.location"}
rsp = card.Transaction(req)The JSON response returns a time:
{
 "status": "GPS updated (478 sec, 27/33 dB SNR, 4/7 sats, HDOP 1) {gps-active} {gps-signal} {gps-sats} {gps}",
 "mode": "continuous",
 "lat": 43.96320156666668,
 "lon": -83.24814393333334,
 "time": 1657306363,
 "threshold": 1
}
As a first step, you need to store the time value that comes back from this
request on your host.
Here's an example of how you can do that on an Arduino-based host using the Notecard Arduino library.
size_t gps_time_s;

{
  J *rsp = notecard.requestAndResponse(notecard.newRequest("card.location"));
  gps_time_s = JGetInt(rsp, "time");
  NoteDeleteResponse(rsp);
}
2) Turn on continuous GPS/GNSS mode
Now that you have the time from the previous location reading, you need to
force the Notecard to take a new GPS/GNSS reading as quickly as possible. The
fastest way to do that is to set the Notecard's location mode to
"continuous".
{
  "req": "card.location.mode",
  "mode": "continuous"
}J *req = NoteNewRequest("card.location.mode");
JAddStringToObject(req, "mode", "continuous");
NoteRequest(req);req = {"req": "card.location.mode"}
req["mode"] = "continuous"
rsp = card.Transaction(req)3) Wait for the reading
Once in continuous mode, the Notecard will immediately start taking a GPS/GNSS reading. However, readings are not instantaneous, and may take some time depending on the quality of your antenna and line-of-sight to the outdoor sky.
The best way to wait for a response is to make a card.location request in a
loop, waiting for valid location data.
{
  "req": "card.location"
}J *req = NoteNewRequest("card.location");
NoteRequest(req);req = {"req": "card.location"}
rsp = card.Transaction(req)At first the card.location request will return status information in the
response.
{
 "status": "GPS search (201 sec, 34/34 dB SNR, 0/1 sats, HDOP 0) {gps-active} {gps-signal} {gps-sats}",
 "mode": "continuous"
}
Once the Notecard completes the reading, the card.location request will
include the captured latitude and longitude, as well as the time of the location
capture.
{
 "status": "GPS updated (478 sec, 27/33 dB SNR, 4/7 sats, HDOP 1) {gps-active} {gps-signal} {gps-sats} {gps}",
 "mode": "continuous",
 "lat": 43.96320156666668,
 "lon": -83.24814393333334,
 "time": 1657306363,
 "threshold": 1
}
The easiest way to implement this on a host is to compare the card.location
request's time to the time value you saved earlier — and when the values are
different you know you have a new reading.
Here's how you might do that on an Arduino-based host.
// Block while waiting for a GPS/GNSS location
for (;;)
{
  // Get the latest location
  J *rsp = notecard.requestAndResponse(notecard.newRequest("card.location"));

  // See if the location has changed from the previous reading
  if (JGetInt(rsp, "time") != gps_time_s)
  {
    // If you get in here, you have a new reading.
    double lat = JGetNumber(rsp, "lat");
    double lon = JGetNumber(rsp, "lon");
    // This is where you'd place your application-specific code to use the
    // new coordinates.
    NoteDeleteResponse(rsp);
    break;
  }
  NoteDeleteResponse(rsp);

  // Wait 2 seconds before trying again
  delay(2000);
}
If your tracker is in a location where getting a GPS/GNSS signal is impossible, the code above may loop endlessly, draining your tracker's battery. Therefore, you may wish to add a termination condition to the loop after a given number of attempts.
The Arduino code below introduces a timeout, and also looks for a stop flag —
which the card.location request returns if it cannot locate a GPS/GNSS signal.
// How many seconds to wait for a location before you stop looking
size_t timeout_s = 300;

// Block while waiting for a GPS/GNSS location
for (const size_t start_ms = ::millis();;)
{
  // Check for a timeout, and if enough time has passed, break out of the loop
  // to avoid looping forever
  if (::millis() >= (start_ms + (timeout_s * 1000)))
  {
    break;
  }

  // Get the latest location
  J *rsp = notecard.requestAndResponse(notecard.newRequest("card.location"));

  // See if the location has changed from the previous reading
  if (JGetInt(rsp, "time") != gps_time_s)
  {
    // If you get in here, you have a new reading.
    double lat = JGetNumber(rsp, "lat");
    double lon = JGetNumber(rsp, "lon");
    // This is where you'd place your application-specific code to use the
    // new coordinates.
    NoteDeleteResponse(rsp);
    break;
  }

  // If a "stop" field is on the card.location response, it means the Notecard
  // cannot locate a GPS/GNSS signal, so we break out of the loop to avoid looping
  // endlessly
  if (JGetObjectItem(rsp, "stop"))
  {
    NoteDeleteResponse(rsp);
    break;
  }

  NoteDeleteResponse(rsp);
  // Wait 2 seconds before trying again
  delay(2000);
}
4) Restore your GPS/GNSS configuration
Once you have your reading, you will likely want to restore your tracker's
initial location mode through a card.location.mode request, as remaining in
continuous mode uses a considerable amount of battery.
{
  "req": "card.location.mode",
  "mode": "periodic"
}J *req = NoteNewRequest("card.location.mode");
JAddStringToObject(req, "mode", "periodic");
NoteRequest(req);req = {"req": "card.location.mode"}
req["mode"] = "periodic"
rsp = card.Transaction(req)The card.location.mode request remembers the arguments you passed in previous
calls. Therefore, you don't need to pass arguments such as seconds if you
provided them in a previous call to card.location.mode.