Writing Host Firmware
CircuitPython and Adafruit Feather M4 Express
In previous tutorials, you used the In-Browser Terminal to communicate with your Notecard and sent hardcoded data to and from the Notehub.
In real-world applications, most connected products are driven by a host: a microcontroller (MCU) or single-board computer (SBC) that reads sensors, runs application logic, and controls the product’s behavior. In Notecard-based projects, the host communicates with Notecard over I2C or UART, typically using one of our official SDKs.
In this tutorial, you’ll learn how to write host firmware that communicates with Notecard, collects data, and sends that data to Notehub.
Versions of this guide are available for several popular languages and host platforms. Use the dropdowns below to explore the options. And if you want to communicate with Notecard using a language or environment not covered by this guide, see our Firmware Libraries page for the official Notecard SDKs for Arduino, C, ESP-IDF, Go, Python, and Zephyr.
Don't see your favorite hardware here? Rest assured the Notecard works with virtually every MCU and SBC available. If you can't figure out how to complete this tutorial let us know in our forum and we can help you out.
Introduction
This tutorial should take approximately 40-50 minutes to complete.
In this tutorial, you'll learn how to use CircuitPython to write firmware that runs on a Adafruit Feather M4 Express. Specifically, your firmware will collect temperature and humidity data at an interval, queue it on your Notecard, and synchronize it to Blues Notehub.
This tutorial uses a library that provides mock sensor readings for simplicity, but feel free to hook up a physical sensor of your choice and use that instead. The goal of this tutorial is to demonstrate reusable firmware techniques you can apply to your own Notecard-based projects.
 AI Tip
Throughout this guide we’ll share tips for writing host firmware with AI, which we recommend. Look for these boxes for AI-specific guidance and prompts you can use with your LLM of choice.
Setup
Make sure you've met the following hardware and software requirements before continuing.
Hardware
To complete this guide, you'll need the following hardware.
- Any CircuitPython-capable Microcontroller (MCU) with Feather headers. We'll be using the Adafruit Feather M4 Express, but any MCU that can run CircuitPython will do.
-
A Notecard wired to your Adafruit Feather M4 Express. If you haven't done this yet, see the Host Wiring Guide.
-
Micro USB to USB-A cable.
 note
noteFor this tutorial, you'll be powering the Notecard through the Micro USB connection of your Adafruit Feather M4 Express. Some Feather-compatible devices cannot handle 2 Amp pulses from the Notecard when connected to GSM, so if you experience resets or other power-related issues, we suggest powering your Notecard separately through the USB or LiPo connector on your Notecarrier.
Software
You'll also need the following software.
-
CircuitPython. A CircuitPython bootloader and binary flashed to your Adafruit Feather M4 Express, so that it shows up as a
CIRCUITPYdrive. See Adafruit's Installing CircuitPython guide, and be sure to update to the latest CircuitPython for the Feather M4 Express. -
An editor. A text editor or IDE that works well with CircuitPython, such as Mu, Thonny, or VS Code with the CircuitPython extension.
Create a Notehub Project
Now that your hardware is ready, let's create a new Notehub project for this tutorial.
-
Navigate to Notehub and log in.
-
Click the Create Project button.
-
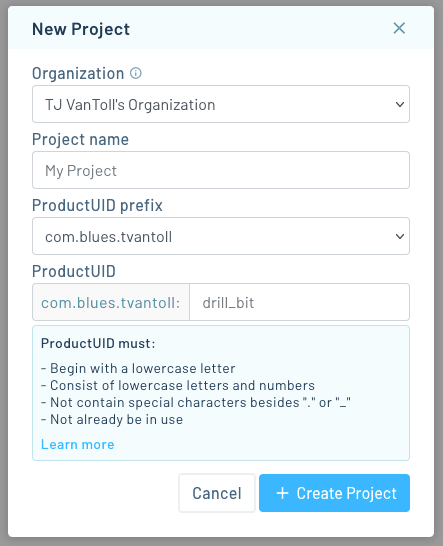
In the New Project dialog, give your project a name and ProductUID.
 note
noteThe ProductUID must be globally unique, so we recommend a namespaced name like
"com.your-company.your-name:your_product". -
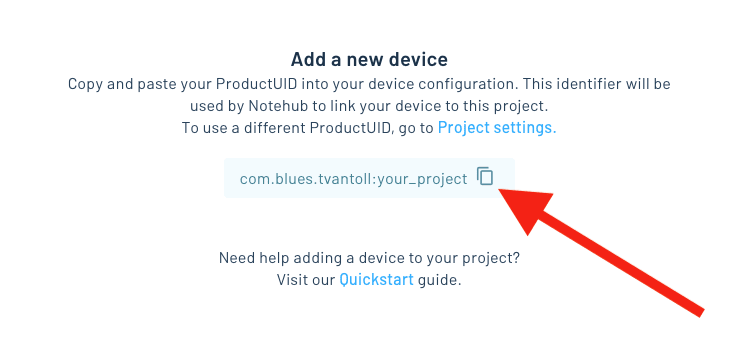
Take note of your ProductUID. This identifier is used by Notehub to associate your Notecard with your project.
Write Firmware
Now you're ready to write some firmware. When communicating with the Notecard,
you can manually send requests using the Serial write function and passing-in
JSON objects, or use the note-python library (the recommended path).
noteThe rest of this tutorial assumes you have already burned the bootloader and flashed the CircuitPython binary to your MCU.
If you haven't, please consult Adafruit's guide for Installing CircuitPython.
Configure your Notecard
Install the Notecard Python Library
-
To use the
note-pythonlibrary, you'll first need to download or clone it from the GitHub repo.
-
Unzip the archive and copy the
notecarddirectory into thelibdirectory of yourCIRCUITPYmount.
-
Add an
importfor the library at the top of yourcode.pyfile.import notecard
Set up Your Notecard
-
Add some additional imports to the top of your
code.pyfile:import board import busio import time -
Add a definition for your ProductUID using the value you specified when creating your Notehub project.
productUID = "com.your-company.your-name:your_product" -
Initialize the connection to your Notecard. Select the tab matching the interface you wired up in the Host Wiring Guide.
port = busio.I2C(board.SCL, board.SDA) card = notecard.OpenI2C(port, 0, 0, debug=True)serial = busio.UART(board.TX, board.RX, baudrate=9600) card = notecard.OpenSerial(serial, debug=True) -
Now, we'll configure the Notecard. Using the
hub.setrequest, we associate this Notecard with the ProductUID of your project and set the Notecard to operate incontinuousmode, which indicates that the device should immediately make a connection to Notehub and keep it active.req = {"req": "hub.set"} req["product"] = productUID req["mode"] = "continuous" rsp = card.Transaction(req)The lines above build up a JSON object by adding two string values for product and mode, and then fire the request off to the Notecard with the
Transactionfunction.
-
Save the
code.pyfile to flash this code to your device. -
Using your IDE or tool of choice, open a Serial monitor to your CircuitPython device. If everything has been connected and configured properly, you'll see a few debug messages, including the JSON object you sent, as well as the response from the Notecard:
{}.
Read from the Sensor
Now that you've configured your MCU to communicate with the Notecard, let's grab
some pseudo sensor readings, where the temperature comes from the onboard
temperature sensor of the Notecard and the humidity is a random number.
noteIf you have your own sensor, feel free to hook it up and use your own values instead of this tutorial's mocked ones.
-
To generate pseudo sensor readings you'll use the
notecard-pseudo-sensorlibrary. Start by downloading or cloning the library from its GitHub repo.
-
Next, unzip the archive and copy the
notecard_pseudo_sensordirectory into thelibdirectory of theCIRCUITPYmount.
-
Add an import for the library at the top of your
code.pyfile.import notecard_pseudo_sensor -
Configure the pseudo sensor with a reference to the Notecard you created earlier.
sensor = notecard_pseudo_sensor.NotecardPseudoSensor(card) -
Add the following code block to the bottom of your
code.pyfile. This takes a mock temperature and humidity reading before sleeping for 15 seconds and repeating the process.while True: temp = sensor.temp() humidity = sensor.humidity() print("\nTemperature: %0.1f C" % temp) print("Humidity: %0.1f %%" % humidity) time.sleep(15)
-
Save
code.pyand reopen the Serial monitor. Every 15 seconds, you'll see new readings.
Send Sensor Readings to the Notecard
Now that we're getting sensor readings, let's send these to our Notecard.
-
To send a sensor reading to the Notecard, we'll need to construct a new JSON request to the
note.addAPI that includes a new Notefile name (sensors.qo), sets thesyncfield to true to instruct the Notecard to sync to Notehub immediately, and finally, sets thebodyto the sensor temperature and humidity. Add the following in thewhileloop right after theprintcommands used to print out readings.req = {"req": "note.add"} req["file"] = "sensors.qo" req["sync"] = True req["body"] = { "temp": temp, "humidity": humidity} rsp = card.Transaction(req) print(rsp)
-
Save this code to your device. After restart, the Serial monitor will update to display the response from the
note.addrequest (the total number of Notes in the Notefile) each time you add a new reading.
noteIf you're using a Notecard for LoRa, you must define a template for the
sensors.qo Notefile before adding Notes to it. Add the following before your
while True loop.
req = {"req": "note.template"}
req["file"] = "sensors.qo"
req["port"] = 1
req["format"] = "compact"
req["body"] = {"temp": 14.1, "humidity": 14.1}
card.Transaction(req)
Learn more in Working with Note Templates.
View Data in Notehub
Once you start capturing readings, your Notecard will initiate a connection to Notehub and will start transferring Notes. Depending on signal strength and coverage in your area, it may take a few minutes for your Notecard to connect to Notehub and transfer data.
-
Return to Notehub and open your project. You should see your Notecard in the Devices view.
 note
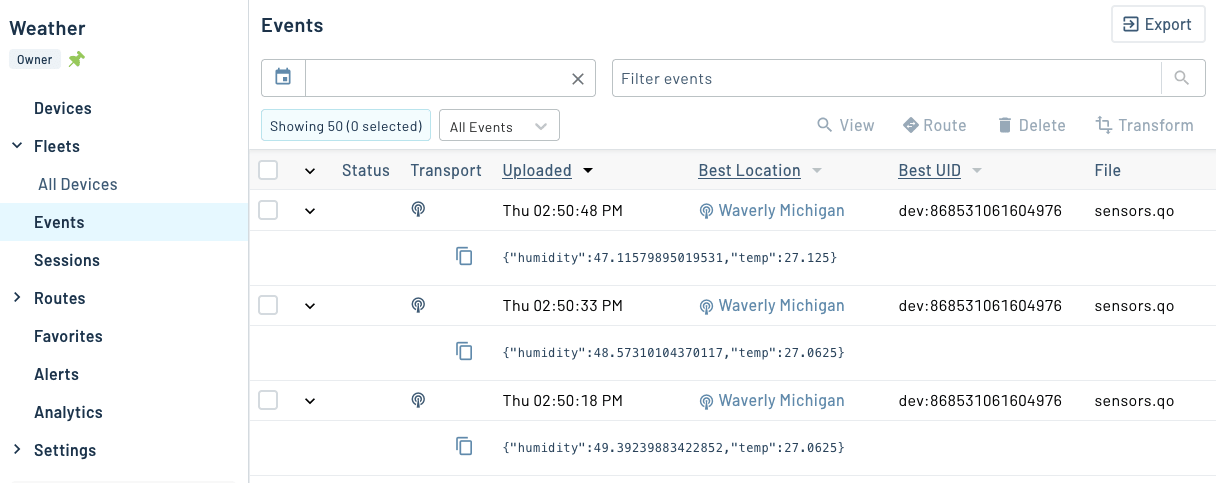
noteEach Notecard has a factory-assigned, globally unique identifier known as a DeviceUID. Notehub uses this identifier in the Devices view by default (for example,
dev:868531061604976in the screenshot above).If you’d prefer to use your own identifier—such as a human-readable name or an internal ID—you can assign a serial number to your Notecard in one of the following ways:
- In Notehub: Double-click your device in the Devices view to open its details, where you can edit the serial number.
- Via the Notehub API: Set the reserved
_snenvironment variable using the Set Device Environment Variables endpoint. - Via the Notecard API: Include an
snargument in the hub.set request you used to configure your Notecard.
-
Now, click on the Events left menu item. Once your sensor Notes start syncing, they'll show up here. You may need to refresh the page to see newly synced Notes.
Use Environment Variables
Environment variables are a Notehub state and settings management feature that allows you to set variables in key-value pairs, and intelligently synchronize those values across devices and fleets of devices.
In this section you'll learn how environment variables work by creating a variable that determines how often your firmware should take sensor readings.
Using Environment Variables in Firmware
The Notecard provides a set of requests for working with environment variables.
The most common of these requests is env.get,
which allows you to retrieve the value of an environment variable.
Complete the steps below to use the env.get request to retrieve and use the
reading_interval environment variable.
AI TipSet my Notecard to use an inbound interval of 5 minutes. Read a new
environment variable named reading_interval, and use that to determine
how many seconds the firmware should wait between sensor readings.
-
First, adjust your existing
hub.setconfiguration to set theinboundargument to5. This tells your Notecard to look for inbound changes from Notehub every 5 minutes.req = {"req": "hub.set"} req["product"] = productUID req["mode"] = "continuous" req["inbound"] = 5 # add this line rsp = card.Transaction(req) -
Next, place the following new function before the existing
while Trueloop.# This function assumes you’ll set the reading_interval environment variable to # a positive integer. If the variable is not set, set to 0, or set to an invalid # type, this function returns a default value of 60. def get_sensor_interval(): sensor_interval_seconds = 60 req = {"req": "env.get"} req["name"] = "reading_interval" rsp = card.Transaction(req) try: reading_interval = int(rsp.get("text", "")) if reading_interval > 0: sensor_interval_seconds = reading_interval except (AttributeError, TypeError, ValueError): pass return sensor_interval_seconds -
Finally, find the existing
time.sleep(15)line in yourwhile Trueloop, and replace it with the code below.sensor_interval_seconds = get_sensor_interval() print(f"Delaying {sensor_interval_seconds} seconds") time.sleep(sensor_interval_seconds)noteNotecard for LoRa requires a template for each environment variable you use. If you're using a Notecard for LoRa to complete this tutorial, add the code below alongside your other Notecard configuration (before your
while Trueloop) to provide a template for thereading_intervalvariable.req = {"req": "env.template"} req["body"] = {"reading_interval": 21} card.Transaction(req)Here
21is the type hint for a 1-byte unsigned integer (0–255). If yourreading_intervalmay exceed 255, use22(a 2-byte unsigned integer) instead.
Your firmware now uses the reading_interval environment variable to determine how
many seconds to delay in between sensor readings.
If you save this code, after restart you should see your device using
the default reading_interval value of 60 seconds.
Setting an Environment Variable
Now that we have our device programmed to retrieve an environment variable from Notehub, we will create that variable. Environment variables can be set in the Notehub UI or through the Notehub API. In this tutorial you'll learn how to set the values through the Notehub UI. If you'd like to instead set environment variables through the Notehub API, see the Set Device Environment Variables endpoint.
-
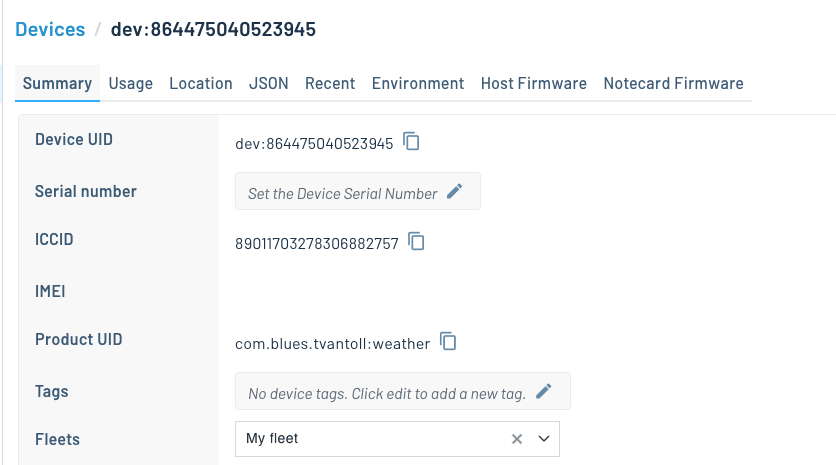
Return to your Notehub project, go to the Devices page, and double-click your device. You should see a screen that looks like this.
-
Click the Environment tab.
-
In the Device section, define a new environment variable named
reading_intervaland set its value to30.
Now that you have an environment variable set, you'll see it reflected on your device
after your configured inbound interval has passed.

noteOn cellular and WiFi-based Notecards you can use the
hub.set request's
sync argument to immediately receive inbound updates instead of relying on the
inbound interval.
And with that, you've used your first environment variable on your Notecard!
To see the real power of environment variables in action, try returning to Notehub
and updating your device's reading_interval with your serial monitor open.
Update Your hub.set Configuration
Throughout this tutorial, you've used several configuration settings that are typically only appropriate for a Notecard running on mains power.
-
In the
hub.setrequest, settingmodeto"continuous"tells the Notecard to maintain an active network connection. -
In the
note.addrequest, settingsynctotruetells the Notecard to immediately synchronize all outbound Notes to Notehub.
Because each of these settings causes the Notecard to use more power, you may wish to disable them if you plan to transition your project to battery power. The requests below show a more typical setup for a battery-powered Notecard.
Start with hub.set. Setting mode to "periodic" tells the Notecard to
connect on a schedule rather than holding a connection open, and the
outbound and inbound intervals control how many minutes it waits before
syncing in each direction.
{
  "req": "hub.set",
  "mode": "periodic",
  "outbound": 60,
  "inbound": 360
}
Then set sync to false on your note.add requests, so each reading waits
for the next scheduled sync instead of triggering one of its own.
{
"req": "note.add",
"file": "sensors.qo",
"sync": false,
"body": { "temp": 22.5, "humidity": 41.2 }
} tip
tip-
For a deeper look at how the
hub.setrequest’s settings work together, watch An In-Depth Guide to Notecard’s hub.set Request. The video steps through complete configuration scenarios that show how your choice ofmode,outbound,inbound, andsyncvalues determines exactly when your Notecard connects and syncs with Notehub. -
For other recommendations when building low-power friendly firmware, see Low-Power Firmware Design.
AI TipLLMs can also help you get your configuration right.
Review the Blues recommendations for the hub.set request at
https://dev.blues.io/notecard/notecard-walkthrough/essential-requests/#notehub-configuration-hub-set.
Then help me get my own hub.set configuration right in my firmware based on
what you know about my project. Ask me questions to gather more information as
necessary.
Next Steps
Congratulations! You've successfully connected your Adafruit Feather M4 Express to your Notecard and built a basic IoT project.
If you're following a Cell+WiFi Quickstart, next we recommend learning how to send (and visualize) your data in a cloud application:
Use Notecard to Send DataWire Notecard to Your HostBuild Your First IoT App With Blues- Send Data to Your Cloud
At any time, if you find yourself stuck, please reach out on the community forum.
