Using a Serial Terminal with Notecard
Every Notecard interface speaks the same protocol: newline-delimited JSON
requests in, newline-delimited JSON responses out. That means any serial
terminal application can act as a development and debugging tool for Notecard
with no firmware, host MCU, or library required. You type a
Notecard API request, press Enter, and read
the response.
There are three ways to talk to a Notecard from your computer:
- The In-Browser Terminal, which needs no installation but requires a browser that supports the Web Serial API.
- The Notecard CLI, a command-line utility.
- A serial terminal application, which is what this guide covers.
 tip
tipIf you're just getting started, try the In-Browser Terminal
first as it requires no setup at all. Try a serial terminal app when you need to
capture a long-running log to a file, when your Notecard is connected over
AUX RX/AUX TX rather than USB, or when you're using a browser without Web
Serial support (e.g. Safari).
Table of Contents
- Choosing a Terminal App
- Baseline Serial Port Settings
- Setting Up CoolTerm
- Setting Up Tera Term
- Using Other Terminal Apps
- Capturing a Log
Choosing a Terminal App
Any serial terminal application that can send a line of text and display the response will work with Notecard. The table below lists the applications most commonly used by Blues customers, and the platforms each one supports.
| Application | macOS | Windows | Linux |
|---|---|---|---|
| CoolTerm | ✅ | ✅ | ✅ |
| Tera Term | — | ✅ | — |
| PuTTY | — | ✅ | ✅ |
screen | ✅ | — | ✅ |
| minicom | — | — | ✅ |
| GTKTerm | — | — | ✅ |
| Arduino Serial Monitor | ✅ | ✅ | ✅ |
This guide walks through CoolTerm and Tera Term in detail, and provides the essential settings for the rest. If you have no existing preference, CoolTerm is a good default: it runs on all three platforms, so the same instructions apply to your whole team.
 note
noteNo driver installation is required to communicate with a Notecard over USB. The USB interface appears to your computer as a standard USB 2.0 Full Speed CDC device, which Linux, Windows, and macOS all support natively.
Baseline Serial Port Settings
Before configuring your terminal application, you need to know two things: which serial port your Notecard is attached to, and which settings that port expects.
Identifying the Serial Port
Connect your Notecard to your computer, then locate the port it enumerated as.
- macOS — run
ls /dev/tty.usbmodem*in a terminal. Notecard typically enumerates as something like/dev/tty.usbmodem14201. - Linux — run
ls /dev/ttyACM*. Notecard typically enumerates as/dev/ttyACM0. If you get a permissions error when connecting, add your user to thedialoutgroup withsudo usermod -a -G dialout $USER, then log out and back in. - Windows — open Device Manager and expand Ports (COM & LPT). Look for a
USB Serial Deviceentry and note its COM number, for exampleCOM3.
tipIf more than one port appears and it isn't obvious which is the Notecard, list the ports with the Notecard unplugged, plug it in, and list them again. The port that appears the second time is the one you want.
Port Configuration
The settings depend on which Notecard interface you've connected to.
| Connection | Baud Rate | Data Bits | Parity | Stop Bits | Flow Control |
|---|---|---|---|---|---|
| USB | Any (9600 is a safe default) | 8 | None | 1 | None |
N_RX/N_TX | 9600 | 8 | None | 1 | None |
AUX RX/AUX TX | 115200 (default) | 8 | None | 1 | None |
noteBecause the USB interface is a CDC device, the baud rate you select is ignored —
any value will connect successfully. The N_RX/N_TX interface is fixed at
9600 and will produce garbled output at any other rate.
115200 is the AUX default, not a fixed rate. A
card.aux.serial
request can change it with the rate argument, and AUX GPS mode
("mode":"gps") defaults to 9600 instead. If AUX output is garbled, confirm
the rate the Notecard is actually using before assuming 115200.
Also, the AUX RX/AUX TX interface is only enabled when AUX_EN_P (pin 56)
is pulled up to VIO. On a Notecarrier, connect the AUXEN pin to a VIO
pin. If you connect to the AUX port without doing this, you'll see no output at
all. See
Working with the Notecard AUX Pins
for details.
Line Endings
Notecard expects each request to be terminated with a newline, and emits
responses the same way. Many terminal applications send only a carriage
return (CR) when you press Enter, so the request never runs. Look for a
setting that transmits CR+LF (hex 0D 0A) when you press Enter.
Enabling local echo is also recommended, so you can see the request you typed alongside the response Notecard returns.
Setting Up CoolTerm
CoolTerm is a free serial terminal available for macOS, Windows, and Linux. Download and install it, then complete the following steps.
Configure the Serial Port
-
Click Options to open the connection settings, and select Serial Port in the left-hand list.
-
Set Port to the port your Notecard is attached to, as identified in Baseline Serial Port Settings.
-
Set Baudrate to the value for your connection:
9600for USB orN_RX/N_TX, or115200forAUX RX/AUX TX— unless the AUX rate has been changed, as described in Baseline Serial Port Settings. -
Set Data Bits to
8, Parity tonone, and Stop Bits to1. -
Leave every Flow Control checkbox unchecked.

Configure the Terminal
-
Still in Options, select Terminal in the left-hand list.
-
Set Terminal Mode to Line Mode. This gives you an edit box at the bottom of the window where you can compose a full request before sending it, rather than transmitting each keystroke as you type.
-
Set Enter Key Emulation to CR+LF, so that pressing
Enterterminates your request the way Notecard expects. -
Check Local Echo so your requests appear in the terminal window alongside Notecard's responses.
-
Click OK to save the settings.

Send a Request
Click Connect in the toolbar. Once connected, type a request into the edit box at the bottom of the terminal window and press Enter.
{"req":"card.version"}{
"version": "notecard-11.3.1.17696",
"device": "dev:351077454518609",
"name": "Blues Wireless Notecard",
"sku": "NOTE-WBGLW",
"ordering_code": "HB0YT1N0AEAU",
"board": "5.13",
"wifi": true,
"cell": true,
"gps": true,
"body": {
"org": "Blues Wireless",
"product": "Notecard",
"target": "u5",
"version": "notecard-u5-11.3.1",
"ver_major": 11,
"ver_minor": 3,
"ver_patch": 1,
"ver_build": 17696,
"built": "Jun 11 2026 16:25:45"
}
}
A response means you're connected and can issue any Notecard API request you like.
Setting Up Tera Term
Tera Term is a free terminal emulator for Windows. Download and install it, then complete the following steps.
Open the Connection
-
Select File > New connection.
-
Choose the Serial radio button, and select the COM port your Notecard is attached to from the Port dropdown.
-
Click OK.

Configure the Serial Port
-
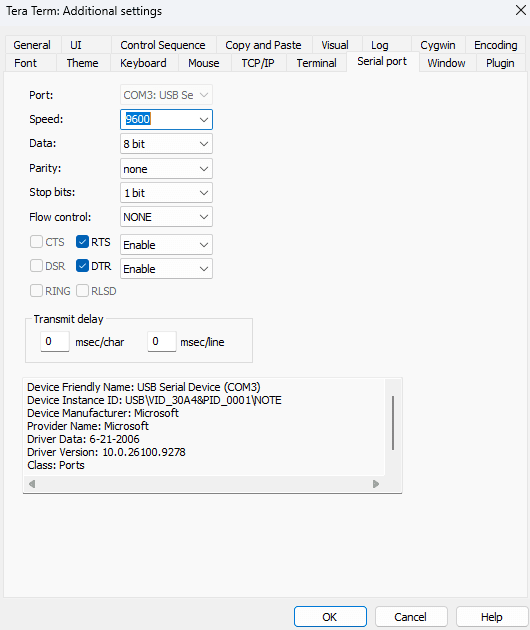
Select Setup > Serial port.
-
Apply the following settings:
Setting Value Speed 9600for USB orN_RX/N_TX,115200forAUX RX/AUX TX(see Baseline Serial Port Settings if the AUX rate has been changed)Data 8 bitParity noneStop bits 1 bitFlow control none -
Click Ok to apply.
Configure the Terminal
-
Select Setup > Terminal.
-
Set New-line Receive to
CR+LFand New-line Transmit toCR+LF. -
Check Local echo.
-
Click OK.

Send a Request
Type a Notecard API request directly into the terminal window and press Enter.
{"req":"card.version"}{
"version": "notecard-11.3.1.17696",
"device": "dev:351077454518609",
"name": "Blues Wireless Notecard",
"sku": "NOTE-WBGLW",
"ordering_code": "HB0YT1N0AEAU",
"board": "5.13",
"wifi": true,
"cell": true,
"gps": true,
"body": {
"org": "Blues Wireless",
"product": "Notecard",
"target": "u5",
"version": "notecard-u5-11.3.1",
"ver_major": 11,
"ver_minor": 3,
"ver_patch": 1,
"ver_build": 17696,
"built": "Jun 11 2026 16:25:45"
}
}
tipTera Term transmits each keystroke as you type it, so you cannot edit a request once you've started typing. If you prefer to compose requests before sending them, paste them in from a text editor, or use CoolTerm in Line Mode instead.
Using Other Terminal Apps
CoolTerm and Tera Term are the applications Blues documents most thoroughly, but any serial terminal will work. Apply the settings from Baseline Serial Port Settings to the application of your choice.
PuTTY (Windows, Linux)
In the PuTTY configuration window, select the Serial connection type, enter
your port in Serial line (for example COM3 or /dev/ttyACM0), and enter
your baud rate in Speed. Then open the Connection > Serial category and
confirm 8 data bits, 1 stop bit, None parity, and None flow control.
Under Terminal, enable Implicit CR in every LF and Local echo so that responses render on separate lines and your typed requests are visible.
screen (macOS, Linux)
screen is preinstalled on macOS and most Linux distributions, and connects
with a single command:
screen /dev/tty.usbmodem14201 9600Substitute your own port and baud rate. To exit, press Ctrl-A followed by
K, then confirm with y.
notescreen does not echo what you type and offers no line editing, so a typo means
retyping the request from the beginning. It's convenient for a quick
card.version check, but CoolTerm or minicom is a
better choice for extended debugging sessions.
minicom (Linux)
Install minicom from your distribution's package manager, then launch it with
the port and baud rate:
minicom --device /dev/ttyACM0 --baudrate 9600Press Ctrl-A then Z for the help menu, and Ctrl-A then E to turn on
local echo. To exit, press Ctrl-A then X.
Arduino Serial Monitor (macOS, Windows, Linux)
If you already have the Arduino IDE installed, its Serial Monitor works well with Notecard. Select your port from Tools > Port, open Tools > Serial Monitor, then set the line ending dropdown to Both NL & CR and the baud rate dropdown to match your connection.
Capturing a Log
When you're debugging a connectivity problem — or working with Blues support or the community forum — it's helpful to capture the terminal session to a file rather than copying text out of the scrollback. This is especially true when using trace mode, which emits a continuous stream of messages that can quickly exceed your terminal's buffer.
Capturing in CoolTerm
-
Select Connection > File Capture > Start.
-
Give the file a name and click Save.
-
Reproduce the behavior you want to capture.
-
Select Connection > File Capture > Stop when you're finished.
Capturing in Tera Term
-
Select File > Log.
-
Check Append and Plain text.
-
Give the file a name and click Save.
-
Reproduce the behavior you want to capture. Tera Term writes to the log file continuously until you select File > Stop logging.
Capturing Trace Output
To capture the most useful debugging information, start your log file first, then enable trace mode:
{"req":"card.trace","mode":"on"}Perform the actions you want to debug — for example a hub.sync request — then
disable trace mode and stop the capture:
{"req":"card.trace","mode":"off"} warning
Trace output is emitted only over the USB serial port or Notecard's
AUX RX/AUX TX serial port. It is not sent over I2C, and it is not sent
over the primary N_RX/N_TX serial pins that a host normally uses. See
Using Notecard Trace Mode for more.
