
Notecard Quickstart: Notecard Simulator
Introduction
Watch a video of this tutorial
This tutorial should take approximately 20-30 minutes to complete.
In this guide you'll learn how to use Notecard, our system-on-module that simplifies connectivity for connected products.
Throughout this guide you'll issue a series of requests to a simulated Notecard. The simulated Notecard has the same API as a physical Notecard, and completing this tutorial allows you to see how Notecard works without having to purchase hardware. As part of this guide you'll learn how to configure a Notecard, how to simulate sending data from sensors, and how to synchronize that data with the cloud.
By the end of this tutorial you'll have a basic understanding of the process for building connected solutions with Blues.
Key Concepts to Know
Before you dive in, it's important to understand a few key concepts:
-
Notecard is a device-to-cloud data pump that reduces the complexity of building smart connected products with a secure, reliable cellular, WiFi, LoRa, or satellite connection. It's a System-on-Module (SOM) that's ready for embedding into any project.
-
Notecarriers are development boards that help you get started quickly with Notecard. There are a variety of Notecarriers designed to fit different needs, from prototyping with a Feather-based MCU to deploying a production solution.
-
Notehub is the cloud service Notecard uses to securely send and receive data. Notehub also provides a console for fleet management and secure connectors for routing data to 3rd-party cloud applications.
-
A Note is a JSON object containing developer-provided content. A Note is the primary means of sending data to/from a Notecard.
Notecard and Notehub work together to provide bidirectional wireless communication capabilities, both outbound (from your microcontroller or single-board computer to the cloud):
And inbound (from the cloud to your microcontroller or single-board computer):
Before You Begin
To complete this quickstart, make sure you have access to the following:
- An internet connection that allows access to Notehub.
Connect Your Notecard and Notecarrier
The Notecard Simulator is available through the Notecard's In-Browser Terminal. If the terminal isn't open already, you may open it by clicking the terminal button in the top-right corner of your browser.

Within the terminal you'll see two options, connecting to a physical Notecard ("USB Notecard"), and trying a Notecard Simulator ("Sign In" or "Notecard Simulator", depending if you are signed into Notehub or not).
Using the Notecard Simulator allocates a new, cloud-based virtual Notecard, and allows you to send requests to the virtual Notecard directly in your web browser.
To use the simulator you must have an account on the Notecard's backing cloud service, Notehub.
Set up Notehub
Notehub is a secure proxy cloud service that communicates with Notecard, provides tooling for managing fleets of devices, allows you to perform over-the-air Notecard and host MCU firmware updates, and makes it easy for you to route data to your own cloud applications.
In this section, you'll set up a Notehub Project and create your first ProductUID. A ProductUID is the unique identifier you will use to associate a Notecard with a Notehub Project, and ensure that data from Notecard ends up in the right location.
Create a Notehub Project
-
Sign in or sign up for Notehub using the links below.
Create a Notehub Account
Already have an account? Sign in -
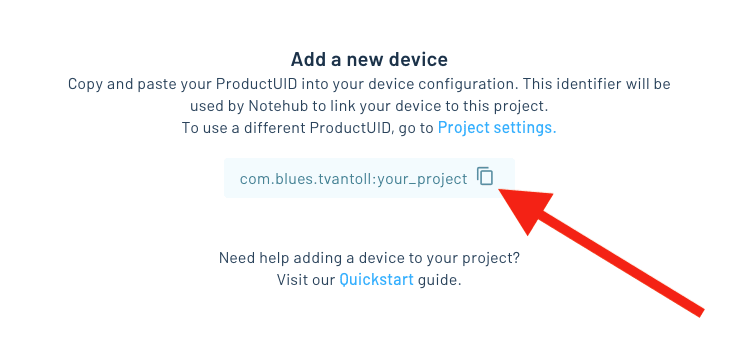
Click "Create Project" on the dashboard. In the New Project card, give your project a name and ProductUID.
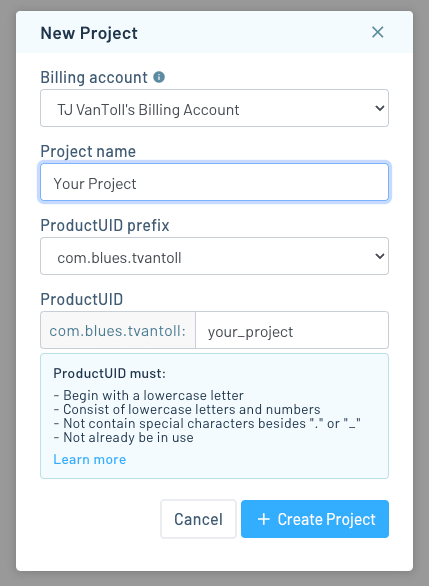
 note
noteThe ProductUID must be globally unique. To reduce collisions, Notehub prepends a generated namespace based on your account email, for instance
com.your-company.your-name:. Enter any identifier you like in the input on the right. -
Take note of your ProductUID. This identifier is used by Notehub to associate a Notecard to your project.
Set up Notecard
Now that you have a Notehub account, you're ready to get started with the Notecard Simulator. If you haven't already, click the Simulate Notecard button within the In-Browser Terminal.
To send your first request, copy and paste the following JSON into the In-Browser Terminal (click the COPY button below).
Hit Enter and you'll see a response similar to the example output.
{"req":"card.version"}{
"body": {
"org": "Blues Wireless",
"product": "Notecard",
"version": "notecard-3.4.1",
"ver_major": 3,
"ver_minor": 4,
"ver_patch": 1,
"ver_build": 15105,
"built": "Jul 19 2022 21:58:21"
},
"version": "notecard-3.4.1.15105",
"device": "dev:default",
"name": "Blues Wireless Notecard",
"sku": "NOTE-SOFTCARD",
"board": "0.0",
"api": 3
}The JSON response above provides version information of the firmware on the Notecard Simulator.
Now that you know how to send requests to Notecard, let's next tell Notecard about your Notehub project so it knows where to send data.
To associate Notecard with your project in Notehub you must assign the ProductUID you created to your Notecard. A Notecard can easily be moved between projects over time, but it can only belong to one project at a time
To set the ProductUID, you'll start by sending a hub.set JSON request to your
Notecard. Once Notecard has finished processing your request, it will send a
JSON response back to your computer to let you know that the request is
complete.
An empty JSON object ({}) from Notecard indicates a successful request. If an
error occurs, Notecard will return a JSON object with an err key and a string
describing the error.
Copy and paste the following Notecard request, making sure to replace
com.your-company.your-name:your_product with the ProductUID you created in the
last step (click the TRY IT button below).
{"req":"hub.set", "product":"com.your-company.your-name:your_product"}{}The JSON object above consists of two key-value pairs. The first provides the
name of the request, denoted with the key req and a value of hub.set. The
second, product, is one of the arguments for the hub.set request. You can
see all the arguments for this, and all Notecard requests, in the
API Documentation.
Validate Your ProductUID and Connection
In this section, you'll validate your Notecard configuration by performing a manual sync with Notehub and then request sync status updates from Notecard.
Start a Sync
Initiate a synchronization between Notecard and Notehub with a hub.sync
request, as shown below.
{"req":"hub.sync"}{}Once a sync has started, you can monitor the state of the sync by watching the status bar at the top of the In-Browser Terminal.

As soon as you see "Successful Notehub sync [x]s ago", the sync is complete!

Optional: Manually check on the state of a sync with the hub.sync.status API
You can also manually check on the state of a sync with a hub.sync.status
request. When the sync is ongoing, the response will return a status field
with the current progress of the sync and a requested field with the number of
seconds since the sync was initiated.
Depending on the timing of your hub.sync.status requests, your responses may
differ from what is displayed here:
{"req":"hub.sync.status"}{
"status": "starting communications {wait-module} {connecting}",
"requested": 2
}
...
{
"status": "modem now ON {modem-on}",
"requested": 6
}
...
{
"status": "waiting for wireless service 6 sec [+---] {cell-registration-wait}",
"requested": 12
}Once the sync has completed, the response to hub.sync.status includes the UNIX
Epoch time of the last sync, and the number of seconds since the last completed
sync.
{"req":"hub.sync.status"}{
"time": 1615585299,
"completed": 4
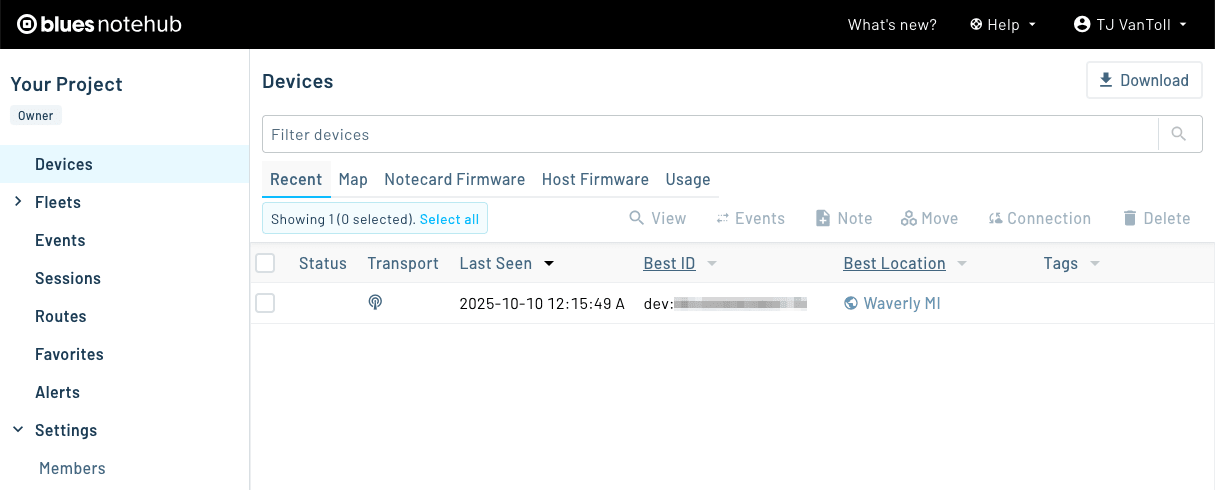
}You should now be able to return to Notehub, refresh the Devices page, and see that a device has been added to your project:

Sync not completing, or having trouble connecting?
-
Check if the response to a
hub.sync.statusrequest includes "no project was found" or "can't open Notehub" errors:>{"req":"hub.sync.status"}{ "status": "opening notehub: no project was found with product UID product:com.your-company.your-name:your_product {product-noexist} {notehub-open-failure}", "requested": 10 } ... { "status": "can't open notehub: opening notehub: no project was found with product UID product:com.your-company.your-name:your_product {product-noexist} {notehub-open-failure}", "requested": 11 }If so, you may have a typo, or may have passed a project name to your
hub.setrequest'sproductinstead of a ProductUID. If this is the case, send anotherhub.setrequest with the correctproduct, and then send ahub.syncrequest.REMINDER: The ProductUID is typically in the form of
com.your-company.your-name:your_product. -
If your ProductUID seems correct, you may have a connectivity issue. Please consult our guide on Diagnosing Cellular Connectivity Issues.
-
It may be helpful to view a detailed trace of the Notecard's activity during a connection attempt. To do this, type
sync-traceinto the In-Browser Terminal and press return to initate a sync and start logging. Once the trace is complete, click the save button in the terminal to export the log for further analysis. -
If you've tried these troubleshooting steps and are still having issues, please reach out on our community forum.
You're doing great! You have now configured your Notecard and are ready to send Notes to your Notehub Project!
Queue Notes to Your Notecard
Think of Notecard as a durable, on-device queue.
Your application writes data to Notecard, where it is safely stored in onboard flash. Notecard then syncs that data with Notehub based on your sync settings and available connectivity (e.g. immediately, periodically, or later when a connection is available). In this section, you will learn how to store data simulating sensor readings on your Notecard.
Imagine your Notecard is connected to a
Host MCU that reads temperature and humidity
data from a sensor. Your sample data might look like this:
{"temp":35.5,"humid":56.23}.
To do this, you will use Notecard's note.add API
that includes a body argument which accepts any arbitrary JSON data.
Copy and paste the following request into the In-Browser Terminal, then press Enter to send it to your Notecard.
{"req":"note.add","body":{"temp":35.5,"humid":56.23}}{"total":1}This request will create a Note that includes your JSON body and additional metadata like creation time and location.
As with other requests, the first key-value pair of the JSON specifies the
note.add request, but in this case, the argument of body contains a full
JSON object of your data as the value. There are a number of other possible
arguments to note.add, as listed in the
documentation.
In response, Notecard returns a JSON object indicating the total number of Notes ready to sync to Notehub. You won't see your Note in Notehub just yet, because Notecard queues your Notes until it is time to sync them to the cloud.
Excellent work! You have queued your first Note to your Notecard!
Send Notes from Notecard to Notehub
In this section, you'll perform another sync to send your Note to Notehub.
As before, you can manually initiate a sync by entering the following JSON request in the In-Browser Terminal:
{"req":"hub.sync"}{}Behind the scenes, your Notecard will again search for a network connection and connect to Notehub. Once the connection is made, Notecard uploads your Note and closes the connection.
As before, you can monitor the state of the sync by watching the status bar at
the top of the In-Browser Terminal, or use a hub.sync.status request.
By default, Notecard places Notes in a Notefile
called data.qo. The .qo extension means that the file is an
"outbound queue," or a queue that originates on Notecard and is synchronized
with Notehub.
Great work! Your Note has now been transferred from Notecard to the cloud and stored in your Notehub project!
noteNotecard is a low-power device (consuming only ~8-18µA@5V when idle) and is built to be continuously powered. This is important to know because certain features of Notecard require the current time, which is established upon Notecard successfully connecting to a network upon startup.
View Notes on Notehub
In this section, you'll learn how to view and interact with your Note on Notehub.
-
First, navigate back to Notehub.io. You will see your project dashboard:

-
Click on the tile with your Project, and the device dashboard for your Project will load. You'll see your Notecard in the Devices list.
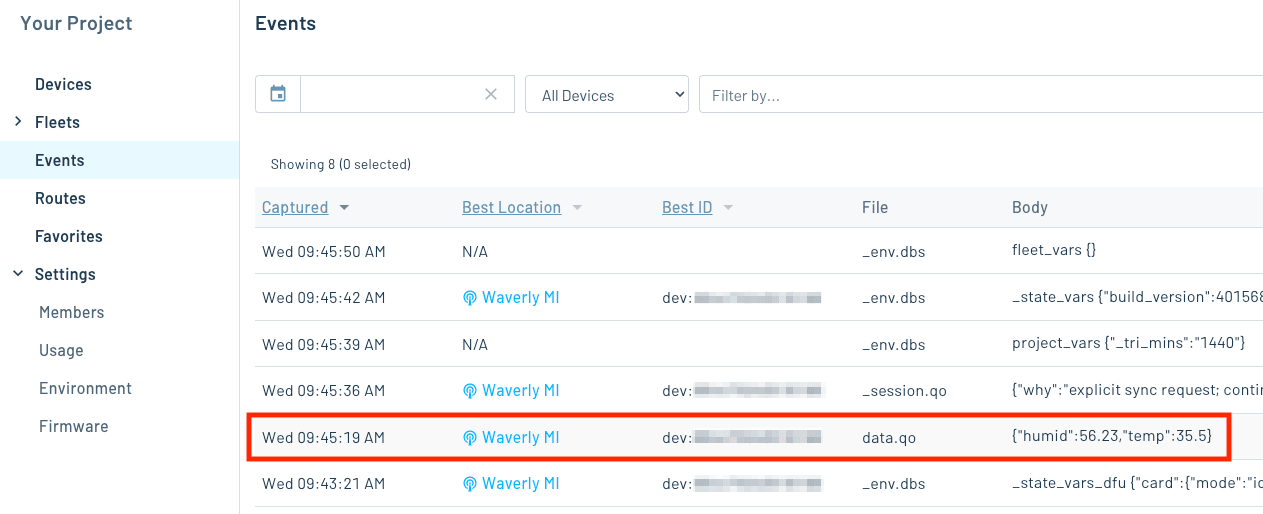
-
Click Events in the left-side navigation. In the Events list, you should see your Note in the list with a simulated sensor reading body. Your Note will be listed in the table, along with other session and environment-specific events sent automatically by Notecard.
It's that simple, your product and data are now online!
Send Notes from Notehub to Notecard
It's important to remember that communication between Notecard and Notehub is bi-directional, both outbound (from Notecard to the cloud, as documented above) and inbound (from the cloud to Notecard).
While not part of the quickstart, you can learn more about inbound data syncing in the Notehub Walkthrough.
Next Steps
Congratulations! You've now queued sensor data on a Notecard and sent that data to the cloud!
If you're ready to get started with a physical Notecard, check out the Blues Starter Kits in our shop.
If you're following the Cell+WiFi Quickstart, next we recommend setting up your microcontroller:
Use the Notecard to Send Data- Set Up Your Microcontroller
- Build Your First IoT App With Blues
- Send Data to Your Cloud
At any time, if you find yourself stuck, please reach out on the community forum.