Building Edge AI Applications on Blues Swan
In this tutorial, you'll learn how to build an Edge AI application—AI that runs directly on edge devices instead of relying on a centralized server. Edge AI offers major advantages: reduced costs, faster performance, and enhanced privacy.
You'll build an ML (machine learning) model using Edge Impulse, and you'll deploy that model to run on a Blues Swan. The instructions detail the creation of a "magic wand" that can recognize gestures using an accelerometer and an ML classification model—but, feel free to adapt the instructions to work with other types of sensors.
You can find the complete source for this guide on GitHub. Specifically, we provide an accelerometer data collector sketch, an example Edge AI model, and a data classification sketch.
Before You Start
Let's start by looking at the hardware, setup steps, and libraries you need to complete this guide.
Hardware
If you wish to follow along with this guide you'll need the following hardware:
- A Swan MCU.
- A triple axis accelerometer. We used the Adafruit LIS3DH for this example.
Setup
You'll also need to perform the following setup:
- Complete the Swan Quickstart for Arduino IDE (recommended) or the Swan Quickstart for PlatformIO.
- Set up a new project to consume accelerometer data within Edge Impulse Studio.
- Follow Edge Impulse's instructions to install the Edge Impulse CLI.
Libraries
Finally, you need to install the appropriate library for your accelerometer in your preferred editor.
If you're using Arduino IDE, you need to install the accelerometer's library from the Arduino Library Manager. To do so, open the Tools > Manage Libraries... menu, search for Adafruit LIS3DH and click Install.

If you're using PlatformIO, add adafruit/Adafruit LIS3DH@^1.3.0 to the
lib_deps section of your platformio.ini file.
Forwarding Data to Edge Impulse
For this example, we will create a simple classification model with an accelerometer designed to analyze movement over a brief period of time (2 seconds) and infer how the motion correlates to one of the following three states:
- Idle (no motion)
- Chop (motioning away and back towards your body)
- Wave (motioning side-to-side across your body)
The first step in building any ML model is data acquisition and labeling, and Edge Impulse makes this simple with the data forwarder and Edge Impulse Studio.
To get started collecting data from your accelerometer, you'll
load a program to the device that streams X, Y, and Z values
from the accelerometer to the serial port on your Blues Swan. Edge Impulse's
data forwarder can then read the output of your device and forward it to Edge
Impulse studio, where you can label the data and build up a dataset for
training.
In your preferred IDE, create a new sketch that will serve as the data acquisition program:
#include <Arduino.h>
#include <Adafruit_LIS3DH.h>

Adafruit_LIS3DH lis = Adafruit_LIS3DH();

void setup(void)
{
  Serial.begin(115200);
  lis.begin(0x18);
}

void loop()
{
  lis.read(); // get x,y,z data at once
  Serial.print(lis.x);
  Serial.print("\t");
  Serial.print(lis.y);
  Serial.print("\t");
  Serial.print(lis.z);
  Serial.println();
}
After initializing the accelerometer, this example sketch will output raw accelerometer data to the serial console.
Run this program on your Swan, using the Upload button in the Arduino IDE or
Upload function in PlatformIO.
If you're having trouble uploading code to your Swan, refer back to the Swan quickstart guide for help.
Once running, you can connect to the serial monitor to verify that the program is running and outputting a stream of accelerometer values, like so:
-224    -528    16192
-320    -528    16192
112     -624    15792
112     -624    15792
304     -496    16160
304     -496    16160
80      -640    16384
80      -640    16384
-112    -640    16384
Once your MCU is emitting accelerometer values, the next step is to capture readings while performing the gestures you want to classify, and forward these to Edge Impulse Studio.
To start the forwarder, make sure you've closed your serial monitor and run the following from a terminal:
edge-impulse-data-forwarderFollow the prompts to log into your Edge Impulse account, select a project,
and assign names to the X, Y, and Z values from your accelerometer.

Once instructed to do so, use the URL provided by the forwarder to open Edge Impulse Studio and start capturing data.
In the Collect data form, make sure your device is selected, set a label for the gesture you plan to perform, and set the sample length to 10000 ms (10 seconds). Then, click "Start sampling".

At this point, Edge Impulse Studio will send a message to the forwarder running on your computer and instruct it to capture a ten second sample from the accelerometer. Once the capture starts, perform a gesture you wish to classify repeatedly for the entire ten seconds.

After the sample is captured, it's uploaded to Edge Impulse Studio, where you can see a visual view of the accelerometer data captured by the forwarder.

Now comes the fun part! To get a solid cross-section of data for your model, you'll want to repeat this process multiple times for each gesture you want to classify in your application.
The more data you capture, the better your model will be, so take the time to record at least a few minutes worth of data for each gesture.

Finally, allocate 10-20% of your captured data to your test set. This data will be set aside and not used to training your model. Doing so will allow you to more accurately test your model before deploying it.

Build and Train an ML Model
Once you've captured enough data from the accelerometer, you're ready to move on to designing and building your model. In the left-side menu of Edge Impulse Studio, click "Create impulse" under the Impulse Design menu. Based on the data you collected, Edge Impulse Studio will recognize that your source data set is a time series and will make some recommendations for the window size and increase to use, which you are free to adjust as you test and iterate on the model.

Next, click on the "Add a processing block" button and add a "Spectral Analysis" block.

Then, click the "Add a learning block" button and select the "Classification" block.

Finally, click "Save Impulse".

On the next screen, "Spectral features", you can adjust and tune parameters if you wish, or keep the defaults.
Click "Save parameters" when done and you'll be taken to the "Generate features" screen.
Click the "Generate features" button and, once the job completes, you'll get some estimates of on-device inference performance and a feature explorer that shows how your gestures are clustering on their x, y, and z axes.
You can pan, zoom and scroll around in that view to drill into your sensor data.

Once you're done playing with the feature explorer, click on the "Classifier"
item in the left nav, and adjust the number of training cycles to 300 and
learning rate to 0.0005. Then, click "Start training" and grab a cup of
coffee while Edge Impulse trains your model.

After training is complete, Edge Impulse Studio will display the performance of the model, a confusion matrix, feature explorer, and on-device performance details.

Test the Model
There are two different ways to test your model in Edge Impulse Studio before you deploy it to your board: "Live Classification" and "Model Testing".
Live Classification
You can use the Edge Impulse data forwarder to perform live classification against the model you've just trained. First, make sure your Blues Swan is connected to your computer and start the Edge Impulse data forwarder:
edge-impulse-data-forwarderNext, in Edge Impulse Studio, click the "Live classification" menu item in the left nav. Make sure your device is selected and click "Start sampling."

After the initialization delay, perform the gesture you want to classify. Once captured from the device, Edge Impulse runs the raw data against the model and displays the classification results. Using the UI, you can set the expected outcome and even move results into your training set for model refinement.
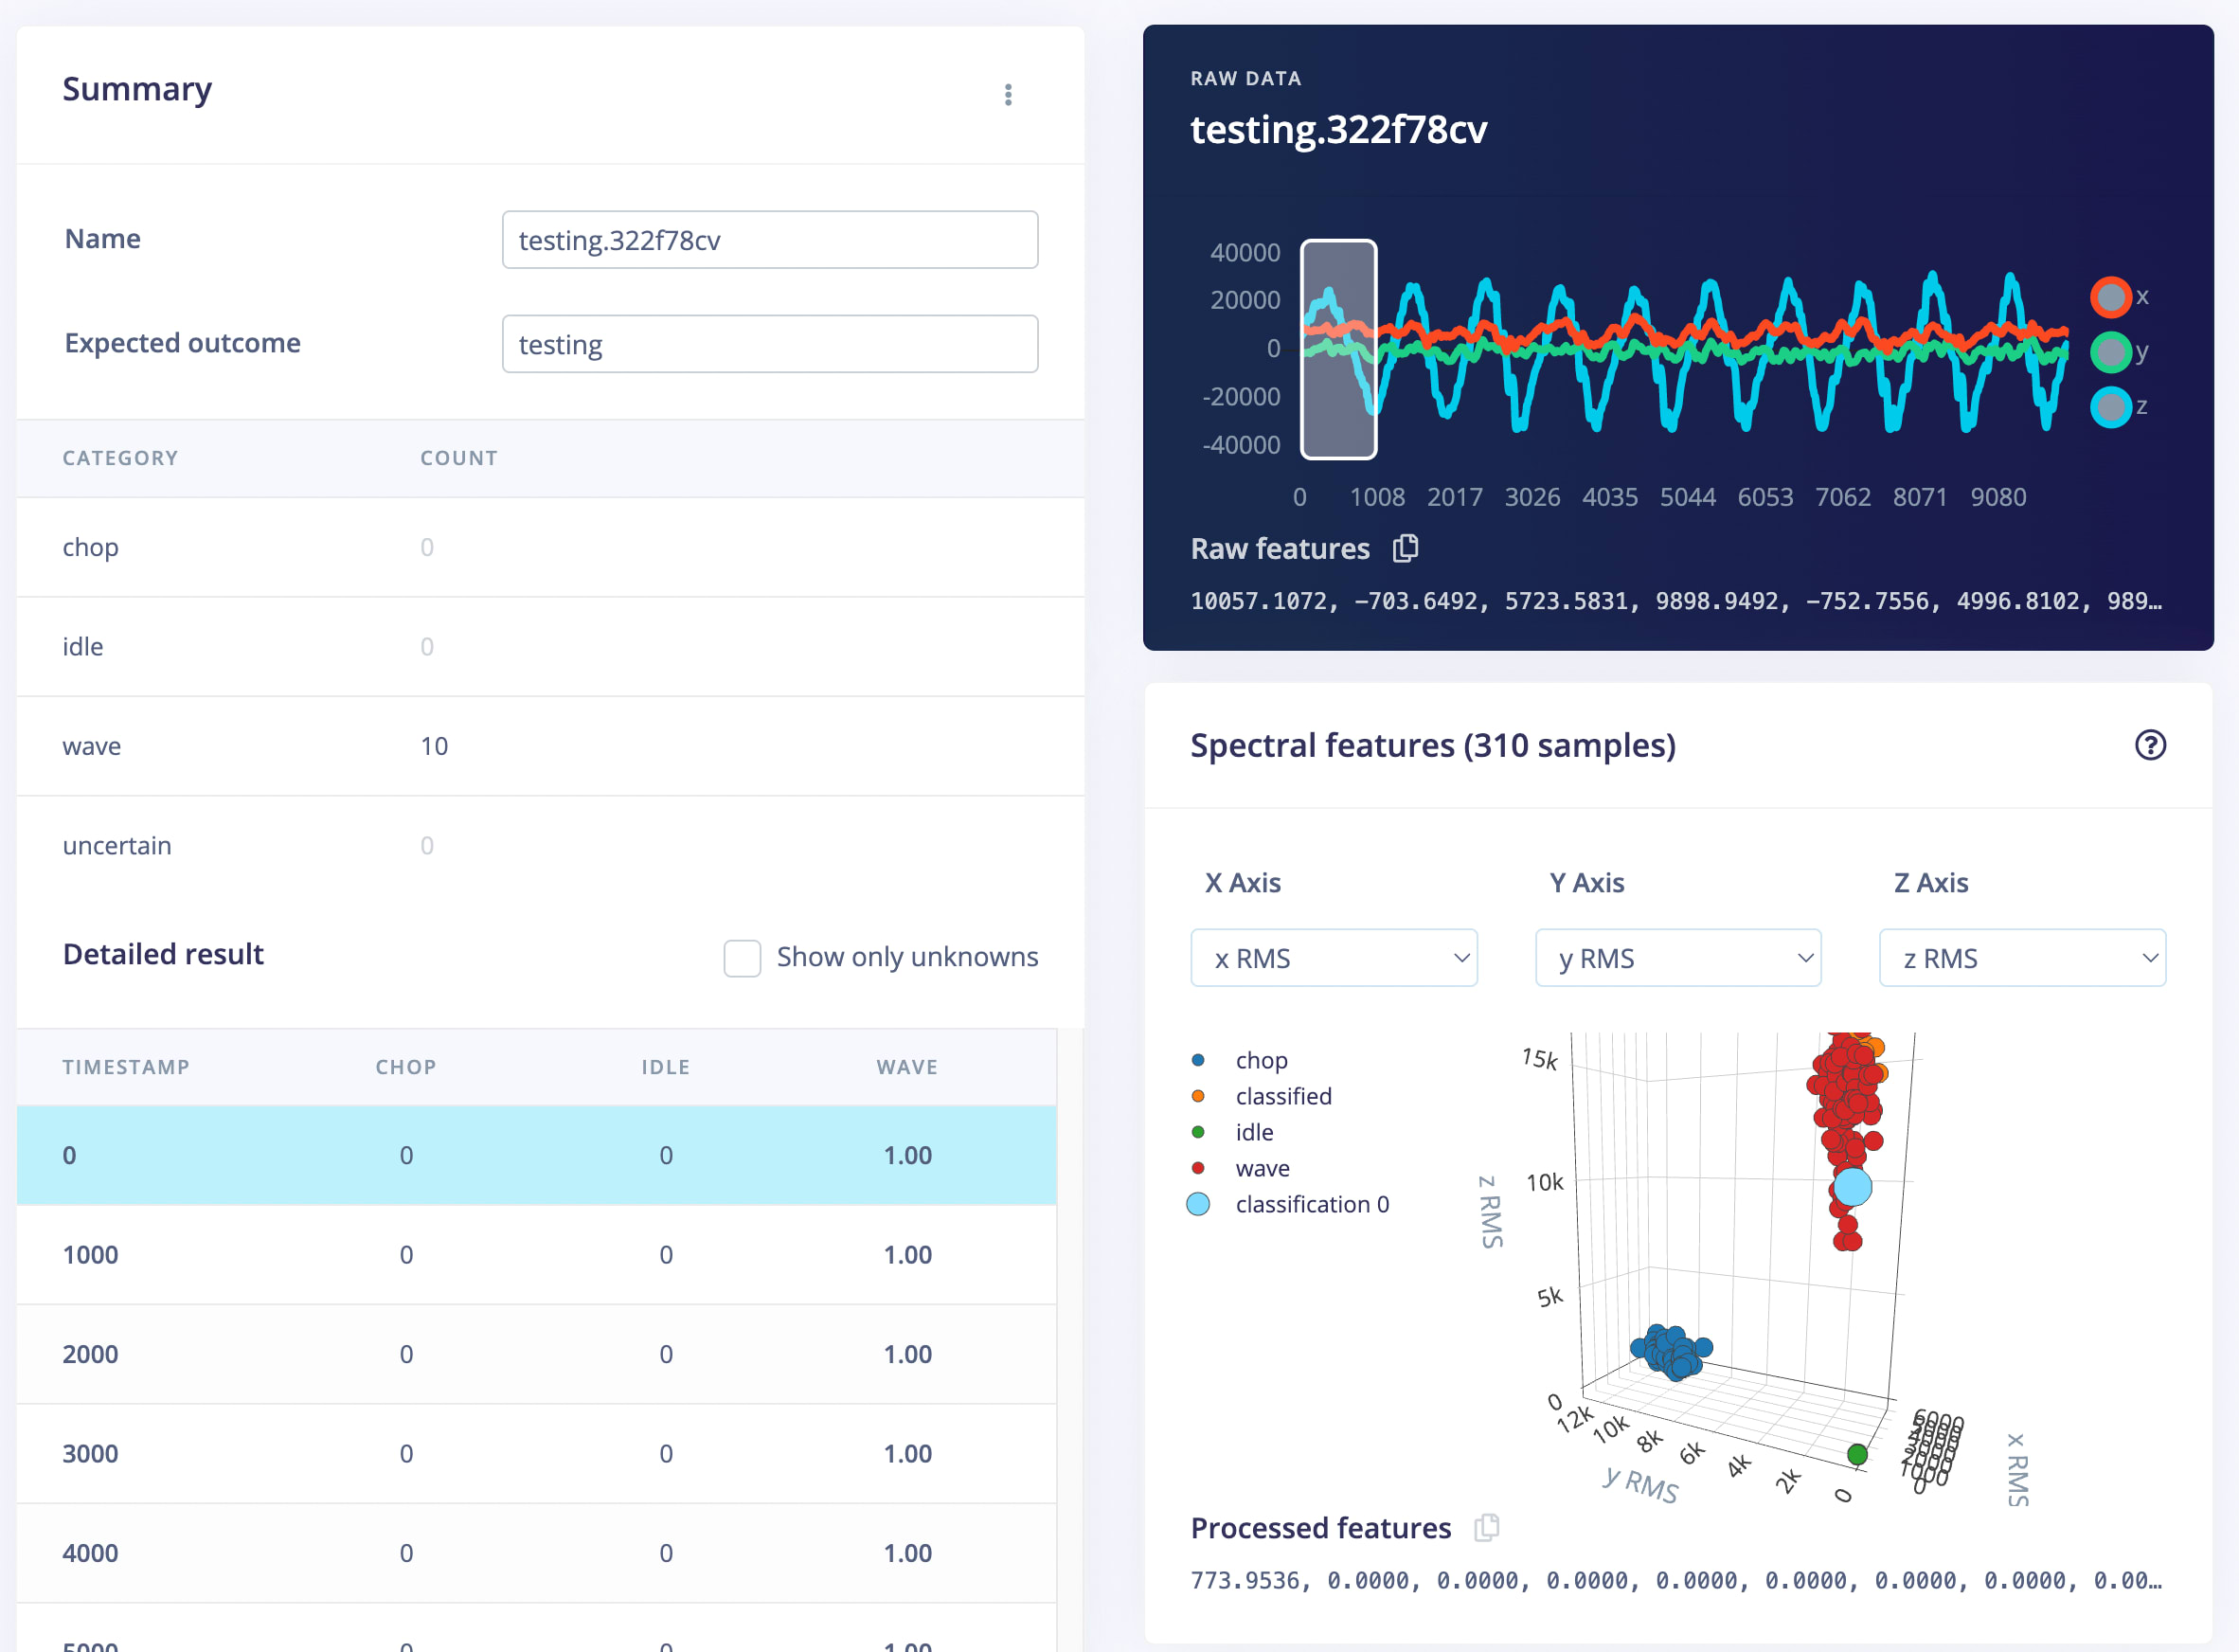
Model Testing
Recall when we earlier set aside a small percentage of data samples in the test set? Click on the "Model testing" menu item. You'll see all of your test samples and have the ability to "Classify all" which will run each sample through the classifier.

Deploy the Model
Once you're happy with the performance of your model, it's time to deploy it to your device!
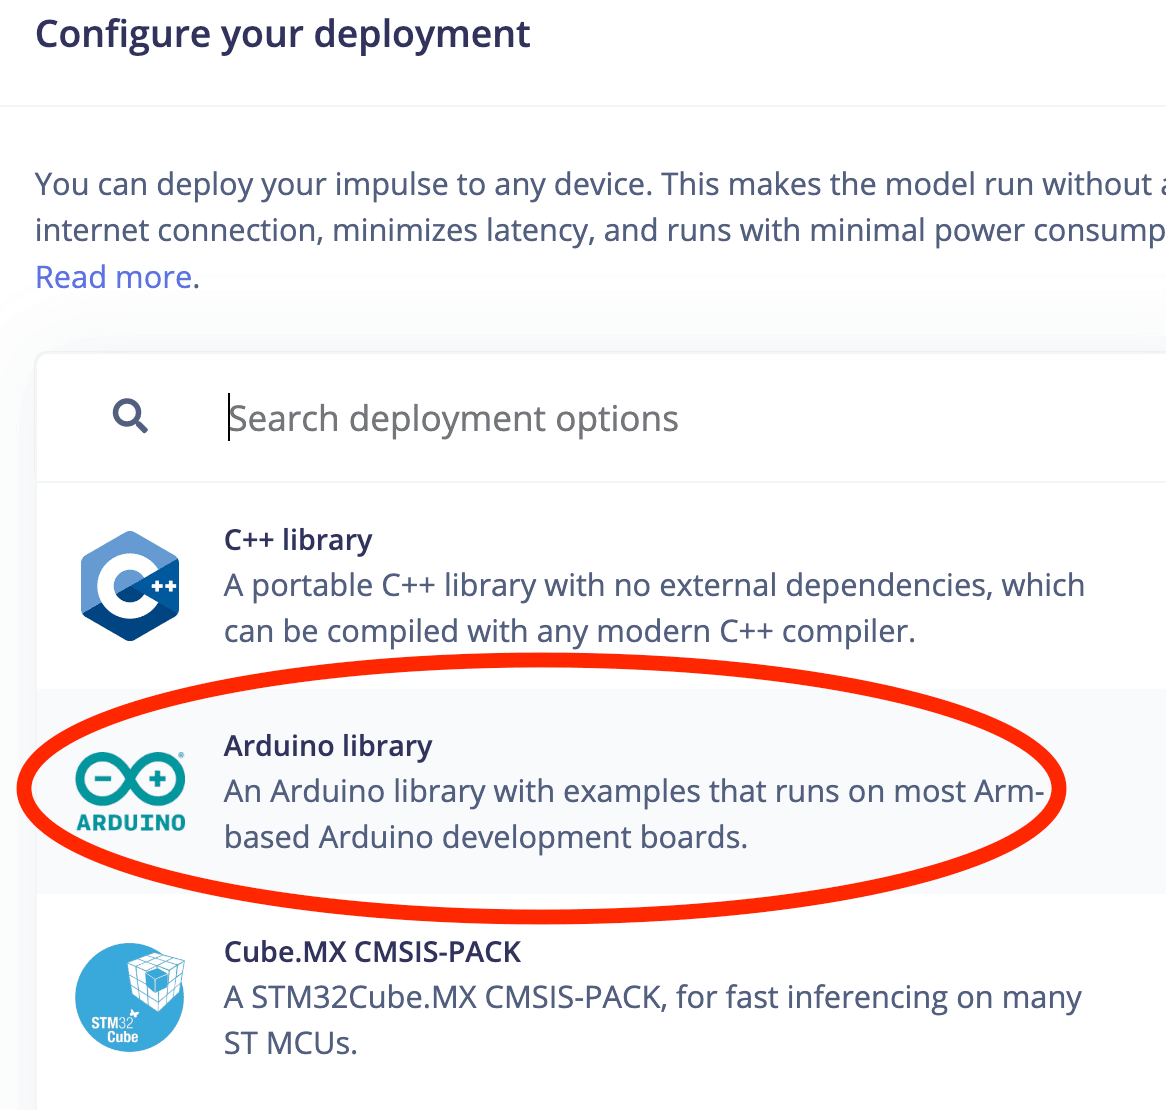
To do so click the the "Deployment" menu item in Edge Impulse Studio, and then click the "Arduino library" button.
Under the "Select optimizations" section, you can select either a quantized model or unoptimized, depending on your needs.
The Swan has plenty of RAM and Flash, so you can choose the unoptimized model if it provides better performance without sacrificing too much speed.
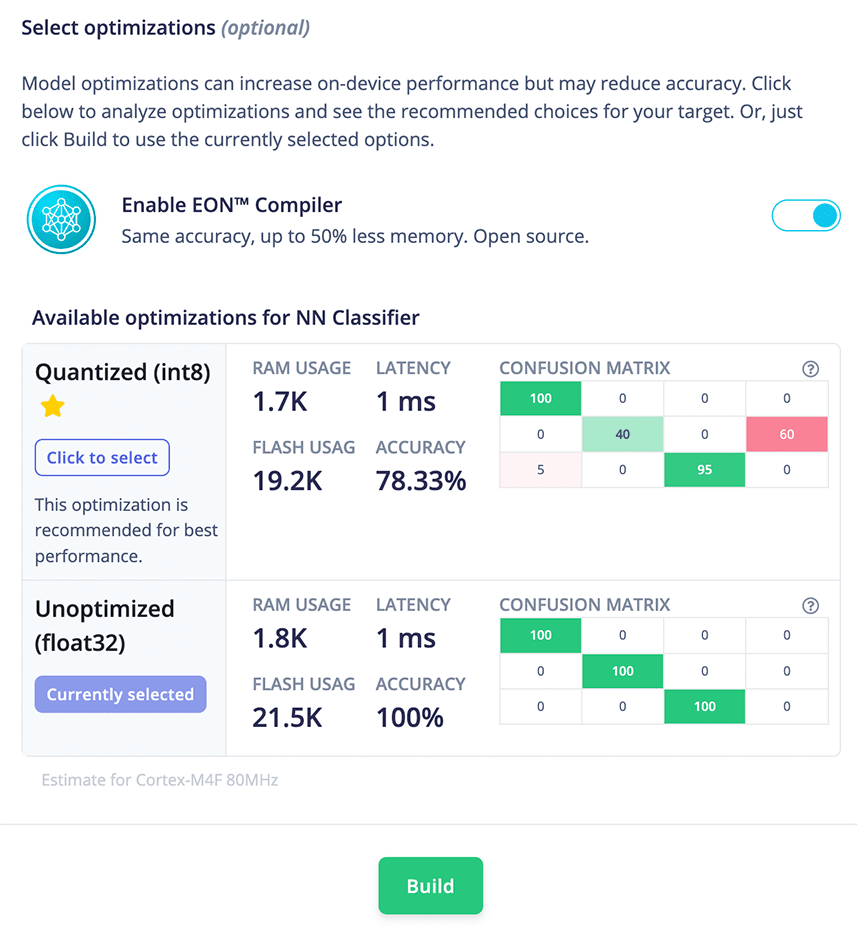
Once you've selected a model, click Build. Edge Impulse Studio will build a model package and deliver a zip archive for you to download.
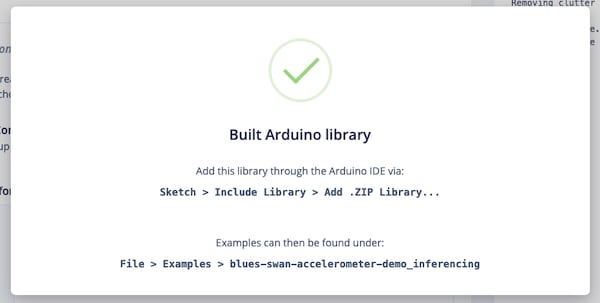
Using Arduino IDE?
You'll need to include this library in Arduino IDE, so that your program your program can reference the model and SDK. To do so, open a new Arduino Sketch, click the Sketch menu then Include Library > Add .ZIP Library...

Navigate to the .zip file you just download and select it.
After Arduino IDE processes the library, open the Sketch > Include Library,
menu, and under Contributed libraries choose the name of the folder you
selected. This will add the appropriate include statement to your sketch.
Using PlatformIO?
You'll need to include this folder in your PlatformIO project's lib directory.
Do so by simply dragging-and-dropping the unzipped folder onto your lib
directory.

Write Your Sketch
With the library installed in your project, you're ready to perform edge inferencing!
You can use the following sketch and customize it for your needs.
#include <Arduino.h>
#include <Adafruit_LIS3DH.h>
#include <Blues_Hammer.h> // **replace this with reference to YOUR model!**

static bool debug_nn = false; // Set this to true to see features generated from raw signal

Adafruit_LIS3DH lis = Adafruit_LIS3DH();

void setup()
{
    Serial.begin(115200);
    lis.begin(0x18);

    if (EI_CLASSIFIER_RAW_SAMPLES_PER_FRAME != 3)
    {
        ei_printf("ERR: EI_CLASSIFIER_RAW_SAMPLES_PER_FRAME should be equal to 3 (the 3 sensor axes)\n");
        return;
    }
}

void loop()
{
    ei_printf("\nStarting inferencing in 2 seconds...\n");
    delay(2000);
    ei_printf("Sampling...\n");

    // Allocate a buffer here for the values we'll read from the IMU
    float buffer[EI_CLASSIFIER_DSP_INPUT_FRAME_SIZE] = {0};

    for (size_t ix = 0; ix < EI_CLASSIFIER_DSP_INPUT_FRAME_SIZE; ix += 3)
    {
        // Determine the next tick (and then sleep later)
        uint64_t next_tick = micros() + (EI_CLASSIFIER_INTERVAL_MS * 1000);

        lis.read();
        buffer[ix] = lis.x;
        buffer[ix + 1] = lis.y;
        buffer[ix + 2] = lis.z;

        delayMicroseconds(next_tick - micros());
    }

    // Turn the raw buffer in a signal which we can the classify
    signal_t signal;
    int err = numpy::signal_from_buffer(buffer, EI_CLASSIFIER_DSP_INPUT_FRAME_SIZE, &signal);
    if (err != 0)
    {
        ei_printf("Failed to create signal from buffer (%d)\n", err);
        return;
    }

    // Run the classifier
    ei_impulse_result_t result = {0};

    err = run_classifier(&signal, &result, debug_nn);
    if (err != EI_IMPULSE_OK)
    {
        ei_printf("ERR: Failed to run classifier (%d)\n", err);
        return;
    }

    ei_printf("(DSP: %d ms., Classification: %d ms., Anomaly: %d ms.)\n",
              result.timing.dsp, result.timing.classification, result.timing.anomaly);
    uint8_t predictionLabel = 0;
    for (size_t ix = 0; ix < EI_CLASSIFIER_LABEL_COUNT; ix++)
    {
        Serial.print("    ");
        Serial.print(result.classification[ix].label);
        Serial.print(": ");
        Serial.println(result.classification[ix].value);

        if (result.classification[ix].value > result.classification[predictionLabel].value)
            predictionLabel = ix;
    }

    // print the predictions
    String label = result.classification[predictionLabel].label;

    Serial.print("\nPrediction: ");
    Serial.println(label);

#if EI_CLASSIFIER_HAS_ANOMALY == 1
    ei_printf("    anomaly score: %.3f\n", result.anomaly);
#endif
}
Deploy to Your MCU
The final step is to upload the program to your Blues Swan.
Once you've done so, open the serial monitor, perform some gestures, and see some inferences. The sample above performs continuous classification every few seconds, so you will see a steady stream of output in the monitor.
(DSP: 37 ms., Classification: 0 ms., Anomaly: 0 ms.)
    chop: 0.00
    idle: 0.98
    wave: 0.02

Prediction: idle

Starting inferencing in 2 seconds...
Sampling...
(DSP: 36 ms., Classification: 0 ms., Anomaly: 0 ms.)
    chop: 0.00
    idle: 0.00
    wave: 1.00

Prediction: wave

Starting inferencing in 2 seconds...
Sampling...
(DSP: 36 ms., Classification: 0 ms., Anomaly: 0 ms.)
    chop: 1.00
    idle: 0.00
    wave: 0.00

Prediction: chopIf your classifications are running slow, check out this section of the Edge Impulse documentation, which has some optimizations you can try enabling to speed up your DSP processing.
Congratulations! You've built an Edge AI model with Edge Impulse and the Blues Swan!
Sending Inference Data to the Cloud With the Notecard
As an additional step, you can send your inference data to the cloud using Notecard. Having inference data in the cloud allows you to build dashboards, and to monitor your Edge AI project remotely.
Let AI write your firmware. Blues Expert MCP connects your AI coding assistant (Claude Code, GitHub Copilot, Cursor) directly to our API docs, providing live request validation and firmware best practices for Arduino, C, Zephyr, and Python. Install the Blues Expert MCP →

If you're interested in setting this up, you must first connect a Notecard to your Swan.
The easiest way to connect a Notecard to the Swan is with a Notecarrier F. See the Notecard and Notecarrier F quickstart for detailed instructions with photos.
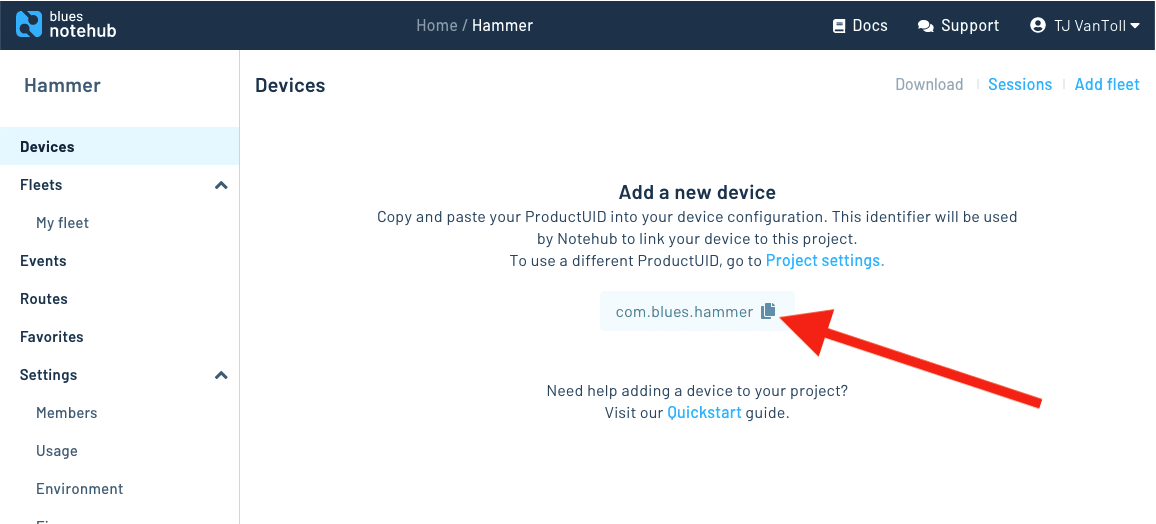
Set up Notehub
With everything connected, you next need to create a Notehub account (if you don't have one already) and create a new Notehub project. Notehub is a cloud backend the Notecard knows how to communicate with by default, and once you have a Notehub project you're ready to start sending data.
Before you head back to your code, make sure to copy your project's ProductUID (see image below), as you'll need it momentarily.
Installing the note-arduino Library
With Notehub set up, you next need to start sending data to your Notehub project from your Arduino code.
To do so, start by installing the Notecard Arduino SDK, note-arduino, in your editor with the instructions below.
Add blues/Blues Wireless Notecard to the lib_deps section of your
platformio.ini file.
Sending Data to Notehub
With the library installed, you next need to use the note-arduino library to send your inference data to the cloud.
You can do so by replacing your current sketch with the code below, making sure to update line 4 with an updated reference to your model, and line 6 with the ProductUID from Notehub you copied earlier.
#include <Arduino.h>
#include <Adafruit_LIS3DH.h>
#include <Notecard.h>
#include <Blues_Hammer.h> // **replace this with reference to YOUR model!**

#define productUID "com.blues.hammer" // **replace this with a reference to YOUR ProductUID!**

static bool debug_nn = false; // Set this to true to see features generated from raw signal

Notecard notecard;
Adafruit_LIS3DH lis = Adafruit_LIS3DH();

void setup()
{
    Serial.begin(115200);
    lis.begin(0x18);
    notecard.begin();
    notecard.setDebugOutputStream(Serial);

    {
        J *req = notecard.newRequest("hub.set");
        JAddStringToObject(req, "product", productUID);
        JAddStringToObject(req, "mode", "periodic");
        JAddNumberToObject(req, "outbound", 5);
        notecard.sendRequest(req);
    }

    {
        J *req = notecard.newRequest("note.template");
        JAddStringToObject(req, "file", "data.qo");
        JAddNumberToObject(req, "port", 1);
        JAddStringToObject(req, "format", "compact");
        J *body = JAddObjectToObject(req, "body");
        if (body)
        {
            JAddNumberToObject(body, "dsp_time", 12);
            JAddNumberToObject(body, "classification_time", 12);
            JAddNumberToObject(body, "anomaly_time", 12);
            JAddStringToObject(body, "prediction", "4");
            JAddNumberToObject(body, "idle", 14.1);
            JAddNumberToObject(body, "chop", 14.1);
            JAddNumberToObject(body, "wave", 14.1);
        }
        notecard.sendRequest(req);
    }

    if (EI_CLASSIFIER_RAW_SAMPLES_PER_FRAME != 3)
    {
        ei_printf("ERR: EI_CLASSIFIER_RAW_SAMPLES_PER_FRAME should be equal to 3 (the 3 sensor axes)\n");
        return;
    }
}

void loop()
{
    ei_printf("\nStarting inferencing in 2 seconds...\n");
    delay(2000);
    ei_printf("Sampling...\n");

    // Allocate a buffer here for the values we'll read from the IMU
    float buffer[EI_CLASSIFIER_DSP_INPUT_FRAME_SIZE] = {0};

    for (size_t ix = 0; ix < EI_CLASSIFIER_DSP_INPUT_FRAME_SIZE; ix += 3)
    {
        // Determine the next tick (and then sleep later)
        uint64_t next_tick = micros() + (EI_CLASSIFIER_INTERVAL_MS * 1000);

        lis.read();
        buffer[ix] = lis.x;
        buffer[ix + 1] = lis.y;
        buffer[ix + 2] = lis.z;

        delayMicroseconds(next_tick - micros());
    }

    // Turn the raw buffer in a signal which we can the classify
    signal_t signal;
    int err = numpy::signal_from_buffer(buffer, EI_CLASSIFIER_DSP_INPUT_FRAME_SIZE, &signal);
    if (err != 0)
    {
        ei_printf("Failed to create signal from buffer (%d)\n", err);
        return;
    }

    // Run the classifier
    ei_impulse_result_t result = {0};

    err = run_classifier(&signal, &result, debug_nn);
    if (err != EI_IMPULSE_OK)
    {
        ei_printf("ERR: Failed to run classifier (%d)\n", err);
        return;
    }

    ei_printf("(DSP: %d ms., Classification: %d ms., Anomaly: %d ms.)\n",
              result.timing.dsp, result.timing.classification, result.timing.anomaly);
    uint8_t predictionLabel = 0;
    for (size_t ix = 0; ix < EI_CLASSIFIER_LABEL_COUNT; ix++)
    {
        Serial.print("    ");
        Serial.print(result.classification[ix].label);
        Serial.print(": ");
        Serial.println(result.classification[ix].value);

        if (result.classification[ix].value > result.classification[predictionLabel].value)
            predictionLabel = ix;
    }

    // print the predictions
    String label = result.classification[predictionLabel].label;

    Serial.print("\nPrediction: ");
    Serial.println(label);

    char prediction[100];
    label.toCharArray(prediction, 100);

    J *req = notecard.newRequest("note.add");
    JAddStringToObject(req, "file", "data.qo");
    JAddBoolToObject(req, "sync", true);
    J *body = JCreateObject();
    JAddNumberToObject(body, "dsp_time", result.timing.dsp);
    JAddNumberToObject(body, "classification_time", result.timing.classification);
    JAddNumberToObject(body, "anomaly_time", result.timing.anomaly);
    JAddStringToObject(body, "prediction", prediction);
    for (size_t ix = 0; ix < EI_CLASSIFIER_LABEL_COUNT; ix++)
    {
        JAddNumberToObject(body, result.classification[ix].label, result.classification[ix].value);
    }
    JAddItemToObject(req, "body", body);
    if (!notecard.sendRequest(req)) {
      JDelete(req);
    }

#if EI_CLASSIFIER_HAS_ANOMALY == 1
    ei_printf("    anomaly score: %.3f\n", result.anomaly);
#endif
}
The new pieces of code are three different calls you make using the
note-arduino library. The first, in setup(), uses the Notecard's
hub.set request to
associate the Notecard with your Notehub backend.
J *req = notecard.newRequest("hub.set");
JAddStringToObject(req, "product", productUID);
JAddStringToObject(req, "mode", "periodic");
JAddNumberToObject(req, "outbound", 5);
if (!notecard.sendRequest(req)) {
    JDelete(req);
}
The second, in setup(), uses the Notecard's
note.template request
to configure a template
for your data.
{
    J *req = notecard.newRequest("note.template");
    JAddStringToObject(req, "file", "data.qo");
    JAddNumberToObject(req, "port", 1);
    JAddStringToObject(req, "format", "compact");
    J *body = JAddObjectToObject(req, "body");
    if (body)
    {
        JAddNumberToObject(body, "dsp_time", 12);
        JAddNumberToObject(body, "classification_time", 12);
        JAddNumberToObject(body, "anomaly_time", 12);
        JAddStringToObject(body, "prediction", "4");
        JAddNumberToObject(body, "idle", 14.1);
        JAddNumberToObject(body, "chop", 14.1);
        JAddNumberToObject(body, "wave", 14.1);
    }
    notecard.sendRequest(req);
}
The third, in loop(), uses the Notecard's note.add request
to send all relevant data up to Notehub in a Note.
J *req = notecard.newRequest("note.add");
JAddStringToObject(req, "file", "data.qo");
JAddBoolToObject(req, "sync", true);
J *body = JCreateObject();
JAddNumberToObject(body, "dsp_time", result.timing.dsp);
JAddNumberToObject(body, "classification_time", result.timing.classification);
JAddNumberToObject(body, "anomaly_time", result.timing.anomaly);
JAddStringToObject(body, "prediction", prediction);
for (size_t ix = 0; ix < EI_CLASSIFIER_LABEL_COUNT; ix++)
{
    JAddNumberToObject(body, result.classification[ix].label, result.classification[ix].value);
}
JAddItemToObject(req, "body", body);
if (!notecard.sendRequest(req)) {
    JDelete(req);
}
With these changes, your Notecard sends a Note to your Notehub backend after
every classification in loop(). After you run your app on your device, you
should see events start to appear on your Notehub project's Events tab with
data from the classification process, including how long the classification
took, as well as confidence levels for each of your supported gestures.

And with that, you've now built an Edge AI model that you can monitor remotely!
See our Notehub routing tutorial for details on how to send Notehub data to other cloud services, such as Ubidots or Datacake for building dashboards.