Wireless for Opta Quickstart
Introduction
This tutorial should take approximately 60–75 minutes to complete.
This guide will introduce you to the Blues Wireless for Opta, an expansion module that can quickly add Cellular IoT connectivity to any Arduino Opta PLC.

In this tutorial you'll learn how to assemble your hardware, how to configure your Opta expansion, how to write firmware that communicates with the expansion module, and how to manage your data in the cloud.
Key Concepts to Know
Before you dive in, it's important to understand a few key concepts from the Blues ecosystem.
-
The Notecard is a device-to-cloud data pump that reduces the complexity of building connected solutions with a secure, reliable cellular, WiFi, or LoRa connection. It's a System-on-Module (SOM) that's ready for embedding into any project. The Blues Opta expansion uses a Notecard for connectivity.
-
Notehub is the cloud service the Notecard uses to securely send and receive data. Notehub also provides a console for fleet management and secure connectors for routing data to 3rd-party cloud applications. You'll use Notehub throughout this tutorial to manage your device and data.
-
A Note is a JSON object containing developer-provided content. A Note is the primary means of sending data to/from a Notecard.
Notecard and Notehub work together to provide bidirectional wireless communication capabilities, both outbound (from your Arduino Opta PLC to the cloud), and inbound (from the cloud to your Arduino Opta PLC). The full process makes seamless connectivity possible for the Arduino Opta ecosystem.

Before You Begin
To complete this quickstart, make sure you have access to the following:
-
The contents of a Blues Wireless for Opta Bundle, which include:
-
Arduino Opta Lite
-
Blues Wireless for Opta expansion module
-
Two LTE SMA antennas
-
Solderless AUX connector
-
-
One of the following means of supplying power:
-
(Recommended) A bench power supply that can provide 12–24 volts, and appropriately rated jumper wires (typically 18AWG) to connect the voltage from the Arduino Opta to the expansion module.
-
Two dedicated USB-C cables to independently power the Arduino Opta and expansion module.
-
-
A computer with an available USB port.
-
A browser that supports the Web Serial API, like Chrome or Microsoft Edge.
-
An internet connection that allows access to Notehub.
Connect Your Notecard
With introductions out of the way, let's get started!
In this section you'll connect to your Notecard, the module within the Opta expansion that makes cellular connectivity possible, and run your first Notecard API request.
Connecting Antennas
The Notecard requires antennas to establish and maintain communication with cellular networks.
To attach antennas to your Notecard, start by locating the two SMA antennas that came in your Wireless for Opta. Once you have them, attach each to the female SMA connectors to your Opta expansion as shown in the image below.
 note
noteYou will likely need a wrench or pair of pliers to attach the second antenna. You can hold the antenna in place, and then use the wrench or pliers to turn the connector at the base.

Connect to the Notecard
With the antennas connected, you're ready to start communicating with the Notecard.
To do so, connect a USB-C cable to the USB port on your Blues Opta expansion, as this connection will allow you to send serial requests to the Notecard.
With the USB-C cable connected, next locate the panel on the right-hand side of your browser window, which we call the In-Browser Terminal.
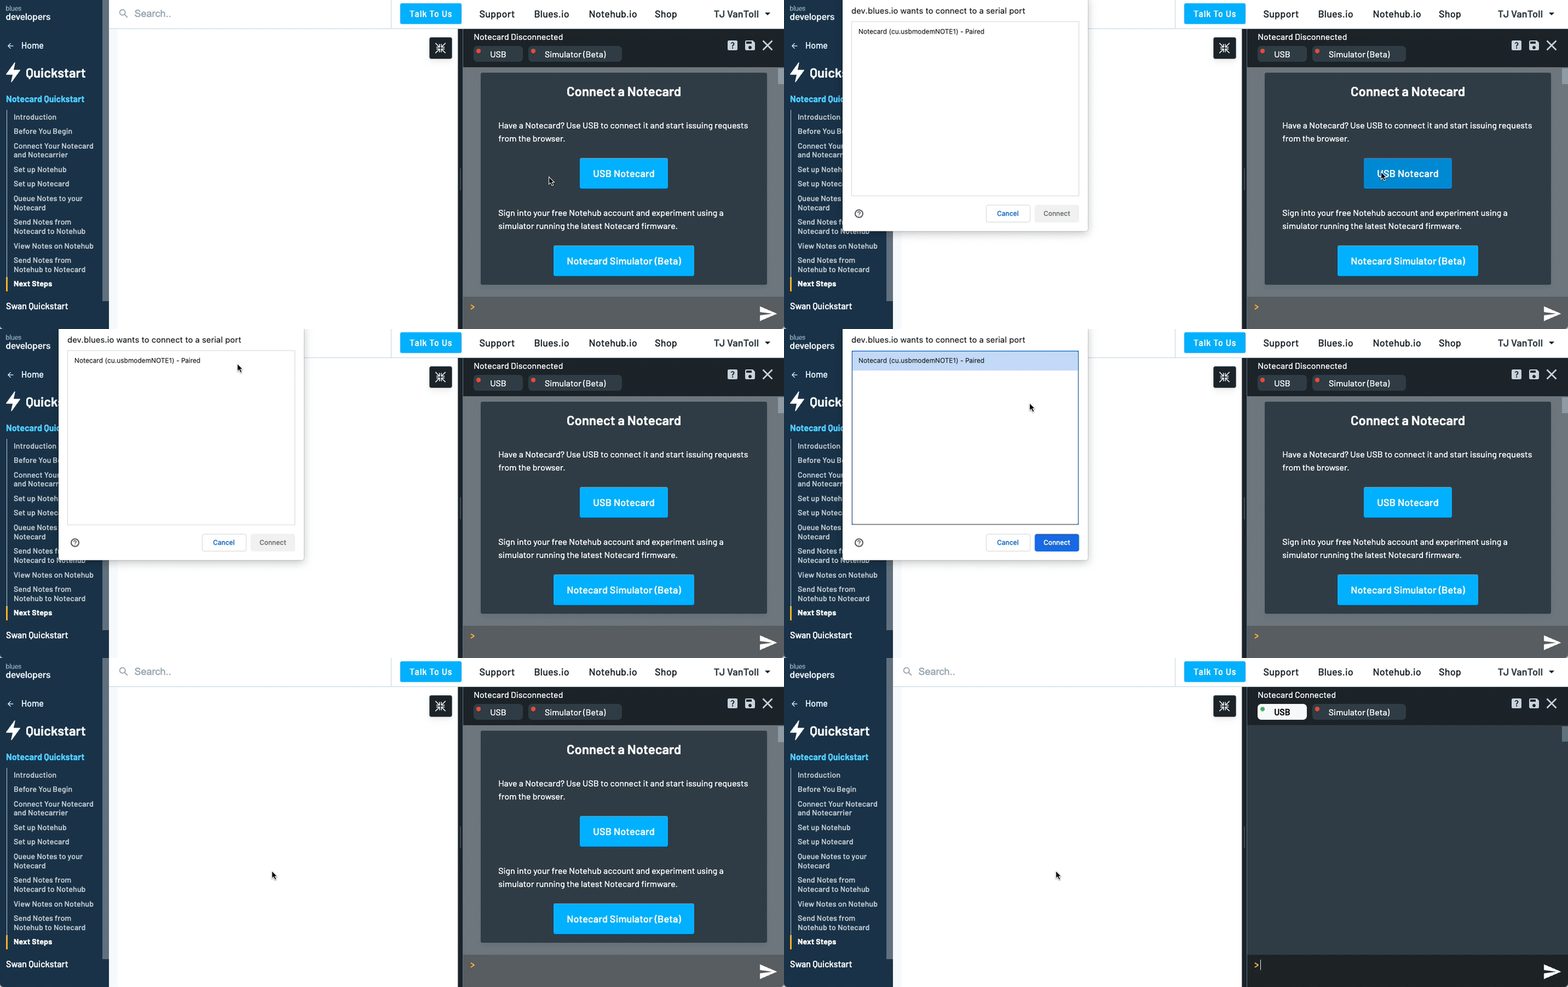
Within the In-Browser Terminal, click the USB Notecard button. A browser prompt will appear asking for permission to connect to a USB serial device:
-
If you're on a Mac, select either
Notecard (cu.usbmodemNOTE1)orNotecard (tty.usbmodemNOTE1). -
On Windows, the option will show up as
USB Serial Device (COMx). -
On Linux the option will show up as
Notecard (ttyACM0).
Having trouble connecting?
-
Try using a different USB cable. Some USB cables are only capable of transferring power, not data.
-
If Linux is your operating system, try adding your user to the
dialoutgroup. Run the commandsudo usermod -aG dialout $USERand restart your computer for the change to take effect (as logging out and back in may not be enough).
Validate Serial Connection
Now you're ready to send your first JSON request
to the Notecard! All requests and responses to/from the Notecard are in JSON
format and are structured with the command as the value of a req key.
Additional arguments are written as additional key-value pairs. For example,
{"req":"card.version"} or {"req":"hub.set", "mode":"continuous"}.
The first request you'll send invokes the card.version API, which returns
metadata about your Notecard.
Copy and paste the following request into the In-Browser Terminal (click the TRY IT button below).
Hit Enter and you'll see a response similar to the example output.
{"req":"card.version"}{
"version": "notecard-7.4.1",
"device": "dev:000000000000000",
"name": "Blues Wireless Notecard",
"sku": "NOTE-WBNAW",
"ordering_code": "FA0YT1N0ACAM",
"board": "5.13",
"wifi": true,
"cell": true,
"gps": true,
"api": 7,
"body": {
"org": "Blues Wireless",
"product": "Notecard",
"target": "u5",
"version": "notecard-u5-7.4.1",
"ver_major": 7,
"ver_minor": 4,
"ver_patch": 1,
"ver_build": 201,
"built": "Jul 1 2024 15:25:49"
}
}Well done! You have properly set up, configured, and validated your hardware. Next, you'll configure your Notecard to communicate with Notehub.
Set up Notehub
Notehub is a secure proxy cloud service that communicates with the Notecard, provides tooling for managing fleets of devices, allows you to perform over-the-air Notecard and host MCU firmware updates, and makes it easy for you to route data to your own cloud applications.
In this section, you'll set up a Notehub Project and create your first ProductUID. A ProductUID is the unique identifier you will use to associate a Notecard with a Notehub Project, and ensure that data from the Notecard ends up in the right location.
Create a Notehub Project
-
Sign in or sign up for Notehub using the links below.
Create a Notehub Account
Already have an account? Sign in -
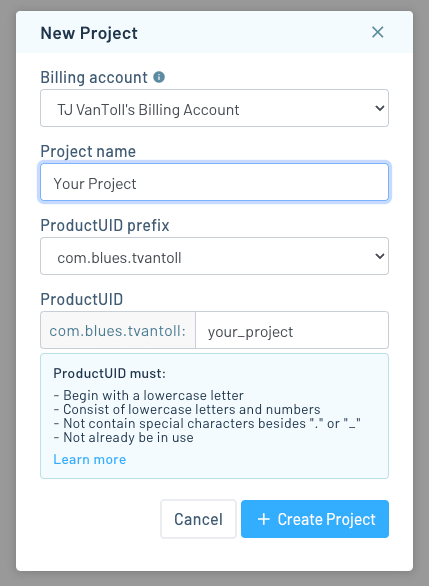
Click "Create Project" on the dashboard. In the New Project card, give your project a name and ProductUID.
note
The ProductUID must be globally unique. To reduce collisions, Notehub prepends a generated namespace based on your account email, for instance
com.your-company.your-name:. Enter any identifier you like in the input on the right. -
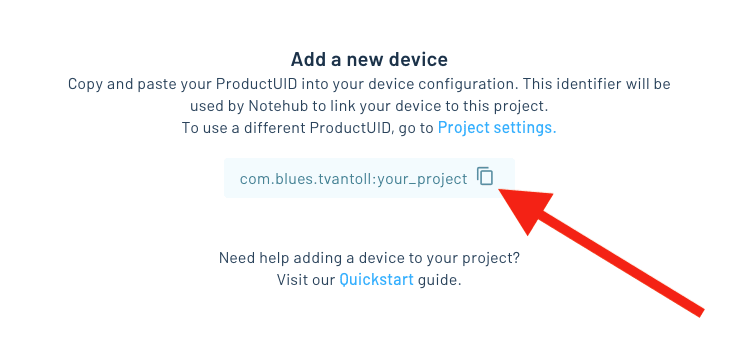
Take note of your ProductUID. This identifier is used by Notehub to associate your Notecard to your project.
Set Up Your Notecard
Now that you know how to send requests to the Notecard, let's next tell the Notecard about your Notehub project so it knows where to send data.
To associate the Notecard with your project in Notehub you must assign the ProductUID you created to your Notecard. A Notecard can easily be moved between projects over time, but it can only belong to one project at a time.
To set the ProductUID, you'll start by sending a hub.set JSON request to your
Notecard. Once the Notecard has finished processing your request, it will send a
JSON response back to your computer to let you know that the request is
complete.
An empty JSON object ({}) from the Notecard indicates a successful request.
If an error occurs, the Notecard will return a JSON object with an err key
and a string describing the error that occurred.
Copy and paste the following Notecard request, making sure to replace
com.your-company.your-name:your_product with the ProductUID you created in the last step
(click the TRY IT button below).
{"req":"hub.set", "product":"com.your-company.your-name:your_product"}{}The JSON object above consists of two key-value pairs. The first provides the name of the
request, denoted with the key req and a value of hub.set. The second, product, is
one of the arguments for the hub.set request. You can see all the arguments for this
and all Notecard requests in the
API Documentation.
Validate Your ProductUID and Connection
In this section, you'll validate your Notecard configuration by performing a manual sync with Notehub and then request sync status updates from the Notecard.
Start a Sync
Initiate a synchronization between the Notecard and Notehub with a hub.sync
request, as shown below.
{"req":"hub.sync"}{}Once a sync has started, you can monitor the state of the sync by watching the status bar at the top of the In-Browser Terminal.

As soon as you see "Successful Notehub sync [x]s ago", the sync is complete!

Optional: Manually check on the state of a sync with the hub.sync.status API
You can also manually check on the state of a sync with a hub.sync.status
request. When the sync is ongoing, the response will return a status field
with the current progress of the sync and a requested field with the number of
seconds since the sync was initiated.
Depending on the timing of your hub.sync.status requests, your responses may
differ from what is displayed here:
{"req":"hub.sync.status"}{
"status": "starting communications {wait-module} {connecting}",
"requested": 2
}
...
{
"status": "modem now ON {modem-on}",
"requested": 6
}
...
{
"status": "waiting for wireless service 6 sec [+---] {cell-registration-wait}",
"requested": 12
}Once the sync has completed, the response to hub.sync.status includes the UNIX
Epoch time of the last sync, and the number of seconds since the last completed
sync.
{"req":"hub.sync.status"}{
"time": 1615585299,
"completed": 4
}You should now be able to return to Notehub, refresh the Devices page, and see that a device has been added to your project:

Sync not completing, or having trouble connecting?
-
Check if the response to a
hub.sync.statusrequest includes "no project was found" or "can't open Notehub" errors:>{"req":"hub.sync.status"}{ "status": "opening notehub: no project was found with product UID product:com.your-company.your-name:your_product {product-noexist} {notehub-open-failure}", "requested": 10 } ... { "status": "can't open notehub: opening notehub: no project was found with product UID product:com.your-company.your-name:your_product {product-noexist} {notehub-open-failure}", "requested": 11 }If so, you may have a typo, or may have passed a project name to your
hub.setrequest'sproductinstead of a ProductUID. If this is the case, send anotherhub.setrequest with the correctproduct, and then send ahub.syncrequest.REMINDER: The ProductUID is typically in the form of
com.your-company.your-name:your_product. -
If your ProductUID seems correct, you may have a connectivity issue. Please consult our guide on Diagnosing Cellular Connectivity Issues.
-
It may be helpful to view a detailed trace of the Notecard's activity during a connection attempt. To do this, type
sync-traceinto the In-Browser Terminal and press return to initate a sync and start logging. Once the trace is complete, click the save button in the terminal to export the log for further analysis. -
If you've tried these troubleshooting steps and are still having issues, please reach out on our community forum.
At this point it's worth taking a step back and thinking about what just happened here. Your device just connected to the cloud, over cellular, and you didn’t have to buy a SIM, sign up with a cellular provider, or manage a cellular modem. This is the magic of the Notecard—cellular just works!
Now that you've seen the device work over cellular, you can optionally configure a WiFi network.
(Optional) Configure a WiFi Network
The Notecard inside the Blues Opta expansion is a Cell+WiFI Notecard, so it’s possible to configure the expansion to use a 2.4 GHz WiFi Network as a primary backhaul, with cellular as a failover. Note that 5GHz WiFi networks are not supported. If you wish to use a local WiFi network for your testing, you can send the following command to the Notecard via the terminal:
{
  "req":"card.wifi",
  "ssid": "YOUR-NETWORK-SSID",
  "password": "YOUR-PASSWORD"
}
note
noteYou can use the Notecard's
card.transport request
to configure which connectivity protocol your Notecard should use.
The default value of the request is "wifi-cell", which tells the
Notecard to prioritize WiFi connectivity, and to fallback to cellular
connectivity if a WiFi connection cannot be established.
Regardless of which method of connectivity you use, now that your expansion is communicating with Notehub you're now ready to physically connect the expansion to your Opta.
Connecting Your Opta
Let's connect some hardware!
To start, get out your Arduino Opta and locate the AUX port on the right-hand side. If you have an AUX connector attached here (see photo below), you're good to go.
If there's still a cover on this port you need to remove it (it comes off pretty easily with a screwdriver), and then attach the small AUX connector included in the Wireless for Opta.

Next, return to the Opta expansion, and remove the AUX cover on its left side. With the expansion's port exposed, connect the Opta and the expansion as shown in the photo below.

 note
noteMake sure the connection between the two modules is snug, as the AUX connector facilitates an I2C connection between the Opta and the Notecard within the expansion module.
With everything connected you next need to provide power, and to do that you have two options.
Option 1) Bench Power Supply (Recommended)
The most robust way to power the Arduino Opta is by connecting an external +12 VDC to +24 VDC power supply to the Opta's power supply. If your power supply's clips won't fit in the terminal, you may need to use loose pins or headers as I'm doing in the image below.
 note
noteThe Arduino Opta uses combo Phillips/flathead screws, and the Blues Opta expansion uses flathead screws. If you use a flathead screwdriver you can loosen/tighten the screws on both devices.

With the Opta powered, next, connect the voltage from the Opta to the expansion using rated jumper wires (typically 18AWG) as shown below.

And that's it! You should have everything you need in place to power both the Arduino Opta and the Blues Opta expansion.
As one last step, connect a USB-C cable from your Opta to the computer you're using to complete this guide. When using a bench power supply the USB cable won't provide power, but you will need it to flash firmware onto the Opta.
Option 2) USB Power
 note
noteThe Opta's output ports are not powered via its USB-C port, therefore using USB for power should only be done during early development. For more, see Powering the Opta.
As a second option you may use two USB-C connections to independently power the Opta and Blues Opta expansion.

The other end of the Opta's cable must be connected to the computer you're using to complete this guide, as you'll need that connection to flash firmware in the next section. And if you're using USB cables for power, we additionally recommend connecting both USB cables to the same computer, as it ensures the devices share a common ground.
Regardless of how you power your devices, your hardware setup is now complete and you're ready to write firmware.
Writing Firmware
In this section you'll learn how to write some firmware for the Arduino Opta that uses the Blues Opta expansion.
 note
note-
Although we cover the basics in this section, the Arduino Opta is a very powerful device with a huge feature set. For an in-depth tutorial of everything the Opta can do, check out the Arduino Opta User Manual.
-
At this time, the Blues Opta expansion only supports firmware written in Arduino IDE (discussed below). If you're interested in using the Arduino PLC IDE let us know in our community forum so we can prioritize the work.
Hello World Example
The easiest way to write firmware for the Arduino Opta is with the Arduino IDE, which you can download and install from Arduino's website.
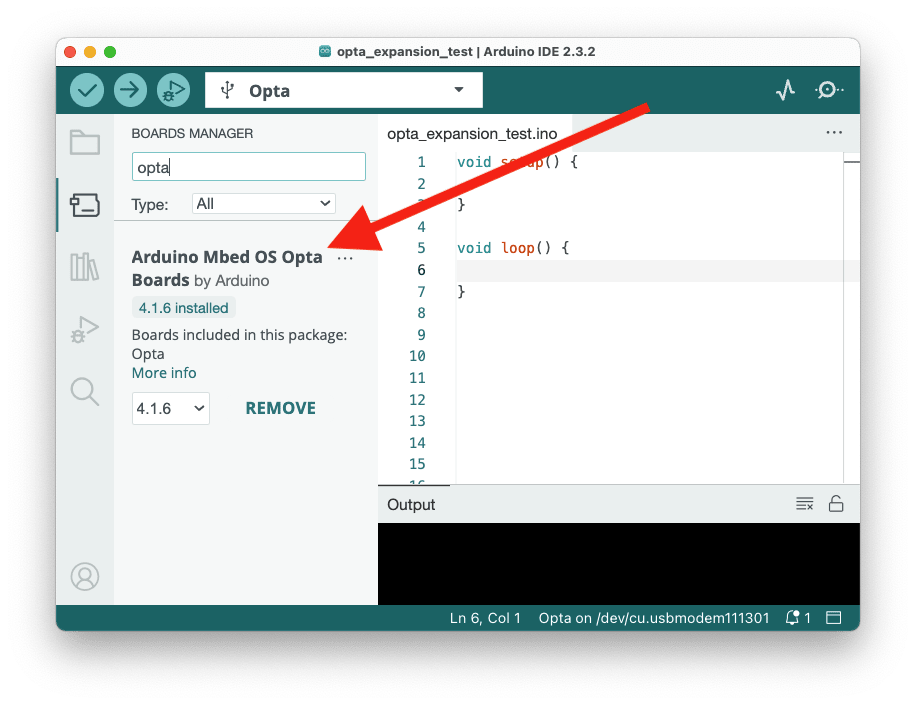
Once installed, open Arduino IDE, click the Boards Manager icon in the left sidebar, search for “opta”, and install the latest version of Arduino Mbed OS Opta Boards.
Next, replace the contents of your sketch (the .ino file that's open by default)
with the code below, which is a basic firmware example that blinks one of the
Opta’s built-in LEDs.
void setup() {
  // Initialize LED_BUILTIN as an output
  pinMode(LED_BUILTIN, OUTPUT);
}

void loop() {
  // Turn the LED_BUILTIN ON
  digitalWrite(LED_BUILTIN, HIGH);
  delay(1000);
  // Turn the user LED_BUILTIN OFF
  digitalWrite(LED_BUILTIN, LOW);
  delay(1000);
}
Ensure you have a USB-C cable connected from your Opta to your computer, and then press the Upload button in Arduino IDE to flash the firmware to your device.

If all went well you should see the LED above the Opta’s RESET button blink on and off every one second.
Notecard Example
Now that you know how to build firmware and flash it to your device, you're ready
to start working with the Notecard. To do so, you first need to install
note-arduino, the official
Notecard Arduino library from Blues.
To install note-arduino, go to the libraries tab in Arduino IDE, search for
“blues”, and install the latest version of the Blues Wireless Notecard library.

With note-arduino installed, you now have access to
its full API for interacting
with the Notecard.
To try it out, replace the contents of your sketch with the code below, which uses a few new Notecard requests to send a temperature and voltage reading to Notehub every 15 seconds.
#include <Notecard.h>

#define usbSerial Serial

Notecard notecard;

void setup() {
    usbSerial.begin(115200);
    const size_t usb_timeout_ms = 3000;
    for (const size_t start_ms = millis(); !usbSerial && (millis() - start_ms) < usb_timeout_ms;)
        ;
    notecard.setDebugOutputStream(usbSerial);

    notecard.begin();
}

void loop() {
  takeReading();
  delay(15 * 1000);
}

void takeReading() {
  double temperature = 0;

  {
    J *rsp = notecard.requestAndResponse(notecard.newRequest("card.temp"));
    if (rsp != NULL)
    {
      temperature = JGetNumber(rsp, "value");
      notecard.deleteResponse(rsp);
    }
  }

  double voltage = 0;
  {
    J *rsp = notecard.requestAndResponse(notecard.newRequest("card.voltage"));
    if (rsp != NULL)
    {
      voltage = JGetNumber(rsp, "value");
      notecard.deleteResponse(rsp);
    }
  }

  {
    J *req = notecard.newRequest("note.add");
    if (req != NULL)
    {
      JAddBoolToObject(req, "sync", true);
      J *body = JAddObjectToObject(req, "body");
      if (body != NULL)
      {
        JAddNumberToObject(body, "temp", temperature);
        JAddNumberToObject(body, "voltage", voltage);
      }
      notecard.sendRequest(req);
    }
  }
}
Let's break down this code in detail. The takeReading() function starts by
gathering two different values from the Notecard. The first call uses the
Notecard's card.temp request
to take a reading from the Notecard's onboard temperature sensor.
double temperature = 0;
{
  J *rsp = notecard.requestAndResponse(notecard.newRequest("card.temp"));
  if (rsp != NULL)
  {
    temperature = JGetNumber(rsp, "value");
    notecard.deleteResponse(rsp);
  }
}
The second call uses the
Notecard's card.voltage request
to retrieve the current V+ voltage level from the Notecard.
double voltage = 0;
{
  J *rsp = notecard.requestAndResponse(notecard.newRequest("card.voltage"));
  if (rsp != NULL)
  {
    voltage = JGetNumber(rsp, "value");
    notecard.deleteResponse(rsp);
  }
}
The final call takes these two values, and uses the
Notecard's note.add request
to queue a Note on the Notecard.
{
  J *req = notecard.newRequest("note.add");
  if (req != NULL)
  {
    JAddBoolToObject(req, "sync", true);
    J *body = JAddObjectToObject(req, "body");
    if (body != NULL)
    {
      JAddNumberToObject(body, "temp", temperature);
      JAddNumberToObject(body, "voltage", voltage);
    }
    notecard.sendRequest(req);
  }
}
By default, the Notecard acts as a queue that you can synchronize with the cloud using a number of different strategies.
In the case of this example, notice that we're including a sync=true option
on the note.add request. This option tells the Notecard to immediately
synchronize this Note to Notehub.
It's easier to understand what this code is doing after you see it in action. To try this firmware on your device, once again hit the Upload button in Arduino IDE to flash this updated sketch. Once the new code has been running for a minute or so, return to your Notehub project and visit its Events screen.
If all went well, you should see a running list of events with temperature and voltage readings from your device.

 note
noteIf you open the Serial Monitor in Arduino IDE, you can also see a running log of the requests and responses from the Notecard.

This is the most common workflow when using the Notecard. To take sensor readings from your device at a certain interval, you queue that data on your Notecard as Notes, and you tell the Notecard how often to synchronize that data with the cloud.
The power of the Notecard is you don't have to worry about the underlying connectivity. In fact, this exact same code works regardless of whether your Notecard is using a WiFi or cellular connection!
Now that you have data flowing in from your device, let's look at what you may want to do with it.
Routing Your Data
Once you have data flowing from your Notecard to Notehub, you can use Notehub’s routing capability to send data to and from your cloud application of choice.
Notehub supports a wide variety of route types, including easy ways to send data over HTTP/HTTPS or MQTT, and powerful integrations with bigger clouds like AWS, Azure, and Google Cloud.
In this section you'll set up a basic HTTP/HTTPS route to see how routing in Notehub works.
Routing With HTTP/HTTPS
To create your first route you'll use webhook.site, an online service that lets you create an HTTPS endpoint and monitor all incoming requests.
After getting your Notehub route working with webhook.site, switching your route to use a custom endpoint is as easy switching the URL. Let's see how it works.
-
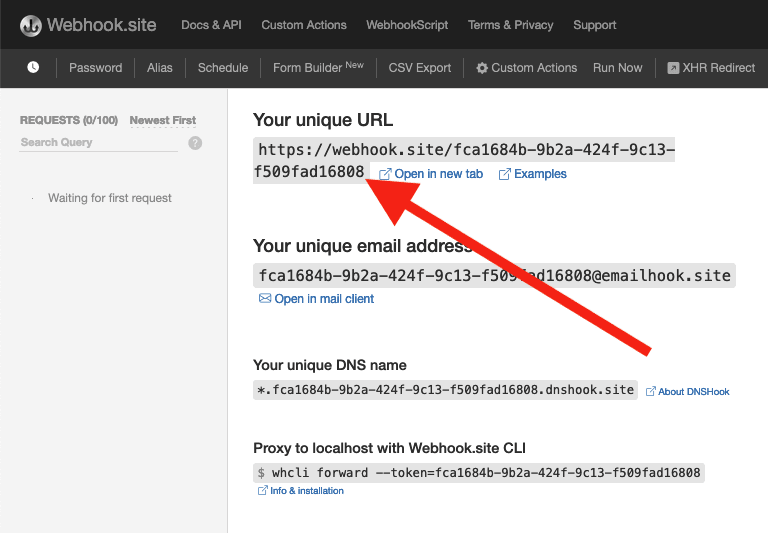
Navigate to webhook.site. When the page loads, you'll be presented with a unique URL that you can use as a route destination. Copy that URL for the next step.
-
Open up your project on Notehub.io, and click on the Routes menu item in the left nav.
-
Click Create Route.

-
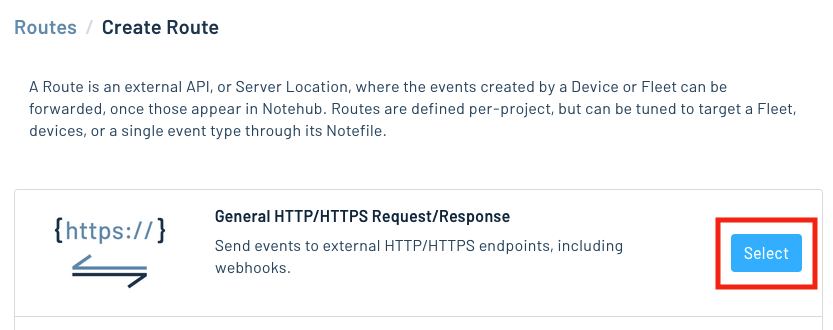
Select the General HTTP/HTTPS Request/Response route type.
-
Give the route a name (for example, "Health").

-
For the Route URL, use the unique URL you obtained from webhook.site.

-
Make sure the Enabled switch remains selected, and click Create Route.
-
Return to webhook.site. This page will update automatically with data from your Notecard as it is received in Notehub. Notice how your custom data is in the
bodyattribute, but that the Notehub appends additional metadata to each request, such as a device's best location.
Routing With Other Services
A basic HTTP route is just one of my ways you can access your data from Notehub. For a guided tutorial through the other routing options, see our Routing Data to Cloud tutorial.
You can also use the RESTful Notehub API to access your event data. For more information on the Notehub API, see our Using the Notehub API tutorial.
Next Steps
In this tutorial you learned how to assemble your Blues Wireless for Opta, how to configure the Notecard, how to write firmware that communicates over cellular, and how to manage your data in the cloud.
Even after all this, you're still scratching the surface of what the Notecard can do. Because the Blues Opta expansion is Notecard-powered, you can complete any of this site's Notecard Guides to learn more about what you can do with the Notecard.
Additionally, you may wish to check out our many Example Apps for inspiration, or for a starting point for the app you want to build next.
If you have any questions along the way (or just show off something cool you built), reach out anytime in our community forum.
Reference
The following is reference information you may find useful as you work with your Arduino Opta expansion.
Default Configuration
Blues runs a series of Notecard requests on all new Opta expansions. Knowing this default configuration can be useful if you choose to override the defaults, or if you factory reset your Notecard and wish to reapply the default configuration.
Monitor Mode
The Blues Opta expansion includes a push button and Neopixel on the front panel
that can be used for testing connectivity during installation or for debugging.
The card.aux request
configures the Notecard to "watch" for a GPIO button press
and, when detected, send a message to Notehub in a reserved _button.qo Notefile.
During transmission the Neopixel colors change to signal pending or successful
transmission as documented
here.
{
  "req":"card.aux",
  "mode":"neo-monitor",
  "sensitivity": 25
}
A successful communication test will appear in the Notehub events view like this:

Power Outage Detection
The Blues Opta expansion includes a power-outage-detection capability via a built-in Lithium Ion Capacitor. What this means is that, when an outage is detected on the 12-24V power supply that feeds the expansion (and presumably the Opta it is connected to), the Notecard will send an alert to Notehub that an outage has been detected, and this message can be routed to your cloud application.
This capability is configured with the Notecard's
card.voltage request.
{
  "req":"card.voltage",
  "mode": "default",
  "alert": true,
  "sync": true
}
Notehub Connection Settings
In addition to setting the ProductUID for
your device, the Notecard's
hub.set request
can also be used to perform additional configuration of the Notecard and how it interacts
with Notehub. The default configuration for the expansion sets the Notecard to maintain
a continuous connection to Notehub, and to sync every 15 minutes if there’s data to send.
{
  "req": "hub.set",
  "mode": "continuous",
  "outbound": 15,
  "inbound": 1440,
  "sync": true,
  "align":true
}
Using the Expansion QR Code
The Blues Opta expansion includes a QR code sticker on the front face. This sticker is an additional feature of the Notecard that allows product builders to associate the Notecard with a dashboard or system for their users.
For example, the Blues Airnote has a printed QR code that users can scan to change an Airnote's settings, and to view a dashboard of device data.

To set up something similar for your product, see Creating a Device Dashboard.
